Closed scargill closed 4 years ago
Thank you for your feedback, and let me tell you that I really like your blog.
I've tested Dallas 18B20 with Raspberry PI Zero W and it worked fine, but i will retest it in a few days. Did you reboot the RPI after setting 1wire pinout, and did you check that pinout remains the same? Did the Dallas address appears in the webGUI select box at the first place?
For the SSD1306 i am using the Luma.Core python library which worked fine when i tried (at July) it may have some problems with Font size. Could you try to play a little with the "Try to display # characters per row" setting? (if the lines are short, and this setting left to '1' it might auto-select bigger fonts than needed) Or if you specify which settings did you use, i will retest it with the same settings.
Currently the native "pwm" command is available and also the WS2812 neopixel LED's can be used with the "neopixel" command. Although the Raspberry has 4 PWM pin that supports hardware PWM, but only has 2 real channel, so i doubt that 4x 12V LED strips will work fine, but can be tried with pwm commands.. ( Channel 0: GPIO18, GPIO12, Channel 1: GPIO13, GPIO19 ) On other pins only software PWM is available which is not very good, i've tried with a PWM controllable SPI Display and i have to say it is flickering as hell. (Of course with the H-PWM it works nicely) As the GPIO's working at 3.3V the 5V devices can only be used with a Level Converter of course.
Thanks for the kind words re:https://tech.scargill.net Alexander - I will try more experiments today, out of interest what county are you in? Right now I'm in the UK. I do think this rpieasy has potential - good work.
i can confirm that on same oled, if more than 3 lines are used the 4th will be like "truncated"... and it seems to be an area which is not used at all on the small 32x128 display, if you write 4 lines and look at it, then select to rotate it 180° and look again, you'll see the difference
Right, now, interesting, I use Python on Node-Red on all my PIs to put a 30 second message on the display on power up andI use all 4 lines, no issue at all (well over a year every day.. in a folder called fonts under /home/pi I keep a font called proggytiny.ttf and that works a TREAT on both the 12864 and 12832 displays - I hope that info is of some use... I don;t know if you have already Alexander but I'd put a timeout option on those displays - otherwise if someone leaves one on - it'll be dead in a couple of months - there's a reason they are cheap... so I just have them on when needed, like power up or some change...
Thanks for the kind words re:https://tech.scargill.net Alexander - I will try more experiments today, out of interest what county are you in? Right now I'm in the UK. I do think this rpieasy has potential - good work.
Thank you. I am living in Hungary. I am a big fan of ESPEasy firmware, and also the Raspberry Pi Zero W hardware, I just made RPIEasy because no one else done it. :)
I don;t know if you have already Alexander but I'd put a timeout option on those displays - otherwise if someone leaves one on - it'll be dead in a couple of months - there's a reason they are cheap
Yes i know it, however timeout option is not added in the menu, there are several commands that supported by the OLED plugin: https://github.com/enesbcs/rpieasy/blob/master/_P023_OLED.py
OLEDCMD,
In real-world usage I am just using "OLEDCMD,off" command if the nearby motion sensors did not see motion for 15 minutes with the help of my Domoticz automation system. Commands can be executed remotely by HTTP GET/MQTT or by the locally stored ESPEasy compatible "Rules" engine, based on several conditions or timers. https://www.letscontrolit.com/wiki/index.php/Tutorial_Rules
I am using an Ubuntu font which allows to be used, studied, modified and redistributed freely.
i can confirm that on same oled, if more than 3 lines are used the 4th will be like "truncated"...
I've just arrived home from work and i will look for one SSD1306 for testing.
Right, now, interesting, I use Python on Node-Red on all my PIs to put a 30 second message on the display on power up andI use all 4 lines, no issue at all (well over a year every day.. in a folder called fonts under /home/pi I keep a font called proggytiny.ttf and that works a TREAT on both the 128_64 and 128_32 displays - I hope that info is of some use... I don;t know if you have already Alexander but I'd put a timeout option on those displays - otherwise if someone leaves one on - it'll be dead in a couple of months - there's a reason they are cheap... so I just have them on when needed, like power up or some change...
I have those displays in a number of nodes and when not running at full brightness they do work quite well for a long time. 2 of these displays have been on for 2 years now and still working fine. One is on my breadboard and one in the CO2 meter in my living room. I have added the brightness control in ESPEasy about 2 years ago and it is working just fine. Only had seen a handful of those displays not supporting all brightness modes and even had one display which started to generate typical coil whine on some brightness levels. Brightness is controlled in 2 parameters and some displays apparently don't have the components for 1 of these parameters, that's why these do not accept all brightness values. So maybe it will save you some time debugging when playing with these values.
Just realized i only have 128x64 I2C displays. :) But indeed, if i change a 128x64 module to 128x32 resolution the 4th line lower end is truncated. In the meantime the gap between the lines seems more than justifiable.
I think i solved the "truncated lower end with Simple OLED plugin" at commit https://github.com/enesbcs/rpieasy/commit/42a98060defb974ef94156b0dcdf89d69674c7e1 , tested with 128x32 and 128x64 resolution. In the meantime i found out that P036 Frame OLED is also affected, probably fixed now also. Dallas test will come soon, but not today. :)
Magic - one down....
Yes, honestly i can not remember why i've added 1 to lineheight originally, but seems better without. :)
Absolutely – so I assume these are 7 pixels high characters – you can only afford 1 px gap. I’d try your udate but where I looked it said last update 3 days ago.
From: Alexander Nagy notifications@github.com Sent: 04 November 2019 19:16 To: enesbcs/rpieasy rpieasy@noreply.github.com Cc: Peter Scargill pete@scargill.org; Author author@noreply.github.com Subject: Re: [enesbcs/rpieasy] Teething problems (#106)
Yes, honestly i can not remember why i've added 1 to lineheight originally, but seems better without. :)
— You are receiving this because you authored the thread. Reply to this email directly, view it on GitHub https://github.com/enesbcs/rpieasy/issues/106?email_source=notifications&email_token=AAONJA6LVKNBOJZAVZNYUYDQSBYFPA5CNFSM4JINS562YY3PNVWWK3TUL52HS4DFVREXG43VMVBW63LNMVXHJKTDN5WW2ZLOORPWSZGOEDAMNJI#issuecomment-549504677 , or unsubscribe https://github.com/notifications/unsubscribe-auth/AAONJAYOGKLAK67NUTJTOPLQSBYFPANCNFSM4JINS56Q .
Absolutely – so I assume these are 7 pixels high characters – you can only afford 1 px gap. I’d try your udate but where I looked it said last update 3 days ago.
The main branch does show latest update of about an hour ago.
Absolutely – so I assume these are 7 pixels high characters – you can only afford 1 px gap. I’d try your udate but where I looked it said last update 3 days ago.
If you click on "Tools->Update" inside RPIEasy it will try to pull actual files from github. After the update either it will stop the process and exit or, if "Hardware->RPIEasy Autostart at boot" is checked (and already restarted) than it will restart with the new (pulled) version.
Tried this tonight for the first time on my RPI4 2GB. GPIO24 with 1-wire and Dallas 18B20 - always returns 0.
Sorry but i am unable to reproduce this issue. I just have Raspberry Zero W's for testing as this is the ideal hw for building sensors, and I've just tested with two of my Dallas 18B20, it is working fine. I've wired Dallas VCC to RPI 3V3, DATA to GPIO24 with a 4.7k pullup resistor, and GND to GND. Did you started RPIEasy with sudo or root user? Did you use Raspbian Lite or other distribution?
If you enter the following commands to raspberry console what do you see?
cat /boot/config.txt | grep w1
lsmod | grep w1
dmesg | grep w1
Right - fresh install... display is now fine, pullup on DS18B20 - pin GPIO4 - set as 1-wire - rebooted, 0 seconds repead, no info entered other than calling the chip DALLAS - and setting that 1-wire on GPIO4 - working - took a while to start - also the DHT11/22 worked a treat..
And this morning I've ben having a GREAT time pushing buttons to install libraries - life should be this simple all the time.
Request - show current time somewhere in panel. I noted incorrect temperature, not realising for a second that the package was not running due to (deliberate) rebooting last night.
Pete
Right - fresh install... display is now fine, pullup on DS18B20 - pin GPIO4 - set as 1-wire - rebooted, 0 seconds repead, no info entered other than calling the chip DALLAS - and setting that 1-wire on GPIO4 - working - took a while to start - also the DHT11/22 worked a treat..
I glad to hear that it works. GPIO4 is the default onewire pin, but it normally can be moved to other pins for example to GPIO24. (unless there are some problem with the w1-gpio linux kernel module)
And this morning I've ben having a GREAT time pushing buttons to install libraries - life should be this simple all the time.
Library installations can take a while, but yes 1-click installation was my primary goal. :) I hope that linux package names will not change frequently as it will require a lot of maintenance in my code.
Request - show current time somewhere in panel. I noted incorrect temperature, not realising for a second that the package was not running due to (deliberate) rebooting last night.
If the display is big enough, for example 64 pixel in height, than you can use P036 FrameOLED plugin that has a header with the current time.
Or with the P023 Simple OLED you can use (most of) ESPEasy System variables like %systime% https://www.letscontrolit.com/wiki/index.php/ESPEasy_System_Variables
Supported variables are: "systime","system_hm","lcltime","syshour","sysmin","syssec","sysday","sysmonth", "sysyear","sysyears","sysweekday","sysweekday_s","unixtime","uptime","rssi","ip", "ip4","sysname","unit","ssid","mac","mac_int","build", "sunrise","sunset","sun_altitude","sun_azimuth","sun_radiation"
Sorry I meant show time on the PC Browser….
For example- http://192.168.14.72:82/devices?run=1 http://192.168.14.72:82/devices?run=1&page=1 &page=1
So I know this is live info…
Request - show current time somewhere in panel. I noted incorrect temperature, not realising for a second that the package was not running due to (deliberate) rebooting last night.
If the display is big enough, for example 64 pixel in height, than you can use P036 FrameOLED plugin that has a header with the current time.
Or with the P023 Simple OLED you can use (most of) ESPEasy System variables like %systime% https://www.letscontrolit.com/wiki/index.php/ESPEasy_System_Variables
Supported variables are: "systime","system_hm","lcltime","syshour","sysmin","syssec","sysday","sysmonth", "sysyear","sysyears","sysweekday","sysweekday_s","unixtime","uptime","rssi","ip", "ip4","sysname","unit","ssid","mac","mac_int","build", "sunrise","sunset","sun_altitude","sun_azimuth","sun_radiation"
— You are receiving this because you authored the thread. Reply to this email directly, view it on GitHub https://github.com/enesbcs/rpieasy/issues/106?email_source=notifications&email_token=AAONJAYHQIFCJLHSQY2GUPTQSLV3RA5CNFSM4JINS562YY3PNVWWK3TUL52HS4DFVREXG43VMVBW63LNMVXHJKTDN5WW2ZLOORPWSZGOEDHEDNQ#issuecomment-550388150 , or unsubscribe https://github.com/notifications/unsubscribe-auth/AAONJA76XDOF5ZVMHDKBEHLQSLV3RANCNFSM4JINS56Q . https://github.com/notifications/beacon/AAONJAZUBMJ4TKSUSVOOTYDQSLV3RA5CNFSM4JINS562YY3PNVWWK3TUL52HS4DFVREXG43VMVBW63LNMVXHJKTDN5WW2ZLOORPWSZGOEDHEDNQ.gif
Sorry I meant show time on the PC Browser…. For example- http://192.168.14.72:82/devices?run=1 http://192.168.14.72:82/devices?run=1&page=1 &page=1 So I know this is live info…
I see, yes it also can be done. I can imagine 2 solution:
I guess the first solution is better, if you are interested that the when the values on the shown page were generated.
No sign of NEOPIXEL working- I set to GPIO19, 5v power, 16 LEDS – absolutely nothing coming ou…
From: Alexander Nagy notifications@github.com Sent: 06 November 2019 16:27 To: enesbcs/rpieasy rpieasy@noreply.github.com Cc: Peter Scargill pete@scargill.org; Author author@noreply.github.com Subject: Re: [enesbcs/rpieasy] Teething problems (#106)
Right - fresh install... display is now fine, pullup on DS18B20 - pin GPIO4 - set as 1-wire - rebooted, 0 seconds repead, no info entered other than calling the chip DALLAS - and setting that 1-wire on GPIO4 - working - took a while to start - also the DHT11/22 worked a treat..
I glad to hear that it works. GPIO4 is the default onewire pin, but it normally can be moved to other pins for example to GPIO24. (unless there are some problem with the w1-gpio linux kernel module)
And this morning I've ben having a GREAT time pushing buttons to install libraries - life should be this simple all the time.
Library installations can take a while, but yes 1-click installation was my primary goal. :) I hope that linux package names will not change frequently as it will require a lot of maintenance in my code.
Request - show current time somewhere in panel. I noted incorrect temperature, not realising for a second that the package was not running due to (deliberate) rebooting last night.
If the display is big enough, for example 64 pixel in height, than you can use P036 FrameOLED plugin that has a header with the current time.
Or with the P023 Simple OLED you can use (most of) ESPEasy System variables like %systime% https://www.letscontrolit.com/wiki/index.php/ESPEasy_System_Variables
Supported variables are: "systime","system_hm","lcltime","syshour","sysmin","syssec","sysday","sysmonth", "sysyear","sysyears","sysweekday","sysweekday_s","unixtime","uptime","rssi","ip", "ip4","sysname","unit","ssid","mac","mac_int","build", "sunrise","sunset","sun_altitude","sun_azimuth","sun_radiation"
— You are receiving this because you authored the thread. Reply to this email directly, view it on GitHub https://github.com/enesbcs/rpieasy/issues/106?email_source=notifications&email_token=AAONJAYHQIFCJLHSQY2GUPTQSLV3RA5CNFSM4JINS562YY3PNVWWK3TUL52HS4DFVREXG43VMVBW63LNMVXHJKTDN5WW2ZLOORPWSZGOEDHEDNQ#issuecomment-550388150 , or unsubscribe https://github.com/notifications/unsubscribe-auth/AAONJA76XDOF5ZVMHDKBEHLQSLV3RANCNFSM4JINS56Q . https://github.com/notifications/beacon/AAONJAZUBMJ4TKSUSVOOTYDQSLV3RA5CNFSM4JINS562YY3PNVWWK3TUL52HS4DFVREXG43VMVBW63LNMVXHJKTDN5WW2ZLOORPWSZGOEDHEDNQ.gif
No sign of NEOPIXEL working- I set to GPIO19, 5v power, 16 LEDS – absolutely nothing coming ou…
Try to set initial brightness to greater to zero, set number of leds and use a level shifter before the DI, because controlling 5V devices with 3V3 GPIO is not the best solution. I've used a one LED neopixel with VCC=3V3 on GPIO19 just now and it works.
https://github.com/enesbcs/rpieasy/blob/master/_P038_NeoPixel.py
Available commands:
NeoPixel,
*Brightness is optional, default=255 or the one that setted at plugin settings
Thanks - for monitoring javascript with refresh is what's needed I guess - need it to show "live" status at a glance.
Thanks for feedback on LEDS - I will try later today, but level shifter ? I've used this serial LED STRIP with ESP8266 often - same voltages.... ?? I'm using pin 19, just set to ONE lLED, initial value 80 and the hardware setting is "special" for GPIO19, is that right? Don't know where to put those NEOPIXEL commands above.
Also - this changing direcory and holding up an SSH session is no good... could you advise on a simple script to simply "bash rpieasy.sh" ? which would run and survive closing the SSH session?? Sorry if that's a daft question...
That's a simple Unix question I can also answer :) If you want to keep a process running, you have several options:
nohup
and end with an ampersand , like nohup scriptname -options &
screen
.The nohup .... &
does state "no-hangup", so when you exit your ssh-session, it will keep running. The &
is there to define it as a background process, to give you back your prompt after entering the command.
For getting back your command from a "background process" you enter fg
(foreground)
screen
is a bit steeper learning curve, but it is very nice to have a shell running while you disconnect and when you reconnect to the same host you can continue your screen session (or even share it with others)
It also will allow you to read the script's output and interact with it as usual from the command line.
Thank you for that TD-er. Thats really helpful. In this case you have to chnge to the rpi-clone folder.. then run that sudo ./ - -- I tried this..
cd /home/pi/rpieasy && sudo nohup ./RPIEasy.py &
It WORKS but chucks out an error message from nohup "ignoring input and appending output to 'nohup.out' - where did I go wrong?
You did not go wrong.
The output of the script is sent to the file nohup.out
, which you can follow using tail -f nohup.out
.
Just have to look for where the file is being stored. I would expect it will be stored in the current folder you were in when running the nohup
(/home/pi/rpieasy/
)
Yes, /home/pi/rpieasy/nohup.out - next trick - how to amend that mess I made to send output to null... I've done that before but cant remember.
cd /home/pi/rpieasy && sudo nohup ./RPIEasy.py > /dev/null 2>&1 &
and now I've wiped all my espeasy settings. Oh, well.
Just remember you have the process still running, so calling it more than once is creating several instances of your script.
Not sure if that's intended to be working?
If you run a nohup
, you will see a number, which is the process ID of the process.
You can kill that one by calling kill <processID>
(e.g. kill 1234
) or if you want to force-kill it: kill -9 <processID>
just make sure you do it as the same user that owns the process and running kill as root (sudo) may be a bit dangerous.
You can also get it back from background by calling fg
and then pressing Ctrl-c (if you are still in the same shell) or running htop
as the right user and move to the right process, select it using space and press F9 and select kill. (all out of the top of my head, so check the F9 part)
Also make sure to select the process with space and not just kill the process which is hopefully under your cursor :)
Thanks - for monitoring javascript with refresh is what's needed I guess - need it to show "live" status at a glance.
I'm opening a new issue for it. https://github.com/enesbcs/rpieasy/issues/107
Thanks for feedback on LEDS - I will try later today, but level shifter ? I've used this serial LED STRIP with ESP8266 often - same voltages.... ?? I'm using pin 19, just set to ONE lLED, initial value 80 and the hardware setting is "special" for GPIO19, is that right? Don't know where to put those NEOPIXEL commands above.
Neopixel command can be executed simlarly like ESPEasy: https://www.letscontrolit.com/wiki/index.php/ESPEasy_Command_Reference
http://<espeasyip>/control?cmd=<command>
<MQTT subscribe template>/cmd with payload: <command>
Yes, indeed the pin settings is changed to "Special" by the Neopixel plugin. In reality it is a PWM mode, but it is managed by the underlaying "rpi_ws281x" module. (The real H-PWM mode setting is provided by the Linux kernel, so Special is only for here to let RPIEasy know that do not configure the kernel for HPWM mode)
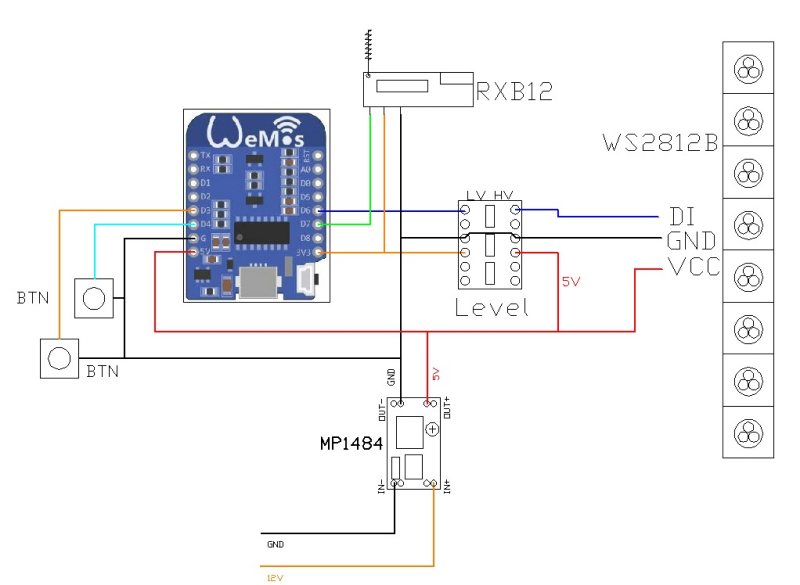
Controlling 5V devices with 3V3 GPIOs is not a good idea. Eventually it may work (out-of-spec) but a high level for an 5V device is generally 5x0.7=3.5V at minimum ... 3.3V is below this and it may not interpret it as HIGH. Or if the DATA line is somewhere connected with pullup resistors in the device, it will fry your 3V3 capable Rasberry Pi or ESP8266 and you will not understand why this GPIO will never work after it, or you will search the source of the smoke... This is my proposal for using neopixel with a 3V3 system: (either RPI or ESP, the RXB12 is not needed as this is my own RF-MQTT translator schematics)
Also - this changing direcory and holding up an SSH session is no good... could you advise on a simple script to simply "bash rpieasy.sh" ? which would run and survive closing the SSH session?? Sorry if that's a daft question...
As TD-er recommended either by & or by started with the screen command it will survive SSH connection closing.
At the Hardware menu you can find a "RPIEasy autostart at boot" checkbox, which will autostart RPIEasy at boot time, this is using this command line to achieve this:
/usr/bin/screen -d -m /home/pi/rpieasy/run.sh
As TD-er recommended either by & or by started with the screen command it will survive SSH connection closing.
Just to be complete, the &
just gives you back the command prompt by running the process in the background.
The nohup
part is what keeps it from getting killed if you close the SSH session.
Issue closed as no new feedbacks arrived.
Apparently this is where we had the original discussion about running in the background. Rpieasy runs fine manually - but of course dies when I close the ssh session to the pi. To have it run from boot, I tried the HARDWARE page - where you can TICK to have RPIEasy start on boot.... and sure enough I ticked that and booted. After boot no sign of 192.168.14.70/hardware until I changed (in SSH) to rpieasy directory and ran RPIEasy.pi manually. Yes, on checking the tickbox was ticked - but no autoboot. Thoughts? I'm on RPI 3 with up to date BUSTER. Sorry for any duplication.
Not a bug but I cant think where else to contact you... rpieasy - all working but of course dies when I close the ssh session to the pi. How would I have it run like a service at Pi power up without terminal interaction. I tried the HARDWARE page - where you can TICK to have RPIEasy start on boot.... and sure enough I ticked that and booted. After boot no sign of 192.168.14.70/hardware until I changed (in SSH) to rpieasy directory and ran RPIEasy.pi manually as usual. Yes, on checking the tickbox was ticked - but no autoboot. Thoughts? I'm on RPI 3 with up to date BUSTER.
First of all "screen" package is a musthave.
sudo apt-get install screen
Then the runner script may have lacks execute bit: (directory is where you installed rpieasy)
sudo chmod a+x /home/pi/rpieasy/run.sh
Then you can check if rc-local service is enabled:
sudo systemctl status rc-local.service
If disabled try to enable:
sudo systemctl enable rc-local.service
If everything seems OK and the /etc/rc.local file contains something like this at the end:
/usr/bin/screen -d -m /home/pi/rpieasy/run.sh exit 0 Then you can try to start it with that command and reboot:
sudo su /etc/init.d/rc.local start screen -r
You can check if RPIEasy is running with: (if you are unable to reach at port 80 it may run accidentally on other ports... but process list is not lying)
ps -aux | grep RPI
In case of error messages shown, post it.
Otherwise this question is already popped up earlier at that issue: https://github.com/enesbcs/rpieasy/issues/9
Issue closed as no further informations received.
Tried this tonight for the first time on my RPI4 2GB. Dallas DHT11 works a TREAT, GPIO24 with 1-wire and Dallas 18B20 - always returns 0. SSD306 set to 4 lines (128*32). I put in random short text, just a word each line - I'm familiar with this board type - use them all the time... the first 3 lines are ok, the 4th has bottom half missing.
And finally do you think the PI is up to handling 5v serial LED strip or 4 PWM channels for the 12v single colour LED strips (obviously with a separate 12v feed)? It would be nice to add these?