Windows Setup Helper
This project provides a GUI to use along side the traditional Windows installer interface on a normal Windows installation ISO/USB. You'll have access to whatever scripts and tools you choose to add along with some great included tools and example scripts. Automated installs will skip everything but disk selection, once the install completes and Windows boots, any scripts you selected will automatically run.
To use Windows Setup Helper you'll need to add the project files to a Windows installer image along with your custom scripts and tools. I've created a script (Build.bat) to help get this done quickly, just follow the instructions below.
Table of Contents
- Features
- Included Tools
- Adding Tools & Scripts
- Create The ISO (Build.bat)
- Alternative Methods To Create an ISO
- Other Customizations & Features
Features
- Boot Windows install media and use the custom GUI to run to tools or install Windows
- Select "Normal Install"
- No modifications, automation or anything is made to the install process or the final Windows installation
- Select "Automated Install"
- GUI to quickly change settings related to install
- Run the selected "logon scripts" after install completes
- Automatic login to the administrator account after install (be sure to disable the administrator account when done)
- Only open source or highly trusted free programs are included
- Tools and scripts are added to the interface from any available drive with folders matching the specific folder path/names
- This project focuses on only modifying the the boot image (boot.wim) and not the Windows image that gets installed, this has multiple benefits.
- The installer image can be better trusted to be bug free and unmodified
- Change install.wim with new or customized versions without effecting the customizations you make with this project
- Have multiple install.wim images you can choose from (future version)
- Use the boot image with PXE booting and still have all the customizations available
- Starts a VNC server so you can remotely connect from another computer
- Automatically add drivers to WinPE that you provide (useful for storage drivers when the installer can't detect drives)
- Has a basic taskbar for switching between open windows
[](https://www.youtube.com/watch?v=NjPxmrIeGhw)
Included Tools
You can add any x64 executable, .bat, .au3, .ps1, or .reg but here are some basic tools to get you started, closed source software that I've included is noted as such.
- AutoIt.exe (Closed source, required) For Running The Helper Script and It's Components
- 7-Zip For Working With Compressed Files
- Putty For SSH and Telnet Connections
- Explorer++ For Browsing Files/Folders
- Nirsoft Tools (Closed source) Including DevManView, FullEventLogView and SearchMyFiles
- Sysinternal Tools (Closed source) Including Disk2VHD and Autoruns
- SeaMonkey Web Browser (Portable exe from my project here)
- Crystal DiskInfo & DiskMark For Disk Benchmark and Viewing SMART Data (Portable exe from my project here)
- GSmartControl For Viewing SMART Data (Portable exe from my project here)
- ReactOS Paint For Viewing Images
- TightVNC Server For Remote Access To WinPE
- NTPWEdit Offline Password Reset
A number of useful example scripts are included as well, each script has comments in it describing its purpose.
Adding Tools/Scripts/Programs/Drivers
- Add file to the "Tools" folder to list them in the GUI so you can run them later
- Add files to the "PEAutoRun" folder to have them automatically run when WinPE starts
- A script to install drivers to WinPE is located at PEAutoRun\Drivers, add driver files to this folder
- Add files to the "Logon" folder to make them selectable before install and then executed after install completes
Advanced features related to these folders can be found below.
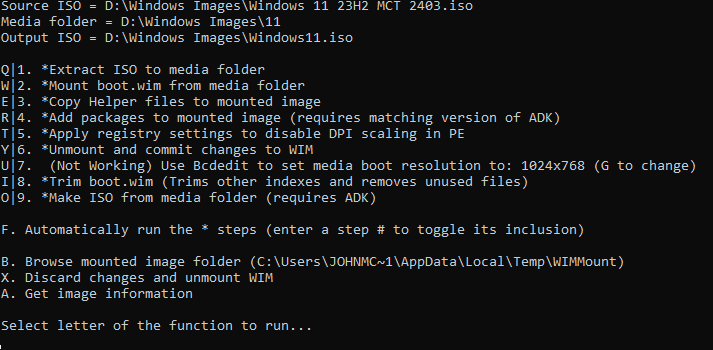
Create The ISO (Build.bat)
Using DISM is the recommended way to update Windows images (wim), it's more advanced but can be faster for repeatedly creating the ISO, the Build.bat script will help automate the process.
Prerequisites
- Download a Windows installer ISO
- Download and install Windows ADK and the PE add-on. Using the correct version for your ISO version is required, Read this for more information.
Running Build.bat
- Edit Build.bat to configure various paths
- Set "sourceiso" to the path of your downloaded Windows ISO
- Set "mediapath" to the directory where you want to extract the ISO files
- Set "outputiso" to the path for the new ISO generated by the script
- Run Build.bat with administrator privileges
- Toggle build steps and select F to begin
Prepare Using Other Methods
Any method of modifying a WIM image and generating an ISO should work. You'll need to copy the project files ("Helper" and "Windows" folders) to the root of the boot.wim image.
- NTLite let's you work with wim images and also lets you create the final ISO. In NTLite, you "load" the "Microsoft Windows Setup (amd64)" image and then copy the project files to %TEMP%\NLTmpMnt (usually).
- 7Zip will also let you make modifications to a wim file but you'll need to use another tool like AnyBurn to create the ISO. If you create a bootable Windows install USB and then modify boot.wim on the USB that could also work since you won't need to create an ISO.
Create Bootable USB From ISO
- Download and open Rufus
- Select your target USB device and source ISO image
- (Optional) Enable the hidden "dual UEFI/BIOS mode" by pressing ALT + E (a message in the bottom left will briefly tell you if you turned it on or off) then set the target system to "BIOS or UEFI" and file system to FAT32
- Click start
Other Customizations & Features
I've created a number of features which may not be clearly documented but I've tried to include examples for each of these in the project, as time goes on and if interest in the project increases I will begin to document more of these.
Special Files & Folders (Tools/Logon/PEAutoRun)
- Folders (Tools, Logon, PEAutoRun) can be used as a prefix for other folder names:
- X:\Helper\Logon
- X:\Helper\LogonCustom
- Folders on different drives matching the path convention are added to the GUI at boot:
- X:\Helper\Tools
- F:\Helper\Tools
- Files starting with "." are treated as hidden and won't be listed and won't autorun
- If ".Explorer++.exe" is in the Tools folder, it's treated as hidden but also triggers an "explorer" button to show in the GUI, this is provided by default.
- ".Options.txt" is a text file that can be used for special treatment of files/folders
- Listing the name of a file will check it by default
- Including the text "CheckAll" will check everything in that folder by default
- Including the text "CollapseTree" will cause that section of the list to be collapsed by default
- Adding "[system]" to the filename of a logon script will cause the item to run in the system context before the user logon
- Adding "[background]" to the filename of a logon script will make the system run the next logon script without waiting
Build.bat "ExtraFiles"
This optional setting in Build.bat is a directory of files that are added to the WinPE image along with the project files. This allows you to keep your customizations separate from the project files to make updating easier. Any files copied from this folder to the WinPE image will overwrite any existing files, folders will be merged.
If you specified "D:\extrafiles" in the build script you would likely want to have folders like "D:\extrafiles\Helper\Tools" and "D:\extrafiles\Helper\Logon" where you keep the files you want to add to the project.
Misc
- Windows Pro is used by default for automated installs, you can switch to home using the advanced menu
- You can customize Helper\autounattend.xml to change things like language, timezone, domain join or other autounattend settings, some values are manipulated by the helper script, most of these show as commented values in the xml.
TightVNC
Running TightVNC server allows remote access to the WinPE instance from another machine on the network. This can be useful if you had a user at a remote site boot to a USB and then you VNC into it to do recovery, diagnostics or Windows installation.
- A startup script is in PEAutoRun\vncserver
- The port and password are configured in "PEAutoRun\vncserver\settings.ini"
- Defaults to port 5950 and password "vncwatch"
- When the VNC service is running "VNC Running" will appear in the status bar
NetBird
NetBird is an overlay/mesh network tool and the NetBird client happens to work well in WinPE, implemented correctly you can have your WinPE boot and be remotely accessible with VNC over the NetBird network automatically. When a WinPE client is booted and online you'll see it apear in the Netbird dashboard along with its Netbird IP. Use your prefered VNC client to connect to that IP one the correct port (see TightVNC information above)
- A startup script is provided in PEAutoRun\NetBird
- Configure the script with a setup key generated via Netbird, be sure you understand the security implications
- Copy netbird.exe and wintun.dll to the same location as the script, get them here (netbird_x.x.x_windows_amd64_signed.tar.gz)
- If the NetBird connection is active, "NetBird Up" will appear in the status bar of the main window
NetBird settings
The default settings Netbird uses would not be secure for this use case and would allow all traffic between all connected clients. These steps are for limiting that connectivity by allowing connections from an approved user group to the WinPE clients and blocking all connections coming from the WinPE clients. These instructions assume your Netbird account has a default configuration.
- Generate a Setup Key
- Enable "Make this key reusable" so the key will stay valid across multiple boots
- Set a long expiration so you do not need to generate a new key and ISO any time soon
- Enable "Ephemeral Peers" so that offline WinPE instances are removed
- Add a group to "Auto-assigned groups", call it "PE" so we can make access rules for WinPE peers
- Configure "Access Control Policies" to allow traffic to WinPE but not from WinPE
- Remove the default rule that allows all traffic in all directions
- Create a new rule with Source=Admin, Destination=PE, Port=5950
- Assign your user or your peer the "Admin" group so you can access any WinPE peers