BusKill / usb-a-magnetic-breakaway

Design requirements for an open-source USB-A magnetic breakaway connector used in the BusKill laptop kill cord
GNU General Public License v3.0
35 stars 2 forks source link

Design Shell in FreeCAD #2

Open maltfield opened 4 years ago

maltfield commented 4 years ago

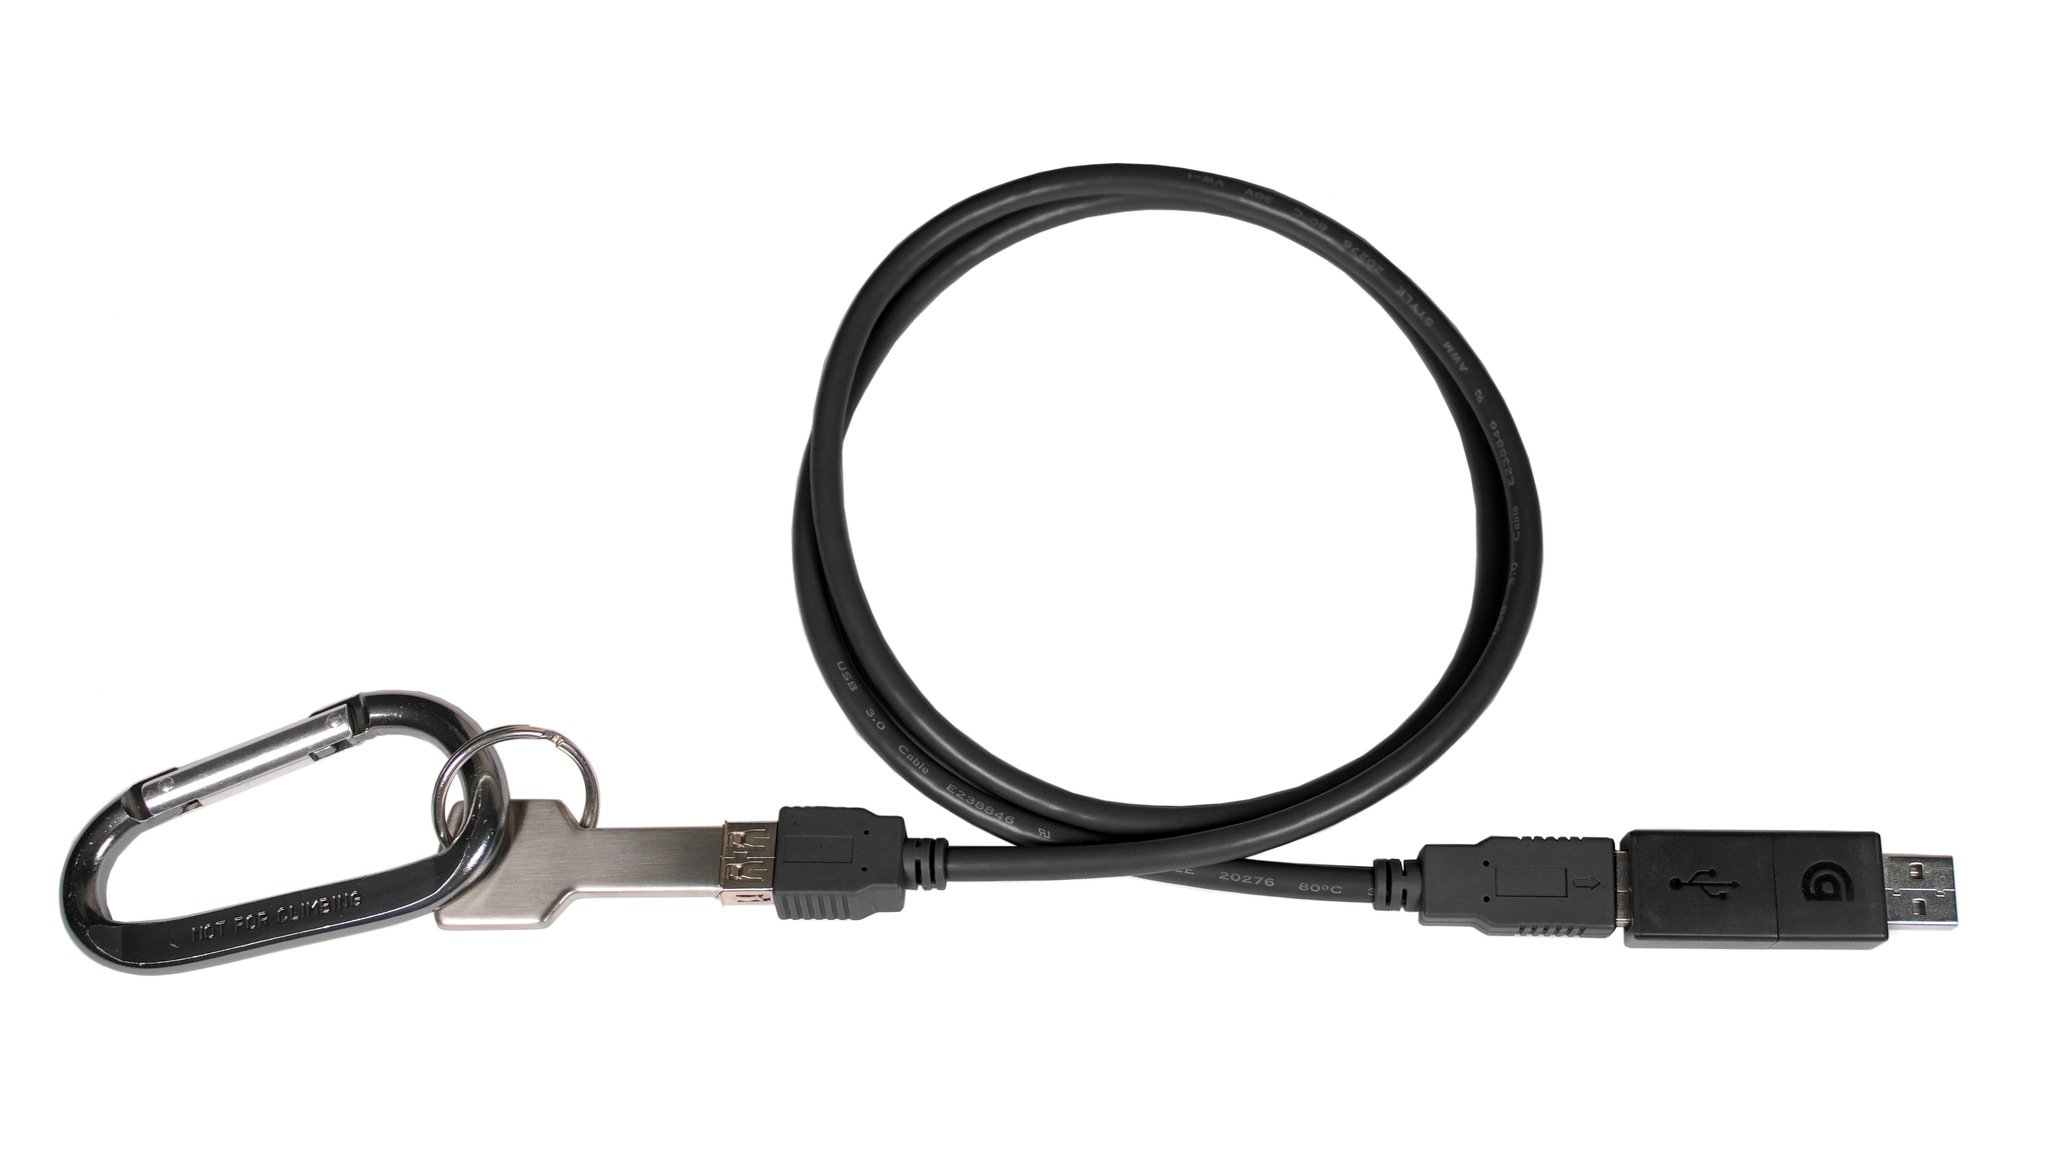
This issue will track the progress of making the shell for the magnetic breakaway adapter that can be 3D-printed for encasing the electronics that makeup the adapter.

This may change as the prototype progresses, but I'm imagining that the shell should:

  1. Be constructed of 4x distinct pieces. There will be both a top and a bottom piece for both the input (side with the female USB receptacle) and output (side with the male USB plug) ends of the adapter.
  2. The top and bottom pieces should attach in such a way that they're easy to disassemble. This is critical for defending against hardware implants; hardware integrity verification must be trivial. They should probably be connected by 1-4 bolts. Use nut catchers for durable plastic/metal composites.
  3. The input and output pieces will connect with magnets
  4. The input and output pieces will use pogo pins to connect the bus
  5. The design of the shell should be asymmetric, such that the pins cannot be connected with reverse polarity (USB-A is non-reversible).
  6. The shell's design should be solid, with voids cut-out that perfectly fit the components (pogo pins, USB receptacle/plug, magnets, wires)
  7. The design of the shell should be only wide and tall enough to accommodate the USB components (so 12mm x 4.5 mm) plus the minimum amount of plastic needed to encase it) such that, when the adapter's plug is connected to a laptop or USB hub, it does not block other USB ports. If our simple-to-build design requires additional space, it should be made in depth, not width or height.
  8. That said, the length should be kept as small as is reasonable. Additional length of the adapter means additional leverage, which makes it more likely to false-positive.
  9. All measurements should be done in metric
maltfield commented 4 years ago

@goldfishlaser please begin designing this in FreeCAD, add the freecad files to this repo, and update this ticket with your progress.

The first deliverable is a the 4x pieces with the voids cut-out for the both USB components on the outside of both the input/output sides only. Per our conversation, hopefully this can be met by Oct 11th.

When first creating the parts in FreeCAD, please make sure you're working in metric so that all measurements will be in metric.

I recommend starting with a solid block of plastic that's:

  1. 14mm wide (12mm USB standard plus 1mm plastic on either side)
  2. 6.5mm high (4.5mm USB standard plus 1mm plastic on either side)
  3. depth = (1.5x the depth of your female receptacle) + (2x the depth of your magnet depth), rounded-up to the nearest whole mm.

Then "carve" that block into our 4x pieces as described above. Two "cuts" should be made:

  1. A cut half-way along the height (so at 6.5/2 = 3.25mm height) that divides the top & bottom sections for both the input and output ends of the adapter (that will be bolted together later)
  2. An asymmetric cut in the depth such that input side (with the female USB receptacle) is larger than the male side (with the male USB plug)

These measurements are just suggestions and will likely need to be modified as the prototype is developed

goldfishlaser commented 4 years ago

This existing thing has several elements worth borrowing for the design: https://www.thingiverse.com/thing:1986046 I plan to build on this design to meet our requirements. I printed it out for examination and the dimensions are good and don't infringe on the space of nearby ports.

I also plan to borrow the dimensions of the space for the hex nut for the surface of the hex magnet. It looked to have about 3mm sides. 4mm also seems reasonable for the depth of the magnet.

I am designing the shell to accommodate a 10mm deep usb-a female connector. These seem to be readily available and are compact.

maltfield commented 4 years ago

This image is a bit concerning. It looks like, if the two USB devices were swapped (with the 3d printed one underneath and the store-bought one on top), then this 3d printed case would block both ports because of its outer dimensions.

Is there any way to make the height the same as a normal USB flash drive? Can you cut it down to ~6.5mm?

goldfishlaser commented 4 years ago

Ah, yeah, I can cut it down. I knew it was taller than what you were suggesting, but I thought I needed it and that it would work, but I forgot vertical stacked ports. And now that I think further on it, I realize don't need the space.

goldfishlaser commented 3 years ago

Forgot to link commit c3ea772085e12a0706d6918b73d211638f65eb3e to this issue so here's the update

goldfishlaser commented 3 years ago

While waiting for magnets to arrive have made some mock magnets with the 3D printer. With USB and pogo rig for scale

goldfishlaser commented 3 years ago

Printed commit b06ae4c4defcabd044fe7f436f2883688c80093e sans channels just to see what would happen.

Slipped in one of the mock magnets, which was definitely too big, but the nozzle squished it down. Assume that even if it was the real magnet, there will need to be some tolerance needed, but will wait to tune this for when real magnets arrive.

Is dimensions provided, but seems a bit smaller than it needs to be, in my opinion. See typical USB for scale.

Tried sideways orientation of magnet instead of vertical but second guessing it.

goldfishlaser commented 3 years ago

the pieces are all there as soon as I wrap my mind around what order things need to be added and subtracted and what not with each other..... 1d2513ab10a1fc361fbbc4e67d9b952ba91bf99f Then I can add the voids for the USB pieces. Actually, maybe I should have added those first! lightbulb Well... until next time. Then can cut in half and start working on the asymmetry...

goldfishlaser commented 3 years ago

status at f4ee6d9fb754e0baf13baecb50d75c94a6c84e90

Bit more work to be done but per advice, just making everything from scratch and not trying to remix anything.

maltfield commented 3 years ago

Glad to see the progress! What's the height of it now in the above screenshot? Back to ~6.5mm?

goldfishlaser commented 3 years ago

the left is 6.5 and the right is 8.5 but I realized I can trim it back down again to 6.5 and plan to do that.

goldfishlaser commented 3 years ago

No, the female usb needs more room and I can't get 6.5 to work. I'm not even sure if 8.5 will work, but I'm making it 8.5 again. Will show pictures. I think we have the 2mm clearance.

goldfishlaser commented 3 years ago

For commit b1841342dd6b7da82e78fef9e2f6d120d5c824a8 See October 3 https://imgur.com/a/dLotlTf

maltfield commented 3 years ago

I can't view that image :( Did you mark the album public on imgur after uploading? Or is it just my browser being weird?

EDIT: It opens in chromium shrug

goldfishlaser commented 3 years ago

So in our initial design discussion, you didn't mention requiring female pogo-pins AKA pp needles or pp contacts. I'm curious whether you think these are necessary, or whether you have any thoughts on what materials should be used. It seems much harder to get these in small quantities, and I think as long as the area is properly conductive, that's all that matters. It may be that just solder is sufficient?

maltfield commented 3 years ago

Sorry, I'm ignorant about pogo pins. I'd assumed when you bought a pogo pin, it would ship with both ends. Maybe not.

It may be that just solder is sufficient?

Please don't do this. I don't think it will be very durable for a connection that is going to be physically hit by a spring-loaded moving part over-and-over. I imagine it also would require skilled labour to build properly, increasing the barrier to build for n00bs--which we want to avoid.

I imagine it could be done with just a screw or something conductive, but I do think it would be best to use some cots/standard-size pogo pin receptor/contact/female-end on the other half of the adapter for best contact, durability, and ease-of-build.

Now that you've mastered navigating alibaba for the magnets, it might be worthwhile for you to spend some time searching for vendors & common dimensions of pogo pins (both ends) on alibaba as well?

goldfishlaser commented 3 years ago

Yeah, no I guess for a lot of applications, both ends aren't needed. So it seems almost always you have to get them separately.

It's hard to find vendors that will provide less than 500 units. They all call them something different so they're trickier to search for... But I'll do a more rigorous search.

I like the pogo pins I picked initially because they're easy to solder and easy to handle (and common), but I could take the opportunity to switch to pins of a shorter length... which may be the more important feature given how important space is.

goldfishlaser commented 3 years ago

So I did some research on the pogo female connectors.

I can't really establish a "standard size" for this. My initial recommendation is this one: https://www.alibaba.com/product-detail/Circular-SMD-Contact-Pad-3-0_62437659039.html?spm=a2700.9114905.0.0.u0lmOJ

or

https://www.alibaba.com/product-detail/3-7-mm-Height-SMT-Female_62394468419.html?spm=a2700.galleryofferlist.normal_offer.d_title.2eb2727fqVV3AO

Both have a MoQ of 500 but it's hard to get an acceptable size at a lesser MoQ.

You'll probably see the 2mm in the relateds- at 1000 MoQ. It works out to only 10 bucks more, though, so. I don't know, what do you think?

https://www.alibaba.com/product-detail/2-0-mm-Height-SMT-Female_62492338184.html?spm=a2700.wholesale.deiletai6.3.20ad2dc2pDpONW

I do like that it is smaller and seems to have an additional groove in there that might help keep it in place. But this also makes it more unique solution, whereas, with a parametric design, on the first two types, it would be as simple as a variable change if one supplier had to be swapped with the other. But, on second look, 2mm does seem to be available from a few distributors at 1000 MoQ.

When I update the "magnet vendor sheet" tomorrow, I'm going to make it a broader parts ordering sheet and include pp details as well.

maltfield commented 3 years ago

I'm confused. I searched for "pogo pin targets" on alibaba and limited it to results with MOQ <20, and I got 5 pages of results.

Wow, that's a dumber/simpler designed piece of metal than I realized. Is it possible to just use a gold-plated standard M1 bolt or something?

Also, are there lower MOQs available on AliExpress?

goldfishlaser commented 3 years ago

Weeeeeeell pretty much all of those results either have unnecessary plastic things, are actually not target pins, are too long, are spring loaded, etc. It's possible I missed one while I was looking through, but I don't think so. (no. 1 issue is being spring loaded- I don't think I want the contact side to be spring loaded... I could be wrong but I don't think it makes sense).

I think I didn't check AliExpress yet so I could take a look after the day job..... BUT

I actually love the idea of using a gold plated M1 bolt. I think that will make it way easier to install into the part securely. And yeah, it would work perfectly well. So if we can source these fairly easily I think it would be the way to go. I'll investigate this.

goldfishlaser commented 3 years ago

Just making a note here that the quest for a gold screw didn't pan out.

Instead just using regular pogo pin contacts. manufacturer added to Magnet_and_PP_Vendor_List.ods

There were a lot of issues with the way I originally coded everything so I've been doing a lot of rewriting and adding comments. The design is going to be way easier to work with now... but I do have a few more sessions before there will be something to try printing again.

goldfishlaser commented 3 years ago

Recent commits of interest:

Latest Render (see visual of latest render) 35c0f54575a0b2dfe4fda7a5af0f0c542bc240b9 (code update)

The breakaway end is almost done, the release end is a bit of a mess and in progress.

Need to add a thin wall that separates the base and lid of each end (more specifically, to separate the top pogo pins and top magnets from the bottom pogo and bottom magnets, while holding everything in place. Would likeit to slip in slot style.

maltfield commented 3 years ago
goldfishlaser commented 2 years ago

January image of current file with midpieces (for stabalizing magnets and pins/receptors) in progress

goldfishlaser commented 2 years ago

almost_there

The general shape we're going for is now way more apparent. Only a few more revisions needed before we are finally at another iteration print.

goldfishlaser commented 2 years ago

This is the tricky part. I went ahead and printed the latest file to see how everything was holding up and test some intuitions...

Lots of little minor size and positions changes needed. And will need to print these on their side? But getting ever closer and feeling good about it.

v 08

goldfishlaser commented 2 years ago

Sorry for the long silence.

Note to Michael: I had some sort of issue when I tried to log into Wire, so I didn't ghost you or the project on purpose.

Hoping to return to development soon.

Last time I talked with Michael, we discussed the option of moving this case down the cord a little. That way, can make the case a little larger, which will help make it easier to assemble/dissemble and print, while not encumbering neighboring usb ports. Apparently this is also how the manufactured version works.

This will be much easier to design, so stay tuned.

maltfield commented 2 years ago

Great news @goldfishlaser ! Last I messaged you on Wire for your address. Hit me back so I can send you a BusKill cable :bow:

goldfishlaser commented 1 year ago

I got back to where I was before, design-wise - but now with more usable code. The code rewrite makes it easier to do what needs to be done next which includes:

1) all of these pieces will become bigger to accommodate a change from teeny screws to a M3 pillar nut and screw. 2) right now the top, bottom, and lid stack to be about 30% of the part. But it needs to be divided up so that the midpiece will be able to hold down the pogo pins/ receptors/magnets.

goldfishlaser commented 1 year ago

Progressing!

Release end only needs some minor tweaks before I try another print! I need to hit up a hardware store for the M3 hex and screws.. hopefully somewhere local will have them!

I really only think about 3-5 more hours of dev time! Even if the dimensions aren't perfect, or don't represent what I can find at the store, because I went through the hassle of refactoring the code, it should be simple to make updates.

Also want to clarify another earlier comment - we are actually moving the release close to where the buskill cable attaches to the body.

goldfishlaser commented 1 year ago

OK I'm laughing now at goldfishlaser_2weeksago. Judging on how long what I've worked on so far has taken me, this is probably more like... 24 more hours dev time and that's ASSUMING this is a viable design at all. BUT I remain optimistic that we get ever closer to a functional piece.

goldfishlaser commented 1 year ago

Release end is close to dialed in. v.09

I print the middle piece with a raft: photo of middlepiece The pieces fit pretty well: photo of middlepiece USB fits pretty well: photo of middlepiece Lid on top of midpiece: photo of middlepiece - was hoping it would hold without glue, but glue will be needed.

Here's all the commits: c992ed65ebf108eba6bd4ddb59491d9497b54617 f523bce840c78d50a67f0d193662d9773fd988c4 557cb40127bebe2766b138bf733e04dabbad4e63 2e6648e4f0cffd1fb165dd64d7d27e4b6796eb4d

goldfishlaser commented 1 year ago

3dc5296bd29d06808d7f9060f9471dc5b1d9c24c

Dialing in breakaway, TODO (1) fix voids (2) fix shell dimensions for all 3 pieces (3) add screw / hex voids (4) add shape to go around the cord?

goldfishlaser commented 1 year ago

Having printed a rough breakaway and release I've proceeded to my assembly attempt. The idea was to make a rough/kludgy connector as a proof of concept.

(1) will be attempting to use online instructions on DIY USB extender cords for creating the usb plug-in side of the release. So far, the instructions I've found have poor picture quality so it may take some trial and error to get the wiring right

(2) placement and glue is hard.

(a) pogo pins and receptors are attracted to the magnet.

(ii) found that I should assemble/glue the magnets on the midpieces and assemble the pins and receptors on the bottom and top pieces -- to avoid the attraction

separate pins and magnets1 separate pins and magnets 2

(b) magnetism is very strong so parts must be glued VERY SECURELY. lots of time involved in letting glue dry.

(c) parts and voids are very small, requires tremendous dexterity and careful glue application...

(d) I don't have the wire channels or space for a perfboard, so i will have to make these voids with hot knife. also the screw holes seem to be JUST too small to be easy to use....

goldfishlaser commented 1 year ago

I've documented what happened here: https://crashxblossom.wordpress.com/2023/03/19/status-of-buskill-open-hardware-project/

Next working session, I will have better leads for my Multimeter, so I should be able to have a bit more reliable results from continuity testing... which I will do at every possible checkpoint this time. As undoing all your solder connections and removing heat shrink tubing from wire is not fun.

goldfishlaser commented 1 year ago

Still trying to figure out what I don't know about splicing USB extender cords.

What happened documented here: https://crashxblossom.wordpress.com/2023/03/26/usb-cord-you-mystery/

maltfield commented 1 year ago

I also asked about this on the EE SE https://electronics.stackexchange.com/questions/660437/why-is-a-spliced-usb-extension-cable-frying-usb-drives

goldfishlaser commented 1 year ago

Tried with a USB Extension Cable White, Costyle 2-Pack 2.0 6ft/2m USB Type A Male to A Female Extension Cord White USB Cable Extender with Gold-Plated Connector

This cord is much simpler than the one I was working with.

Progress Photo

Also documented here: https://crashxblossom.wordpress.com/2023/04/29/4-28-buskill-progress/

goldfishlaser commented 1 year ago

Added 5th wire channel, started channel size adjustments, experimented with printing orientations. Needs refinements. commit 73c38b8

goldfishlaser commented 1 year ago

We had an extremely helpful commenter visit my blog and provide some advice that I am executing on today:

You do need an electrical connection between the shields. If the cable has a shield and a drain wire, then you can just cut the shield back and attach the drain wire to a fifth pogo pin, like you are doing with this cable. The ideal solution would be to have a metal or conductive shield around the entire connector. E.g. wrap it in conductive copper tape that has conductive adhesive. That’s available on Amazon. Where the cable goes into the connector, strip off a bit of just the outside insulation from the cable, so the copper tape can make a good join to the cable shield. If you do that, consider putting something insulating over the top, like a separate 3D printed plastic part, or just electrical tape. This will prevent the copper tape from accidentally touching and shorting something else. -codingjon

Fortunately, I have electrical tape and copper tape in the workshop already. 😀

He also left this note:

For testing, I suggest you get a USB device that runs the USB connection at 12 Mbit/second “Full Speed” rates. That is much more robust than the 480 Mbit/s USB 2 limit, so much more likely to work. Any USB 1 device will be “Full Speed” or slower, and many mice, keyboards, and USB-Serial adapters will also be “Full Speed” or slower. USB 2 disks almost always use the 480 Mbit/s speed. -codingjon

The latest USBs that I acquired for testing have the following specs:

Brand: EASTFUN Capacity: 8GB Five Mixed Colors: Black Rose Blue Purple Green Interface Type: USB 2.0. USB 2.0 Compatible (Backwards compatible to USB 1.1) Writing speed: 4mb/s-6mb/s Reading speed : 12mb/s-16mb/s

I am printing the part at +10% rather than worrying too much about updating the OpenSCAD. It seems like it's going to be tricky to get these pogo receptors to behave and all line up neatly at the front of the part...

You may notice the magnets are sitting in different orientations. It looks like with the extra space, I have more choices- and for the record, it was actually way easier to get them to stay in there...

progresspic

leoheck commented 1 year ago

Hi, I saw a post about this today. It is an interesting thing. But I could not understand what do you want to achieve. The napkin drawing is beyond readability. Where I can find a picture of the thing you are trying to make? This is interesting and I would like to make an attempt to create a version of it with Freecad. I just have to I understand the idea of the device, so I can add my own ideas and improvements.

leoheck commented 1 year ago

Ah, nevermind. There is a gif in the Readme. But that is a different thing. The magnets are close to the fixed part. Looking at the comments here the magnets are placed in the middle of the cord. I don't think it will last long this way.

goldfishlaser commented 1 year ago

Hi Leoheck,

We're very excited to hear that you're interested in creating one of these in FreeCAD.

The napkin drawing was really just a part of my own process, and is not necessary for you to understand.

One version Michael made involves a piece such as in this image:

version 1

In this photo, you can see that a USB extension cord goes into a device that ends with a USB. That device is a magnetic release. When the cord is plugged into a computer, and then separates off from itself at the device, it severs the connection with the USB, which the computer reads as a USB ejection event. The BusKill software locks the computer when the USB is ejected.

version 1 split

However, Michael has also manufactured a version where the cord itself includes the device that magnetically detaches:

version 2

So the goal of this issue is just trying to make a 3D printable version of the case for these magnetic breakaway cables per what Michael outlines in the OP.

When I started, I was making something more like the first version. Then I switched to making this which is more like the second version.

goldfishlaser commented 1 year ago

Ah, nevermind. There is a gif in the Readme. But that is a different thing. The magnets are close to the fixed part. Looking at the comments here the magnets are placed in the middle of the cord. I don't think it will last long this way.

Those are not magnets in the center. Those are pogo receptors. In the center on one side are pogo receptors, and on the other side are pogo pins. They are carrying the signal from the USB wires. The magnets are on the outside (they're silver).

leoheck commented 1 year ago

Hey, @goldfishlaser thanks for the explanation.

I understood the pogo pins and the magnets and I can make a 3d model including the off-the-shelf parts. Just have to find the 3d models of them or the dimensions/part number of them to be able to recreate the whole thing.

Ah, I was looking at the files here in this repo, and it has some 3d models here, I will start by trying to replicate what I am seeing here.

leoheck commented 1 year ago

I am seeing some files that I am not able to tell which one is the latest or if they are different ideas.

I am also seeing 2 versions of the magnet. There is one model that is 4mm in height, but there is another file describing it as smaller than 2mm, and also one side of the hexagon is smaller too. Which one is the right one?

Freecad files have .stl (meshes) objects inside They are not quite useful on Freecad, I will redesign them. I would just like to understand what is what.

Here is an image with everything together. They are kind of in order from top to bottom and left to right. image

leoheck commented 1 year ago

This connector is awesome why this cannot be used in the 3d printable version?

image

unless you want to have something easy to reproduce at home, but then I would say pogo pins will be hard to find too.

goldfishlaser commented 1 year ago

Thank you for your questions I am happy to clarify.

I am currently using the smaller version of the hexagonal magnet. However, I think it is better to switch to disk magnets because these are easier to acquire, and plan to do so. It would be awesome if you design yours to use the Neodymium N35 Dia 4mm X 3mm - magnets that are a bit easier to find.

The other parts are still as listed in Magnet_and_PP_Vendor_List.ods

leoheck commented 1 year ago

Yeah, I would like to use easy-to-find parts What about the usb connectors? Where do I find the models in use?

goldfishlaser commented 1 year ago

Re: https://github.com/BusKill/usb-a-magnetic-breakaway/issues/2#issuecomment-1532417869 We welcome you using that similar kind of magnetic connector in your design.

Michael and I had some reasons for why we were trying the hexagonal magnets and disc magnets, but it isn't required to go in that direction. We originally were hoping to make something that didn't require glue.