We are going to how use the form to call our Azure Function! Yay :tada:! Things are coming together.
✅ Task:
[x] 1: Modify the function and use await fetch to send the form input to your Bunnimage Azure Function
[ ] 2: If the upload was successful, change the output div to Your image has been stored successfully!
[ ] 3: Modify your CORS settings in your function app so your frontend can make requests.
[ ] 4: Commit your updated code to bunnimage/script.js to the bunnimage-frontend branch
[ ] 5: Create a pull request to merge bunnimage-frontend onto main, and only merge the pull request when the bot approves your changes!
🚧 Test your Work
Open up your LiveServer plugin and start your local server. To test your web app:
Upload an image and click submit. Do you get a "Your image has been stored successfully!" message?
Log into your Azure portal and navigate to your storage account. In your container, do you see your image?
1: How do I get form data?
To get the information the user entered in the form, you will need to create a FormData object. FormData lets you compile a set of key/value pairs to send.
const bunniForm = document.getElementById("YOUR_FORM_ID");
const payload = new FormData(bunniForm);
const file = fileInput.files[0]; // fileInput is the file upload input element
payload.append("file", file);
❓ What's happening here?
Code breakdown:
- we reference the html form element with `document.getElementById("YOUR_FORM_ID")`, so we can create a FormData object.
- we extract the file the user uploaded using `fileInput.files[0]`
- finally, we add the file created to the `FormData` object using `append`, and a key-value pair. The key is `file`, and its value is the file itself.
💡 Since we need to reference the form element in `document.getElementById("YOUR_FORM_ID")`, we need to give it an id in the html.
```html
2: How do I call the Azure Function?
The Fetch API is built in to Javascript to make HTTP requests (using GET, POST and other methods), download, and upload files.
:bulb: We don't have to install node-fetch as an npm package since fetch is built into JavaScript. Remember: we were using NodeJS before.
To start a request, call the special function fetch():
const response = await fetch(resource, options);
Fetch accepts two arguments:
resource: the URL string, or a Request object
options: the configuration object with properties like method, headers, body, credentials, and more.
❓ What does fetch exactly do?
`fetch()` starts a request and returns a promise. When the request completes, the promise is resolved with the Response object. **If the request fails due to some network problems, the promise is rejected.**
> Keep this in mind if your function throws a promise error!
3: How to configure "options"
In order to pass the type of method, the payload in the pody, and headers, you have to configure the "options" part of the fetch function.
Fill in the method, headers and body with the correct information compatible with your API!
:bulb: Refer back to previous Fetch requests we made in NodeJS for hints. Remember for this request, we are not receiving JSON!
How to validate that the upload worked
We need to let the users know if the upload was successful! We do this by making sure we receive a response from our upload API:
❗ Use a "try...catch"
A [`try...catch`](https://developer.mozilla.org/en-US/docs/Web/JavaScript/Reference/Statements/try...catch) is what it sounds like - it catches errors. This makes for a better user experience and is crucial to error handling.
```js
try {
// Try receiving data from your fetch request
// Change the output div's value
} catch (e) {
// If an error occurred, tell the user!
}
```
4: Update CORS Settings
CORS (Cross-origin resource sharing) settings tells the Function App what domains (such as wwww.website.com) can make requests to the Azure Functions.
❓ How can I change it?
Head to your function app in your portal and find the button on the left hand side called `CORS`.
![https://user-images.githubusercontent.com/69332964/99188905-6f0b7c00-272c-11eb-8142-f91882227c78.png](https://user-images.githubusercontent.com/69332964/99188905-6f0b7c00-272c-11eb-8142-f91882227c78.png)
:question: What should I change it to?
Change it to a wildcard operator (`*`), which allows *all* origin domains to make requests.
> 💡 Be sure to remove any other existing inputs before attempting to save with wildcard. **Don't forget to save your changes!**
Week 4 Step 3 ⬤⬤⬤◯◯◯◯ | 🕐 Estimated completion: 20-25 minutes
Making
fetch
HappenDemo: 🐰
We are going to how use the form to call our Azure Function! Yay :tada:! Things are coming together.
✅ Task:
await fetch
to send the form input to your Bunnimage Azure Functionoutput
div toYour image has been stored successfully!
bunnimage/script.js
to thebunnimage-frontend
branchbunnimage-frontend
ontomain
, and only merge the pull request when the bot approves your changes!🚧 Test your Work
Open up your LiveServer plugin and start your local server. To test your web app:
1: How do I get form data?
To get the information the user entered in the form, you will need to create a
FormData
object. FormData lets you compile a set of key/value pairs to send.❓ What's happening here?
Code breakdown: - we reference the html form element with `document.getElementById("YOUR_FORM_ID")`, so we can create a FormData object. - we extract the file the user uploaded using `fileInput.files[0]` - finally, we add the file created to the `FormData` object using `append`, and a key-value pair. The key is `file`, and its value is the file itself. 💡 Since we need to reference the form element in `document.getElementById("YOUR_FORM_ID")`, we need to give it an id in the html. ```html2: How do I call the Azure Function?
The Fetch API is built in to Javascript to make HTTP requests (using GET, POST and other methods), download, and upload files.
To start a request, call the special function
fetch()
:Fetch
accepts two arguments:resource
: the URL string, or a Request objectoptions
: the configuration object with properties like method, headers, body, credentials, and more.❓ What does fetch exactly do?
`fetch()` starts a request and returns a promise. When the request completes, the promise is resolved with the Response object. **If the request fails due to some network problems, the promise is rejected.** > Keep this in mind if your function throws a promise error!3: How to configure "options"
In order to pass the type of method, the payload in the pody, and headers, you have to configure the "options" part of the fetch function.
Fill in the method, headers and body with the correct information compatible with your API!
How to validate that the upload worked
We need to let the users know if the upload was successful! We do this by making sure we receive a response from our upload API:
❗ Use a "try...catch"
A [`try...catch`](https://developer.mozilla.org/en-US/docs/Web/JavaScript/Reference/Statements/try...catch) is what it sounds like - it catches errors. This makes for a better user experience and is crucial to error handling. ```js try { // Try receiving data from your fetch request // Change the output div's value } catch (e) { // If an error occurred, tell the user! } ```4: Update CORS Settings
CORS (Cross-origin resource sharing) settings tells the Function App what domains (such as wwww.website.com) can make requests to the Azure Functions.
❓ How can I change it?
Head to your function app in your portal and find the button on the left hand side called `CORS`. ![https://user-images.githubusercontent.com/69332964/99188905-6f0b7c00-272c-11eb-8142-f91882227c78.png](https://user-images.githubusercontent.com/69332964/99188905-6f0b7c00-272c-11eb-8142-f91882227c78.png):question: What should I change it to?
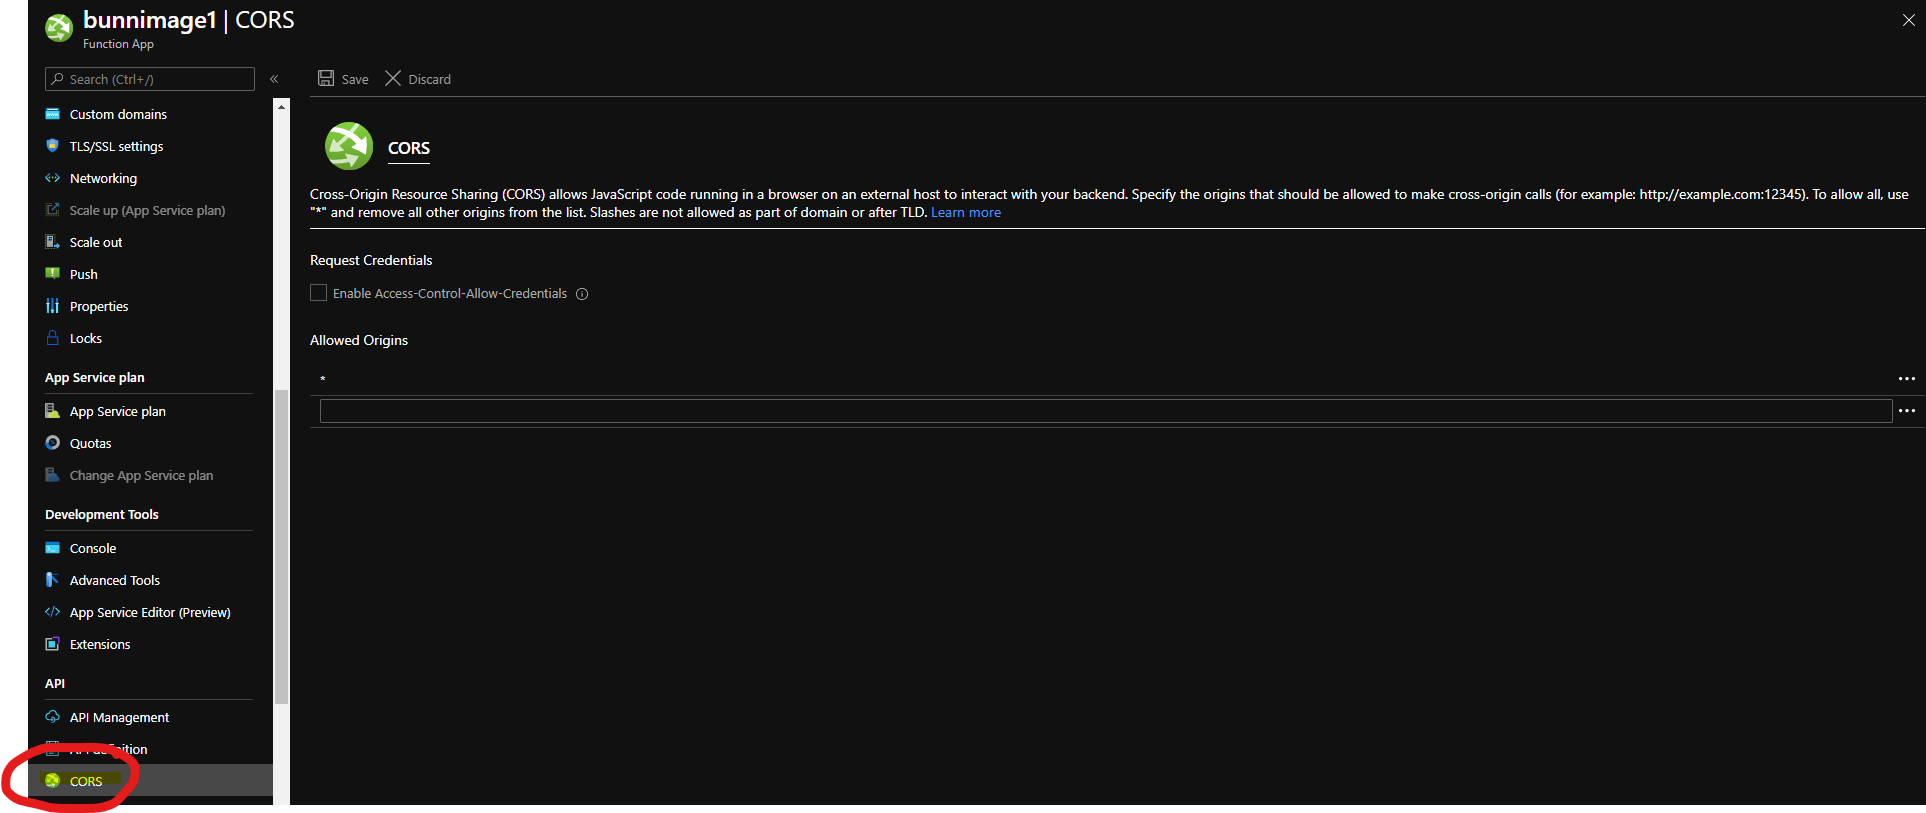
Change it to a wildcard operator (`*`), which allows *all* origin domains to make requests. > 💡 Be sure to remove any other existing inputs before attempting to save with wildcard. **Don't forget to save your changes!**📹 Walkthrough Video
Part 1
Part 2