// src/core/vdom/patch.js

function invokeInsertHook(vnode, queue, initial) {
  // delay insert hooks for component root nodes, invoke them after the
  // element is really inserted
  if (isTrue(initial) && isDef(vnode.parent)) {
    vnode.parent.data.pendingInsert = queue;
  } else {
    for (let i = 0; i < queue.length; ++i) {
      queue[i].data.hook.insert(queue[i]);
    }
  }
}
// src/core/vdom/create-component.js

const componentVNodeHooks = {
  insert(vnode: MountedComponentVNode) {
    const { context, componentInstance } = vnode;
    if (!componentInstance._isMounted) {
      componentInstance._isMounted = true;
      callHook(componentInstance, "mounted");
    }
    if (vnode.data.keepAlive) {
      if (context._isMounted) {
        // vue-router#1212
        // During updates, a kept-alive component's child components may
        // change, so directly walking the tree here may call activated hooks
        // on incorrect children. Instead we push them into a queue which will
        // be processed after the whole patch process ended.
        queueActivatedComponent(componentInstance);
      } else {
        activateChildComponent(componentInstance, true /* direct */);
      }
    }
  }
};
引言
在创建一个
Vue实例的时候需要经过一系列的初始化过程,比如设置数据监听、编译模板、挂载实例到 DOM、在数据变化时更新 DOM等。同时在这个过程中也会运行一些叫做
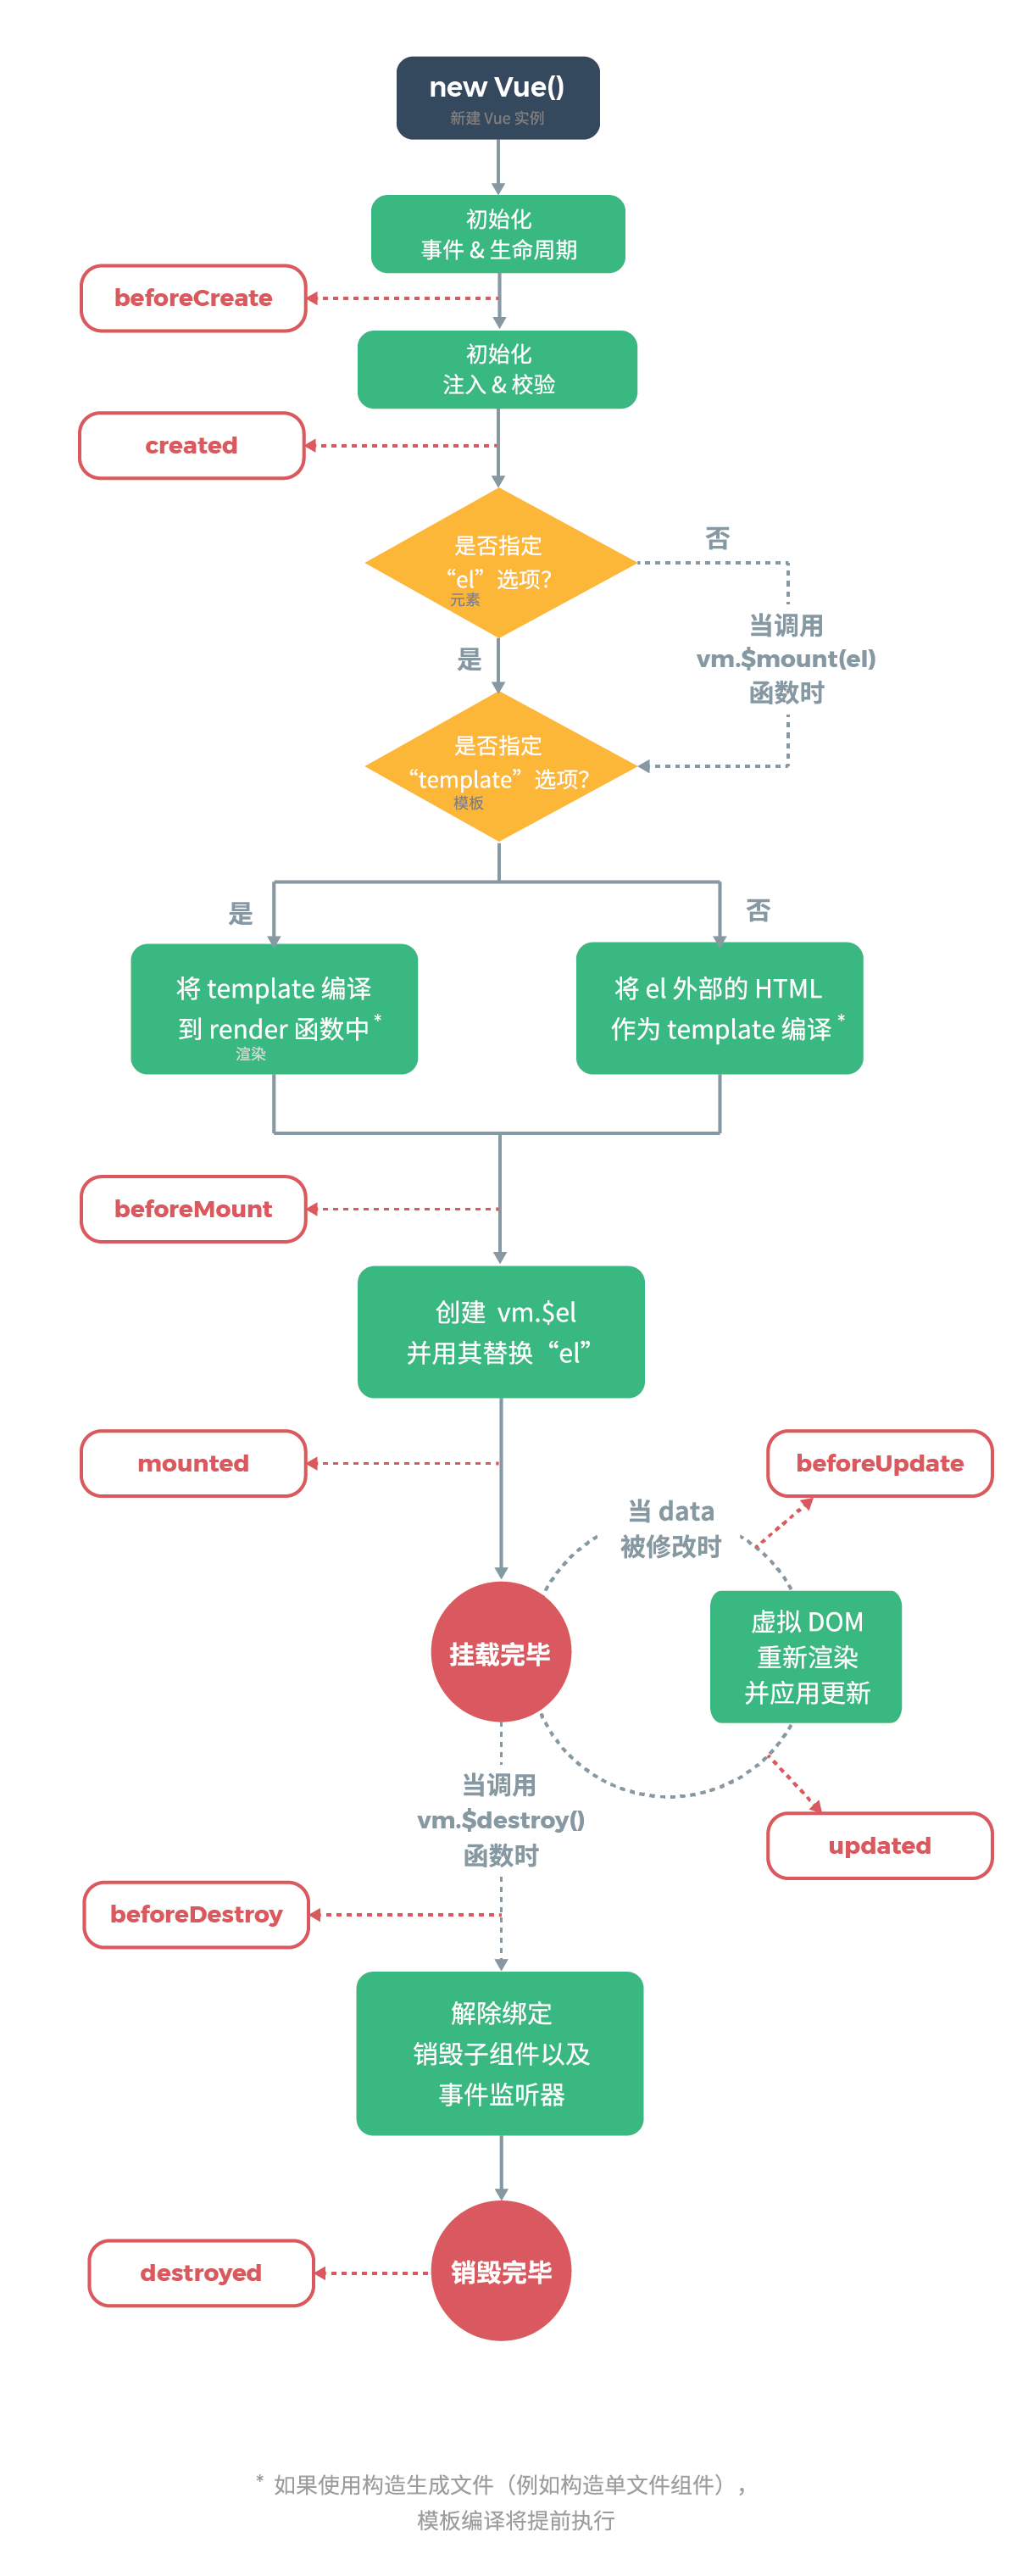
生命周期钩子的函数,这给了用户在不同阶段添加自己的代码的机会。下面引用官网的一张图,这张图展示了
Vue实例的生命周期以及在它生命周期的各个阶段分别调用的钩子函数:除了上图中展示的之外,还有
activated和deactivated,这两个是和keep-alive相关的函数。callHook
回顾
_init函数有这么一段代码:这里调用了两次
callHook函数,分别执行了生命周期钩子函数beforeCreate和created。来看callHook函数的定义:callHook函数接收两个参数,一个是vm实例,一个是要执行的钩子函数名。这里通过vm.$options[hook]拿到对应的函数数组,然后遍历这个数组调用invokeWithErrorHandling函数。invokeWithErrorHandling函数定义如下:invokeWithErrorHandling函数主要逻辑就是执行传入的handler函数。在调用invokeWithErrorHandling函数的时候传入vm作为context参数,也就是说生命周期函数的this会指向当前实例vm。另外这里设置一个标识符_handled保证函数只被调用一次,避免递归调用。了解了生命周期的执行方式后,接下来我们会具体介绍每一个生命周期函数它的调用时机。
beforeCreate & created
beforeCreate和created这两个钩子函数的调用时机前面也提到过了,在执行_init函数时被调用:可以看到,在完成
初始化生命周期、事件、render后调用了beforeCreate。在调用beforeCreate之后才调用initState。也就是说在beforeCreate函数中是访问不到data、props等属性的,因为这个时候还没有初始化。而
created是在初始化data、props后才被调用,因此在created中可以访问这些属性。beforeMount & mounted
beforeMount和mounted这两个的调用时机是什么时候呢?顾名思义,
beforeMount钩子函数发生在mount,也就是DOM挂载之前,它的调用时机是在mountComponent函数中,定义在src/core/instance/lifecycle.js中:可以看到,在组件挂载前就会调用
beforeMount函数,然后在执行了一系列挂载操作后,在最后的if语句判断这个vm是外部new Vue的实例还是内部的组件实例。如果是外部实例则执行
mounted函数。因此组件实例的
mounted函数调用时机不在mountComponent函数中,那是在什么地方呢?回顾
patch函数:组件的
VNodepatch 到DOM后,会执行invokeInsertHook函数,把insertedVnodeQueue里保存的钩子函数依次执行一遍,它的定义在src/core/vdom/patch.js中:该函数会执行
insert这个钩子函数,对于组件而言,insert钩子函数的定义在src/core/vdom/create-component.js中的componentVNodeHooks中:可以看到,组件的
mounted就是在这里通过callHook调用的。beforeUpdate & updated
beforeUpdate和updated是和数据更新相关的,数据更新这一部分会在下一章详细讲解。beforeUpdate的调用时机在mountComponent创建Watcher实例时:在
Watcher的参数中有一个对象,对象中有一个before函数,这个函数判断如果组件已经mounted并且还没有destroyed,就调用callHook执行beforeUpdate。而
before函数的执行时机是在flushSchedulerQueue函数调用的时候,它被定义在src/core/observer/scheduler.js中:现在我们只需要知道这里的
queue是一个个Watcher,flushSchedulerQueue函数会遍历queue然后执行每一个Watcher的before方法。flushSchedulerQueue函数中还调用了callUpdatedHooks函数:可以看到
updated是在这里被调用的。beforeDestroy & destroyed
beforeDestroy和destroyed都在执行$destroy函数时被调用。$destroy函数是定义在Vue.prototype上的一个方法,在src/core/instance/lifecycle.js文件中:可以看到在
$destroy函数一开始就调用了beforeDestroy,然后执行一系列销毁操作后再调用destroyed,这些销毁操作会在后面章节再来具体分析。这里调用了我们之前介绍过的
__pacth__函数,实际上调用__pacth__函数后会触发子组件的$destroy函数,然后又执行__pacth__函数。也就是说会通过
递归调用按先父后子的顺序把组件一层一层地销毁掉。因此beforeDestroy的调用顺序是先父后子,因为它会随着递归被调用;而destroyed是递归结束后执行,因此执行顺序是先子后父。总结
这一小节我们学习了生命周期函数的调用时机以及执行顺序。大概整理一下就是:
created钩子函数中可以访问到data、props等属性mounted钩子函数中可以访问到DOMdestroyed函数中可以执行定时器销毁工作beforeMount/beforeDestroy的执行顺序是先父后子mounted/destroyed的执行顺序是先子后父