Closed tatyanade closed 4 years ago
Thanks @tatyanade, the staggered stitch endpoints is a very helpful suggestion. (@LingDong- , please see above). Also, Tatyana, please be aware of the setStitch() function,
E.setStitch( float min_stitch_length, float stitch_length, float resample_noise);
With larger resample noise, there's more variation among stitches, and therefore less of the problematic stitch alignment patterns. The default noise value is = 0.5.
0ca31e8c67d1051d9a891f5ed52f2bc34979fdd2 added some improvement (?) to resample_noise with a weighted random, which will favour extreme values over mediocre values, as opposed to the uniform random that was used. Seems to help a bit.
maybe we need to rethink the resample algorithm
@LingDong- , what if alternate (every other) hatch lines simply began with a half-length stitch? Then we wouldn't have to depend on noise, and could implement Tatyana's suggestion precisely:
I tried that already.
However it doesn't seem to help much because the circles curvature is quite large compared to stitch length, so these offsets get cancelled out very soon.
It is easy to come up with a solution for one situation, but harder to have a resample algorithm that works for all situations, (different hatch modes, outlines, etc.) One way is to make an algorithm for each shape and hatch mode.
There's an interesting but ....kindof terrible... idea, which is to have the stitch points operate like a particle system, and mutually repel each other, but constrained to move only along their hatch lines, until an equilibrium is reached....
Hey @LingDong- , I tried this out with a particle repulsion system. It actually works OK, check it out in this animated GIF:
Here's my quick filthy code for testing the idea:
int nHatches = 34;
HatchLine hatches[];
float SL = 25;
float friction = 0.975;
void setup() {
size(400, 400);
hatches = new HatchLine[nHatches];
for (int i=0; i<nHatches; i++) {
float ay = map(i, 0, nHatches-1, height*0.25, height*0.75);
float by = ay;
float dr = 100;
float dy = height/2 - ay;
float dx = sqrt(dr*dr - dy*dy);
float ax = width/2 - dx;
float bx = width/2 + dx;
PVector A = new PVector(ax, ay);
PVector B = new PVector(bx, by);
hatches[i] = new HatchLine(A, B);
}
}
void draw() {
background(255);
pushMatrix();
translate( width/2, height/2);
rotate(radians(-30));
translate(-width/2, -height/2);
for (int i=0; i<nHatches; i++) {
hatches[i].draw();
}
popMatrix();
simulate();
}
void simulate() {
float R = 3.3 * SL;
float STRENGTH = 0.001;
noFill();
for (int i=0; i<nHatches; i++) {
HatchLine H = hatches[i];
for (int ip=0; ip<H.N; ip++) {
float px = H.pts[ip].x;
float py = H.pts[ip].y;
for (int j=0; j<nHatches; j++) {
HatchLine K = hatches[j];
for (int jq=0; jq<K.N; jq++) {
if (!((i == j) && (ip == jq))) {
float qx = K.pts[jq].x;
float qy = K.pts[jq].y;
float dx = qx - px;
float dy = qy - py;
float dh = sqrt(dx*dx + dy*dy);
if ((dh < R) && (dh > 0)) {
float F = STRENGTH/(dh*dh);
float fx = dx/dh * F;
if ((ip != 0) && (ip < (H.N-1))) {
H.varray[ip] -= fx; // add acc
H.varray[ip] *= friction; // add fric
H.parray[ip] += H.varray[ip]; // add acc
H.parray[ip] = constrain(H.parray[ip], 0,1);
}
if ((jq != 0) && (jq < (K.N-1))) {
K.varray[jq] += fx;
K.varray[jq] *= friction; // add fric
K.parray[jq] += K.varray[jq];
K.parray[jq] = constrain(K.parray[jq], 0,1);
}
}
}
}
}
}
}
}
class HatchLine {
PVector A;
PVector B;
int N;
float parray[];
float varray[];
PVector pts[];
HatchLine (PVector a, PVector b) {
A = a;
B = b;
N = 2 + (int)(dist(A.x, A.y, B.x, B.y)/SL);
parray = new float[N];
varray = new float[N];
pts = new PVector[N];
for (int i=0; i<N; i++) {
float t = map(i, 0, N-1, 0, 1);
float nt = 0;
if ((i > 0) && (i < N-1)) {
nt = 0.75 * (noise(i/10.0 + A.x, A.y) - 0.5);
}
float tnt = constrain(t + nt, 0, 1);
parray[i] = tnt;
varray[i] = 0;
pts[i] = new PVector(0, 0);
}
}
void draw() {
stroke(0);
line(A.x, A.y, B.x, B.y);
fill(0);
noStroke();
for (int i=0; i<N; i++) {
float t = parray[i];
float tx = lerp(A.x, B.x, t);
float ty = lerp(A.y, B.y, t);
pts[i].set(tx, ty);
}
for (int i=0; i<N; i++) {
float px = pts[i].x;
float py = pts[i].y;
ellipse(px, py, 5, 4);
}
}
}
@golanlevin cool!
Since we're now specifically fixing parallel hatching, I just had another idea while watching your simulation:
The stitches for parallel hatching can actually be the intersection with cross hatching
I can add some code for a special case when doing parallel hatching. Currently the resampler is ignorant of the nature of the thing it is asked to resample (it just tries its best looking at 1 polyline it is given), but seems like sooner or later we need branching
I see what you're saying about the cross-hatch, but the relative angles or cross-spacing might need to be tinkered with to achieve the desired stitch length.
I improved my particle algorithm a little by having each particle only look at the two adjacent hatch lines (as opposed to all of them). Ultimately I don't think this simulation algorithm is practical, but it is interesting.
I was inspired by the idea of Poisson-disc distribution sampling and was curious if it could be extended to a poly-1D world.
Hi @golanlevin
I think I was able to solve the problem (quite perfectly :) with the cross hatch method I mentioned earlier. 6d8c7929168e87008a7e158b3e4e43812b4d4e3e
Utilizing some Ancient Greek technology I was able to figure out the correct relative angles and cross-spacing:
Ha! So much better than my ridiculous particle system. @tatyanade, could you please test out Lingdong's new hatching (for PARALLEL mode)?
Hi @LingDong-, Next challenge: can you use the Ancient Greek Technology to plan stitch points for the cross-hatching method (with the goals of spacing the points as far apart as possible, and minimizing the occurrence of points that are too close together)? And how will this interact with the user being able to set variable stitch lengths?
tests - this is really effective for hatch spacing of 2; with a spacing of 1 it still warps - I think it would be good to have an option for how offset each layer is - right now this offset each alternate by half the stitch length but for denser fills i think it would be appropriate to offset each line by thirds or even fourths.
Hi @tatyanade , to be clear, do you mean something like the following?
On the left is a sparse hatch, and the threads are offset by 0%-50%-0%. On the right is a dense hatch, and the threads are offset by 0%-33%-66%-0%
@LingDong- , is this something you could try?
Also, @tatyanade , have you tried hatch spacing of 1.5? (Does that work?)
@golanlevin Sure! this is so easy to try, I just need to change one number from 0.5 to 1/3 or 1/4 etc.
I'll accept the challenge of making it work for cross hatching ;) But out of curiosity, would simply applying the algorithm for parallel hatching twice for each direction work? and maybe afterwards we make some micro adjustments to have the points spread out. Or maybe would the stretching in two directions cancel out to become no stretching?
Added experimental option E.PARALLEL_RESAMPLING_FACTOR
to control the offset: eb069c2addf2519211043be64ecce09a2338c036
@golanlevin btw, just finished documenting PEmbroiderGraphics with javadoc style comments, all 147 functions. Never realized I wrote so much code until I need to document it ;)
@golanlevin I implemented the resampling algorithm for cross hatching in your illustration (again with Greek tech ;) c7c86312742b657b266b85ea4f4630fc21827f97
However I don't know what to do about variable stitch length, so the solution I came up with is to round the stitch length to the nearest multiple.
So for user stitch lengths that are higher than the "perfect" spacing shown in your illustration, it will do every two steps, every three steps, every four steps, etc. (See the rightmost center circle in the screenshot) I think that's probably an acceptable compromise for the user?
@tatyanade , could you kindly test out the new hatching options. In particular, I made a new hatching demo (#3) that shows the effects of changing the offset percentage and the noise amount:
Also ran the first row again with stitch length of 50, hatch spacing at 1.5, here is that:
This appears resolved :)
Experiments with altering stitch length! and hatch
For fills I think it would be beneficial to make the thread stops on alternating layers as far from each other as possible (Like these yellow dots I've drawn in) or at least not very close to the thread stops on neighbor lines - the magenta dots in here are where the stitches start and stop and the yellow is a suggestion for how to make the fill a little better![2020-06-08_17h21_51](https://user-images.githubusercontent.com/21960277/84085061-c43fa680-a9b2-11ea-9364-e4b15ea8f183.png)
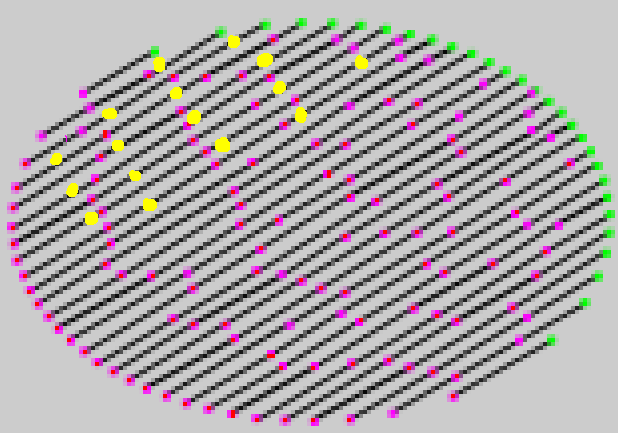
so the threads look more like this - this seems to be how other machine embroideries get their fills effectively.
other wise it creates valleys in the fill (highlighted in red below) that alter the shape - i think this skewed the circle since it causes the fabric to stretch and is harder on the fabric and more likely to deform or break it since its poking a lot of holes right next to each other instead of spacing them out more![2020-06-08_17h13_22](https://user-images.githubusercontent.com/21960277/84085090-d15c9580-a9b2-11ea-9858-8b4051f38bc9.png)
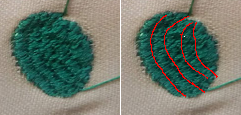
Also did some tests with outlines, the one on the left has a lower hatch value and the stitch length on both is the same and is the same as the width of the border, decreasing hatch and increasing stitch_length definitely help things look better