 TrickSumo
commented
5 years ago
TrickSumo
commented
5 years ago Hi
Use Arduino-JSON 5.0 library.
https://github.com/bblanchon/ArduinoJson/tree/5.x?files=1
It will fix issue.
Open Nuba123 opened 5 years ago
TrickSumo
commented
5 years ago Hi
Use Arduino-JSON 5.0 library.
https://github.com/bblanchon/ArduinoJson/tree/5.x?files=1
It will fix issue.
 Nuba123
commented
5 years ago
Nuba123
commented
5 years ago Hi @TrickSumo , Thanks for your reply. I installed ArduinoJson 5.13.1 and this issue is solved. But I got the error message in IDE serial monitor as-- "DHT11 Sensor Read Failed". Basically, I work with DHT11 sensor and ESP8266 to send the data to Google Firebase DB.
I set the baud rate in serial monitor 115200 same as in sketch Serial.begin(115200); I connected the DHT11 data pin (2) to ESP8266's D2 (GPIO 4). Following is the script.
DHT dht(DHTPIN, DHTTYPE); void setup() { Serial.begin(115200); delay(1000); WiFi.begin(WIFI_SSID, WIFI_PASSWORD); Serial.print("Connecting to "); Serial.print(WIFI_SSID); while (WiFi.status() != WL_CONNECTED) { Serial.print("."); delay(500); } Serial.println(); Serial.print("Connected to "); Serial.println(WIFI_SSID); Serial.print("IP Address is : "); Serial.println(WiFi.localIP()); Firebase.begin(FIREBASE_HOST, FIREBASE_AUTH); dht.begin(); } void loop() { float h = dht.readHumidity(); float t = dht.readTemperature(); if (isnan(h) || isnan(t)) { Serial.println(F("Failed to read from DHT sensor!")); return; } Serial.print("Humidity: "); Serial.print(h); String fireHumid = String(h) + String("%"); Serial.print("% Temperature: "); Serial.print(t); Serial.println("°C "); String fireTemp = String(t) + String("°C"); delay(4000); Firebase.pushString("xxxx.firebaseio.com/DHT11/Humidity", fireHumid); Firebase.pushString("xxxx.firebaseio.com/DHT11/Temperature", fireTemp); } Would you please help me to fix this problem? Can anyone please give me an idea to fix it?
TrickSumo
commented
5 years ago Hi,
Please try these configs.
Libraries:-
Code to interface NodeMCU ESP8266 with DHT11.
https://gist.github.com/TrickSumo/f1aecd17972aa3b6c0668750c3309714
Video tutorials:- https://youtu.be/hPv9uX3rUWc https://youtu.be/pA_Rfop7kDc
Once you successfully interface temperature sensor, you can connect to firebase using :- https://gist.github.com/TrickSumo/cb65221277fb974352b4c2589e7475a1
Hope it help you.
Thanks
Nuba123
commented
5 years ago Thanks so much for your reply. I tried according to your provided link “Code to interface NodeMCU ESP8266 with DHT11.”https://gist.github.com/TrickSumo/f1aecd17972aa3b6c0668750c3309714. And connect the DHT11 with ESP8266 after upload this program. Unfortunately, I got the same error message””DHT SENSOR READ FAILED. I also installed the specific DHT11-master library according to the following blog suggestions. https://arduino.stackexchange.com/questions/36765/arduino-uno-sensor-dht11-failed-to-read-from-dht-sensor. And installed the DHT11 library https://github.com/adidax/dht11. Following is my script.
//#define WIFI_SSID "eduroam"
//#define WIFI_PASSWORD "London123"
dht11 DHT11;
void setup() {
Serial.begin(115200);
delay(1000);
//WiFi.begin(WIFI_SSID, WIFI_PASSWORD); // if I don’t comment out the wi-fi part its only
showing the dotted output in serial monitor.
//Serial.print("Connecting to ");
//Serial.print(WIFI_SSID); //After comment out this part the output showing as
//(Temperature 0.00c)
// Humidity 0.00%
//while (WiFi.status() != WL_CONNECTED) {
//Serial.print("..........");
//delay(500);}
// Serial.println();
//Serial.print("Connected to ");
// Serial.println(WIFI_SSID);
//Serial.print("IP Address is : ");
//Serial.println(WiFi.localIP());
}
void loop(){
Serial.println("**");
int chk = DHT11.read(DHT11PIN);
Serial.print("Humidity: ");
Serial.print("t");
Serial.print((float)DHT11.humidity,2); // float humidity value will show two digits more after decimal
Serial.println(" %");
Serial.print("Temperature: ");
Serial.print("t");
Serial.print((float)DHT11.temperature,2);
Serial.println(" C");
delay(2000);
}
But I got the output like the following. Which makes sense to me that the sensor is not reading anything.
Humidity 0.00%
Temperature 0.00C
Would you please help me to sort it out ? May I get your e-mail address/skype ID to discuss in more details.
Can anyone please give me an idea to sort this problem?
TrickSumo
commented
5 years ago Hi @Nuba123
20:22:05.211 -> Humidity: t55.00 %
20:22:05.211 -> Temperature: t31.00 C
20:22:07.163 -> ******************
20:22:07.197 -> Humidity: t55.00 %
20:22:07.197 -> Temperature: t31.00 C
20:22:09.209 -> ******************
20:22:09.209 -> Humidity: t55.00 %
20:22:09.209 -> Temperature: t31.00 C
Also, you mentioned (in a comment in between codes) that esp8266 not connecting with wifi, so the problem may be with nodemcu.
All pins of DHT11 temperature sensor are connected properly?
Nuba123
commented
5 years ago Hi @TrickSumo, Thanks much for your effort. After your words I tried with DHT Tester example program using UNO board and 10K resistor. Unfortunately, I got several errors and didn’t fix it. And I wanna buy a new sensor. I found this sensor with two specified name “HALJIA 2PCs DHT11 Digital Temperature Humidity Sensor Module for Arduino” (amazon.co.uk) and the other one “ DHT11 Temperature and Relative Humidity Sensor Module NTC Thermal KY-015 Arduino” (ebay.co.uk). But I am not sure are they compatible with the ESP8266 module or not? Would you please take a look on it?
And secondly, I already install the NodeMCU board and checked its connectivity with the COM port using Examples->ESP8266-> BLINK before those issues occured. I set D7 in the first parameter of three functions in the BLINK example. I test with a LED and it was blinking in my case. It make sense that the board is properly installed with my PC. how do I test the ESP8266's connectivity with the internet? Would you mind to help me in this context?
TrickSumo
commented
5 years ago Hi @Nuba123
I am using DHT11 which is available on eBay.
Use this code to check connectivity to firebase.
It must upload any random value (equivalent to infinite) to firebase real-time database even without any temperature sensor.
To create real time database, you can refer:- https://tricksumo.com/use-firebase-with-mit-app-inventor/#How_to_use_firebase_with_MIT_app_inventor_2
/* Libraries:-

Arduino firebase Master  https://github.com/FirebaseExtended/firebase-arduino
 *              Ardunio Json  https://github.com/bblanchon/ArduinoJson/tree/5.x
 *              DHT11 by adafruit  https://github.com/adafruit/DHT-sensor-library
 *              adafruit universal senor  https://github.com/adafruit/Adafruit_Sensor
 */

#include <ESP8266WiFi.h>
#include<FirebaseArduino.h>
#include <DHT.h>

#define DHTTYPE DHT11   // Sensor DHT 11

#define FIREBASE_HOST "xxxxxxxxxxxx.firebaseio.com"                          // database URL
#define FIREBASE_AUTH "xxxxxxxxxxxxxxxxxxxxxxxxxxxxxxxxxxxxxxxx"             // secret key

#define WIFI_SSID "xxxxxx"
#define WIFI_PASSWORD "xxxxxxx"

#define dht_dpin D1
DHT dht(dht_dpin, DHTTYPE);

void setup() {

  dht.begin();
  Serial.begin(9600);

  Serial.println("Humidity and temperature \n\n");

  WiFi.begin(WIFI_SSID, WIFI_PASSWORD);                                     //try to connect with wifi
  Serial.print("Connecting to ");
  Serial.print(WIFI_SSID);
  while (WiFi.status() != WL_CONNECTED) {
    Serial.print(".");
    delay(500);
  }
  Serial.println();
  Serial.print("Connected to ");
  Serial.println(WIFI_SSID);
  Serial.print("IP Address is : ");
  Serial.println(WiFi.localIP());                                            //print local IP address
  Firebase.begin(FIREBASE_HOST, FIREBASE_AUTH);                              // connect to firebase
                                                             //Start reading dht sensor
}

void loop() {

  // Firebase Error Handling ************************************************
 if (Firebase.failed())
  { delay(500);
    Firebase.begin(FIREBASE_HOST, FIREBASE_AUTH);
    Serial.println(Firebase.error());
  Serial.println("Ignoring firebase\n\n\n\n\n");
  delay(500);
  }

  else {
    Serial.println("Everything is ready!");
    delay(300); Serial.println("Everything is ready!");
    delay(300); Serial.println("Everything is ready!");
    delay(300);
  }

  float h = dht.readHumidity();                                              // Reading humidity
  float t = dht.readTemperature();                                           // Reading temperature

  if (isnan(h) || isnan(t)) {                                                // Check if any reads failed and exit early (to try again).
    Serial.println("Failed to read from DHT sensor! Ignoring it! ");

  }

Serial.print("Current humidity = ");
    Serial.print(h);
    Serial.print("%  ");
    Serial.print("temperature = ");
    Serial.print(t);
    Serial.println("C  ");
  delay(2000 );

  Firebase.setFloat("\data",t);
}
Source:- https://gist.github.com/TrickSumo/cb65221277fb974352b4c2589e7475a1
Don't forget to update WIFI and firebase details.
Nuba123
commented
5 years ago Hi @TrickSumo Thanks for your quick reply. To answering your previous question " Is DHT connected properly" ? As I understand from ESP PIN WorkOutSheet, Pin D1=GPIO5. I connected the DHT11 sensor's GND and VCC pin to ESP's GND, 3V3 properly. The data pin of DHT is get connected with ESP's D1. And I define in sketch #define DHT11PIN D1 and I tried in either way #define DHT11PIN 5. Is it okay?
Now, I am trying your code provided for Firebase test only.
TrickSumo
commented
5 years ago Hi @Nuba123
Pin connection seems Ok.
Hope you successfully connected nodemcu to firebase.
Nuba123
commented
5 years ago Hi @TrickSumo I afraid I can't find the VV pin. In my MCU the first pin is D0...D4, 3V3, GND, D5 ...D8 Rx Tx GND 3V3 ( from top left) and the other way around listed as Vin GND RST EN 3v3 GND clk ....RSV A0 (BOTTOM LINE ). I guess in my case it might be Vin pin. Is it okay? Sorry, am unable to upload the Node image because I didn't create my own repository.
Nuba123
commented
5 years ago Ignoring firebase Failed to read from DHT sensor! Ignoring it! Current humidity = nan% temperature = nanC**
It seems that, Firebase is begin perfectly only once with no reading of DHT sensor. After one loop done the Firebase begin is failed again. I tried even without DHT connection.
Would you please take a look to sort my problem?
TrickSumo
commented
5 years ago Hi
Syntax is Firebase.setInt("tag-here",variable-to-upload-here);
Example:- To store temperature in demo >> value, use:- Firebase.setFloat("/Demo/Value",t);
Alternatively, you can also use Firebase.setInt("/temp/data",t);
#define FIREBASE_HOST "test.firebaseio.com"
#define FIREBASE_AUTH "xxxxxxxxxxxxxxxxxxxxxxxxxxxxxxxxxxxxx" @Nuba123
Don't forget to update this library :- https://github.com/FirebaseExtended/firebase-arduino
Then try this one:- https://youtu.be/dLvSGPsV344
#include <ESP8266WiFi.h>
#include<FirebaseArduino.h>

#define FIREBASE_HOST "test.firebaseio.com"                          // database URL
#define FIREBASE_AUTH "xxxxxxxxxx"             // secret key

#define WIFI_SSID "xxxxxxx"
#define WIFI_PASSWORD "xxxxxxx"

    int val=0, val3=1000;

void setup() {

  Serial.begin(9600);

  Serial.println("Serial communication started\n\n");

  WiFi.begin(WIFI_SSID, WIFI_PASSWORD);                                     //try to connect with wifi
  Serial.print("Connecting to ");
  Serial.print(WIFI_SSID);

  while (WiFi.status() != WL_CONNECTED) {
    Serial.print(".");
    delay(500);
  }

  Serial.println();
  Serial.print("Connected to ");
  Serial.println(WIFI_SSID);
  Serial.print("IP Address is : ");
  Serial.println(WiFi.localIP());                                            //print local IP address
  Firebase.begin(FIREBASE_HOST, FIREBASE_AUTH);   // connect to firebase
delay(1000);
}

void loop() {

// Firebase Error Handling ************************************************
  if (Firebase.failed())
  { delay(500);
    Firebase.begin(FIREBASE_HOST, FIREBASE_AUTH);
    Serial.println(Firebase.error());
  Serial.println("Connection to fiebase failed. Reconnecting...");
  delay(500);
  }

 else {
    Serial.println("Everything is ready!");
    delay(300); Serial.println("Everything is ready!");
    delay(300); Serial.println("Everything is ready! \n \n \n");
    delay(300);

    Firebase.setInt("/data",val);
   Serial.println(val);
    delay(300); Serial.println("uploaded val to firebase \n \n \n");

      Firebase.setInt("/test/val3",val3);
   Serial.println(val3);
    delay(300); Serial.println("uploaded val3 to firebase \n \n \n");

  val++; val3++;
 }

}
Source:- https://gist.github.com/TrickSumo/b6019110713446fca7743ec1e65793f4
Nuba123
commented
5 years ago Hi @TrickSumo Thanks so much for your every quick response. It really helps me. Finally, the temperature and humidity value is showing in Firebase console under my own project. And the issue was with the FirebaseArduino Library. It needs to be updated every time.
Now I intend to send these data in any platform (App/web application) as a user notification. How can I do it using MIT Inventor App? Or any other idea to reach my goal? Please, give me a complete guidelines to work through.
I found some step-by-step guidelines to 'Get Started with Web/IoS/Android' in the below link. https://firebase.google.com/docs/?authuser=0
How do I find the MIT App Inventor in firebase console to create an app using credentials according to your provided guidelines ? https://tricksumo.com/use-firebase-with-mit-app-inventor/#close
TrickSumo
commented
5 years ago Hi @Nuba123
Actually, I forgot to put the hyperlink to MIT app inventor in that post (now updated).
So, first of all, go to appinventor.mit.edu and create a new project.
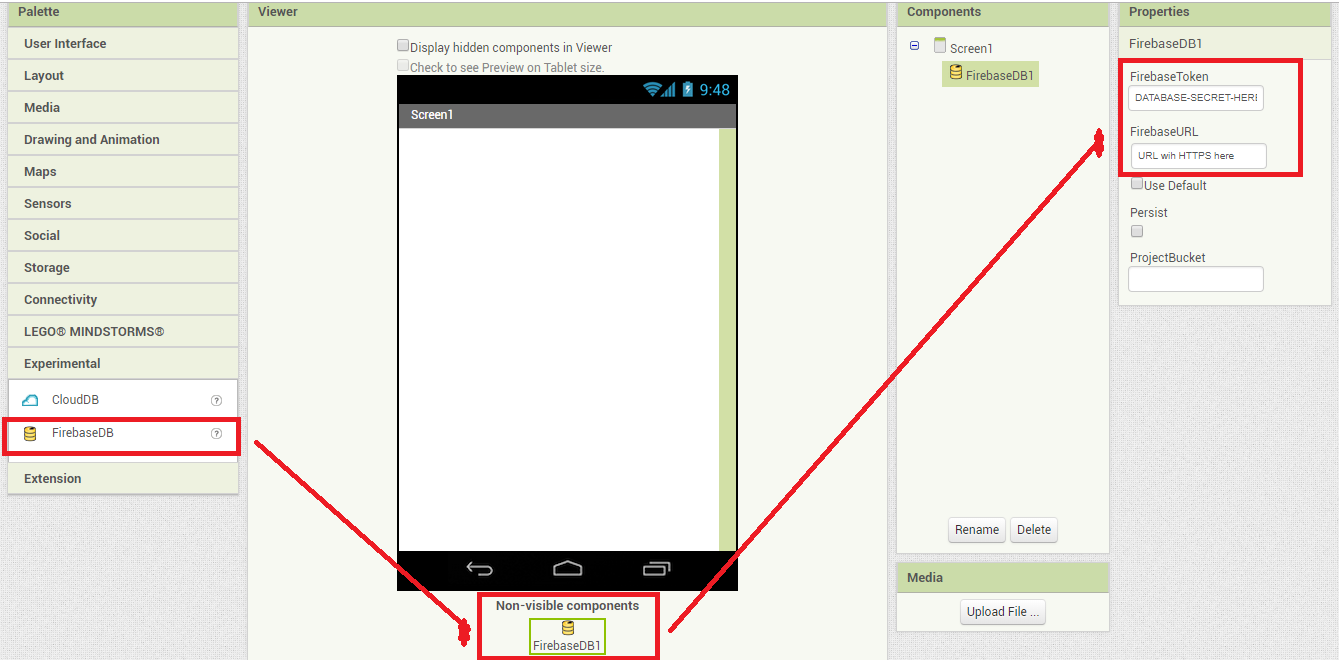
In left panel, locate experimental >> FirebaseDB and put required details as show in screenshot (https://tricksumo.com/wp-content/uploads/2019/03/FirebaseDB-app-inventor-properties.png).
Done! Now firebase is successfully integrated with app inventor.
Now, follow these steps to sync firebase data with the android app:- https://tricksumo.com/use-firebase-with-mit-app-inventor/#How_To_Read_Data_From_Firebase_Using_MIT_App_Inventor
TrickSumo
commented
5 years ago Hello @Nuba123
Here is complete step by step tutorial:-
https://youtu.be/GPM9uuKpiDs https://www.instructables.com/id/IOT-Based-Room-Temperature-Control/
Hope you find it useful.
Nuba123
commented
5 years ago Hi @TrickSumo Thanks so much for your complete guidelines.
In your video tutorial- https://www.instructables.com/id/IOT-Based-Room-Temperature-Control/; you didn't show any use of Firebase. If you restructure the video (DHT value>>monitored/showing in Firebase>> Firebase Integration with MIT APP>>Read/write/modify the value in Firebase as well as in Android App), it might be helps us a lot. I did this much. Create App>> Term of Services>> start a new project>> project-name (I put the same name as my firebase project name here)>> put the firebase token and URL in the FirebaseDB1 properties after drag it from Experimental; according to your comment made on Friday. And the project name is showing in Project Bucket in right pane. Is that okay?
I am getting a confusion to import the project(.aia from my computer) here; according to your today's commentary guidelines. In my case what would be my project to import? Is that an Arduino code to work with the DHT-Firebase?
I set the security rules as Test mode to completing the Firebase Setup instead of Lock Mode? Is that might occur any issue to work?
I am running windows 10. Is this will be occur any issue to completing the App development?
Nuba123
commented
5 years ago Hi @TrickSumo Once again I need to know, is there any perspective to read the DHT data and send it to the Firebase console as a real-time data and using an MIT App to control/monitor the data from my own handset.?
If I can see the DHT data in Firebase console under my own project, it means I can be able to see/monitor from anywhere in the world using the URL. Above mentioned is in my own project case (DHT-Firebase-App). Its just my personal interest to know the goal of this iteration. Please let me know.
TrickSumo
commented
5 years ago
- In your video tutorial- https://www.instructables.com/id/IOT-Based-Room-Temperature-Control/; you didn't show any use of Firebase. If you restructure the video (DHT value>>monitored/showing in Firebase>> Firebase Integration with MIT APP>>Read/write/modify the value in Firebase as well as in Android App), it might be helps us a lot.
Actually my aim was just to show working of final project and then provide link to written tutorial. But your idea of firebase part is really nice! I will keep it in mind next time.
Thanks for valuable feedback :)
- I am getting a confusion to import the project(.aia from my computer) here; according to your today's commentary guidelines. In my case what would be my project to import? Is that an Arduino code to work with the DHT-Firebase?
MIT app inventor file (.aia file) is attached at the end of step 2 of that instructable. No need to create new app, just download and import it.
https://cdn.instructables.com/ORIG/FVN/AU0I/JUWYCP03/FVNAU0IJUWYCP03.aia
Then open imported project >> edit FirebaseDB details.
- And the project name is showing in Project Bucket in right pane. Is that okay?
In that instructable, I had mentioned to put S_HO_C_K in project bucket because i had used this in my arduino code:- t1 = Firebase.getString("/S_HO_C_K/mantemp").toInt();
You can put anything there, but don't forget to modify code as:- t1 = Firebase.getString("/myproject/mantemp").toInt();
- I set the security rules as Test mode to completing the Firebase Setup instead of Lock Mode? Is that might occur any issue to work?
As long as you have secret key, you can always go with lock mode.
- I am running windows 10. Is this will be occur any issue to completing the App development?
Not at all. App is being created on server of MIT. Hence you can use any OS.
If I can see the DHT data in Firebase console under my own project
Yes, you can view data, but creating app helps to control NodeMCU. But still its optional.
Change real-time databse rules to =>
{ "rules": { ".read": true, ".write": true } }
Add tagname.json at the end of databse URL.
Example:- https://test.firebaseio.com/tagname.json or https://your-project-name.firebaseio.com/temperature.json or https://my-project-name-firebase.firebaseio.com/dht.json or https://example.firebaseio.com/data.json
And so on...
Nuba123
commented
5 years ago Hi @TrickSumo Thanks so much for your patience. Now I am really kin on to developing an app using MIT for my Android phone using wi-fi. And I find your below tutorial is useful. First of all I need to convert my .ino file to .aia file. Secondly, (.aia to .apk). How do I do that?
TrickSumo
commented
5 years ago Hello @Nuba123
No, you don't need to convert .ino file to anything. Just upload this file to your NodeMCU ESP8266 (after some necessary changes).
After that, download .aia file from instructable. Import it in mit app inventor. Now edit project to add your own real time database URL and its secret key.
Then hit build button to download .apk file.
That's it!
Just follow this Instructable step by step:- https://www.instructables.com/id/IOT-Based-Room-Temperature-Control/
And tutorial to create firebase real-time database:- https://tricksumo.com/use-firebase-with-mit-app-inventor/#How_to_use_firebase_with_MIT_app_inventor_2
Hope its clear now.
Thanks And Have Fun :)
Nuba123
commented
5 years ago Hi @TrickSumo Thanks much for your feedback. But I want to do this in respect of my own .ino code (sends the DHT sensor data to Arduino IDE and Google Firebase ). Would you please guided me to convert the (.ino) to (*. aia)? After successfully import the .ino code to my computer using MIT is that .apk file will be auto generated as executable (after hit the build button on MIT).
Can I have to download the MIT Ai2 companion app in my android phone? which I find from the below link. http://appinventor.mit.edu/explore/ai2/setup-device-wifi.html ( Step 1: Download and install the MIT AI2 Companion App on your phone. which I find from the below link.)
TrickSumo
commented
5 years ago Hi @Nuba123
Actually I am not getting your point but still trying to explain. So if I am getting wrong please correct me ;)
MIT will automatically generate .apk file after hitting build button.
Just download this file and transfer it to any Android device. Install the app and run it.
No need to download MIT companion app.
Also .ino file can't be converted to .aia. Aia is format of app inventor raw file.
Upload ino to NodeMCU ESP8266. Now it will update data to firebase.
Create app which can read data from firebase, that is aia file.
So as you can see, ino and aia both are different things.
Nuba123
commented
5 years ago hi @TrickSumo Thanks much for your guidance. Now I understand that .apk file is an executable file which will be working in Android O/S. on the other hand, .aia file is the own project format of MIT.
I already design an APP plus its Logic from Block and save the project as .apk file. But the problem is I design the APP in Screen 3 and used screen1 and 2 for app design practice. And I integrate Firebase with screen 3 and 1. As I understand whenever I build the .apk file its saved with all its working screen. Though whenever I hit build and select (save as .apk file) on that time screen 3 was open. Its really urgent to know.
Is that might occur an issue to get the Firebase data into my phone app? How do I delete a screen? And how do I undo the Firebase Integration from any screen?
TrickSumo
commented
5 years ago Hi @Nuba123
Hope you enjoyed your first app with MIT app inventor 2.
To remove any screen, there is option to remove screen somewhere in front of screen name.
To undo real time database integration, just delete dragged FirebaseDB from design window.
If there are three screens, first one will open in the app by default. To solve it, just add button on first screen which when hitted it redirect to third screen.
Also you can integrate same firebase with unlimited screens without any problem. So don't worry about it.
Are you creating this app for temperature sensor?
Thanks
Nuba123
commented
5 years ago Hi @TrickSumo Thanks for your quick feedback. I resolve according to your guidelines but the first secreen is not deleted as it's a default screen. so, its a good idea to 'To Add a button on First screen and re-direct it to the 3rd screen'. I'll be very happy if you send me the 'logic ' to doing it. I am sending the DHT data to the Firebase using DHT11 sensor plus ESP8266 module.
Nuba123
commented
5 years ago Hi @TrickSumo I resolve the redirecting issue in my app. Now the new issue is the Humidity and Temperature value is not showing in the App. I am following this tutorial and the app design is same like this. https://www.youtube.com/watch?v=3RPJtL2rnXc . And my logic is same like this tutorial logic as well. My phone, PC is in the same network.
What might be the issue
TrickSumo
commented
5 years ago Hi @Nuba123
Make sure that app is reading data from same path where dht11 is uploading data.
Example.
NodeMCU ESP8266 is uploading to '\temp\data'
Then app must read data from same path. So keep ProjectBucket of FirebaseDB 'temp' and read data from 'data' tag.
Now come to your case. According to that video data is being uploaded as:-
Firebase.setFloat ("Temp",t); Firebase.setFloat ("Humidity",h);
So make sure ProjectBucket option of FirebaseDB is empty and read data from respective tags. You can open firebase console to get more insights.
This may be issue. Except this, everything seems fine to me.
Nuba123
commented
5 years ago Hey @TrickSumo Thanks much for your guidance. I already 'empty' my project bucket and set the data path in App logic same as in Arduino sketch. example Firebase.pushString("Humidity/Data",fireHumid ); Firebase.pushString("Temperature/Data",fireTemp); unfortunately, the issue is not solve . -I am using forward slash in the above parameter and simply copy Humidity/Data inside the App logic. Is that '/' might be an issue? shouldn't it. Though I checked without '/' as well.
Basically, My Firebase console is heavy loaded with sensor data. Suddenly it's stopped working and ask to'Recover Webpage'. And its difficult to check the recent sensor data. is there any way to delete this data? Or I can create a new project in Firebase and using new token+URL integrate with MIT. But this is not a shortcut idea I believe.
-what do you mean in this line, cant understand. 'Then app must read data from same path. So keep ProjectBucket of FirebaseDB 'temp' and read data from 'data' tag.
TrickSumo
commented
5 years ago Hello @Nuba123
It is not necessary to connect both device on same network.
You can delete firebase data just by pressing cross in front of tag name (you can search a video on that for more details).
For app not reading data, can't say anything. Everything seems fine to me!
Nuba123
commented
5 years ago hi @TrickSumo hope you're doing fine. Is there anyway to make an executable this part' collecting data (using dht) and sending data to firebase'? Basically, sometimes its asked to submit any executable file in submission. is it will be kind of saving the project in GitHub repository. please let me know.
In file included from C:\Users\Nuba\Documents\Arduino\libraries\firebase-arduino-master\src/Firebase.h:30:0, from C:\Users\Nuba\Documents\Arduino\libraries\firebase-arduino-master\src/FirebaseArduino.h:22, from C:\Users\Nuba\Documents\Arduino\TempHumidityDataToFirebase\TempHumidityDataToFirebase.ino:3: C:\Users\Nuba\Documents\Arduino\libraries\firebase-arduino-master\src/FirebaseObject.h:109:11: error: StaticJsonBuffer is a class from ArduinoJson 5. Please see arduinojson.org/upgrade to learn how to upgrade your program to ArduinoJson version 6 std::shared_ptr<StaticJsonBuffer> buffer_; ^ In file included from C:\Users\Nuba\Documents\Arduino\libraries\firebase-arduino-master\src/FirebaseArduino.h:22:0, from C:\Users\Nuba\Documents\Arduino\TempHumidityDataToFirebase\TempHumidityDataToFirebase.ino:3: C:\Users\Nuba\Documents\Arduino\libraries\firebase-arduino-master\src/Firebase.h:86:11: error: StaticJsonBuffer is a class from ArduinoJson 5. Please see arduinojson.org/upgrade to learn how to upgrade your program to ArduinoJson version 6 std::shared_ptr<StaticJsonBuffer> buffer_;
exit status 1 Error compiling for board NodeMCU 1.0 (ESP-12E Module).