 FlailingFog
commented
2 years ago
FlailingFog
commented
2 years ago Dang, this looks great! The features shown in that playlist definitely trump what's on the current armature. Thanks for writing these scripts, I'll check them out.
Open ilcane87 opened 2 years ago
FlailingFog
commented
2 years ago Dang, this looks great! The features shown in that playlist definitely trump what's on the current armature. Thanks for writing these scripts, I'll check them out.
FlailingFog
commented
2 years ago ~Is the generate rig button supposed to be selectable after the first script is run? The button is there and the script looks like it's modifying things but the armature doesn't seem to be recognized as a metarig so I can't use the button.~
Nevermind, I got it working on 2.93 (didn't seem to work on 3.0). Apparently I didn't know what I was missing because these extra features are a lot of fun to play around with. In addition to the eye controls, it also looks like you made a ton of controls for the face and chest accessible too!
Also, let me know if I forgot to carry over any of the features of the original armature so I can make amendments.
Does Rigify support three spine bones instead of two? Maybe I didn't dig far enough, but out of the three spine bones (Spine, Chest, Upper chest) I only see access to the Chest and Upper chest. The Hips are parented to the Spine, so that third spine bone is essentially lost. Other than that, I think you hit every feature on the original one.
As usual, feel free to include this in the addon as an extra if you think people could find it useful.
I'll gladly do this! Do you want to make a pull request with these files so you're credited as the original author? I can take care of the addon integration part.
 ilcane87
commented
2 years ago
ilcane87
commented
2 years ago @FlailingFog
Nevermind, I got it working on 2.93 (didn't seem to work on 3.0).
I actually haven't even downloaded 3.0 yet, maybe Rigify isn't running correctly on it at this time, or they may have made some changes, I'll check it out.
In addition to the eye controls, it also looks like you made a ton of controls for the face and chest accessible too!
I added a custom shape to anything that could have any kind of deformation effect, be it direct or indirect. In fact the (MCH) layers are entirely made out of bones formerly in layer 10 that have any kind of relation with the deform bones of the face and hair/accessories, but there's probably lots of redundancy there. All of the bones that have no effect whatsoever end up in the Junk layer of the original armature (they are almost 500, more than half the original bones!), and are deleted on the generated rig when you run the After Each Generate script, which is why Junk is empty there, so if you want to preserve some of them you can just move them to a different layer in the original armature and then hit Generate again (and run the subsequent script).
Does Rigify support three spine bones instead of two? Maybe I didn't dig far enough, but out of the three spine bones (Spine, Chest, Upper chest) I only see access to the Chest and Upper chest. The Hips are parented to the Spine, so that third spine bone is essentially lost.
Three bones is actually the minimum length of the Rigify spine, you're saying the bone called Spine is missing, or did I misunderstand?
You can check out the actual structure by showing layer 29 (the Deform layer):
 For the second spine bone Rigify generates an FK control and Tweak control below it, in the Torso (Tweak) layer:
 I didn't change any parenting when it comes to the spine bones so I'd be surprised if I skipped anything.
I'll gladly do this! Do you want to make a pull request with these files so you're credited as the original author? I can take care of the addon integration part.
Honestly I'd rather not be credited, this is something I did for my own use and released it on a whim, so while I'm going to try and maintain it I don't plan to spend extra time on issues that wouldn't affect my own work, so I'd prefer it if people didn't come looking for me when you make the next public release. Consider this an anonymous contribution to give something back for the amazing work that's being done on KKBSP. :)
ilcane87
commented
2 years ago I actually haven't even downloaded 3.0 yet, maybe Rigify isn't running correctly on it at this time, or they may have made some changes, I'll check it out.
Just uploaded the updated version in the OP, now it's compatible with both 2.93 and 3.0, all they changed is adding more granularity to the custom shape transform parameters (a welcome change, actually).
Also, apparently Rigify doesn't like the 'mmd_bone' custom property anymore, so I had to None them all or the generation would fail.
But they did make a nice addition by letting you setup a script to run automatically after the rig generation, which is perfectly suitable for the "After Each Rigify Generate" script:
 If you follow the Rigify workflow of making changes on the metarig and then generating from it again and again this could save you one step each time.
FlailingFog
commented
2 years ago For the second spine bone Rigify generates an FK control and Tweak control below it, in the Torso (Tweak) layer:
What I meant was, the Spine_fk bone seems to be doing something similar to the Hips_fk bone. They're both affecting the lower body, but I was trying to get the Spine_fk to affect the upper body. If you check the original armature you can see what I'm talking about. The Spine (along with the Chest and Upper chest) affects the upper body and the Pelvis affects the lower body. The DEF-Spine bone on the Rigify armature looks like it's doing just that, and the chest bone in the Torso section only seems to affect the Chest_fk bone / Upper Chest_fk bone, so am I missing something obvious that allows the Spine_fk bone to affect the upper body?
this is something I did for my own use and released it on a whim,
Okay no problem, I can understand that. Thanks again for sharing these!
ilcane87
commented
2 years ago What I meant was, the Spine_fk bone seems to be doing something similar to the Hips_fk bone. They're both affecting the lower body, but I was trying to get the Spine_fk to affect the upper body. If you check the original armature you can see what I'm talking about. The Spine (along with the Chest and Upper chest) affects the upper body and the Pelvis affects the lower body. The DEF-Spine bone on the Rigify armature looks like it's doing just that, and the chest bone in the Torso section only seems to affect the Chest_fk bone / Upper Chest_fk bone, so am I missing something obvious that allows the Spine_fk bone to affect the upper body?
Ah, I see what you were referring to now.
By default Rigify sets the pivot point of the spine FK controls after the second bone in the chain, which is the "Spine" bone, meaning every bone before the pivot will move the lower part of the body with it; this setting facilitates animation, because it gives you two bones to control the lower body and two to control the upper, but it can be easily changed in a few ways from the metarig.
You can find the options by selecting the first bone of the chain in Pose mode (Rigify options tend to be on the first bone of any structure component), and then checking the bone properties tab:
 The "pivot position" option is what I was talking about, so simply setting it to 1 instead of 2 will give you back the original behavior of the Spine bone when manipulating the Spine_fk control; the problem is, you will instead lose the current behavior.
If you feel like the previous behavior is more suitable as default, I can easily set it up like that in the script.
By the way, Rigify also provides the fun option "Custom Pivot Control": when selected, the generated rig will have an additional bone that you can position at will, and when you rotate it the whole spine will rotate using that as its pivot point:
The "pivot position" option is what I was talking about, so simply setting it to 1 instead of 2 will give you back the original behavior of the Spine bone when manipulating the Spine_fk control; the problem is, you will instead lose the current behavior.
If you feel like the previous behavior is more suitable as default, I can easily set it up like that in the script.
By the way, Rigify also provides the fun option "Custom Pivot Control": when selected, the generated rig will have an additional bone that you can position at will, and when you rotate it the whole spine will rotate using that as its pivot point:
 The limbs have that option as well.
FlailingFog
commented
2 years ago I've added a wrapper for your scripts into the plugin. Click the button in the Extras panel once and it'll do steps 5-6. Every click after that will do steps 7-10
The "pivot position" option is what I was talking about, so simply setting it to 1 instead of 2 will give you back the original behavior of the Spine bone when manipulating the Spine_fk control; the problem is, you will instead lose the current behavior. If you feel like the previous behavior is more suitable as default, I can easily set it up like that in the script.
That's what I was looking for, thanks! I personally prefer it like this, but if position 2 is the default Rigify setting then I think it'd be better to leave it alone.
ilcane87
commented
2 years ago I've added a wrapper for your scripts into the plugin. Click the button in the Extras panel once and it'll do steps 5-6. Every click after that will do steps 7-10
Well done, it's functional and I'll be able to release updated files as they are without worrying about the plugin side of things.
ilcane87
commented
2 years ago @poisenbery
The scripts don't alter any weights, they are in fact designed to work with the original weights. The only exception to this rule are the wrist weights, a part of which is divided among the palm bones that didn't exist beforehand, but even those are unchanged.
Can you post comparison pictures between the original weights and the resulting weights from using the scripts, so that I may understand what's going on?
 poisenbery
commented
2 years ago
poisenbery
commented
2 years ago @ilcane87 Sorry, I deleted the original post because I noticed that's pretty much exactly what you did.
However, I'm still having some issues, specifically with the legs area. I haven't tested everywhere else yet.
Top is original skeleton, bottom is after rigify. Hips cave in whenever I move the legs out like that.
Its happening on all of my models.
Not sure if 3.0 might be the issue?


More extreme examples:


ilcane87
commented
2 years ago @poisenbery
Thanks for posting this, there are definitely issues with both the "cf_s_leg_R/L" and the "cf_s_siri_R/L" bones when moving the legs, probably caused by differences in the leg bone axes compared to the original. I'll be working on a fix today.
poisenbery
commented
2 years ago @ilcane87 No problem!
Really appreciate the fact that this even exists. You're doing a lot of people a huge favor by having made this!
ilcane87
commented
2 years ago I double checked a few things and also found erratic behaviors with the waist and shoulder correction bones, but now everything should work like it does in the original armature. I updated the zip file in the OP, let me know if you find any more issues, otherwise @FlailingFog can update the plugin files.
poisenbery
commented
2 years ago @ilcane87 im having a couple of issues:
I repacked everything, and when I click the button for this, I get an error:.
Python: Traceback (most recent call last):
  File "C:\Users\AREALHUMANPERSON\AppData\Roaming\Blender Foundation\Blender\3.0\scripts\addons\KK-Blender-Porter-Pack-5-merger\extras\rigifywrapper.py", line 68, in execute
    exec(text.as_string())
  File "<string>", line 786
    constraint.invert_z = True
TabError: inconsistent use of tabs and spaces in indentation

location: <unknown location>:-1
That script only has 78 lines of code, so it's actually referencing part of the "Before First Rigify Generate -Public.py" script.
So running that in the script editor, I now get this:
Python:   File "\Before First Rigify Generate - Public.py", line 786
    constraint.invert_z = True
TabError: inconsistent use of tabs and spaces in indentation

location: <unknown location>:-1
I decided to investigate and see if there were spaces used instead of tabs, or vice versa. I found everything to be consistent. I decided to erase all of the tabs and then...put them back in.
Re-ran the script and it worked. Very strange.
I saved the "new" version and retested on a different model, and it worked without issues.
I researched the issue and it said that python only allows a user to use tabs OR spaces for indentation. I'm kind of baffled on why I was getting this error when I found no stray spaces at all in the code. [but i also don't really know anything about coding]
ilcane87
commented
2 years ago @poisenbery
Darn, I'm sorry, that was 100% my fault. The problematic line was the last one I added to the public file, and I did it from an external editor that doesn't convert tabs to spaces, unlike the Blender editor. And of course I didn't test it after that last addition. I updated the corrected zip file in the OP, but all I did was the same thing you did so you don't need to download it again.
ilcane87
commented
2 years ago Howdy, I bring you new years gifts (and gifs I guess). I added a bunch of features to the eyes to facilitate animation and retargeting from different sources, they are all optional and can be activated and tweaked from the Rig UI properties just like Rigify features. Here's the rundown:
Limit location (Left Eye Handle, Right Eye Handle, Eyes Handle):
 This is self-explanatory, and will be useful to take full advantage of the other features; the default values for the limits aren't going to be perfect since the eyes sizes and shapes can vary greatly, so take a minute to tweak them.
Eyelids automation (Eyes Handle):
 The default values attempt to reproduce the eyelids motion from the Koikatsu in-game editor, but you can tweak all parameters according to your tastes.
Eye speed correction (Left Eye Handle, Right Eye Handle):
 This may not be obvious at first glance, but were you ever annoyed that the pupils tend to not reach their final left/right position at the same time, and require manual tweaking? This property saves you the effort, whenever you move the Eyes Handle bone the speed of each individual pupil will be tweaked so that they smoothly reach their side positions at the same time on both sides (this depends on the limits set as per the first feature on this list).
Eyeball controls (Eyeballs, Left Eyeball, Right Eyeball):
 These are an alternative way to control the eyes with rotation instead of location like you'd usually do with the eye handles; not very useful when animating manually, but this allows for retargeting eye motions from armatures that use that kind of eye controls.
Here's a retargeting example from a VMD animation:
These are an alternative way to control the eyes with rotation instead of location like you'd usually do with the eye handles; not very useful when animating manually, but this allows for retargeting eye motions from armatures that use that kind of eye controls.
Here's a retargeting example from a VMD animation:
 Depending on your retargeting tool, you may want to retarget either the common eyeballs bone, or the left and right ones, but not both at the same time, or the source motion may apply twice (this is caused by the source armature, not the target one).
Also, remember that different sources may require different speed settings to match them, so start from an animation that has a full range of eye motions and adjust the speed property accordingly.
By the way these controls are also affected by the eye speed correction from the previous point.
Depending on your retargeting tool, you may want to retarget either the common eyeballs bone, or the left and right ones, but not both at the same time, or the source motion may apply twice (this is caused by the source armature, not the target one).
Also, remember that different sources may require different speed settings to match them, so start from an animation that has a full range of eye motions and adjust the speed property accordingly.
By the way these controls are also affected by the eye speed correction from the previous point.
Target tracking (Eyeballs):
 Once enabled, your character's eyes will always point to the Eyes track target bone, which can be moved freely, and has custom properties to switch its parent between the head, torso, root or none. Enabling eye position limits is necessary to get good results with this.
It also has an optional nearby target correction feature:
Once enabled, your character's eyes will always point to the Eyes track target bone, which can be moved freely, and has custom properties to switch its parent between the head, torso, root or none. Enabling eye position limits is necessary to get good results with this.
It also has an optional nearby target correction feature:

And that's it, all custom properties have tooltips to explain them but feel free to ask me if anything is unclear. Until @FlailingFog updates the plugin, you can download the new scripts from the link in the OP and replace the existing ones.
 miyabi-95
commented
2 years ago
miyabi-95
commented
2 years ago looks very promising! i'm still an amateur with blender, so i was wondering if this something that can allow me to apply an armature to my character and stay with her when i export her to unity? reason being i have accessories that don't seem to have non-deform bones from the start so if this automatically assigns bones to the entire mesh it may be useful to me.
ilcane87
commented
2 years ago @miyabi-95
Hello, I'm afraid I'm not very knowledgeable when it comes to exporting to game engines, since that's outside the scope of my development, but I can give you a few pointers. First of all, the effect of these scripts on the character accessories (and hair, since it behaves the same way) is that their deform bones are moved to layer 29, and they get a non-deform copy (with a custom shape) that can be manually controlled in layer 0, with additional control bones in layer 1 if the original bones have at least one chain, and additional controls in layer 2 if the original bones had parents in the original layer 10.
But I don't think that's what matters when you are exporting to Unity, I think accessories are supposed to work even if you're just using the default armature of KKBPP, whether their bones are deform or not. If you're having trouble with the procedure shown in FlailingFog's videos, you can open a new issue and ask for help. But if what you want is to export the character with the Rigify rig generated with these scripts, then I recommend checking out this playlist that should have all the answers: https://www.youtube.com/playlist?list=PLdcL5aF8ZcJvCyqWeCBYVGKbQgrQngen3
 BugMonkey42335
commented
2 years ago
BugMonkey42335
commented
2 years ago Yo @ilcane87 while testing your rigify scripts I have found an issue, they don't seem to work on male cards.
I've tested both vanilla and modded male cards but they all give this same error.
Traceback (most recent call last):
  File "<string>", line 1645, in <module>
  File "<string>", line 313, in main
  File "<string>", line 173, in arrangeTripleWidgetSet
TypeError: unsupported operand type(s) for +: 'NoneType' and 'NoneType'

Failure@BugMonkey42335
Hello, this is not surprising considering I've never tried a male character before. I exported the default one from Koikatsu but I can't get the "Import KK Shader and Textures" step to work without errors, is there a trick to it for male characters?
Anyway I threw in a quick fix for that problem, you can get the updated scripts from the zip file uploaded in the first post, but I expect more issues to arise since I couldn't test it properly.
Edit: nevermind, I just hadn't updated the exporter for a while, things seem to be working fine aside from some breast bones not having any effect for obvious reasons.
 koshisan
commented
2 years ago
koshisan
commented
2 years ago Hi! Thank you for your great work!
I am a bit confused what part of it is actually in the latest release and for what extra scripts are required - especially with Blender 3...
Although I am kind of new to Blender, I followed the guide as closely as possible, but I still end up with things looking like this:

Is this a bug/missing steps in the documentation (it says to parent with empty weights, but there is no such option - just automatic or envelope) or am I just stupid? ;)
ilcane87
commented
2 years ago Hi @koshisan, if you're using the latest release of the addon (5.0.1) you don't need anything else, it already includes the latest version of these Rigify scripts, and it works just fine in Blender 3.0. The instructions in the first post here are only for using the scripts separately from the addon, so you shouldn't follow them.
Here's what you should do, starting from a new Blender file:

What you should Not do is edit anything else prior to completing the 8 steps, don't even move or resize any object. It's not clear from your picture because of the color theme, but to me it looks like the character isn't centered at the world origin (X=0, Y=0, Z=0), meaning you may have changed its location, and that would have caused the scripts to misbehave. That is just a theory though, if even following the 8 steps and doing nothing else you get strange results, try a vanilla Koikatsu character and see if that works.
If it turns out it's a specific character's problem, you can post it here and I'll take a look.
koshisan
commented
2 years ago @ilcane87 Thank you for your quick reply!
I indeed may have moved the model, since I was fiddeling around with it quite a bit before I got the rig to generate. However, on a vanilla model strictly following the steps above I still have the same problem:

There is some dependency between the bones, but when posing the arms for example, the hands seem to be pinned in space and the mesh just gets streched. Maybe I am just grabbing her wrong? Rigged test models, however, seem to work fine for me...
ilcane87
commented
2 years ago @koshisan
Since the rig generated correctly, I think your problem is that you aren't used to manipulating a control rig: for example, I see from the picture that you moved the tweak bones of the arm, which are only for cartoony deformations or subtle shape corrections. The bone you're supposed to move for the arm is the big red square that encompasses the hand, in the Arm.L IK and Arm.R IK layers (you should hide any layer you are not currently using for clarity).
But that just scratches the surface, to become able to take advantage of the features of a Rigify rig, I strongly recommend checking out this video for a quick overview: https://www.youtube.com/watch?v=vKgH5zXIYmM&list=PLdcL5aF8ZcJv68SSdwxip33M7snakl6Dx&index=14
koshisan
commented
2 years ago @ilcane87 Thanks again! It was a combination of that and parenting to the wrong rig, I guess. I am finally getting somewhere:

However, it is a real pain to find the bone/joint you want and move it around in blender (since support for 3d input devices is limited). You wouldn't happen to have a better software in mind I could export to for better posing? The final result would be printed on a 3d printer, so I don't really care about colors/textures...
ilcane87
commented
2 years ago @koshisan
I'm afraid I'm only familiar with Blender, you could look into retargeting existing animations to your character or exporting to game engines (I linked to useful playlists for those purposes in this thread), but if all you want is poses then that may be more trouble than it's worth, especially for a beginner. If you'd like to create your own motion capture data, I know of Rokoko (https://www.rokoko.com/) which has tools for that, but the poses will be applied to a different armature, so you'll still need to use retargeting tools to transfer them to your Koikatsu character.
If you are fine with Koikatsu poses, this addon you've been using has a quick way to apply them to your character, as explained at the end of part 4 of the newest tutorial by FlailingFog: https://www.youtube.com/watch?v=XFt12n7ByBI Remember though that if you want to use that method, you must not convert your armature to a Rigify rig, so you should skip steps 6, 7 and 8 from the previous list.
But with everything considered, if you want to pose and print the character you exported to Blender, I believe the most efficient way is to just get used to making poses yourself, reproducing them from references and following tutorials; your speed will pick up fast and it won't feel awkward anymore if you spend some time on it.
koshisan
commented
2 years ago @ilcane87 Thank you for your detailed reply, even though it is a bit off topic here... You are probably right and I just have to bite the bullet with blender. I did shortly look into Daz3d and even Poser, but that adds the problem of importing/exporting, while not making posing significiantly easier...
If anyone else has a similiar problem: Posing one limb at a time and hiding all other layers helps significantly, especially if you work one something with controls all over the place, like hair.
poisenbery
commented
2 years ago This is extremely off topic. If you dont know how to use blender, github issue tracking is NOT the place to post about that.
This forum is meant to address bugs with code. It is NOT a beginner help blog. I suggest you post your questions in help forums, not bug trackers.
On Wed, Feb 9, 2022, 6:04 PM Jens @.***> wrote:
@ilcane87 https://github.com/ilcane87 Thank you for your detailed reply, even though it is a bit off topic here... You are probably right and I just have to bite the bullet with blender. I did shortly look into Daz3d and even Poser, but that adds the problem of importing/exporting, while not making posing significiantly easier...
If anyone else has a similiar problem: Posing one limb at a time and hiding all other layers helps significantly, especially if you work one something with controls all over the place, like hair.
— Reply to this email directly, view it on GitHub https://github.com/FlailingFog/KK-Blender-Porter-Pack/issues/78#issuecomment-1034412775, or unsubscribe https://github.com/notifications/unsubscribe-auth/ASWU22E5ZIM5CFJOSK24FULU2MMJVANCNFSM5JPT6Z7Q . Triage notifications on the go with GitHub Mobile for iOS https://apps.apple.com/app/apple-store/id1477376905?ct=notification-email&mt=8&pt=524675 or Android https://play.google.com/store/apps/details?id=com.github.android&referrer=utm_campaign%3Dnotification-email%26utm_medium%3Demail%26utm_source%3Dgithub.
You are receiving this because you were mentioned.Message ID: @.***>
koshisan
commented
2 years ago @poisenbery I am well aware! Please see my initial comment: since it was unclear in the documentation how much of the scripts was already in the released version. I admit that the discussion got a bit side-tracked, but possible errors/missing information in the project documentation does belong in the issue tracker - especially since this issue was still open and it was therefore unclear how much of this was actually implemented!
ilcane87
commented
2 years ago it was unclear in the documentation how much of the scripts was already in the released version this issue was still open and it was therefore unclear how much of this was actually implemented
Good point, I edited the first post for clarity.
 KotoriKoi
commented
2 years ago
KotoriKoi
commented
2 years ago @ilcane87 It's really great work! But something went wrong with it. I followed your guide and FlailingFog's video tutorial, but after clicking "Convert for rigify" the armature becomes weird. As you can see,
 before this it was no different from the armature of FlailingFog's video tutorial.

ilcane87
commented
2 years ago Hi @KotoriKoi, ~the huge shapes you see in the first pictures aren't the bones of the armature, they are just the meshes used to give custom shapes to the bones, and you should not edit them, so I suggest you keep the "Bone Widgets" collection hidden.~ ~Behind those shapes I can still see the bones of the original armature, so the Rigify conversion didn't work; are you sure that before clicking the 'Convert for Rigify' button you were in Object Mode, with the armature selected and active?~
Nevermind, I see that at least the eyes bone widget was generated, so I have no idea what the issue was. I suggest trying again from the beginning with a vanilla Koikatsu character, then if it fails you should open the console from the Window menu and copy the contents here, so that I may find the error message.
If it turns out that only a specific character doesn't work then you can post a zip file with the model and textures here and I'll check it out.
KotoriKoi
commented
2 years ago @ilcane87 Thanks for your reply, I have resolved the issue. The content in the console is as follows
“Traceback (most recent call last):
File "
ilcane87
commented
2 years ago @KotoriKoi Now I understand where the problem lies. The script expects to find certain vertex groups in the "Body" object, including the ones for the eyes, which were missing because you probably separated the head from the Body object. You can still do that separation after you've generated the Rigify rig, just don't do it before.
KotoriKoi
commented
2 years ago @ilcane87 Hi, I have a new problem again. This is a problem caused by a specific model. As you can see, when clicking "Convert for Rigify" for the first time, it works fine as usual, but when clicking "Convert for Rigify" again, it throws an exception. The contents of the console are as follows
“Python: Traceback (most recent call last):
File "C:\Users\Minam\AppData\Roaming\Blender Foundation\Blender\2.93\scripts\addons\KK-Blender-Porter-Pack-master\extras\rigifywrapper.py", line 36, in execute
bpy.ops.pose.rigify_generate()
File "C:\Users\Minam\Downloads\blender-2.93.4-windows-x64\blender-2.93.4-windows-x64\2.93\scripts\modules\bpy\ops.py", line 132, in call
ret = _op_call(self.idname_py(), None, kw)
RuntimeError: Error: Generation has thrown an exception: not enough arguments for format string
location: 

ilcane87
commented
2 years ago @KotoriKoi
I requested permission to access the file.
Also, I forgot to address this part from before:
Also, when I was looking for the reason, I saw something about "japEngRequiredBoneNamesDictionary" in "Koikatsu Commons.py", does that mean you are thinking about compatibility with VMD motions? I look forward to your update.
VMD motions, as any other humanoid motion, can be retargeted to the Rigify armature using tools like Rokoko/Auto-Rig Pro, or even manually by creating all the bone constraints and then baking the animation. In fact one of the gifs I posted in a previous reply (https://user-images.githubusercontent.com/34897042/147934669-e83a8e55-af17-4377-a79c-d844b372a6dd.gif) shows the retargeting result of a VMD motion. Now if I wanted to make those motions directly 'compatible' with the armature, that would be a matter of renaming the right bones accordingly, but I don't plan to do that for the time being as I find it much more convenient to just use the tools I mentioned, since they allow you to use motions from any source, and there are usually adjustments you want to make before applying a foreign motion to your armature. The dictionary you noticed is part of a translation routine from a separate script, one that I use on VMD armatures with Japanese bone names before retargeting their motions, since they can otherwise cause malfunctions in addons that can't handle kana or kanji, but you can already do such a thing with the MMD Tools addon for example.
If you are interested in retargeting existing motions to your armature, I recommend checking out this playlist that will teach you how, and also includes examples with Rigify armatures:
https://www.youtube.com/watch?v=Wm4me6ZZRk8&list=PLdcL5aF8ZcJux9f5Bvb1QlByiHWTK3ICP
KotoriKoi
commented
2 years ago @ilcane87 Sorry I forgot to turn off the permission settings, I have set to share the file with you, please revisit this link https://drive.google.com/file/d/1Lom6vvHVvB5yOhyJvHDANe0r0xlzHo3O/view?usp=sharing Also I looked for the relevant content of the error, it seems to be caused by having placeholders like "%" in the content, but I can't solve the problem.
ilcane87
commented
2 years ago @KotoriKoi
Sorry but for some reason the download keeps failing after it reaches 100%, can you try a different host? I know of mediafire for example, it doesn't require you to register or anything: https://www.mediafire.com/
KotoriKoi
commented
2 years ago @ilcane87 All right. I have uploaded it to mediafire. Link: https://www.mediafire.com/file/v5s2v74vbl8yh87/model.zip/file Considering possible encoding issues with compressed files, you can get the original character cards at the link below https://db.bepis.io/card/download/KK_223153.png Also, I've actually used redirection, but it requires a lot of rotation transformations due to bone axis issues, maybe scripting would reduce this effort, but I'm not good at scripting. And some VMD motions include “右肩P - shoulderP_R 左肩P - shoulderP_L 右腕捩 - arm twist_R 左腕捩 - arm twist_L 右手捩 - wrist twist_R 左手捩 - wrist twist_L” I don't think VMD motions should include them, it makes it difficult for other skeletons to fit these VMD motions, I don't know how to map this part of the skeleton and add related constraints. Of course, I'm not asking you to fix these things, even if your script doesn't have these things it's still great work. I will watch the video tutorial you shared, it might be helpful for me.
ilcane87
commented
2 years ago @KotoriKoi
Whew, that character was causing not just one but two hard to predict issues, both caused by that arm cloth accessory on both sides. Thanks for posting it! While the first issue was with the handling of bone chains and Rigify properties in these scripts only, the second one actually affects the original armature too, as that accessory brings with it two bones named "Head" and "Neck", which overlap with the names of the bones in the body, causing them to get renamed to something like Head.002 and Neck.002 and not getting their custom shapes.


I uploaded a new version of these scripts that addresses these issues, you can find them in the first post of this topic; until @FlailingFog updates the plugin, just download them and replace them in your own plugin files.
As far as your question about VMD motions goes, I haven't used a lot of them, but for those I did use, I ignored the bones you mentioned and only retargeted the ones on this list (jap-eng), and everything worked smoothly:
But you do need to know the basics (such as changing the rest pose to match the one of your armature), and using an appropriate addon speeds up the process a lot, so do check out the playlist I gave you. And if you have trouble with the eye motions, try following my instructions in this post:
https://github.com/FlailingFog/KK-Blender-Porter-Pack/issues/78#issuecomment-1004094710
FlailingFog
commented
2 years ago Thanks, these are in 5.1.0 now
BugMonkey42335
commented
2 years ago Yo ilcane87 does your Rigify script have support for the Better Penetration bones? Because prior to appling the rigify script they were working fine, but when I applied it they don't seem to work anymore.
ilcane87
commented
2 years ago Hi @BugMonkey42335, I don't think I've ever tried a Koikatsu character with that mod before, so I'm not surprised there are issues. Can you post one for me to fiddle with, as well as describe what the mod does?
BugMonkey42335
commented
2 years ago The Better Penetration Mod adds additional bones to the genitals allowing for better deformations and posing.
They can be found in the body tab under the uncensor selector.
 Here
is a blend file with the default female with the better penetration uncensor already applied.
Here
is a blend file with the default female with the better penetration uncensor already applied.
ilcane87
commented
2 years ago Alright, it should all be fixed now, the relevant bones will appear in the "Torso (Tweak)" layer, let me know if I missed any. I uploaded the updated scripts in the OP, though the only one that's actually changed is "Koikatsu Commons.py", so until @FlailingFog updates the repository you can just replace that in your addon folder.
Thanks for reporting this!
FlailingFog
commented
2 years ago @ilcane87
Cool, thanks for the update!
I also may have come across something. Is the bone roll data preserved when doing the conversion? I noticed that the fingers don't bend inward when rotated on their local axis

ilcane87
commented
2 years ago @FlailingFog That's odd, I've never seen a human rig that bends fingers that way, I guess the purpose is to help making fist shapes since the Koikatsu armature has no palm bones. I can't use the same roll with Rigify since the finger bone chains need to be connected, but I could probably replicate the same behavior by eye. I'm a bit conflicted about it though, since that would hinder retargeting animations from basically any source other than Koikatsu, while with the current setup it would be simply a matter of adjusting the palm bones accordingly for Koikatsu animations. I'll mull over it.
Meanwhile, I noticed my latest update broke the conversion for characters without the better penetration mod, so I uploaded the fixed version in the OP.
ilcane87
commented
2 years ago @FlailingFog I decided to check the Koikatsu Studio finger axes since some of the Blender ones looked pretty unnatural, and I found that a few transforms weren't too accurate, such as when bending the fingers upward, or rotating some of the intermediate bones:

Since the Koikatsu axes weren't extremely different from the Rigify ones, I used those as reference instead, and reproduced the Studio behavior as faithfully as I could by altering the bone rolls.
I updated the scripts in the OP, thanks a lot for reporting this, it may have caused me more than a few headaches down the line.
FlailingFog
commented
2 years ago @ilcane87 Thanks for this update too! (But shoot, I didn't realize that happened on the pre-converted armature. I'll have to take another look at that...)
 MediaMoots
commented
2 years ago
MediaMoots
commented
2 years ago Is this issue solved?
Note from the future: these scripts are now integrated into the addon, so you don't need to download them from here, just do as instructed in the video tutorials, but don't forget to activate the Rigify addon first, by following these steps:
In the Blender preferences, activate the Rigify addon (it's already there):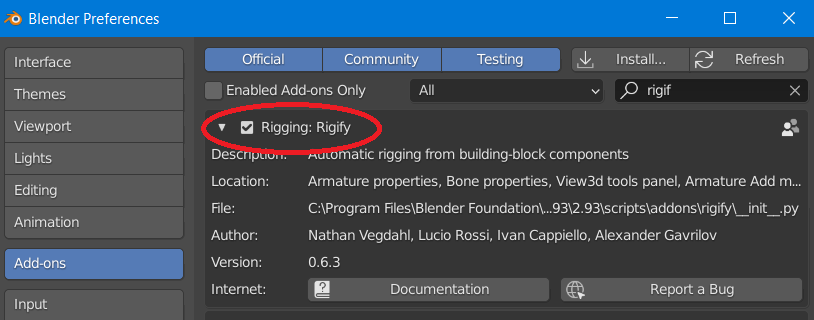
Enable AutoRun Python Scripts from the Save & Load section: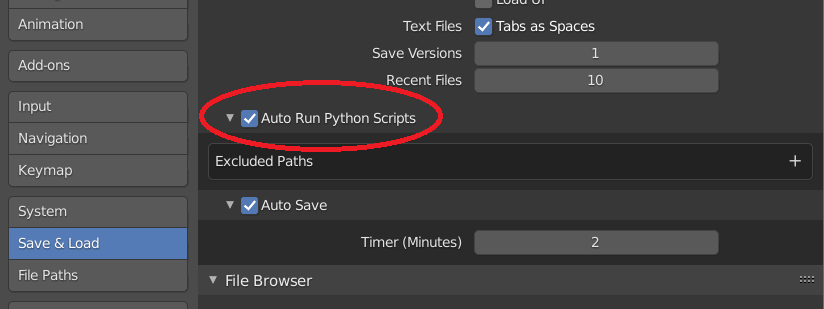 You may need to save the preferences and restart Blender in order for Rigify to run properly.
Rigify Scripts.zip (Updated 2023-04-03)
These scripts will automatically make the KKBSP imported armature Rigify-compliant while preserving all existing joint correction functionalities, meaning you'll be able to generate an elaborate control rig from it that contains a lot of additional features and automations:
I know it looks messy, but everything is actually neatly organized in layers that you can show or hide at will from the side panel.
Warning: these scripts heavily alter the original armature and some vertex groups, which I assume will prevent any of the features of KKBSP that affect them from working, so I advise you to duplicate the whole collection in advance.
If you aren't familiar with Rigify or character rigs in general then the armature may look confusing to you, and you won't be able to leverage all of its features, so I recommend checking out this playlist that will teach you the basics: https://www.youtube.com/watch?v=-JSFcSxsaTs&list=PLdcL5aF8ZcJv68SSdwxip33M7snakl6Dx The same youtube channel also contains several videos about working with Rigify armatures for different tasks, like exporting to game engines or retargeting animations, so it's worth spending some time on it if you're interested.
On a side note, expect the hair/accessories layers to be a bit messy since their contents are unpredictable and I had to use a generic algorithm for their controls; you can always go back to the original armature and make a few adjustments and then, while it's selected in Object Mode, click the star-shaped 'Convert for Rigify' button in the 'KKBP Extras' section of the plugin. And as per Rigify conventions, you'll find all Deform bones in the third to last layer (which isn't shown in the Rig Layers panel), in case you want to adjust some weights.
And that's it, I've tested these scripts with several characters and they work fine, but if you run into any issues you can link to the characters causing them here so I might be able to reproduce them. Also, let me know if I forgot to carry over any of the features of the original armature so I can make amendments.