Open GioVatti opened 2 years ago
Hi!
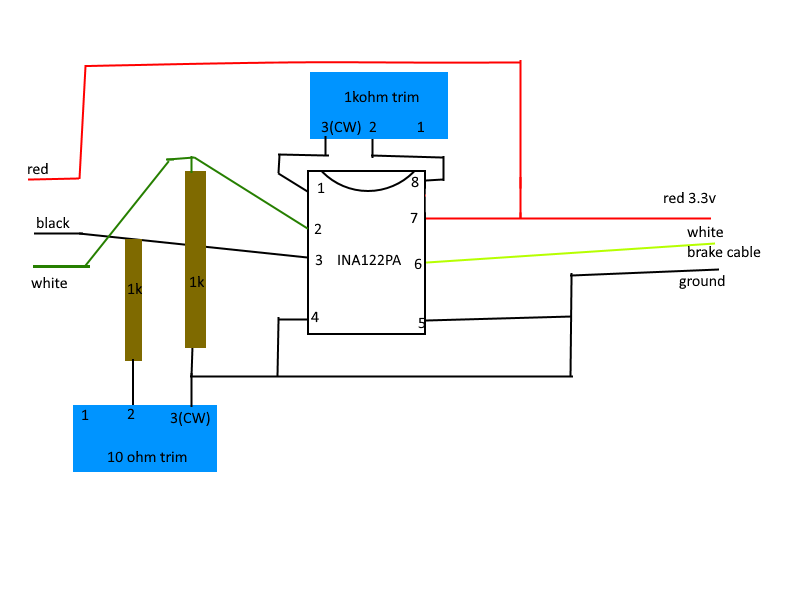
At first glance, the circuit you have drawn looks fine, so I guess some simple troubleshooting tips would be the next step.
First, I'd check that the voltages into the amp look ok, especially since you mention seeing over 6v. Could you measure the voltage between the following pins please?
The first 3 will give an indication if something is not wired up correctly. The last one gives an idea about how far out the initial calibration is as this voltage difference is the thing that actually gets amplified.
The calibration is a bit of a dance between tweaking the 10ohm pot (which tweaks the balance of the bridge) and the 1kohm pot (which tweaks the amplification of the voltage between pins 3 and 2). The reason for this is because the G29 works in reverse, taking a higher voltage as less brake pressure, so we have to have unbalance the bridge to allow the circuit to provide the higher voltage with no load.
Thanks for spending some time to reply. First of all, I realised I was using my multimeter in AC mode, ence the 6.3v. on the red cable I could measure 3.22-3.27V, which is the same I measured between pin 4 and 7. Both pin 4 to pin 3 and pin 4 to pin 2 measured around 1.63v, so it is looking good enough for the connections.between 2 and 3 however there was a difference of just 10mV(if I got the scaling right). Does this mean I just have to calibrate to unsettle the bridge? Thanks again, Gio
Il dom 10 lug 2022, 10:52 Scott Deakin @.***> ha scritto:
Hi!
At first glance, the circuit you have drawn looks fine, so I guess some simple troubleshooting tips would be the next step.
First, I'd check that the voltages into the amp look ok, especially since you mention seeing over 6v. Could you measure the voltage between the following pins please?
- 4 and 7 - should be around 3.3v
- 4 and 3 - should be around 1.65v
- 4 and 2 - should be around 1.65v
- 3 and 2 - should be < 50mV (you'll need to pay close attention to the scale on your multimeter for this one). Don't worry about exact numbers as this is the value you have to tweak to calibrate, it just has to be pretty small
The first 3 will give an indication if something is not wired up correctly. The last one gives an idea about how far out the initial calibration is as this voltage difference is the thing that actually gets amplified.
The calibration is a bit of a dance between tweaking the 10ohm pot (which tweaks the balance of the bridge) and the 1kohm pot (which tweaks the amplification of the voltage between pins 3 and 2). The reason for this is because the G29 works in reverse, taking a higher voltage as less brake pressure, so we have to have unbalance the bridge to allow the circuit to provide the higher voltage with no load.
— Reply to this email directly, view it on GitHub https://github.com/GeekyDeaks/g29-load-cell/issues/6#issuecomment-1179686016, or unsubscribe https://github.com/notifications/unsubscribe-auth/AZYDNSPPGNS4GJK7SC2J3HTVTKFNJANCNFSM53DKLIHA . You are receiving this because you authored the thread.Message ID: @.***>
Little update: I tried tweaking the 10 ohm trimpot and got the voltage between 2 and 3 within the right value (4.4 mV as now). It still flickers at around 3% and it doesn't seem to be affected at all by the 1k ohm trimpot tweaking and by any force I try to apply on the loadcell... I also tried to use the spare components I had to replicate the same circuit on a breadboard but still nothing, so I don't think I have ruined any components by soldering or sending power through a wrong circuit. May my problems e related to the fact I'm using a ina122PA instead of the ina122P?
Il lun 11 lug 2022, 13:50 Giovanni Vatti @.***> ha scritto:
Thanks for spending some time to reply. First of all, I realised I was using my multimeter in AC mode, ence the 6.3v. on the red cable I could measure 3.22-3.27V, which is the same I measured between pin 4 and 7. Both pin 4 to pin 3 and pin 4 to pin 2 measured around 1.63v, so it is looking good enough for the connections.between 2 and 3 however there was a difference of just 10mV(if I got the scaling right). Does this mean I just have to calibrate to unsettle the bridge? Thanks again, Gio
Il dom 10 lug 2022, 10:52 Scott Deakin @.***> ha scritto:
Hi!
At first glance, the circuit you have drawn looks fine, so I guess some simple troubleshooting tips would be the next step.
First, I'd check that the voltages into the amp look ok, especially since you mention seeing over 6v. Could you measure the voltage between the following pins please?
- 4 and 7 - should be around 3.3v
- 4 and 3 - should be around 1.65v
- 4 and 2 - should be around 1.65v
- 3 and 2 - should be < 50mV (you'll need to pay close attention to the scale on your multimeter for this one). Don't worry about exact numbers as this is the value you have to tweak to calibrate, it just has to be pretty small
The first 3 will give an indication if something is not wired up correctly. The last one gives an idea about how far out the initial calibration is as this voltage difference is the thing that actually gets amplified.
The calibration is a bit of a dance between tweaking the 10ohm pot (which tweaks the balance of the bridge) and the 1kohm pot (which tweaks the amplification of the voltage between pins 3 and 2). The reason for this is because the G29 works in reverse, taking a higher voltage as less brake pressure, so we have to have unbalance the bridge to allow the circuit to provide the higher voltage with no load.
— Reply to this email directly, view it on GitHub https://github.com/GeekyDeaks/g29-load-cell/issues/6#issuecomment-1179686016, or unsubscribe https://github.com/notifications/unsubscribe-auth/AZYDNSPPGNS4GJK7SC2J3HTVTKFNJANCNFSM53DKLIHA . You are receiving this because you authored the thread.Message ID: @.***>
Ok, that all looks very promising, except for no change when applying force of course!
So, going back to some values to look for. The G29 wheelbase does a bit of auto-calibration to accept a bit of voltage variance. From testing my buddy and I did, we found that the biggest range it would accept a voltage between 1.47v (100% brake) and 3.15v (0% brake), so I'd aim for something just within that e.g 1.5v to 3.1v as a starting point and then maybe reduce the top or increase the bottom as required.
To do this though, I'd start at the voltage coming in via the 10ohm pot (i.e. between pins 2 and 3). You are looking to try and get the voltage there to approximately halve (-50%) when the pedal is fully pressed. e.g. if you are seeing 4.4mv with no load, you want to see if you can get it to 2.2mv under load. If the mv goes up when you press the pedal, then that means the bridge is balanced the wrong way. You can try a couple of things to help swing it the other way. First just switch the black and white leads on the loadcell. If that doesn't help, try switching R1 and R2.
Please note that the tolerances that affect the bridge balance are very small and the load cells only change about 2-3ohms under full load, which is less than 0.5%, so if R1 and R2 have a tolerance of 5% (gold band), then they could be as much as 50 ohm in difference and this will totally mess up your day! You might want to check R1 and R2 and match them as close as possible if you can.
Got back from a short vacation and discovered that the other circuit I had found cannot work as it only works with full bridge load cells... At this point I have no idea what I can do to make this work.
Il mer 13 lug 2022, 19:18 Giovanni Vatti @.***> ha scritto:
I had to switch the cables as it was going up, but now they are going down (I couldn't get it to half, but it's probably because I couldn't press it hard enough as I don't have it properly mounted yet). Still no luck in getting some usable outputs tho, I might use my second INA122PA to try making a simpler circuit which doesn't do the inversion and invert it through software since I'm only going to use it on pc, but I don't know if that would solve the problem. As always thank you very much for your time!
Il giorno mar 12 lug 2022 alle ore 14:48 Scott Deakin < @.***> ha scritto:
Ok, that all looks very promising, except for no change when applying force of course!
So, going back to some values to look for. The G29 wheelbase does a bit of auto-calibration to accept a bit of voltage variance. From testing my buddy and I did, we found that the biggest range it would accept a voltage between 1.47v (100% brake) and 3.15v (0% brake), so I'd aim for something just within that e.g 1.5v to 3.1v as a starting point and then maybe reduce the top or increase the bottom as required.
To do this though, I'd start at the voltage coming in via the 10ohm pot (i.e. between pins 2 and 3). You are looking to try and get the voltage there to approximately halve (-50%) when the pedal is fully pressed. e.g. if you are seeing 4.4mv with no load, you want to see if you can get it to 2.2mv under load. If the mv goes up when you press the pedal, then that means the bridge is balanced the wrong way. You can try a couple of things to help swing it the other way. First just switch the black and white leads on the loadcell. If that doesn't help, try switching R1 and R2.
Please note that the tolerances that affect the bridge balance are very small and the load cells only change about 2-3ohms under full load, which is less than 0.5%, so if R1 and R2 have a tolerance of 5% (gold band), then they could be as much as 50 ohm in difference and this will totally mess up your day! You might want to check R1 and R2 and match them as close as possible if you can.
— Reply to this email directly, view it on GitHub https://github.com/GeekyDeaks/g29-load-cell/issues/6#issuecomment-1181719212, or unsubscribe https://github.com/notifications/unsubscribe-auth/AZYDNSKQLCQJV5IJKWR3SQDVTVSQXANCNFSM53DKLIHA . You are receiving this because you authored the thread.Message ID: @.***>
Hello, I am a noob in electronics and I tried to follow this project withnot much success. At first it acted like there wasn't anything attached (oscillating at around 15% brake), then I modified the circuit adding cables that connect all ground to the pedal metal chassis and it now does the same thing but at around 3%... there are many things that can have gone wrong: 1) Defective components from China 2) I ruined some components while soldering/by making a circuit that sends power where it shouldent 3) By having got the whole thing wrong. 4) got the wrong resistors I have a backup loadcell and a backup INA122, but since I fear I might ruin those too, here I send a quick drawing (sorry for the poor quality) of my circuit as it stands. Also worth noting that if I test the voltage between the red cable from any of the pedals and ground, it reads 6.3v, so I either do not know how to test it or maybe it could be that the G920 has a different voltage than the g29, which seems weird. Thanks for your time!