IntelRealSense / librealsense

Intel® RealSense™ SDK
https://www.intelrealsense.com/
Apache License 2.0
7.59k stars 4.82k forks source link

Loading a JSON file using pyrealsense2 #6075

Closed BenDavisson closed 4 years ago

BenDavisson commented 4 years ago

| Camera Model | D435 } | | Firmware Version | 05.11.06.250 | | Operating System & Version | Win 10 | | Platform | PC | | SDK Version | 2.25.0 | | Language | python | | Segment | vision |

Issue Description I am trying to load a json file that I created in the intel realsense viewer in order to optimize the settings for my use case. Below is my script. the json file is called "Custom.json".

import pyrealsense2 as rs
import numpy as np
import cv2
import json
import time

jsonObj = json.load(open("Custom.json"))
json_string= str(jsonObj).replace("'", '\"')

# Configure depth and color streams
pipeline = rs.pipeline()
config = rs.config()

freq=int(jsonObj['stream-fps']));
print("W: ", int(jsonObj['stream-width']))
print("H: ", int(jsonObj['stream-height']))
print("FPS: ", int(jsonObj['stream-fps']))
config.enable_stream(rs.stream.depth, int(jsonObj['stream-width']), int(jsonObj['stream-height']), rs.format.z16, int(jsonObj['stream-fps']))
config.enable_stream(rs.stream.color, int(jsonObj['stream-width']), int(jsonObj['stream-height']), rs.format.bgr8, int(jsonObj['stream-fps']))
cfg = pipeline.start(config)
dev = cfg.get_device()
advnc_mode = rs.rs400_advanced_mode(dev)
advnc_mode.load_json(json_string)

try:
    while True:

        # Wait for a coherent pair of frames: depth and color
        frames = pipeline.wait_for_frames()
        depth_frame = frames.get_depth_frame()
        color_frame = frames.get_color_frame()
        if not depth_frame or not color_frame:
            continue

        # Convert images to numpy arrays
        depth_image = np.asanyarray(depth_frame.get_data())
        color_image = np.asanyarray(color_frame.get_data())

        # Apply colormap on depth image (image must be converted to 8-bit per pixel first)
        depth_colormap = cv2.applyColorMap(cv2.convertScaleAbs(depth_image, alpha=0.03), cv2.COLORMAP_JET)

        # Stack both images horizontally
        images = np.hstack((color_image, depth_colormap))

        # Show images
        cv2.namedWindow('RealSense', cv2.WINDOW_AUTOSIZE)
        cv2.imshow('RealSense', images)
        key = cv2.waitKey(1)
        # Press esc or 'q' to close the image window
        if key & 0xFF == ord('q') or key == 27:
            cv2.destroyAllWindows()
            break

finally:

    # Stop streaming
    pipeline.stop()

I'm receiving different results when I run the camera with with the realsense viewer compared to my script.

Image of what the settings look like in the viewer. realsense_img

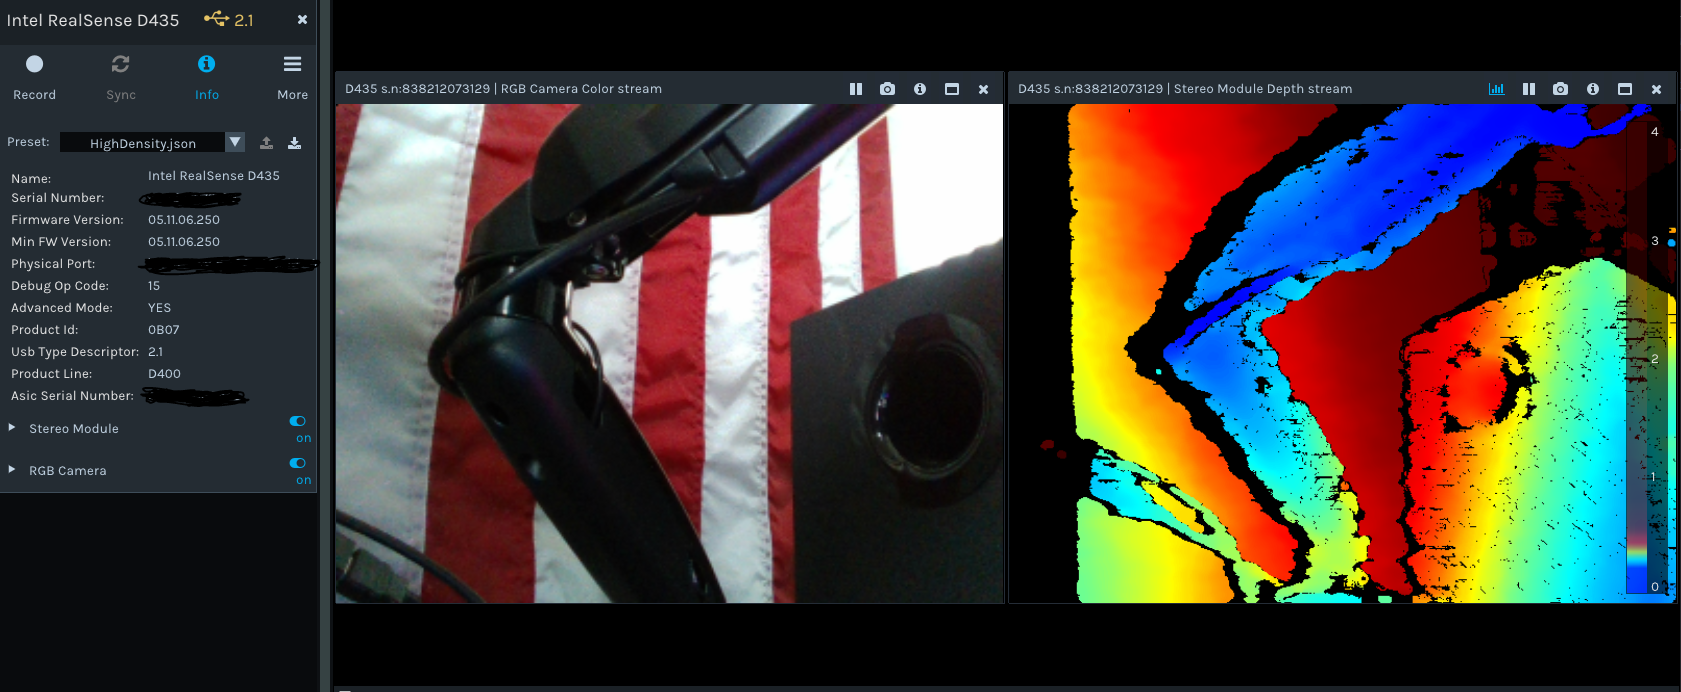
Image of what the settings look like when launched in my script. python_img

Why does my script return only blue on the depth image?

Shouldn't it mirror the return that is shown in the realsense viewer?

I'm using the same file for both cases.

MartyG-RealSense commented 4 years ago

There can be differences between the RealSense Viewer and a self-written application because in the RealSense Viewer, a range of post-processing filters are active by default that alter the image for the purpose of enhancing its quality. In applications that you write yourself though, post-processing filters must be deliberately programmed into the application.

If you open the 'Post-Processing' section of the Viewer's options side panel then you will be able to see the filters being applied and their settings. The active ones are indicated by a blue icon beside the filters.

Intel have published a tutorial for adding post-processing filters to a Pyrealsense2 application.

https://github.com/IntelRealSense/librealsense/blob/jupyter/notebooks/depth_filters.ipynb

More information about post-processing filters can be found here:

https://github.com/IntelRealSense/librealsense/blob/master/doc/post-processing-filters.md

dorodnic commented 4 years ago

Hi @BenDavisson You are doing - depth_colormap = cv2.applyColorMap(cv2.convertScaleAbs(depth_image, alpha=0.03), cv2.COLORMAP_JET) This is part, but not all, of what the SDK does:

  1. Before applying the color scheme we perform histogram equalization to get nice rainbow of colors
  2. You need to filter out everything that is equal 0, and treat it differently.

You can accomplish this with opencv, but it's easier just to use provided rs2.colorizer algorithm. It guaranties you get same results as in the viewer (excluding any enabled post-processing)

BenDavisson commented 4 years ago

@MartyG-RealSense - Thank you for the informative links. I was able to create a solution using the colorizer() algorithm. I will however read deeply into the references you listed to better understand the possible post-processing options.

@dorodnic - This worked for me. Thank you for the very helpful information. Using the colorizer() class altered the image to something I can work with.

For those who may find this question.... here is the altered code that fixed my issue.

import pyrealsense2 as rs
import numpy as np
import cv2
import json
import time

jsonObj = json.load(open("Custom.json"))
json_string= str(jsonObj).replace("'", '\"')

# Configure depth and color streams
pipeline = rs.pipeline()
config = rs.config()

freq=int(jsonObj['stream-fps']));
print("W: ", int(jsonObj['stream-width']))
print("H: ", int(jsonObj['stream-height']))
print("FPS: ", int(jsonObj['stream-fps']))
config.enable_stream(rs.stream.depth, int(jsonObj['stream-width']), int(jsonObj['stream-height']), rs.format.z16, int(jsonObj['stream-fps']))
config.enable_stream(rs.stream.color, int(jsonObj['stream-width']), int(jsonObj['stream-height']), rs.format.bgr8, int(jsonObj['stream-fps']))
cfg = pipeline.start(config)
dev = cfg.get_device()
advnc_mode = rs.rs400_advanced_mode(dev)
advnc_mode.load_json(json_string)

try:
    while True:

        # Wait for a coherent pair of frames: depth and color
        frames = pipeline.wait_for_frames()
        depth_frame = frames.get_depth_frame()
        color_frame = frames.get_color_frame()
        if not depth_frame or not color_frame:
            continue

        #Initialize colorizer class
        colorizer = rs.colorizer()
        # Convert images to numpy arrays, using colorizer to generate appropriate colors
        depth_image = np.asanyarray(colorizer.colorize(depth_frame).get_data())
        color_image = np.asanyarray(color_frame.get_data())

        # Stack both images horizontally
        images = np.hstack((color_image, depth_image))

        # Show images
        cv2.namedWindow('RealSense', cv2.WINDOW_AUTOSIZE)
        cv2.imshow('RealSense', images)
        key = cv2.waitKey(1)
        # Press esc or 'q' to close the image window
        if key & 0xFF == ord('q') or key == 27:
            cv2.destroyAllWindows()
            break

finally:

    # Stop streaming
    pipeline.stop()
MartyG-RealSense commented 4 years ago

@BenDavisson I'm very glad that the advice of @dorodnic about the colorizer was helpful to you. Thanks so much too for sharing your code with the RealSense community!

fabiavargasr commented 3 years ago

@BenDavisson hi, thanks for your contribution, please help me, i try to test this code with json file generated by realsense-viewer and my d435i camera, FW: 05.12.15.50. but it does not execute it because it does not load the data correctly. any ideas, thanks

MY JSON FILE IS:

{ "device": { "fw version": "05.12.15.50", "name": "Intel RealSense D435I", "product line": "D400" }, "parameters": { "aux-param-autoexposure-setpoint": "1536", "aux-param-colorcorrection1": "0.298828", "aux-param-colorcorrection10": "-0", "aux-param-colorcorrection11": "-0", "aux-param-colorcorrection12": "-0", "aux-param-colorcorrection2": "0.293945", "aux-param-colorcorrection3": "0.293945", "aux-param-colorcorrection4": "0.114258", "aux-param-colorcorrection5": "-0", "aux-param-colorcorrection6": "-0", "aux-param-colorcorrection7": "-0", "aux-param-colorcorrection8": "-0", "aux-param-colorcorrection9": "-0", "aux-param-depthclampmax": "27774", "aux-param-depthclampmin": "0", "aux-param-disparityshift": "0", "controls-autoexposure-auto": "True", "controls-autoexposure-manual": "2143", "controls-color-autoexposure-auto": "True", "controls-color-autoexposure-manual": "166", "controls-color-backlight-compensation": "0", "controls-color-brightness": "0", "controls-color-contrast": "50", "controls-color-gain": "64", "controls-color-gamma": "300", "controls-color-hue": "0", "controls-color-power-line-frequency": "3", "controls-color-saturation": "64", "controls-color-sharpness": "50", "controls-color-white-balance-auto": "True", "controls-color-white-balance-manual": "4600", "controls-depth-gain": "16", "controls-laserpower": "150", "controls-laserstate": "on", "ignoreSAD": "0", "param-amplitude-factor": "0", "param-autoexposure-setpoint": "1536", "param-censusenablereg-udiameter": "9", "param-censusenablereg-vdiameter": "3", "param-censususize": "9", "param-censusvsize": "3", "param-depthclampmax": "27774", "param-depthclampmin": "0", "param-depthunits": "381", "param-disableraucolor": "0", "param-disablesadcolor": "0", "param-disablesadnormalize": "0", "param-disablesloleftcolor": "0", "param-disableslorightcolor": "1", "param-disparitymode": "0", "param-disparityshift": "0", "param-lambdaad": "1001", "param-lambdacensus": "7", "param-leftrightthreshold": "20", "param-maxscorethreshb": "791", "param-medianthreshold": "240", "param-minscorethresha": "24", "param-neighborthresh": "110", "param-raumine": "3", "param-rauminn": "1", "param-rauminnssum": "4", "param-raumins": "3", "param-rauminw": "1", "param-rauminwesum": "14", "param-regioncolorthresholdb": "0.0489237", "param-regioncolorthresholdg": "0.0714286", "param-regioncolorthresholdr": "0.137965", "param-regionshrinku": "3", "param-regionshrinkv": "1", "param-robbinsmonrodecrement": "20", "param-robbinsmonroincrement": "3", "param-rsmdiffthreshold": "3.8125", "param-rsmrauslodiffthreshold": "0.46875", "param-rsmremovethreshold": "0.547619", "param-scanlineedgetaub": "130", "param-scanlineedgetaug": "244", "param-scanlineedgetaur": "618", "param-scanlinep1": "63", "param-scanlinep1onediscon": "14", "param-scanlinep1twodiscon": "119", "param-scanlinep2": "45", "param-scanlinep2onediscon": "21", "param-scanlinep2twodiscon": "12", "param-secondpeakdelta": "31", "param-texturecountthresh": "0", "param-texturedifferencethresh": "783", "param-usersm": "1", "param-zunits": "381" }, "schema version": 1, "viewer": { "stream-depth-format": "Z16", "stream-fps": "30", "stream-height": "480", "stream-width": "848" } }

Contributor Author BenDavisson

fabiavargasr commented 3 years ago

hola, ya lo solucioné

este es el archivo data2.json que se puede editar los parametros


"{\"param-regioncolorthresholdb\": \"0.0489237\", \"param-regioncolorthresholdg\": \"0.0714286\", \"param-rsmremovethreshold\": \"0.541667\", \"param-censusenablereg-vdiameter\": \"3\", \"param-regioncolorthresholdr\": \"0.137965\", \"controls-laserstate\": \"on\", \"param-rauminw\": \"1\", \"param-rauminnssum\": \"4\", \"param-raumins\": \"3\", \"controls-laserpower\": \"150\", \"param-raumine\": \"3\", \"param-rauminn\": \"1\", \"controls-autoexposure-auto\": \"True\", \"param-minscorethresha\": \"511\", \"param-rsmdiffthreshold\": \"3.8125\", \"param-maxscorethreshb\": \"791\", \"param-regionshrinkv\": \"1\", \"param-regionshrinku\": \"3\", \"param-depthclampmax\": \"65535\", \"param-medianthreshold\": \"240\", \"param-disablesadnormalize\": \"0\", \"param-usersm\": \"1\", \"param-disparityshift\": \"0\", \"controls-autoexposure-manual\": \"8500\", \"param-zunits\": \"1000\", \"param-robbinsmonroincrement\": \"3\", \"controls-color-autoexposure-manual\": \"166\", \"controls-color-power-line-frequency\": \"3\", \"param-autoexposure-setpoint\": \"1536\", \"param-disableslorightcolor\": \"1\", \"param-leftrightthreshold\": \"20\", \"param-rauminwesum\": \"14\", \"param-censusvsize\": \"3\", \"aux-param-colorcorrection6\": \"-0\", \"aux-param-colorcorrection7\": \"-0\", \"aux-param-colorcorrection4\": \"0.114258\", \"aux-param-colorcorrection5\": \"-0\", \"aux-param-colorcorrection2\": \"0.293945\", \"aux-param-colorcorrection3\": \"0.293945\", \"aux-param-colorcorrection1\": \"0.298828\", \"aux-param-colorcorrection8\": \"-0\", \"aux-param-colorcorrection9\": \"-0\", \"controls-color-contrast\": \"50\", \"controls-color-brightness\": \"0\", \"param-disablesloleftcolor\": \"0\", \"controls-color-autoexposure-auto\": \"True\", \"ignoreSAD\": \"0\", \"controls-color-hue\": \"0\", \"controls-depth-gain\": \"16\", \"param-robbinsmonrodecrement\": \"20\", \"param-censusenablereg-udiameter\": \"9\", \"param-scanlineedgetaur\": \"618\", \"param-scanlineedgetaub\": \"130\", \"param-depthunits\": \"10\", \"param-scanlineedgetaug\": \"244\", \"aux-param-colorcorrection10\": \"-0\", \"param-amplitude-factor\": \"0\", \"param-disparitymode\": \"0\", \"param-scanlinep1\": \"63\", \"param-scanlinep2\": \"45\", \"controls-color-backlight-compensation\": \"0\", \"param-neighborthresh\": \"110\", \"param-secondpeakdelta\": \"31\", \"param-disablesadcolor\": \"0\", \"param-texturedifferencethresh\": \"783\", \"param-texturecountthresh\": \"0\", \"aux-param-colorcorrection11\": \"-0\", \"aux-param-colorcorrection12\": \"-0\", \"param-depthclampmin\": \"0\", \"controls-color-gamma\": \"300\", \"controls-color-white-balance-manual\": \"4600\", \"controls-color-white-balance-auto\": \"True\", \"param-lambdacensus\": \"7\", \"controls-color-saturation\": \"64\", \"param-censususize\": \"9\", \"param-scanlinep2twodiscon\": \"12\", \"controls-color-gain\": \"64\", \"param-scanlinep1twodiscon\": \"119\", \"param-rsmrauslodiffthreshold\": \"0.46875\", \"aux-param-disparityshift\": \"0\", \"param-lambdaad\": \"1001\", \"param-scanlinep1onediscon\": \"14\", \"aux-param-autoexposure-setpoint\": \"1536\", \"controls-color-sharpness\": \"50\", \"aux-param-depthclampmin\": \"0\", \"param-scanlinep2onediscon\": \"21\", \"param-disableraucolor\": \"0\", \"aux-param-depthclampmax\": \"65535\"}"

__-

el siguiente codigo carga los valores del archivo json import pyrealsense2 as rs import numpy as np import cv2 import json import time

jsonObj = json.load(open("custom_2.json"))

este archivo carga bien la configuracion del archivo json para conectar la camara desde python

with open("data2.json") as jsonFile: jsonObj = json.load(jsonFile) jsonFile.close()

https://stackoverflow.com/questions/60957372/getting-a-keyerror-when-parsing-json-file

json_string= jsonObj

print("W: ",json_string )

Configure depth and color streams

pipeline = rs.pipeline() config = rs.config()

freq=30

print("DATA fre",freq)

print("W: ", 848) print("H: ", 480) print("FPS: ", 30) config.enable_stream(rs.stream.depth, 848, 480, rs.format.z16, 30) config.enable_stream(rs.stream.color, 848, 480, rs.format.bgr8, 30) cfg = pipeline.start(config) dev = cfg.get_device() advnc_mode = rs.rs400_advanced_mode(dev) advnc_mode.load_json(json_string)

try: while True:

    # Wait for a coherent pair of frames: depth and color
    frames = pipeline.wait_for_frames()
    depth_frame = frames.get_depth_frame()
    color_frame = frames.get_color_frame()
    if not depth_frame or not color_frame:
        continue

    #Initialize colorizer class
    colorizer = rs.colorizer()
    # Convert images to numpy arrays, using colorizer to generate appropriate colors
    depth_image = np.asanyarray(colorizer.colorize(depth_frame).get_data())
    color_image = np.asanyarray(color_frame.get_data())

    # Stack both images horizontally
    images = np.hstack((color_image, depth_image))

    # Show images
    cv2.namedWindow('RealSense', cv2.WINDOW_AUTOSIZE)
    cv2.imshow('RealSense', images)
    key = cv2.waitKey(1)
    # Press esc or 'q' to close the image window
    if key & 0xFF == ord('q') or key == 27:
        cv2.destroyAllWindows()
        break

finally:

# Stop streaming
pipeline.stop()
MartyG-RealSense commented 3 years ago

Translation: Hello, I already solved it. This is the data2.json file that you can edit the parameters


Thanks so much for sharing your solution, @fabiavargasr

Muchas gracias por compartir tu solución, @fabiavargasr