 LearningNerd
commented
7 years ago
LearningNerd
commented
7 years ago Great worked! Mission accomplished!
Closed LearningNerd closed 7 years ago
LearningNerd
commented
7 years ago Great worked! Mission accomplished!
So you've built your first Firebase app, and with just a few lines of JavaScript code, you already know how to take information from your database and display it on your web page! Woohoo! Now here's some more practice to help you check your understanding of the Firebase functions we used to make it happen.
📚 Prerequisites: First complete "Challenge: Create your first Firebase app!"
✔️ To complete this challenge: follow each step below, check off the checkboxes to track your progress (so we can see your progress too!), and then submit your solution as a pull request.
❓ If you have any questions, post a comment at the bottom of this page or ask us in our Slack chatroom!
1. Set up for local development
[x] Open the command line and navigate into your directory/folder for the
pair-partnersproject.[x] If you're not already on it, switch to the local branch that you created in the previous challenge. (For example, Liz's branch was named
firebase-test-lk)Great! Now any commits you make will be saved to this branch and kept separate from other versions of our project.
2. Create another row in your Firebase database
[x] In the Firebase console, navigate to the "Database" page and then to the "Data" tab. Shortcut: Click on this link and then choose your project.
[x] Hover your mouse over the name of your database at the top (probably similar to
fir-test-c7763), and then click on the green plus sign that appears:[x] In the two text boxes that pop up, type "myname" for the name and enter your actual name for the value. Then click the blue "Add" button to save your new data: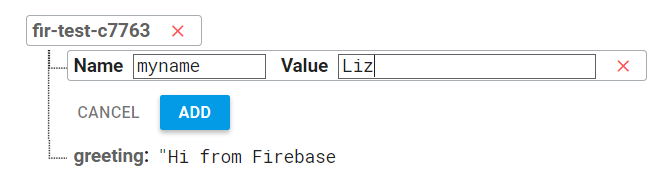
3. Edit your JavaScript and HTML to display the new data
🏆 The goal: Let's change our app to display our two pieces of data in two separate paragraphs that both update in real time when the data changes!
[x] In your
firebasetest.jsfile, find and change one word in your code to make your app display your name instead of the previous message.[x] Once you got that working, save your work and make a Git commit! Make sure your commit message describes what you changed. For example: "Display myname from Firebase."
[x] In your
firebase-test/index.htmlfile, create another empty paragraph with the id of"username"and put it above the existing paragraph. This is where we'll display your name![x] In your
firebasetest.jsfile, turn that new paragraph into a JavaScript object namedusernameBox.✔️ SOLUTION for Part 3: https://gist.github.com/LearningNerd/d886a3c64e9da6121992f63191e1c70a
4. Create more Firebase reference objects
In Firebase, a reference object represents a specific location in your database. Firebase organizes data in a hierarchy or tree structure, just like your computer's file system or the web browser's Document Object Model (which organizes elements of a web page into a hierarchy, with the
documentobject as the root of the entire tree).So now that we want to access two sections of our database, we're first going to create a reference to the root of our database, and then we'll use the root reference to create two more reference objects: one for "myname" and one for "greeting".
[x] Locate the line where you defined the
dbRefobject, and delete thechild()method from the end of that line. So now that line of code should look like:var dbRef = firebase.database().ref();[x] Create two more variables named
dbGreetinganddbUsername, set them both equal todbRef.child(), and remember to give eachchild()method a string input matching the locations in your database!💡 Remember to commit early and commit often! A good rule of thumb is to make a commit with Git after every 15 minutes of coding and at the end of every work session.
✔️ SOLUTION for Part 4: https://gist.github.com/LearningNerd/f7a3851bf7fbd6c56890546bb21b5719
5. Review event listeners in JavaScript
📚 Reference link: Review these slides on event listeners from our previous JavaScript slideshow!
Remember JavaScript's built-in
addEventListener()method? It took two inputs: a string representing the name of the event and a function to run when the event occurs. For example, if you wanted to run thesayHellofunction each time the user clicks thesubmitButtonon your web page, your code might look like this:submitButton.addEventListener("click", sayHello);submitButton"click"eventsayHellofunctionRemember also that your function can receive an input from the event listener, which contains information about the event that just occurred! For example, the
eventparameter in the code below will be replaced by a MouseEvent object containing lots of information about your mouse clicks:[x] Challenge: Try running the code above, either directly in your browser console or in a CodePen. Click somewhere on the web page, and then look inside the console. Do you see the MouseEvent objects show up in your console? It should look like this:
6. Review anonymous functions
Anonymous functions are just functions defined without a name, which is a common practice in JavaScript when you know you're only going to use the function in one place. Let's compare the previous code sample with a version that uses an anonymous function to do the exact same thing:
Example 1: Named function
Example 2: Anonymous function
See how the second version is shorter because of the way we defined that anonymous function? This is a pattern you will see again and again in JavaScript; in fact, the code at the end of your
firebasetest.jsfile is using an anonymous function right now! Let's take a closer look.7. Create another Firebase event listener
If you know how to use event listeners in JavaScript, you already know how to use event listeners in Firebase! The Firebase event listener is a method named
on(), and it's the main way to read data from your database. Right now, the end of your JavaScript file should already contain this code:dbRefobject, which now points to the root of our Firebase database!"value"event, which is triggered any time a value changes inside this database location.messageBoxelement on our web page.Notice that the
dataSnapshotparameter works exactly the same as theeventparameter in section 5 above; it's given to us by the event listener, and it gets replaced with an object that contains lots of information about the event that just occurred! With Firebase, we don't need to use the entiredataSnapshotobject, so instead the convention is to use a special method calledval()to extract the data. So when we calldataSnapshot.val(), we're getting the new data from our database and none of the other Firebase information (which we don't need to worry about).[x] Add
console.log( dataSnapshot.val() );into your code so that it will log the new Firebase data to your browser's console any time the Firebase data changes.[x] Open
firebase-test/index.htmlin your web browser again to test it, and look inside your browser console. You should see all your data, formatted as a JavaScript object!There's just one problem: even though you can see your data in the console, your web page is displaying
[object Object]instead of showing your name or your greeting message! Why is that? Because we're using the Firebase event listener on the root of our database, which contains our entire database:{greeting: "Hi from Firebase!", myname: "Liz"}Notice the format of that data: it's a JavaScript object! We don't want to display the entire database inside one paragraph, though; we want to display a string, one in each paragraph.
[x] In your
firebasetest.jsfile, look inside the Firebase event listener code and replacedbRefwithdbGreetingso that your code will now only listen for changes to the "greeting" section of your database![x] Test it in your web browser again, and you should see your "greeting" message show up on the web page again! Try changing the value of "greeting" from inside the Firebase Console and it should update in real time!
[x] Copy all of the Firebase event listener code, and paste a duplicate of it at the end of your
firebasetest.jsfile.[x] Inside the second copy of your Firebase event listener code, replace one variable to display the data inside the other paragraph on your web page.
[x] Now replace one more variable in that same section to tell the Firebase event listener to only listen for updates to the other section of your database.
✔️ SOLUTION for Part 7: https://gist.github.com/LearningNerd/d088d03deff297e6121068788d136eb6
8. Create a pull request to share your code with us
💡 You can create a pull request at any point! Please share your code with us at the end of every work session, whether or not you've finished the challenge. Pull requests are a great way to ask for feedback on your code!
[x] If you haven't already, make a commit! (Make sure you're on the branch for this challenge.)
[x] Upload your branch to GitHub with the
git push origin BRANCH-NAMEcommand.[x] Create a new pull request by clicking here, and make sure the base branch is set to "master" and the compare branch is set to the name of your new branch:
[x] Review your files to make sure all your changes show up, and then click the green "Create pull request" button:
[x] Make sure the title of your pull request includes the name of the challenge you're working on (for example,
Solution for "Practice displaying Firebase data" challenge). Then add any comments or questions in the description box and click "Create pull request" again to publish it:Once you've submitted your pull request, everyone on our team can share feedback on your code using GitHub's code review and commenting features. So keep an eye out for GitHub notifications in your email inbox!
Congrats, you've completed this challenge!
✔️ Don't forget to check off all the checkboxes in these instructions, so the rest of our team can easily see your progress!
👉 More challenges to come, so stay tuned!