Closed Fourdee closed 6 years ago
I think I left first boot setup for quite a while to run. I have now tried to reinstall following the same steps as before on a clean Debian image, but each time the DIetPi install fails:
─────────────────────────┤ DietPi Error Handler: ├────────────────────────────── tPi-PREP: G_AGDUG Exit code: 100 DietPi version: v6.25.3 (MichaIng/master) | HW_MODEL:71 | HW_ARCH:2 | DISTRO:4 Image creator: n/a Pre-image: n/a
file contents: Failed to fetch ps://deb.debian.org/debian/pool/main/b/base-files/base-files_9.9+deb9u9_armhf.de ld not resolve host: deb.debian.org Failed to fetch ps://deb.debian.org/debian-security/pool/updates/main/p/perl/libperl5.24_5.24.1- u5_armhf.deb Could not resolve host: deb.debian.org Failed to fetch ps://deb.debian.org/debian-security/pool/updates/main/p/perl/perl_5.24.1-3+deb9u
Suggestions?
@scottwilliamsinaus
Did you assure after installing resolvconf
and purging connman
beforehand, that /etc/resolv.conf
contains the correct DNS server entry that is shipped e.g. by your DHCP server/router? You really need to assure that the whole network setup is fully based on ifupdown
(networking.service
), resolvconf
and if not static isc-dhcp-server
(dhclient
). As name resolving broke after G_AGI resolvconf
is called within the script, it looks like it was not installed before and name resolving still controlled by something else.
This is how /etc/resolv.conf
should look like:
root@VM-Stretch:~# cat /etc/resolv.conf
# Dynamic resolv.conf(5) file for glibc resolver(3) generated by resolvconf(8)
# DO NOT EDIT THIS FILE BY HAND -- YOUR CHANGES WILL BE OVERWRITTEN
nameserver 192.168.178.1
root@VM-Stretch:~# ls -l /etc/resolv.conf
lrwxrwxrwx 1 root root 31 Mar 24 17:54 /etc/resolv.conf -> /etc/resolvconf/run/resolv.conf
192.168.178.1
is the IP of my router, which acts as DNS server and forwards requests to an upstream server provided by my ISP.
Good to know that you are using Ethernet. At least netman does not have issues with Ethernet, meaning that if it is controlling the Ethernet network and you purge it, the connection stays active (including SSH). But connman seems to work differently, cutting any active connection it controls + DNS nameserver entries when being removed 🤔.
For those experiencing "dpkg-reconfigure: command not found" error after running prep script on Buster, you can try to execute
export PATH=$PATH:/usr/sbin
before running the prep script again
@peca89 The following commit should prevent such cases for v6.27: https://github.com/MichaIng/DietPi/commit/c93e618e7b40ed1ecb52f23fd9db5fd349a671f2
I noticed using this, then installing virtualmin caused some issues. DNS for one needs to be hard set by dietpi, and you need to check that it's not changing in virtualmin. So make them the same, but dietpi config first. Also, mariaDB seems to get messed up and won't start. Best thing to do is disable Dietpi control of it. Then it works fine. Basically...I THINK anything that VirtualMin is going to mess with that DietPi is going to mess with can be messed up. It would be nice to just GET virtual min in the DietPi install, rather than webmin. Virtualmin REALLY helps with web-servering. And if you can get dietpi and virtualmin working together, it's very responsive.
@wsimon98 Since this has nothing to do with the preparation script, please open a new issue/softwarerequest for virtualmin. That it conflicts with DietPi-Config network setup is expected and natural, the same as it is with webmin: Every tool that edits the same thing, does it its own way/format, and they naturally conflict, if not all of them put VERY much effort in being compatible with any kind of current setup/format. Hence it must be chosen which tool to use for what and not mixing multiple ones for same purpose.
But since we do no uncommon setup of MariaDB, virtualmin should not have any issues with that. Its a pure Debian APT package install with 4byte support enabled, which is anyway all default since the version from Debian Buster. If virtualmin cannot deal with this, it must fail on regular Debian/Raspbian Buster as well 😉. But as said, further discussion/testing in separate issue, please.
I tried on a virtualized server with kvm and after rebooting I can no longer log in via ssh
@tolel Were you able to get boot log of the VM to check for init/service start errors or kernel/hardware if relevant?
I never actively tested it with KVM, but use systemd-nspawn
with qemu-static
for ARM image building. QEMU uses KVM, if available. Clear is that KVM itself does not make real hardware emulation, but would require QEMU to do so. Depending in how KVM is invoked, either additional drivers might be required, or things like the installed bootloader and/or Linux kernel are obsolete. systemd-nspawn
uses and exposes to the hosts network interfaces directly and (without explicitly granting it) is not allowed to manipulate them of course and cannot use a port that is used by the host already (e.g. SSH).
Basically DietPi-PREP, when selecting VM, expects a full emulated or paravirtualised VM that regularly loads the VM images bootloader and kernel and does not require any special firmware packages. Is this true in your case or how do you invoke KVM?
@tolel Were you able to get boot log of the VM to check for init/service start errors or kernel/hardware if relevant?
I never actively tested it with KVM, but use
systemd-nspawn
withqemu-static
for ARM image building. QEMU uses KVM, if available. Clear is that KVM itself does not make real hardware emulation, but would require QEMU to do so. Depending in how KVM is invoked, either additional drivers might be required, or things like the installed bootloader and/or Linux kernel are obsolete.systemd-nspawn
uses and exposes to the hosts network interfaces directly and (without explicitly granting it) is not allowed to manipulate them of course and cannot use a port that is used by the host already (e.g. SSH).Basically DietPi-PREP, when selecting VM, expects a full emulated or paravirtualised VM that regularly loads the VM images bootloader and kernel and does not require any special firmware packages. Is this true in your case or how do you invoke KVM?
I'm trying to install DietPi in a trade hosting vps ( https://www.tradehosting.it/game ) so I don't know how KVM is configured and I can't access the logs after the reboot.
@tolel Do they provide Debian images to start with or did you install it with the Debian installer initially?
Debian image to start
Without log's it's quite impossible to find out what happen.
We would need to check the Debian base image, e.g. partition structure, drivers, if/which bootloader/kernel/firmware is pre-installed, network setup. Obviously it does not work with the regular VM setup DietPi-PREP applies, with grub bootloader, Debian amd64 Linux image package and initramfs-tools, if it is not only the network (e.g. a specific static gateway) or Dropbear, but indeed hard to say what is missing (or wrong) without further details.
Is there no web console available in the VPS client area? Probably the local console shows something, in case when rebooting from there or while it's open. Otherwise the VPS provider might be able to give some info about requirements for boot and network that might differ from e.g. a VirtualBox or VMware guest.
For manually checking a fresh working VPS Debian image, the following should contain useful infos to start with (if you want to, please open a new issue then):
ls -Al / /boot
dpkg -l --no-pager
cat /etc/network/interfaces
We would need to check the Debian base image, e.g. partition structure, drivers, if/which bootloader/kernel/firmware is pre-installed, network setup. Obviously it does not work with the regular VM setup DietPi-PREP applies, with grub bootloader, Debian amd64 Linux image package and initramfs-tools, if it is not only the network (e.g. a specific static gateway) or Dropbear, but indeed hard to say what is missing (or wrong) without further details.
Is there no web console available in the VPS client area? Probably the local console shows something, in case when rebooting from there or while it's open. Otherwise the VPS provider might be able to give some info about requirements for boot and network that might differ from e.g. a VirtualBox or VMware guest.
For manually checking a fresh working VPS Debian image, the following should contain useful infos to start with (if you want to, please open a new issue then):
ls -Al / /boot dpkg -l --no-pager cat /etc/network/interfaces
I have nothing other than SSH installed on the server. I asked for VNC access directly in the panel.
@MichaIng
I was playing around on my RPi3B+ and tried top reset using PREP script, During execution I hit a nice error 😉
┌───────────────────────────────────────────────────┤ DietPi-PREP ├────────────────────────────────────────────────────┐
│ APT update │
│ - Command: apt-get -q update │
│ - Exit code: 100 │
│ - DietPi version: v6.29.2 (MichaIng/dev) | HW_MODEL: 0 | HW_ARCH: 2 | DISTRO: 5 │
│ - Error log: │
│ Get:1 https://deb.debian.org/debian buster InRelease [122 kB] │
│ Hit:2 https://archive.raspberrypi.org/debian buster InRelease │
│ Get:3 https://deb.debian.org/debian buster-updates InRelease [49.3 kB] │
│ Get:4 https://deb.debian.org/debian-security buster/updates InRelease [65.4 kB] │
│ Get:5 https://deb.debian.org/debian buster-backports InRelease [46.7 kB] │
│ Err:1 https://deb.debian.org/debian buster InRelease │
│ The following signatures couldn't be verified because the public key is not available: NO_PUBKEY 04EE7237B7D453EC │
│ NO_PUBKEY 648ACFD622F3D138 NO_PUBKEY DCC9EFBF77E11517 │
│ Err:3 https://deb.debian.org/debian buster-updates InRelease │
│ The following signatures couldn't be verified because the public key is not available: NO_PUBKEY 04EE7237B7D453EC │
│ NO_PUBKEY 648ACFD622F3D138 │
│ Err:4 https://deb.debian.org/debian-security buster/updates InRelease │
│ The following signatures couldn't be verified because the public key is not available: NO_PUBKEY AA8E81B4331F7F50 │
│ NO_PUBKEY 112695A0E562B32A │
│ Err:5 https://deb.debian.org/debian buster-backports InRelease │
│ The following signatures couldn't be verified because the public key is not available: NO_PUBKEY 04EE7237B7D453EC │
│ NO_PUBKEY 648ACFD622F3D138 │
│ Reading package lists... │
looks like incorrect source list is used as it's trying deb.debian.org
but it should be raspbian.raspberrypi.org
as it is a RPi. What I noticed as well, during the script I need to select the device (as usual). And in the past it was always on top of the list. Nowadays it's at the bottom and I need to scroll up to the top to be able to select HW_MODEL: 0 RPI devices
@Joulinar Many thanks for reporting. I re-added RPi as default selection to DietPi-PREP. Indeed it is better to start at the top of the list than at the bottom: https://github.com/MichaIng/DietPi/commit/e5d2dd60ef3c41f2e2dc78474b36b90d3bd2593b
I found a reason why DietPi-PREP created a wrong sources.list when one chooses to do a distro upgrade: https://github.com/MichaIng/DietPi/commit/5e98abc3bd95538d6b52954d04de34422c8f32ec However, the RPi should have been correctly auto-detected and hence the right Raspbian entry added. Could you paste:
cat /boot/dietpi/.hw_model
/boot/dietpi/func/dietpi-obtain_hw_model
cat /boot/dietpi/.hw_model
/boot/dietpi/func/dietpi-set_software apt-mirror default
cat /etc/apt/sources.list
damn, I did the same as yesterday, but I was not able to reproduce the error with the incorrect source list. 🤔
Anyway I end up with the missing rootFS entry and a ro file system 😟
@Joulinar The sources list according to my review should have been only incorrect when you choose to upgrade the distro, e.g. from a Stretch image to Buster. I could not derive why an RPi should not be identified correctly, but will run a test build on true RPi later (still waiting for ISP technician...)
@MichaIng today I was able to replicate the issue. Thats the output you requested
root@DietPi:/tmp/DietPi-PREP# cat /boot/dietpi/.hw_model
G_HW_MODEL=22
G_HW_MODEL_NAME='Generic Device (armv7l)'
G_HW_ARCH=2
G_HW_ARCH_NAME='armv7l'
G_HW_CPUID=0
G_HW_CPU_CORES=4
G_DISTRO=5
G_DISTRO_NAME='buster'
G_ROOTFS_DEV='/dev/mmcblk0p2'
G_HW_UUID='0db1c30f-9dd9-4037-b459-b8ce61a59e49'
root@DietPi:/tmp/DietPi-PREP#
root@DietPi:/tmp/DietPi-PREP# /boot/dietpi/func/dietpi-obtain_hw_model
root@DietPi:/tmp/DietPi-PREP#
root@DietPi:/tmp/DietPi-PREP# cat /boot/dietpi/.hw_model
G_HW_MODEL=22
G_HW_MODEL_NAME='Generic Device (armv7l)'
G_HW_ARCH=2
G_HW_ARCH_NAME='armv7l'
G_HW_CPUID=0
G_HW_CPU_CORES=4
G_DISTRO=5
G_DISTRO_NAME='buster'
G_ROOTFS_DEV='/dev/mmcblk0p2'
G_HW_UUID='0db1c30f-9dd9-4037-b459-b8ce61a59e49'
root@DietPi:/tmp/DietPi-PREP#
root@DietPi:/tmp/DietPi-PREP# /boot/dietpi/func/dietpi-set_software apt-mirror default
[ SUB1 ] DietPi-Set_software > apt-mirror (default)
[ OK ] DietPi-Set_software | Desired setting in /boot/dietpi.txt was already set: CONFIG_APT_DEBIAN_MIRROR=https://deb.debian.org/debian/
[ OK ] apt-mirror https://deb.debian.org/debian/ | Completed
root@DietPi:/tmp/DietPi-PREP#
root@DietPi:/tmp/DietPi-PREP# cat /etc/apt/sources.list
deb https://deb.debian.org/debian/ buster main contrib non-free
deb https://deb.debian.org/debian/ buster-updates main contrib non-free
deb https://deb.debian.org/debian-security/ buster/updates main contrib non-free
deb https://deb.debian.org/debian/ buster-backports main contrib non-free
root@DietPi:/tmp/DietPi-PREP#
and that's the input I did during script execution
[ INFO ] DietPi-PREP | -----------------------------------------------------------------------------------
[ OK ] DietPi-PREP | Step 1: Target system inputs
[ INFO ] DietPi-PREP | -----------------------------------------------------------------------------------
[ INFO ] DietPi-PREP | Entered image creator: bla
[ INFO ] DietPi-PREP | Entered pre-image info: bla
[ INFO ] DietPi-PREP | Selected hardware model ID: 0
[ INFO ] DietPi-PREP | Detected CPU architecture: armv7l (ID: 2)
[ INFO ] DietPi-PREP | Marking WiFi as NOT required
[ INFO ] DietPi-PREP | Disabled distro downgrade to: Stretch
[ INFO ] DietPi-PREP | Selected Debian version: buster (ID: 5)
looks like it's detecting a Generic Device
, which is not correct.
@Joulinar Found and fixed: https://github.com/MichaIng/DietPi/commit/028c38b5f8a3be88f3412b25b772417401793ee5
@MichaIng ok seems working again. I used dev branch PREP script and selected dev branch as target. 👍 but now going to close the shop for today 🤣
Hey there!
I love dietpi and its low profile. Running it on several ARM Devices and I wanted to convert a freshly installed debian system on a VPS (x64 IONOS) to dietpi.
It seems that the conversion completed successfully but after the reboot it dosent boot up. The KVM Console gives an error which indicates, that initially on the stock debian install the device "/dev/mapper/vg00-lv01" mounted to / isn't available anymore and so the boot up process couldn't mount it to / .
Is there a way to implement an option at the beginning of the script where you can choose the system for IONOS VPS ?
Some other guy had the same issue and created a thread in the dietpi forums LINK TO FORUM
KVM Console Output:
Begin: Running /scripts/local-block ... done.
....
done.
Gave up waiting for suspend/resume device
done.
Begin: Waiting for root file system ... Begin: Running /scripts/local-block ... done.
done.
Gave up waiting for root file system device. Common problems:
- Boot args (cat /proc/cmdline)
- Check rootdelay= (did the system wait long enough?)
- Missing modules (cat /proc/modules; ls /dev)
ALERT! /dev/mapper/vg00-lv01 does not exist. Dropping to a shell!
(initramfs)
df -h from a freshly installed debian on the VPS:
root@localhost:~# df -h
Filesystem Size Used Avail Use% Mounted on
udev 214M 0 214M 0% /dev
tmpfs 46M 5.2M 41M 12% /run
/dev/mapper/vg00-lv01 7.5G 1.3G 5.9G 18% /
tmpfs 230M 0 230M 0% /dev/shm
tmpfs 5.0M 0 5.0M 0% /run/lock
tmpfs 230M 0 230M 0% /sys/fs/cgroup
/dev/sda1 464M 84M 352M 20% /boot
tmpfs 46M 0 46M 0% /run/user/0
Would be nice if someone could help to resolve this issue. Would also test it and provide feedback.
Thank you very much! Have a nice day
Hi,
Something to check with Ionos as already recommended on the forum. Probably they don't support installations like DietPi on their platform.
@rondadon
The root file system is an LVM volume. I think this requires an additional APT package: https://packages.debian.org/buster/lvm2
The /etc/fstab
entries seem to be the same, although I read about a recommendation to use disk labels instead of UUIDs: https://wiki.debian.org/fstab#Defining_filesystems
Can you run and paste the output of the following commands from the fresh VPS image?
cat /etc/fstab
df -a
blkid
lsblk
Hi there @MichaIng ... Thank you for trying to help! I appreciate it! Hope this could be easily solved with installing an additional package!
Sure I can paste the output of said commands. Here they are!
root@localhost:~# cat /etc/fstab
# /etc/fstab: static file system information.
#
# Use 'blkid' to print the universally unique identifier for a
# device; this may be used with UUID= as a more robust way to name devices
# that works even if disks are added and removed. See fstab(5).
#
# <file system> <mount point> <type> <options> <dump> <pass>
/dev/mapper/vg00-lv01 / ext4 errors=remount-ro 0 1
# /boot was on /dev/sda1 during installation
UUID=0fde5837-626f-4cb3-ba89-e0cae8601f55 /boot ext4 defaults 0 2
/dev/mapper/vg00-lv00 none swap sw 0 0
/dev/sr0 /media/cdrom0 udf,iso9660 user,noauto 0 0
root@localhost:~# df -a
Filesystem 1K-blocks Used Available Use% Mounted on
sysfs 0 0 0 - /sys
proc 0 0 0 - /proc
udev 219008 0 219008 0% /dev
devpts 0 0 0 - /dev/pts
tmpfs 46992 5320 41672 12% /run
/dev/mapper/vg00-lv01 7792568 1603464 5774796 22% /
securityfs 0 0 0 - /sys/kernel/security
tmpfs 234952 0 234952 0% /dev/shm
tmpfs 5120 0 5120 0% /run/lock
tmpfs 234952 0 234952 0% /sys/fs/cgroup
cgroup2 0 0 0 - /sys/fs/cgroup/unified
cgroup 0 0 0 - /sys/fs/cgroup/systemd
pstore 0 0 0 - /sys/fs/pstore
bpf 0 0 0 - /sys/fs/bpf
cgroup 0 0 0 - /sys/fs/cgroup/pids
cgroup 0 0 0 - /sys/fs/cgroup/net_cls,net_prio
cgroup 0 0 0 - /sys/fs/cgroup/memory
cgroup 0 0 0 - /sys/fs/cgroup/perf_event
cgroup 0 0 0 - /sys/fs/cgroup/devices
cgroup 0 0 0 - /sys/fs/cgroup/blkio
cgroup 0 0 0 - /sys/fs/cgroup/cpu,cpuacct
cgroup 0 0 0 - /sys/fs/cgroup/freezer
cgroup 0 0 0 - /sys/fs/cgroup/rdma
cgroup 0 0 0 - /sys/fs/cgroup/cpuset
systemd-1 0 0 0 - /proc/sys/fs/binfmt_misc
debugfs 0 0 0 - /sys/kernel/debug
hugetlbfs 0 0 0 - /dev/hugepages
mqueue 0 0 0 - /dev/mqueue
/dev/sda1 474712 85236 360446 20% /boot
tmpfs 46988 0 46988 0% /run/user/1000
root@localhost:~# blkid
/dev/sda1: UUID="0fde5837-626f-4cb3-ba89-e0cae8601f55" TYPE="ext4" PARTUUID="bc873d4a-01"
/dev/sda2: UUID="msy2Zk-rDPu-iXjf-jabJ-9SVQ-1WnZ-kkOKYS" TYPE="LVM2_member" PARTUUID="bc873d4a-02"
/dev/mapper/vg00-lv01: UUID="a74fdb8e-18cb-4438-8652-a900525cf565" TYPE="ext4"
/dev/mapper/vg00-lv00: UUID="99a6095c-5433-471c-b8f7-b7de434d6921" TYPE="swap"
root@localhost:~# lsblk
NAME MAJ:MIN RM SIZE RO TYPE MOUNTPOINT
sda 8:0 0 10G 0 disk
├─sda1 8:1 0 487M 0 part /boot
└─sda2 8:2 0 9.5G 0 part
├─vg00-lv01 254:0 0 7.6G 0 lvm /
└─vg00-lv00 254:1 0 1.9G 0 lvm [SWAP]
sr0 11:0 1 1024M 0 rom
Again: Thank you for your help. :+1: Have a nice sunday!
@rondadon Many thanks, this indeed allows me to implement LVM support:
df /dev/mapper/vg00-lv01 7792568 1603464 5774796 22% /
/dev/mapper/
source is mounted, install lvm2
APT package.
# blkid
/dev/sda2: UUID="msy2Zk-rDPu-iXjf-jabJ-9SVQ-1WnZ-kkOKYS" TYPE="LVM2_member" PARTUUID="bc873d4a-02"
LVM2_member
# /etc/fstab
/dev/mapper/vg00-lv01 / ext4 errors=remount-ro 0 1
/dev/mapper/
mount sources via mount source instead of UUID to fstab.But I'll not find time quickly to implement this ℹ️.
Generally the fstab entry works with UUID as well and should be added like this already, so actually the VPS should boot if your run DietPi-PREP and run apt install lvm2
manually afterwards. And as failsafe step check /etc/fstab first if you see the the rootfs /
mount entry. The swap partition will be missing but can be re-added afterwards manually.
@MichaIng :
Wow... Thank you very much for your time and help.
So I just need to run the DietPi-PREP Script and install lvm2 package manually after the script finished before I reboot the System.
Surely I would check /etc/fstab
before rebooting.. And mounting swap will be necessary because the VPS has only 512MB Ram which is totally enough for the Service I will run on the VPS but still SWAP will be necessary. I will let you know how it went!
And not pressure regarding implementing it into the DietPi-PREP Script. Let me know if I could provide any help.
Man, thank you again. I have no words for how thankful I am!
:)
@rondadon Do not thank me too early, so far this is just an assumption of what I think "should" work 😉.
Ah please also check if the mapper device is still present: ls -Al /dev/mapper/
Not sure if some lvm2 command needs to run first to create it or it it is auto-generated on package install.
Please also check the following config files before running DietPi-PREP (if it's not yet too late):
cat /etc/lvm/lvm.conf
cat /etc/lvm/lvmlocal.conf
Probably the device mapping must be defined there.
@MichaIng Hehe, I'm allready thankful for your time and help, even when it dosen't work at the end. I didn't ran the script, still. Will do it in an hour or so.
cat /etc/lvm/lvm.conf
```# This is an example configuration file for the LVM2 system.
# It contains the default settings that would be used if there was no
# /etc/lvm/lvm.conf file.
#
# Refer to 'man lvm.conf' for further information including the file layout.
#
# Refer to 'man lvm.conf' for information about how settings configured in
# this file are combined with built-in values and command line options to
# arrive at the final values used by LVM.
#
# Refer to 'man lvmconfig' for information about displaying the built-in
# and configured values used by LVM.
#
# If a default value is set in this file (not commented out), then a
# new version of LVM using this file will continue using that value,
# even if the new version of LVM changes the built-in default value.
#
# To put this file in a different directory and override /etc/lvm set
# the environment variable LVM_SYSTEM_DIR before running the tools.
#
# N.B. Take care that each setting only appears once if uncommenting
# example settings in this file.
# Configuration section config.
# How LVM configuration settings are handled.
config {
# Configuration option config/checks.
# If enabled, any LVM configuration mismatch is reported.
# This implies checking that the configuration key is understood by
# LVM and that the value of the key is the proper type. If disabled,
# any configuration mismatch is ignored and the default value is used
# without any warning (a message about the configuration key not being
# found is issued in verbose mode only).
checks = 1
# Configuration option config/abort_on_errors.
# Abort the LVM process if a configuration mismatch is found.
abort_on_errors = 0
# Configuration option config/profile_dir.
# Directory where LVM looks for configuration profiles.
profile_dir = "/etc/lvm/profile"
}
# Configuration section devices.
# How LVM uses block devices.
devices {
# Configuration option devices/dir.
# Directory in which to create volume group device nodes.
# Commands also accept this as a prefix on volume group names.
# This configuration option is advanced.
dir = "/dev"
# Configuration option devices/scan.
# Directories containing device nodes to use with LVM.
# This configuration option is advanced.
scan = [ "/dev" ]
# Configuration option devices/obtain_device_list_from_udev.
# Obtain the list of available devices from udev.
# This avoids opening or using any inapplicable non-block devices or
# subdirectories found in the udev directory. Any device node or
# symlink not managed by udev in the udev directory is ignored. This
# setting applies only to the udev-managed device directory; other
# directories will be scanned fully. LVM needs to be compiled with
# udev support for this setting to apply.
obtain_device_list_from_udev = 1
# Configuration option devices/external_device_info_source.
# Select an external device information source.
# Some information may already be available in the system and LVM can
# use this information to determine the exact type or use of devices it
# processes. Using an existing external device information source can
# speed up device processing as LVM does not need to run its own native
# routines to acquire this information. For example, this information
# is used to drive LVM filtering like MD component detection, multipath
# component detection, partition detection and others.
#
# Accepted values:
# none
# No external device information source is used.
# udev
# Reuse existing udev database records. Applicable only if LVM is
# compiled with udev support.
#
external_device_info_source = "none"
# Configuration option devices/preferred_names.
# Select which path name to display for a block device.
# If multiple path names exist for a block device, and LVM needs to
# display a name for the device, the path names are matched against
# each item in this list of regular expressions. The first match is
# used. Try to avoid using undescriptive /dev/dm-N names, if present.
# If no preferred name matches, or if preferred_names are not defined,
# the following built-in preferences are applied in order until one
# produces a preferred name:
# Prefer names with path prefixes in the order of:
# /dev/mapper, /dev/disk, /dev/dm-*, /dev/block.
# Prefer the name with the least number of slashes.
# Prefer a name that is a symlink.
# Prefer the path with least value in lexicographical order.
#
# Example
# preferred_names = [ "^/dev/mpath/", "^/dev/mapper/mpath", "^/dev/[hs]d" ]
#
# This configuration option does not have a default value defined.
# Configuration option devices/filter.
# Limit the block devices that are used by LVM commands.
# This is a list of regular expressions used to accept or reject block
# device path names. Each regex is delimited by a vertical bar '|'
# (or any character) and is preceded by 'a' to accept the path, or
# by 'r' to reject the path. The first regex in the list to match the
# path is used, producing the 'a' or 'r' result for the device.
# When multiple path names exist for a block device, if any path name
# matches an 'a' pattern before an 'r' pattern, then the device is
# accepted. If all the path names match an 'r' pattern first, then the
# device is rejected. Unmatching path names do not affect the accept
# or reject decision. If no path names for a device match a pattern,
# then the device is accepted. Be careful mixing 'a' and 'r' patterns,
# as the combination might produce unexpected results (test changes.)
# Run vgscan after changing the filter to regenerate the cache.
#
# Example
# Accept every block device:
# filter = [ "a|.*/|" ]
# Reject the cdrom drive:
# filter = [ "r|/dev/cdrom|" ]
# Work with just loopback devices, e.g. for testing:
# filter = [ "a|loop|", "r|.*|" ]
# Accept all loop devices and ide drives except hdc:
# filter = [ "a|loop|", "r|/dev/hdc|", "a|/dev/ide|", "r|.*|" ]
# Use anchors to be very specific:
# filter = [ "a|^/dev/hda8$|", "r|.*/|" ]
#
# This configuration option has an automatic default value.
# filter = [ "a|.*/|" ]
# Configuration option devices/global_filter.
# Limit the block devices that are used by LVM system components.
# Because devices/filter may be overridden from the command line, it is
# not suitable for system-wide device filtering, e.g. udev.
# Use global_filter to hide devices from these LVM system components.
# The syntax is the same as devices/filter. Devices rejected by
# global_filter are not opened by LVM.
# This configuration option has an automatic default value.
# global_filter = [ "a|.*/|" ]
# Configuration option devices/types.
# List of additional acceptable block device types.
# These are of device type names from /proc/devices, followed by the
# maximum number of partitions.
#
# Example
# types = [ "fd", 16 ]
#
# This configuration option is advanced.
# This configuration option does not have a default value defined.
# Configuration option devices/sysfs_scan.
# Restrict device scanning to block devices appearing in sysfs.
# This is a quick way of filtering out block devices that are not
# present on the system. sysfs must be part of the kernel and mounted.)
sysfs_scan = 1
# Configuration option devices/scan_lvs.
# Scan LVM LVs for layered PVs.
scan_lvs = 1
# Configuration option devices/multipath_component_detection.
# Ignore devices that are components of DM multipath devices.
multipath_component_detection = 1
# Configuration option devices/md_component_detection.
# Ignore devices that are components of software RAID (md) devices.
md_component_detection = 1
# Configuration option devices/fw_raid_component_detection.
# Ignore devices that are components of firmware RAID devices.
# LVM must use an external_device_info_source other than none for this
# detection to execute.
fw_raid_component_detection = 0
# Configuration option devices/md_chunk_alignment.
# Align the start of a PV data area with md device's stripe-width.
# This applies if a PV is placed directly on an md device.
# default_data_alignment will be overriden if it is not aligned
# with the value detected for this setting.
# This setting is overriden by data_alignment_detection,
# data_alignment, and the --dataalignment option.
md_chunk_alignment = 1
# Configuration option devices/default_data_alignment.
# Align the start of a PV data area with this number of MiB.
# Set to 1 for 1MiB, 2 for 2MiB, etc. Set to 0 to disable.
# This setting is overriden by data_alignment and the --dataalignment
# option.
# This configuration option has an automatic default value.
# default_data_alignment = 1
# Configuration option devices/data_alignment_detection.
# Align the start of a PV data area with sysfs io properties.
# The start of a PV data area will be a multiple of minimum_io_size or
# optimal_io_size exposed in sysfs. minimum_io_size is the smallest
# request the device can perform without incurring a read-modify-write
# penalty, e.g. MD chunk size. optimal_io_size is the device's
# preferred unit of receiving I/O, e.g. MD stripe width.
# minimum_io_size is used if optimal_io_size is undefined (0).
# If md_chunk_alignment is enabled, that detects the optimal_io_size.
# default_data_alignment and md_chunk_alignment will be overriden
# if they are not aligned with the value detected for this setting.
# This setting is overriden by data_alignment and the --dataalignment
# option.
data_alignment_detection = 1
# Configuration option devices/data_alignment.
# Align the start of a PV data area with this number of KiB.
# When non-zero, this setting overrides default_data_alignment.
# Set to 0 to disable, in which case default_data_alignment
# is used to align the first PE in units of MiB.
# This setting is overriden by the --dataalignment option.
data_alignment = 0
# Configuration option devices/data_alignment_offset_detection.
# Shift the start of an aligned PV data area based on sysfs information.
# After a PV data area is aligned, it will be shifted by the
# alignment_offset exposed in sysfs. This offset is often 0, but may
# be non-zero. Certain 4KiB sector drives that compensate for windows
# partitioning will have an alignment_offset of 3584 bytes (sector 7
# is the lowest aligned logical block, the 4KiB sectors start at
# LBA -1, and consequently sector 63 is aligned on a 4KiB boundary).
# This setting is overriden by the --dataalignmentoffset option.
data_alignment_offset_detection = 1
# Configuration option devices/ignore_suspended_devices.
# Ignore DM devices that have I/O suspended while scanning devices.
# Otherwise, LVM waits for a suspended device to become accessible.
# This should only be needed in recovery situations.
ignore_suspended_devices = 0
# Configuration option devices/ignore_lvm_mirrors.
# Do not scan 'mirror' LVs to avoid possible deadlocks.
# This avoids possible deadlocks when using the 'mirror' segment type.
# This setting determines whether LVs using the 'mirror' segment type
# are scanned for LVM labels. This affects the ability of mirrors to
# be used as physical volumes. If this setting is enabled, it is
# impossible to create VGs on top of mirror LVs, i.e. to stack VGs on
# mirror LVs. If this setting is disabled, allowing mirror LVs to be
# scanned, it may cause LVM processes and I/O to the mirror to become
# blocked. This is due to the way that the mirror segment type handles
# failures. In order for the hang to occur, an LVM command must be run
# just after a failure and before the automatic LVM repair process
# takes place, or there must be failures in multiple mirrors in the
# same VG at the same time with write failures occurring moments before
# a scan of the mirror's labels. The 'mirror' scanning problems do not
# apply to LVM RAID types like 'raid1' which handle failures in a
# different way, making them a better choice for VG stacking.
ignore_lvm_mirrors = 1
# Configuration option devices/require_restorefile_with_uuid.
# Allow use of pvcreate --uuid without requiring --restorefile.
require_restorefile_with_uuid = 1
# Configuration option devices/pv_min_size.
# Minimum size in KiB of block devices which can be used as PVs.
# In a clustered environment all nodes must use the same value.
# Any value smaller than 512KiB is ignored. The previous built-in
# value was 512.
pv_min_size = 2048
# Configuration option devices/issue_discards.
# Issue discards to PVs that are no longer used by an LV.
# Discards are sent to an LV's underlying physical volumes when the LV
# is no longer using the physical volumes' space, e.g. lvremove,
# lvreduce. Discards inform the storage that a region is no longer
# used. Storage that supports discards advertise the protocol-specific
# way discards should be issued by the kernel (TRIM, UNMAP, or
# WRITE SAME with UNMAP bit set). Not all storage will support or
# benefit from discards, but SSDs and thinly provisioned LUNs
# generally do. If enabled, discards will only be issued if both the
# storage and kernel provide support.
issue_discards = 0
# Configuration option devices/allow_changes_with_duplicate_pvs.
# Allow VG modification while a PV appears on multiple devices.
# When a PV appears on multiple devices, LVM attempts to choose the
# best device to use for the PV. If the devices represent the same
# underlying storage, the choice has minimal consequence. If the
# devices represent different underlying storage, the wrong choice
# can result in data loss if the VG is modified. Disabling this
# setting is the safest option because it prevents modifying a VG
# or activating LVs in it while a PV appears on multiple devices.
# Enabling this setting allows the VG to be used as usual even with
# uncertain devices.
allow_changes_with_duplicate_pvs = 0
}
# Configuration section allocation.
# How LVM selects space and applies properties to LVs.
allocation {
# Configuration option allocation/cling_tag_list.
# Advise LVM which PVs to use when searching for new space.
# When searching for free space to extend an LV, the 'cling' allocation
# policy will choose space on the same PVs as the last segment of the
# existing LV. If there is insufficient space and a list of tags is
# defined here, it will check whether any of them are attached to the
# PVs concerned and then seek to match those PV tags between existing
# extents and new extents.
#
# Example
# Use the special tag "@*" as a wildcard to match any PV tag:
# cling_tag_list = [ "@*" ]
# LVs are mirrored between two sites within a single VG, and
# PVs are tagged with either @site1 or @site2 to indicate where
# they are situated:
# cling_tag_list = [ "@site1", "@site2" ]
#
# This configuration option does not have a default value defined.
# Configuration option allocation/maximise_cling.
# Use a previous allocation algorithm.
# Changes made in version 2.02.85 extended the reach of the 'cling'
# policies to detect more situations where data can be grouped onto
# the same disks. This setting can be used to disable the changes
# and revert to the previous algorithm.
maximise_cling = 1
# Configuration option allocation/use_blkid_wiping.
# Use blkid to detect and erase existing signatures on new PVs and LVs.
# The blkid library can detect more signatures than the native LVM
# detection code, but may take longer. LVM needs to be compiled with
# blkid wiping support for this setting to apply. LVM native detection
# code is currently able to recognize: MD device signatures,
# swap signature, and LUKS signatures. To see the list of signatures
# recognized by blkid, check the output of the 'blkid -k' command.
use_blkid_wiping = 1
# Configuration option allocation/wipe_signatures_when_zeroing_new_lvs.
# Look for and erase any signatures while zeroing a new LV.
# The --wipesignatures option overrides this setting.
# Zeroing is controlled by the -Z/--zero option, and if not specified,
# zeroing is used by default if possible. Zeroing simply overwrites the
# first 4KiB of a new LV with zeroes and does no signature detection or
# wiping. Signature wiping goes beyond zeroing and detects exact types
# and positions of signatures within the whole LV. It provides a
# cleaner LV after creation as all known signatures are wiped. The LV
# is not claimed incorrectly by other tools because of old signatures
# from previous use. The number of signatures that LVM can detect
# depends on the detection code that is selected (see
# use_blkid_wiping.) Wiping each detected signature must be confirmed.
# When this setting is disabled, signatures on new LVs are not detected
# or erased unless the --wipesignatures option is used directly.
wipe_signatures_when_zeroing_new_lvs = 1
# Configuration option allocation/mirror_logs_require_separate_pvs.
# Mirror logs and images will always use different PVs.
# The default setting changed in version 2.02.85.
mirror_logs_require_separate_pvs = 0
# Configuration option allocation/raid_stripe_all_devices.
# Stripe across all PVs when RAID stripes are not specified.
# If enabled, all PVs in the VG or on the command line are used for
# raid0/4/5/6/10 when the command does not specify the number of
# stripes to use.
# This was the default behaviour until release 2.02.162.
# This configuration option has an automatic default value.
# raid_stripe_all_devices = 0
# Configuration option allocation/cache_pool_metadata_require_separate_pvs.
# Cache pool metadata and data will always use different PVs.
cache_pool_metadata_require_separate_pvs = 0
# Configuration option allocation/cache_metadata_format.
# Sets default metadata format for new cache.
#
# Accepted values:
# 0 Automatically detected best available format
# 1 Original format
# 2 Improved 2nd. generation format
#
# This configuration option has an automatic default value.
# cache_metadata_format = 0
# Configuration option allocation/cache_mode.
# The default cache mode used for new cache.
#
# Accepted values:
# writethrough
# Data blocks are immediately written from the cache to disk.
# writeback
# Data blocks are written from the cache back to disk after some
# delay to improve performance.
#
# This setting replaces allocation/cache_pool_cachemode.
# This configuration option has an automatic default value.
# cache_mode = "writethrough"
# Configuration option allocation/cache_policy.
# The default cache policy used for new cache volume.
# Since kernel 4.2 the default policy is smq (Stochastic multiqueue),
# otherwise the older mq (Multiqueue) policy is selected.
# This configuration option does not have a default value defined.
# Configuration section allocation/cache_settings.
# Settings for the cache policy.
# See documentation for individual cache policies for more info.
# This configuration section has an automatic default value.
# cache_settings {
# }
# Configuration option allocation/cache_pool_chunk_size.
# The minimal chunk size in KiB for cache pool volumes.
# Using a chunk_size that is too large can result in wasteful use of
# the cache, where small reads and writes can cause large sections of
# an LV to be mapped into the cache. However, choosing a chunk_size
# that is too small can result in more overhead trying to manage the
# numerous chunks that become mapped into the cache. The former is
# more of a problem than the latter in most cases, so the default is
# on the smaller end of the spectrum. Supported values range from
# 32KiB to 1GiB in multiples of 32.
# This configuration option does not have a default value defined.
# Configuration option allocation/cache_pool_max_chunks.
# The maximum number of chunks in a cache pool.
# For cache target v1.9 the recommended maximumm is 1000000 chunks.
# Using cache pool with more chunks may degrade cache performance.
# This configuration option does not have a default value defined.
# Configuration option allocation/thin_pool_metadata_require_separate_pvs.
# Thin pool metdata and data will always use different PVs.
thin_pool_metadata_require_separate_pvs = 0
# Configuration option allocation/thin_pool_zero.
# Thin pool data chunks are zeroed before they are first used.
# Zeroing with a larger thin pool chunk size reduces performance.
# This configuration option has an automatic default value.
# thin_pool_zero = 1
# Configuration option allocation/thin_pool_discards.
# The discards behaviour of thin pool volumes.
#
# Accepted values:
# ignore
# nopassdown
# passdown
#
# This configuration option has an automatic default value.
# thin_pool_discards = "passdown"
# Configuration option allocation/thin_pool_chunk_size_policy.
# The chunk size calculation policy for thin pool volumes.
#
# Accepted values:
# generic
# If thin_pool_chunk_size is defined, use it. Otherwise, calculate
# the chunk size based on estimation and device hints exposed in
# sysfs - the minimum_io_size. The chunk size is always at least
# 64KiB.
# performance
# If thin_pool_chunk_size is defined, use it. Otherwise, calculate
# the chunk size for performance based on device hints exposed in
# sysfs - the optimal_io_size. The chunk size is always at least
# 512KiB.
#
# This configuration option has an automatic default value.
# thin_pool_chunk_size_policy = "generic"
# Configuration option allocation/thin_pool_chunk_size.
# The minimal chunk size in KiB for thin pool volumes.
# Larger chunk sizes may improve performance for plain thin volumes,
# however using them for snapshot volumes is less efficient, as it
# consumes more space and takes extra time for copying. When unset,
# lvm tries to estimate chunk size starting from 64KiB. Supported
# values are in the range 64KiB to 1GiB.
# This configuration option does not have a default value defined.
# Configuration option allocation/physical_extent_size.
# Default physical extent size in KiB to use for new VGs.
# This configuration option has an automatic default value.
# physical_extent_size = 4096
# Configuration option allocation/vdo_use_compression.
# Enables or disables compression when creating a VDO volume.
# Compression may be disabled if necessary to maximize performance
# or to speed processing of data that is unlikely to compress.
# This configuration option has an automatic default value.
# vdo_use_compression = 1
# Configuration option allocation/vdo_use_deduplication.
# Enables or disables deduplication when creating a VDO volume.
# Deduplication may be disabled in instances where data is not expected
# to have good deduplication rates but compression is still desired.
# This configuration option has an automatic default value.
# vdo_use_deduplication = 1
# Configuration option allocation/vdo_emulate_512_sectors.
# Specifies that the VDO volume is to emulate a 512 byte block device.
# This configuration option has an automatic default value.
# vdo_emulate_512_sectors = 0
# Configuration option allocation/vdo_block_map_cache_size_mb.
# Specifies the amount of memory in MiB allocated for caching block map
# pages for VDO volume. The value must be a multiple of 4096 and must be
# at least 128MiB and less than 16TiB. The cache must be at least 16MiB
# per logical thread. Note that there is a memory overhead of 15%.
# This configuration option has an automatic default value.
# vdo_block_map_cache_size_mb = 128
# Configuration option allocation/vdo_block_map_period.
# Tunes the quantity of block map updates that can accumulate
# before cache pages are flushed to disk. The value must be
# at least 1 and less then 16380.
# A lower value means shorter recovery time but lower performance.
# This configuration option has an automatic default value.
# vdo_block_map_period = 16380
# Configuration option allocation/vdo_check_point_frequency.
# The default check point frequency for VDO volume.
# This configuration option has an automatic default value.
# vdo_check_point_frequency = 0
# Configuration option allocation/vdo_use_sparse_index.
# Enables sparse indexing for VDO volume.
# This configuration option has an automatic default value.
# vdo_use_sparse_index = 0
# Configuration option allocation/vdo_index_memory_size_mb.
# Specifies the amount of index memory in MiB for VDO volume.
# The value must be at least 256MiB and at most 1TiB.
# This configuration option has an automatic default value.
# vdo_index_memory_size_mb = 256
# Configuration option allocation/vdo_use_read_cache.
# Enables or disables the read cache within the VDO volume.
# The cache should be enabled if write workloads are expected
# to have high levels of deduplication, or for read intensive
# workloads of highly compressible data.
# This configuration option has an automatic default value.
# vdo_use_read_cache = 0
# Configuration option allocation/vdo_read_cache_size_mb.
# Specifies the extra VDO volume read cache size in MiB.
# This space is in addition to a system-defined minimum.
# The value must be less then 16TiB and 1.12 MiB of memory
# will be used per MiB of read cache specified, per bio thread.
# This configuration option has an automatic default value.
# vdo_read_cache_size_mb = 0
# Configuration option allocation/vdo_slab_size_mb.
# Specifies the size in MiB of the increment by which a VDO is grown.
# Using a smaller size constrains the total maximum physical size
# that can be accommodated. Must be a power of two between 128MiB and 32GiB.
# This configuration option has an automatic default value.
# vdo_slab_size_mb = 2048
# Configuration option allocation/vdo_ack_threads.
# Specifies the number of threads to use for acknowledging
# completion of requested VDO I/O operations.
# The value must be at in range [0..100].
# This configuration option has an automatic default value.
# vdo_ack_threads = 1
# Configuration option allocation/vdo_bio_threads.
# Specifies the number of threads to use for submitting I/O
# operations to the storage device of VDO volume.
# The value must be in range [1..100]
# Each additional thread after the first will use an additional 18MiB of RAM,
# plus 1.12 MiB of RAM per megabyte of configured read cache size.
# This configuration option has an automatic default value.
# vdo_bio_threads = 1
# Configuration option allocation/vdo_bio_rotation.
# Specifies the number of I/O operations to enqueue for each bio-submission
# thread before directing work to the next. The value must be in range [1..1024].
# This configuration option has an automatic default value.
# vdo_bio_rotation = 64
# Configuration option allocation/vdo_cpu_threads.
# Specifies the number of threads to use for CPU-intensive work such as
# hashing or compression for VDO volume. The value must be in range [1..100]
# This configuration option has an automatic default value.
# vdo_cpu_threads = 2
# Configuration option allocation/vdo_hash_zone_threads.
# Specifies the number of threads across which to subdivide parts of the VDO
# processing based on the hash value computed from the block data.
# The value must be at in range [0..100].
# vdo_hash_zone_threads, vdo_logical_threads and vdo_physical_threads must be
# either all zero or all non-zero.
# This configuration option has an automatic default value.
# vdo_hash_zone_threads = 1
# Configuration option allocation/vdo_logical_threads.
# Specifies the number of threads across which to subdivide parts of the VDO
# processing based on the hash value computed from the block data.
# A logical thread count of 9 or more will require explicitly specifying
# a sufficiently large block map cache size, as well.
# The value must be in range [0..100].
# vdo_hash_zone_threads, vdo_logical_threads and vdo_physical_threads must be
# either all zero or all non-zero.
# This configuration option has an automatic default value.
# vdo_logical_threads = 1
# Configuration option allocation/vdo_physical_threads.
# Specifies the number of threads across which to subdivide parts of the VDO
# processing based on physical block addresses.
# Each additional thread after the first will use an additional 10MiB of RAM.
# The value must be in range [0..16].
# vdo_hash_zone_threads, vdo_logical_threads and vdo_physical_threads must be
# either all zero or all non-zero.
# This configuration option has an automatic default value.
# vdo_physical_threads = 1
# Configuration option allocation/vdo_write_policy.
# Specifies the write policy:
# auto - VDO will check the storage device and determine whether it supports flushes.
# If it does, VDO will run in async mode, otherwise it will run in sync mode.
# sync - Writes are acknowledged only after data is stably written.
# This policy is not supported if the underlying storage is not also synchronous.
# async - Writes are acknowledged after data has been cached for writing to stable storage.
# Data which has not been flushed is not guaranteed to persist in this mode.
# This configuration option has an automatic default value.
# vdo_write_policy = "auto"
}
# Configuration section log.
# How LVM log information is reported.
log {
# Configuration option log/report_command_log.
# Enable or disable LVM log reporting.
# If enabled, LVM will collect a log of operations, messages,
# per-object return codes with object identification and associated
# error numbers (errnos) during LVM command processing. Then the
# log is either reported solely or in addition to any existing
# reports, depending on LVM command used. If it is a reporting command
# (e.g. pvs, vgs, lvs, lvm fullreport), then the log is reported in
# addition to any existing reports. Otherwise, there's only log report
# on output. For all applicable LVM commands, you can request that
# the output has only log report by using --logonly command line
# option. Use log/command_log_cols and log/command_log_sort settings
# to define fields to display and sort fields for the log report.
# You can also use log/command_log_selection to define selection
# criteria used each time the log is reported.
# This configuration option has an automatic default value.
# report_command_log = 0
# Configuration option log/command_log_sort.
# List of columns to sort by when reporting command log.
# See
cat /etc/lvm/lvmlocal.conf
```# This is a local configuration file template for the LVM2 system
# which should be installed as /etc/lvm/lvmlocal.conf .
#
# Refer to 'man lvm.conf' for information about the file layout.
#
# To put this file in a different directory and override
# /etc/lvm set the environment variable LVM_SYSTEM_DIR before
# running the tools.
#
# The lvmlocal.conf file is normally expected to contain only the
# "local" section which contains settings that should not be shared or
# repeated among different hosts. (But if other sections are present,
# they *will* get processed. Settings in this file override equivalent
# ones in lvm.conf and are in turn overridden by ones in any enabled
# lvm_
@MichaIng So I ran the script. I chose "x86_64 Virtual Machine". These are the outputs after running the DietPi_Prep Script:
root@localhost:~# ls -Al /dev/mapper/
total 0
crw------- 1 root root 10, 236 May 17 17:31 control
lrwxrwxrwx 1 root root 7 May 17 18:17 vg00-lv00 -> ../dm-1
lrwxrwxrwx 1 root root 7 May 17 17:32 vg00-lv01 -> ../dm-0
root@localhost:~# cat /etc/fstab
# Please use "dietpi-drive_manager" to setup mounts
#----------------------------------------------------------------
# NETWORK
#----------------------------------------------------------------
#----------------------------------------------------------------
# TMPFS
#----------------------------------------------------------------
tmpfs /tmp tmpfs size=229M,noatime,lazytime,nodev,nosuid,mode=1777
tmpfs /var/log tmpfs size=50M,noatime,lazytime,nodev,nosuid,mode=1777
#----------------------------------------------------------------
# MISC: ecryptfs, vboxsf (VirtualBox shared folder), gluster, bind mounts
#----------------------------------------------------------------
#----------------------------------------------------------------
# SWAPFILE
#----------------------------------------------------------------
#----------------------------------------------------------------
# PHYSICAL DRIVES
#----------------------------------------------------------------
UUID=a74fdb8e-18cb-4438-8652-a900525cf565 / auto noatime,lazytime,rw 0 1
UUID=0fde5837-626f-4cb3-ba89-e0cae8601f55 /boot ext4 noatime,lazytime,rw 0 2
#UUID=msy2Zk-rDPu-iXjf-jabJ-9SVQ-1WnZ-kkOKYS /mnt/msy2Zk-rDPu-iXjf-jabJ-9SVQ-1WnZ-kkOKYS LVM2_member noatime,lazytime,rw,nofail
root@localhost:~# df -a
df: /proc/sys/fs/binfmt_misc: No such device
Filesystem 1K-blocks Used Available Use% Mounted on
sysfs 0 0 0 - /sys
proc 0 0 0 - /proc
udev 219008 0 219008 0% /dev
devpts 0 0 0 - /dev/pts
tmpfs 46992 4120 42872 9% /run
/dev/mapper/vg00-lv01 7792568 599060 6779200 9% /
securityfs 0 0 0 - /sys/kernel/security
tmpfs 234952 0 234952 0% /dev/shm
tmpfs 5120 0 5120 0% /run/lock
tmpfs 234952 0 234952 0% /sys/fs/cgroup
cgroup2 0 0 0 - /sys/fs/cgroup/unified
cgroup 0 0 0 - /sys/fs/cgroup/systemd
pstore 0 0 0 - /sys/fs/pstore
bpf 0 0 0 - /sys/fs/bpf
cgroup 0 0 0 - /sys/fs/cgroup/net_cls,net_prio
cgroup 0 0 0 - /sys/fs/cgroup/freezer
cgroup 0 0 0 - /sys/fs/cgroup/cpu,cpuacct
cgroup 0 0 0 - /sys/fs/cgroup/perf_event
cgroup 0 0 0 - /sys/fs/cgroup/devices
cgroup 0 0 0 - /sys/fs/cgroup/pids
cgroup 0 0 0 - /sys/fs/cgroup/cpuset
cgroup 0 0 0 - /sys/fs/cgroup/memory
cgroup 0 0 0 - /sys/fs/cgroup/rdma
cgroup 0 0 0 - /sys/fs/cgroup/blkio
hugetlbfs 0 0 0 - /dev/hugepages
mqueue 0 0 0 - /dev/mqueue
debugfs 0 0 0 - /sys/kernel/debug
/dev/sda1 474712 24077 421605 6% /boot
tmpfs 46988 0 46988 0% /run/user/0
fusectl 0 0 0 - /sys/fs/fuse/connections
tmpfs 234496 0 234496 0% /tmp
tmpfs 51200 24 51176 1% /var/log
root@localhost:~# blkid
/dev/sda1: UUID="0fde5837-626f-4cb3-ba89-e0cae8601f55" TYPE="ext4" PARTUUID="bc873d4a-01"
/dev/sda2: UUID="msy2Zk-rDPu-iXjf-jabJ-9SVQ-1WnZ-kkOKYS" TYPE="LVM2_member" PARTUUID="bc873d4a-02"
/dev/mapper/vg00-lv01: UUID="a74fdb8e-18cb-4438-8652-a900525cf565" TYPE="ext4"
/dev/mapper/vg00-lv00: UUID="99a6095c-5433-471c-b8f7-b7de434d6921" TYPE="swap"
root@localhost:~# lsblk
NAME MAJ:MIN RM SIZE RO TYPE MOUNTPOINT
sda 8:0 0 10G 0 disk
|-sda1 8:1 0 487M 0 part /boot
`-sda2 8:2 0 9.5G 0 part
|-vg00-lv01 254:0 0 7.6G 0 lvm /
`-vg00-lv00 254:1 0 1.9G 0 lvm
sr0 11:0 1 1024M 0 rom
I then updated the package list with apt-get update, installed lvm2 and dependencies, and changed fstab to following:
root@localhost:~# cat /etc/fstab
# Please use "dietpi-drive_manager" to setup mounts
#----------------------------------------------------------------
# NETWORK
#----------------------------------------------------------------
#----------------------------------------------------------------
# TMPFS
#----------------------------------------------------------------
tmpfs /tmp tmpfs size=229M,noatime,lazytime,nodev,nosuid,mode=1777
tmpfs /var/log tmpfs size=50M,noatime,lazytime,nodev,nosuid,mode=1777
#----------------------------------------------------------------
# MISC: ecryptfs, vboxsf (VirtualBox shared folder), gluster, bind mounts
#----------------------------------------------------------------
#----------------------------------------------------------------
# SWAPFILE
#----------------------------------------------------------------
#----------------------------------------------------------------
# PHYSICAL DRIVES
#----------------------------------------------------------------
/dev/mapper/vg00-lv01 / ext4 errors=remount-ro 0 1
#UUID=a74fdb8e-18cb-4438-8652-a900525cf565 / auto noatime,lazytime,rw 0 1
UUID=0fde5837-626f-4cb3-ba89-e0cae8601f55 /boot ext4 noatime,lazytime,rw 0 2
#UUID=msy2Zk-rDPu-iXjf-jabJ-9SVQ-1WnZ-kkOKYS /mnt/msy2Zk-rDPu-iXjf-jabJ-9SVQ-1WnZ-kkOKYS LVM2_member noatime,lazytime,rw,$
So basically I commented the line with UUID=a74fdb8e-18cb-4438-8652-a900525cf565 / auto noatime,lazytime,rw 0 1
and added /dev/mapper/vg00-lv01 / ext4 errors=remount-ro 0 1
.
The I checked again with ls -Al /dev/mapper/
and it looked the same like posted at the top of this post.
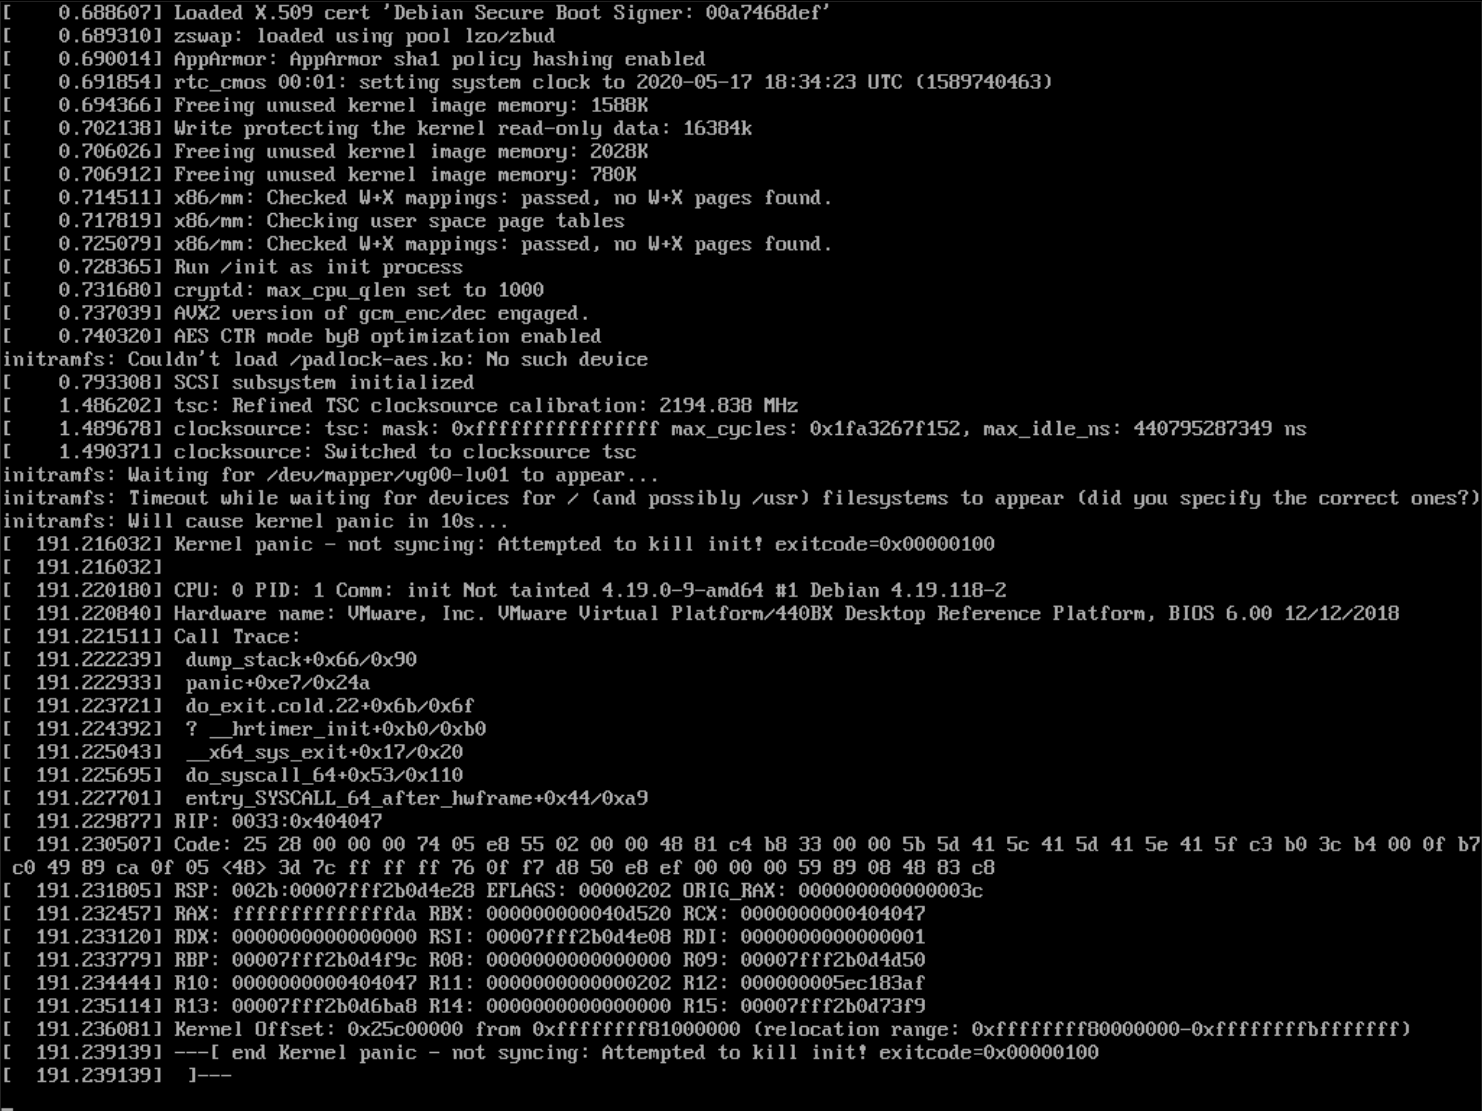
I rebooted and now I get a different error message in KVM Console. It somehow waits for /dev/mapper/vg00-lv01
to appear and after a while it jumps to Kernel-Panic:
See Screenshots from KVM Console (Sorry, couldn't copy and paste it):
And at the Server Info Page I get this warning:
VMware Tools: Die VMWare Tools sind nicht auf dem Server installiert. Die VMware Tools bestehen aus einer Reihe von Dienstprogrammen, die Sie im Betriebssystem des Servers installieren. Installieren Sie die VMware Tools, damit der ordnungsgemäße Betrieb Ihres Servers gewährleistet werden kann.
So basically it says that the VMWare Tools are not installed on the server. Maybe it's necessary to install the VMWare Tools to run the mapper devices.?!
Will try it again later but additionally install VMWare Tools.
Have a nice evening!
@rondadon Since the errors occurred within the initramfs, probably updating it is required as well:
update-initramfs -u
Possibly when removing lvm2, the initramfs is updated to not attempt loading this module. Hence when installing it again, it might be required to update it again to load it.
The LVM configs look like defaults, no entries for specific devices.
Also to get some more details about the VPS setup:
dpkg --get-selections 'linux-image*' '*initramfs*' 'grub*' '*boot*'
ls -l /lib/modules/
@MichaIng
update-initramfs -u
did the trick!!!
Needed to install the initramfs-tools package to be able tu run update-initramfs -u
.
Wow... You can't imagine how happy I am that it works now. I can not thank you enough..
I forgot to run the following prior to running the script. Will revert to the clean debian install and will run this command.
dpkg --get-selections 'linux-image*' '*initramfs*' 'grub*' '*boot*'
ls -l /lib/modules/
Now converted to dietpi, it boots flawelessly, I can login via ssh and tinker with it. Do you need some info for the dietpi install now? Only the SWAP Partition needs to be mounted now.
Man, this made my day... !
many thanks for confirmation. I linked the solution back to the forum post to have the loop completed.
@rondadon
Ah, I didn't think about that we install tiny-initramfs
on VMs, update-tirfs
would have been the command to update it. However probably tiny-initramfs
does not support LVM, so that the regular initramfs-tools
may be required anyway.
I forgot to run the following prior to running the script. Will revert to the clean debian install and will run this command.
Would be awesome, although not too important as we now know how to make it working 😃.
Only the SWAP Partition needs to be mounted now.
Yes, you can do the following:
# Disable the DietPi swap file
/boot/dietpi/func/dietpi-set_swapfile 0
# Create swap partition
mkswap /dev/mapper/vg00-lv00
# Enable swap partition
swapon /dev/mapper/vg00-lv00
# Mount swap partition on boot
echo '/dev/mapper/vg00-lv00 none swap sw' >> /etc/fstab
So to summerize what I did:
apt-get update
and then apt-get install lvm2 initramfs-tools
UUID=a74fdb8e-18cb-4438-8652-a900525cf565 / auto noatime,lazytime,rw 0 1
and add the line
/dev/mapper/vg00-lv01 / ext4 errors=remount-ro 0 1
and save it!update-initramfs -u
Now the Swapfile is using the space on / (about 1.5GB) so we need to disable the swapfile and enable the SWAP partition of the VMware VPS by doing following (as shown above by Michalng):
/boot/dietpi/func/dietpi-set_swapfile 0
mkswap /dev/mapper/vg00-lv00
swapon /dev/mapper/vg00-lv00
echo '/dev/mapper/vg00-lv00 none swap sw' >> /etc/fstab
swapon --show
It should show something like this if it's activated/enabled:
root@DietPi:~# swapon --show
NAME TYPE SIZE USED PRIO
/dev/dm-1 partition 1.9G 0B -2
Additional Info:
df -h before activating SWAP Partition:
root@DietPi:~# df -h
Filesystem Size Used Avail Use% Mounted on
udev 215M 0 215M 0% /dev
tmpfs 46M 2.3M 44M 5% /run
/dev/mapper/vg00-lv01 7.5G 2.2G 4.9G 31% /
tmpfs 230M 0 230M 0% /dev/shm
tmpfs 5.0M 0 5.0M 0% /run/lock
tmpfs 230M 0 230M 0% /sys/fs/cgroup
tmpfs 1.0G 0 1.0G 0% /tmp
tmpfs 50M 8.0K 50M 1% /var/log
/dev/sda1 464M 50M 386M 12% /boot
df -h AFTER activating SWAP Partition:
root@DietPi:~# df -h
Filesystem Size Used Avail Use% Mounted on
udev 215M 0 215M 0% /dev
tmpfs 46M 2.3M 44M 5% /run
/dev/mapper/vg00-lv01 7.5G 632M 6.5G 9% /
tmpfs 230M 0 230M 0% /dev/shm
tmpfs 5.0M 0 5.0M 0% /run/lock
tmpfs 230M 0 230M 0% /sys/fs/cgroup
/dev/sda1 464M 50M 386M 12% /boot
tmpfs 50M 0 50M 0% /var/log
tmpfs 229M 0 229M 0% /tmp
Question still to find an answer for:
BTW: I installed debian again and ran the commands mentioned above by @MichaIng . These are the results:
root@localhost:~# dpkg --get-selections 'linux-image*' '*initramfs*' 'grub*' '*boot*'
linux-image-4.19.0-5-amd64 install
linux-image-4.19.0-9-amd64 install
linux-image-amd64 install
initramfs-tools install
initramfs-tools-core install
grub-common install
grub-pc install
grub-pc-bin install
grub2-common install
libefiboot1:amd64 install
root@localhost:~# ls -l /lib/modules/
total 8
drwxr-xr-x 3 root root 4096 Aug 29 2019 4.19.0-5-amd64
drwxr-xr-x 3 root root 4096 May 18 22:50 4.19.0-9-amd64
I hope that is all. Thank you again for your effort, help and time to get this resolved! I am really happy now being able to use dietpi on ionos VPS. It uses like 30-40 MB less ram and also about roughly half of the space on / . I hope this is also of help for others trying to run dietpi on their (IONOS) VPS!
@MichaIng I was facing following error message during PREP script usage. However PREP was running find and finished at the end
[ INFO ] DietPi-PREP | Disable package state translation downloads
[ OK ] DietPi-PREP | Preserve modified config files on APT update
./PREP_SYSTEM_FOR_DIETPI.sh: line 753: ((: > 5 : syntax error: operand expected (error token is "> 5 ")
[ INFO ] DietPi-PREP | APT install for: libraspberrypi-bin libraspberrypi0 raspberrypi-bootloader raspberrypi-kernel raspberrypi-sys-mods raspi-copies-and-fills, please wait...
Jep, this has been fixed here: https://github.com/MichaIng/DietPi/commit/16a1e9f405ebe0746b3561b60f0c4143c819977f
Only relevant for Bullseye (where systemd-timesyncd
became an own package) and even there it would be installed or kept as dependency of systemd
. Only on Bullseye, when a different time sync daemon is installed already, this would be kept and systemd-timesyncd
would be missing without the fix 😉.
Hello @Fourdee and @MichaIng ,
It's been a loooong time. I hope you two are doing well in this pandemic age... LOL
I have a new challenge... Do you think something like this would work for getting a dietpi image running in a chroot on a Chromebook? I need a thin dev environment and all the targets that I have tried through Crouton are bogging down my older Chromebook.
-Rob Kean
Hi Rob, nice to see you stopping by. Yes did and doing well here during pandemic, luckily coding basically implies limited infection risk 😄. I hope you're doing fine as well.
We made large progress to make DietPi + DietPi-PREP running inside a chroot, allowing to automate things. Image creation is currently mostly done by booting images via losetup
images files and systemd-nspawn -bD /mnt/mountpoint
, so aside of some "/sys/something is read-only..." like errors and obsoletely failing network setup (fixed from host) this works fine and reduces the overhead largely. I use a set of such images for compiling/building binaries and packages hosted on https://dietpi.com/downloads/binaries/, bootloader+initramfs+kernel can be purged, then it is quite thin. binfmt-support
+ qemu-user-static
can be used to boot ARM images on x86 hosts, systemd-nspawn
invokes those automatically when required, so cross compiling and testing can be made in one step. But it takes much more time due to emulation for every single binary call, so only useful when builds can run unattended and time does play no role 😉.
Any chance this dietpi-prep script would work with an older 32 bit laptop? Last I checked debian still supported 32 bit but it's not in the list of choices for dietpi although 32 bit for other architectures IS available. Yes I know 32 bit is ancient but I just have difficulty in tossing a perfectly working laptop into the trash when it's still usable for so many things.
Hi,
I guess this will answer your question. #4024 Short answer is: no
Getting a 404 when trying to get PREP script via raw.githubusercontent.com... Has this been moved to another URL please?
Yes it has: https://raw.githubusercontent.com/MichaIng/DietPi/master/.build/images/dietpi-installer
For reference our updated docs: https://dietpi.com/docs/hardware/#make-your-own-distribution
Status: Beta
What is this?
What this script does NOT do:
Step 1: Ensure a Debian/Raspbian OS is running on the system
Step 2: Pre-req packages
apt-get update; apt-get install -y systemd-sysv ca-certificates sudo wget locales --reinstall
Step 3: Run DietPi installer
Ensure you have elevated privileges (eg: login as
root
, or usesudo su
).Copy and paste all into term.
Follow the onscreen prompts.