 jmwall24
commented
5 years ago
jmwall24
commented
5 years ago Not sure if this is just your WIP, but this will probably be better served in the Wiki.
Closed LordBaaa closed 3 years ago
jmwall24
commented
5 years ago Not sure if this is just your WIP, but this will probably be better served in the Wiki.
 multimokia
commented
5 years ago
multimokia
commented
5 years ago Just FYI. I'd shy away from giving people access to the dev console. We removed it from the main repository for a reason. If you wanted to do something like this, sure you can make a dev tool, but have it done via topics which you can use to access everything, similar to the dev rpy's we have in the dev version.
You can PR those as well.
 LordBaaa
commented
5 years ago
LordBaaa
commented
5 years ago @jmwall24 I am not sure if you mean I should put it in the wiki or if people should use the wiki instead. It is a WIP however each section contains a template and or explanation of what to do so all of the sections aside from the advanced one are complete I just need to remove the console stuff and add in the label version which I was already planning on adding.
@multimokia if you read my parenthesis I said I am gonna make a label version aka do it from a rpy file as opposed to the console. The console it just what I use and I wanted to write this for a while and to respond to #4314. I didn’t have enough time to add the “dev tool” version before I left. I was hopping this tutorial would be helpful to people because a few people I have talked to have had a hard time understanding the wiki. Also what does “PR those as well” mean?
jmwall24
commented
5 years ago @LordBaaa I meant when it is done, you should put it in the Wiki. Anyone can update the wiki, and this the kind of thing it is meant for.
LordBaaa
commented
5 years ago @jmwall24 Oh I didn’t know I could update the wiki. I just put it here cause that is the only place I though I could.
multimokia
commented
5 years ago When you have the dev tool versions, I mean to make a pull request submitting them. That way anyone who installs the developer build of MAS can use them.
LordBaaa
commented
5 years ago @multimokia Ahh sorry I am not the best with abbreviations. Aside needing the dev tools version what do you think of what I covered? I was trying to make it a bit more average user understandable.
 bittercaramel
commented
5 years ago
bittercaramel
commented
5 years ago woah finally something understandable i didnt get anything from official wiki and i had to figure it out on my own xD thought i was doing it wrong but actually i wasnt thanx for this
LordBaaa
commented
5 years ago @bittercaramel Good, I’m glad it helped you. :)
Okay so you want to add a ACS to the game. Well lets start with a basic single pose ACS.
See the Advanced Section(Comming Soon) for full explanation of each bit but for now let just get something in the game.
gamefolder. This will enable the console and allow you test your sprites more easily. (You can remove unren when your done.) (edit: removing this zip for now until we decide just how readily available we want the console for the masses - @jmwall24)(I will add a version of how to do this with labels later but for now I am gonna show you how ot use console commands)
(Templates.zip is comming soon couldn't finish all of this before I had to go out of town) (All templates should work with no problems but if there problems let me know. Also I will DOUBLE Check for the billionth time when I come back)
Preparing Images (Read me first)
Start by downloading the After Story Base psd's from here. We will be using these a lot. We will be using this piano clip art I found as base for the Basic ACS, Hairclip and Plushie
Import your image, resize, position it and save the layer by itself for day time mode and apply the twilight group for night time.
Next we resize the images to 1280 by 850 In another program like GIMP or Paint.Net
Preparing Images for ACS
Contents
Images for **ACS** start with the header `acs-` followed by `spritename` followed by `-pose` ended by `-n` for night time mode. or `acs-Basic ACS (Single Pose ACS)
An example of this naming style in action is the Basic ACS section where we will be naming out sprites `acs-piano-0.png` and`acs-piano-0.png` which is the night time version. - the name `piano` could be replaced with any name for your sprite. 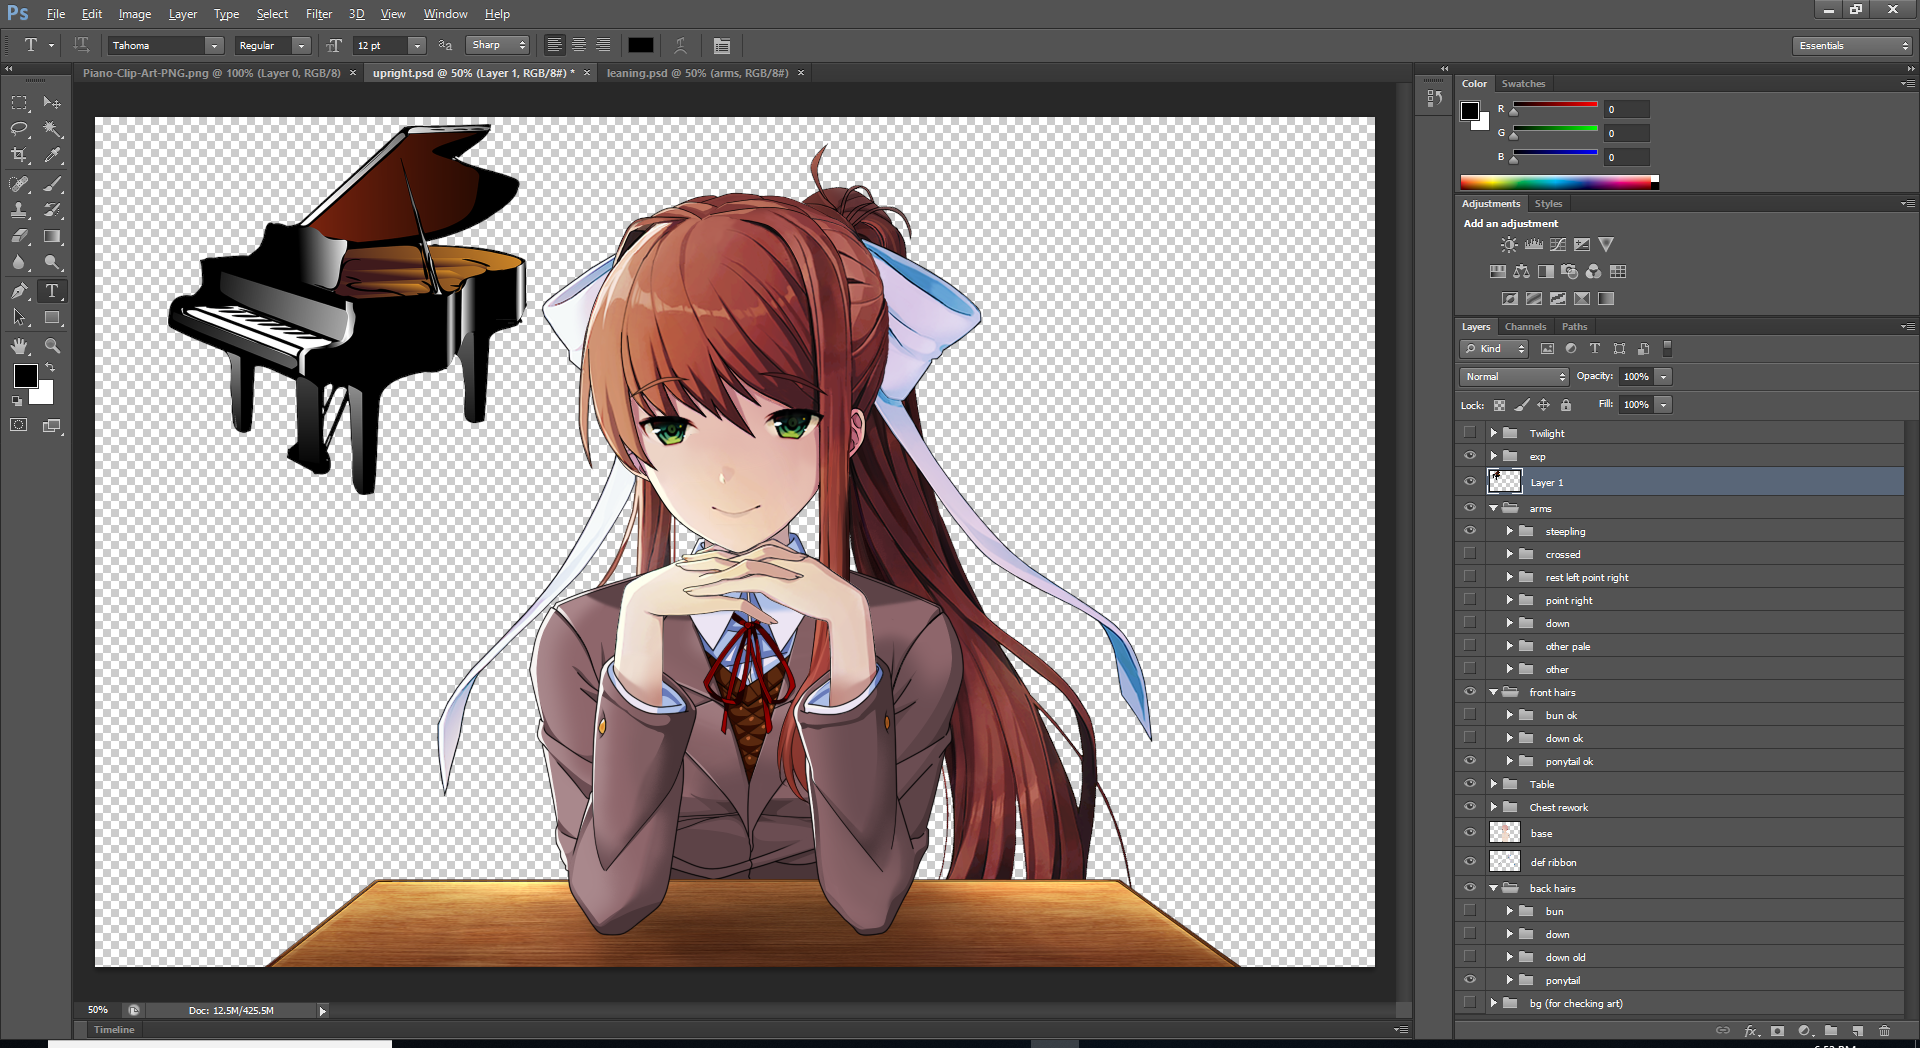 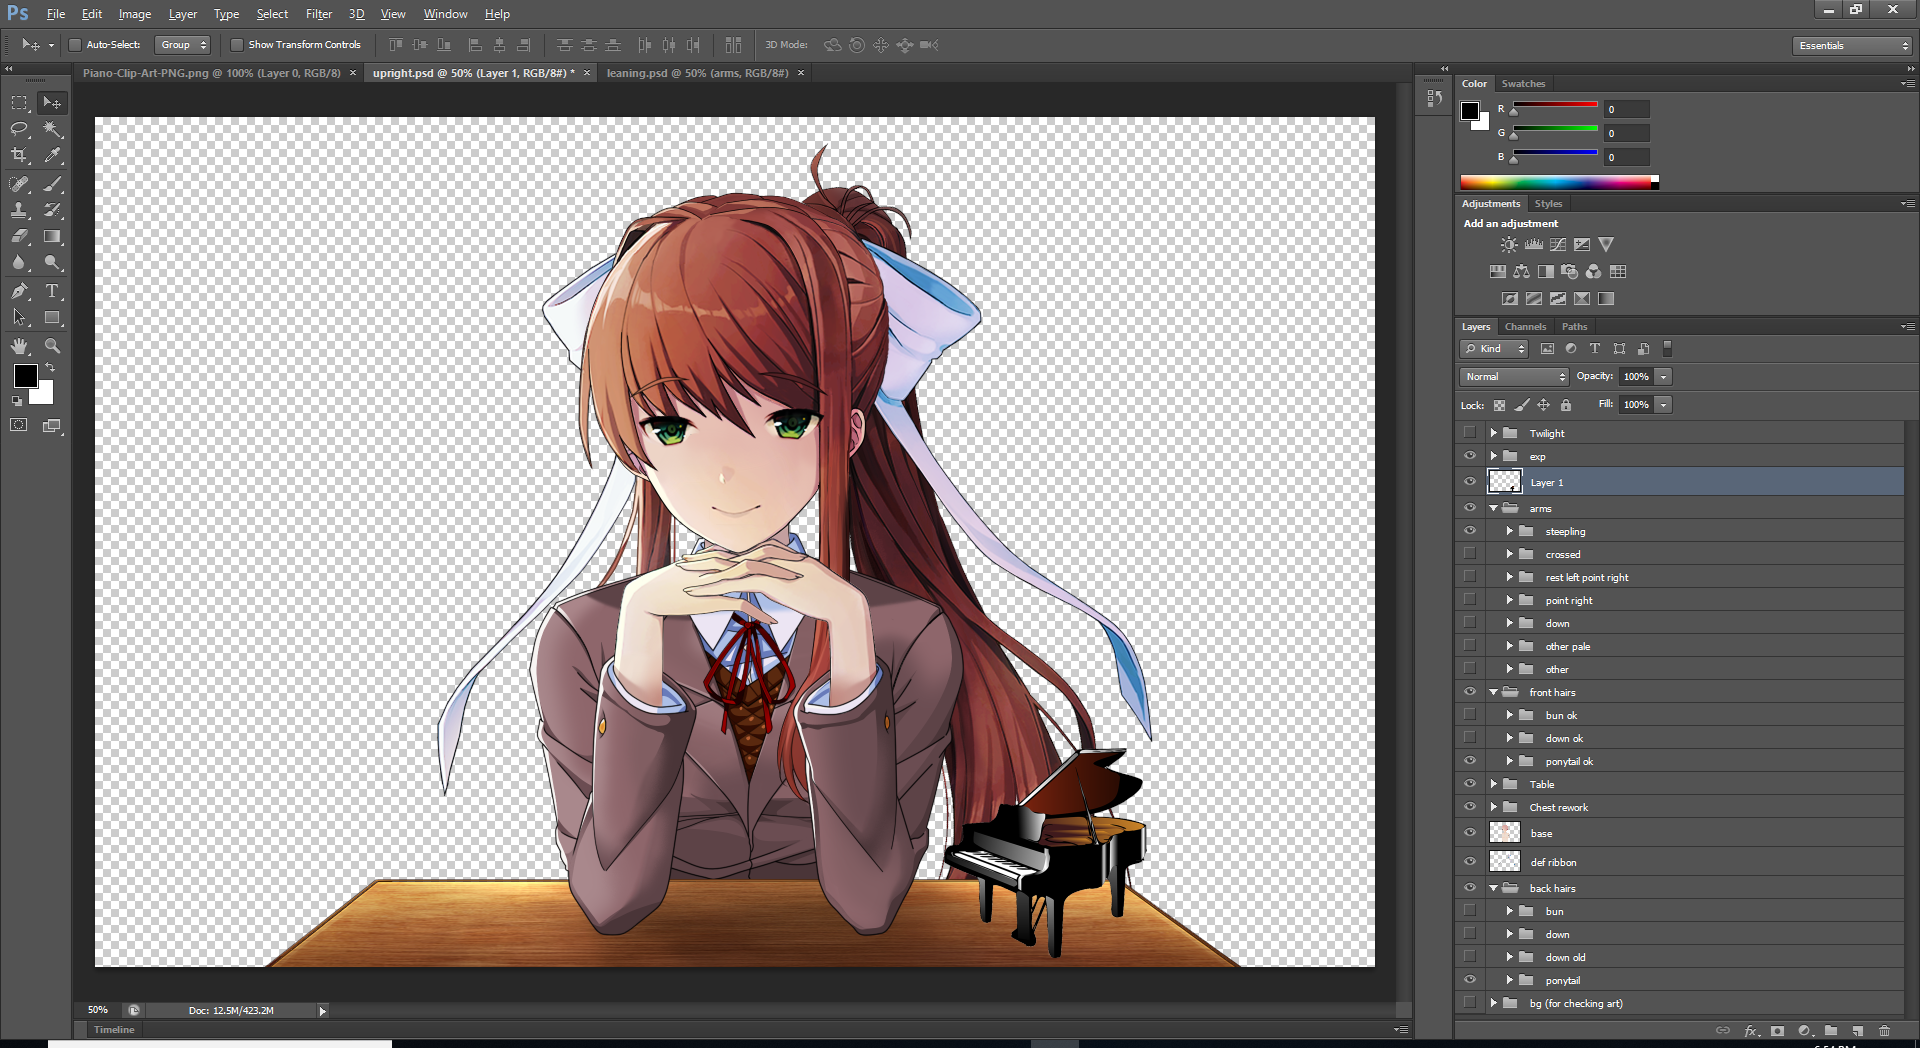  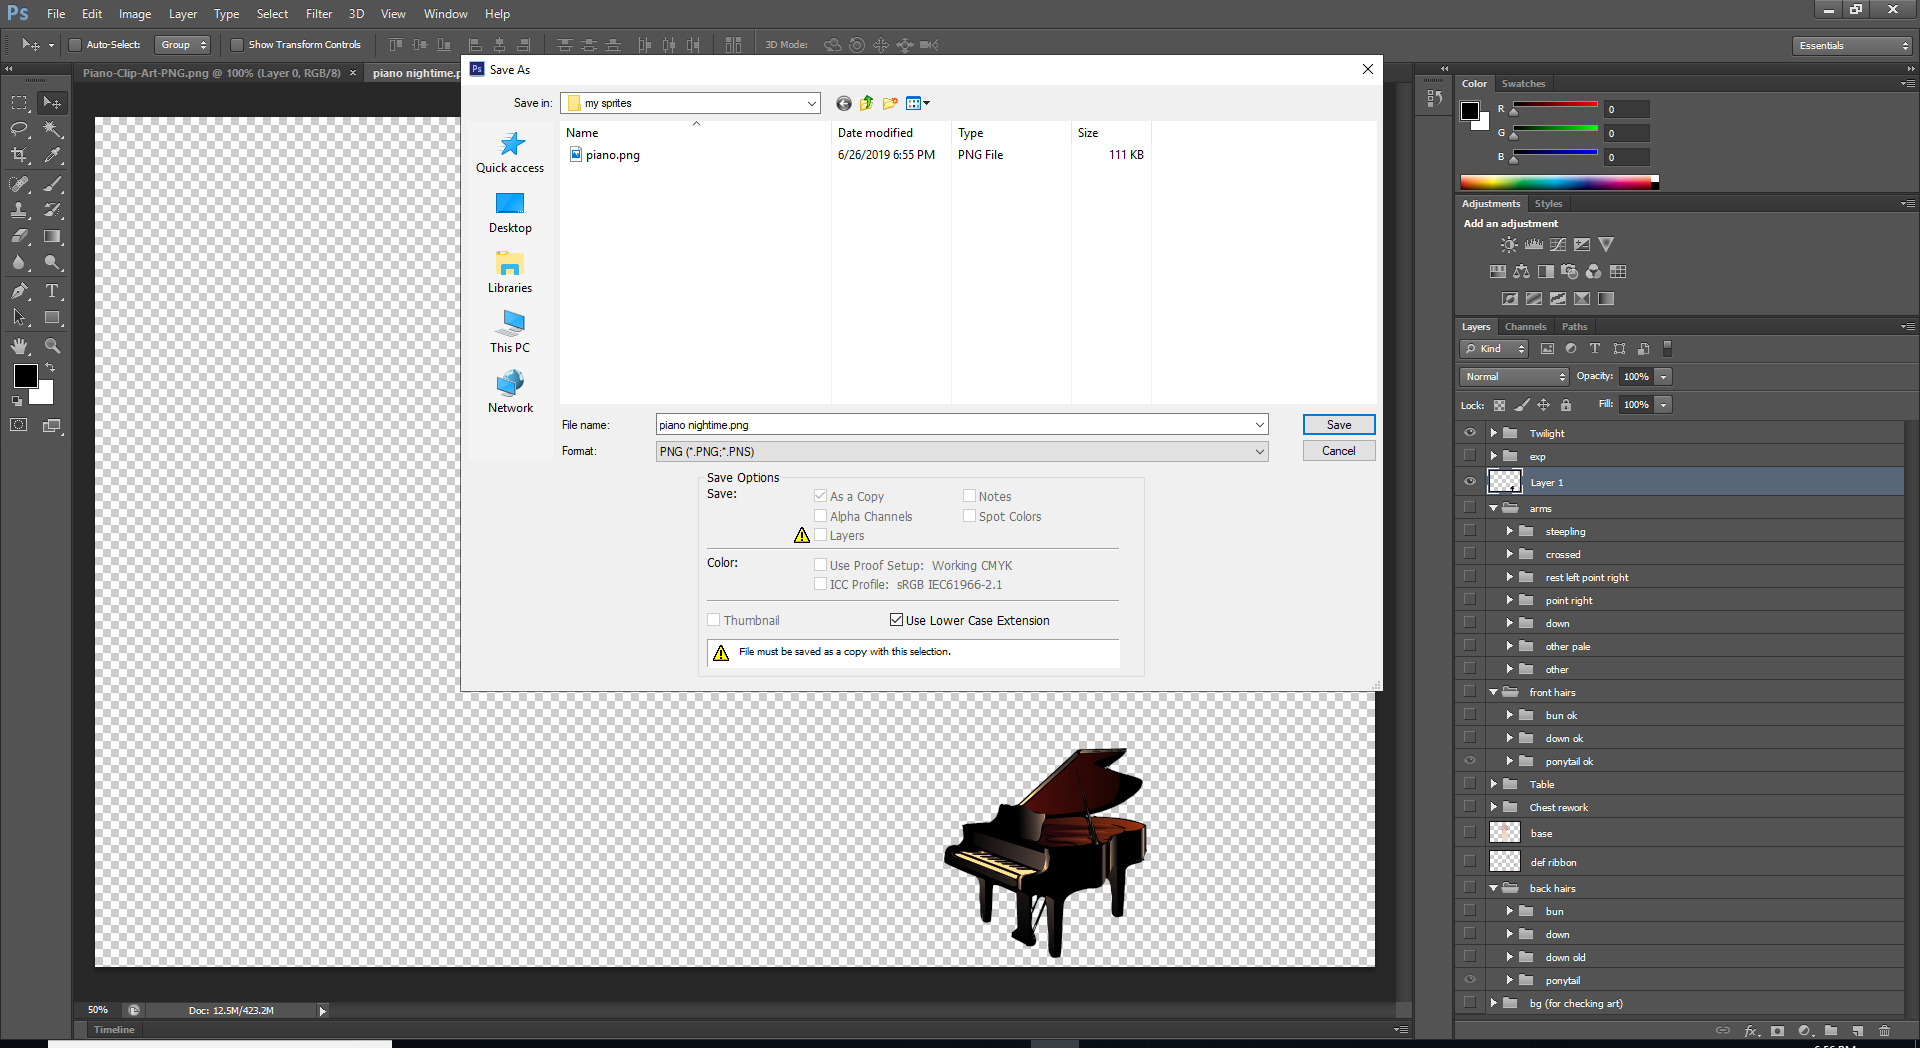 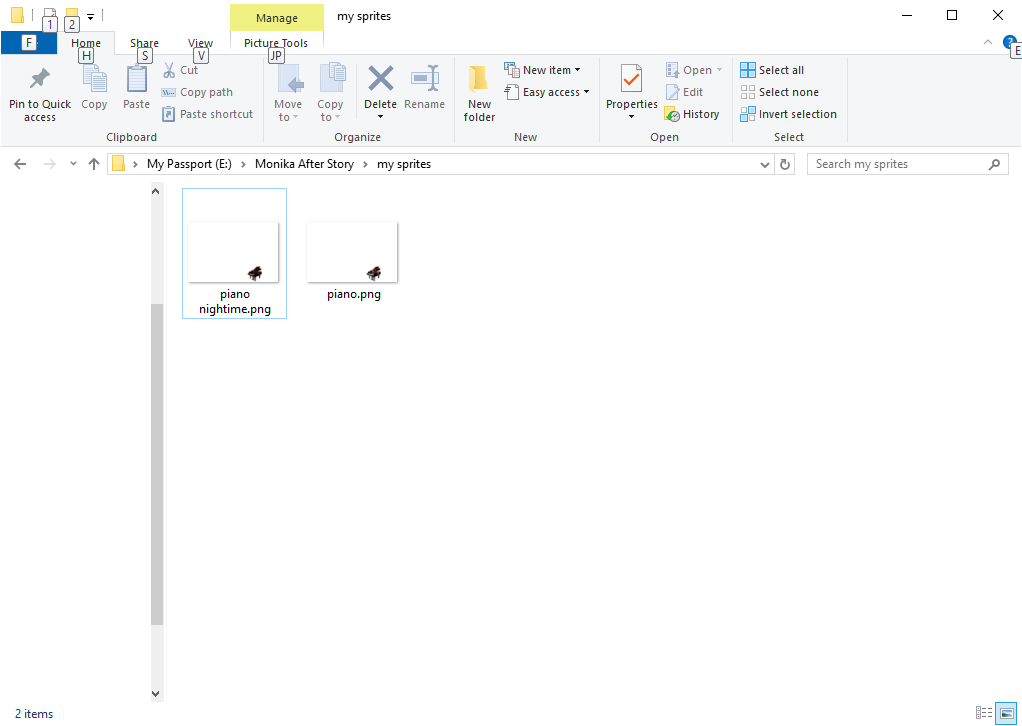 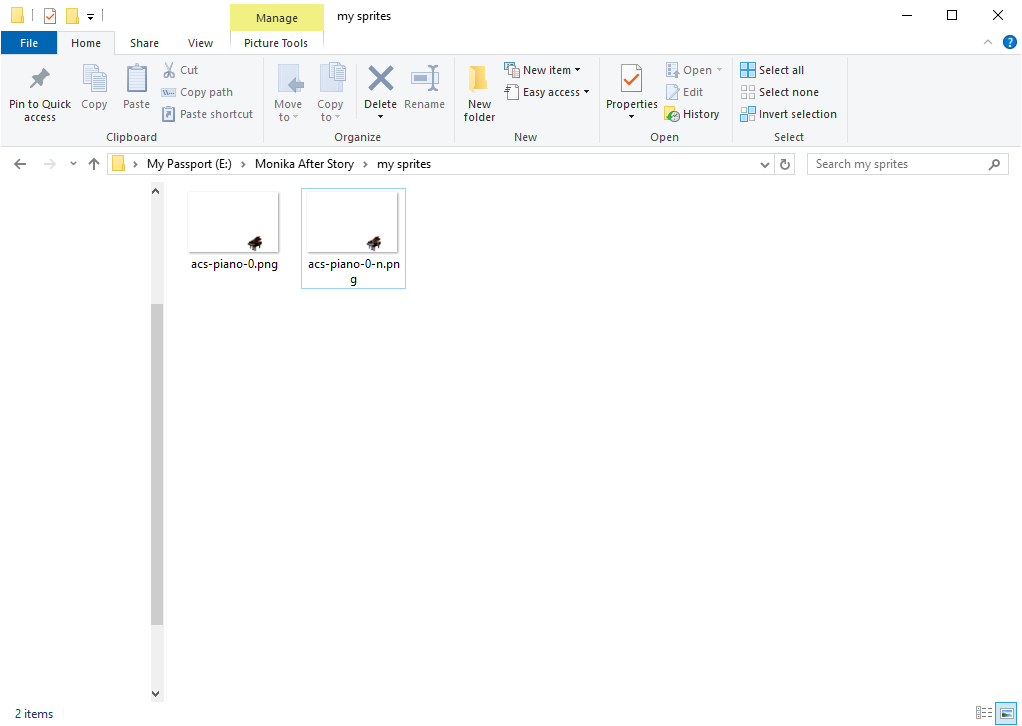Hairclip/Ribbon (Two Pose ACS)
An example of this naming style in action is in the hairclip section where we would name our files 'acs-piano-hairclip-0.png' and 'acs-piano-hairclip-5.png' for daytime versions and 'acs-piano-hairclip-0-n.png' and 'acs-piano-hairclip-5-n.png' as night version. - `0` is for upright and `5` is for leaning in this example. - Change `acs-piano-hairclip-0.png` `to acs-piano-ribbon-0.png` or something like that if you are doing a ribbon.  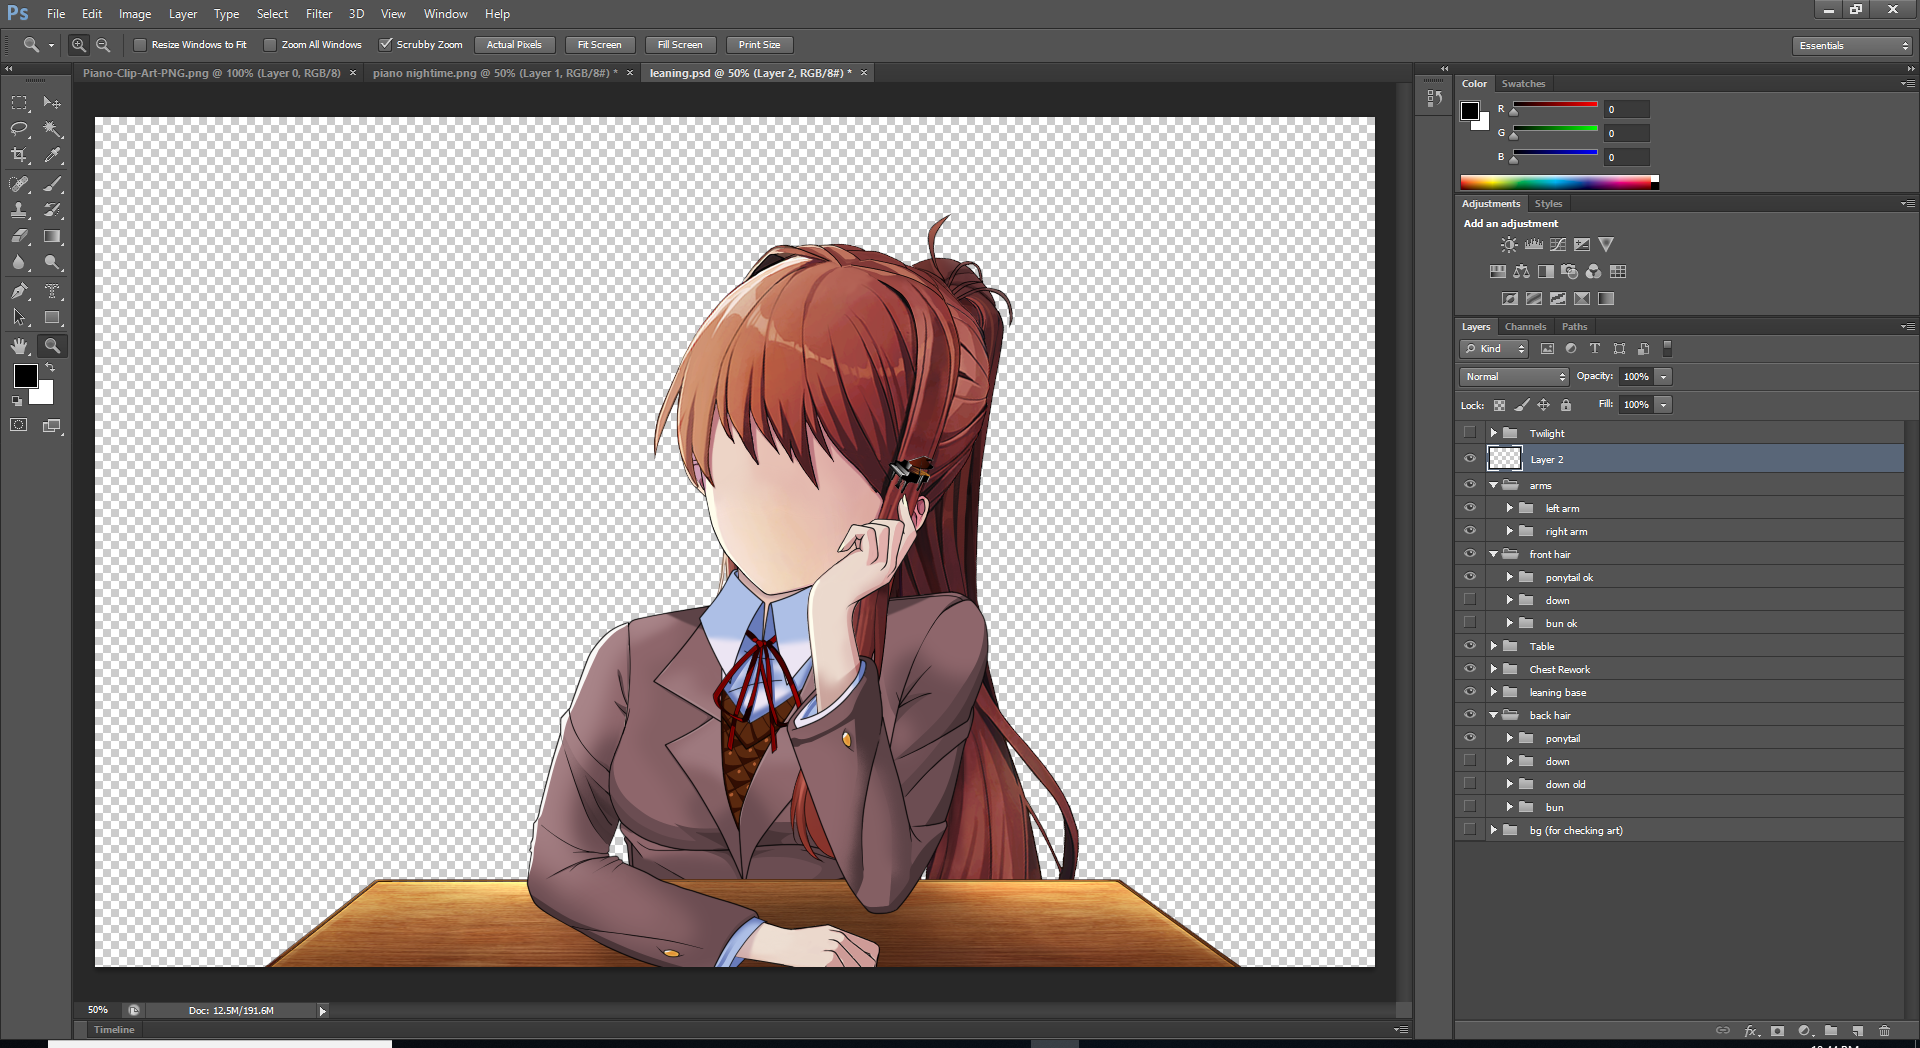 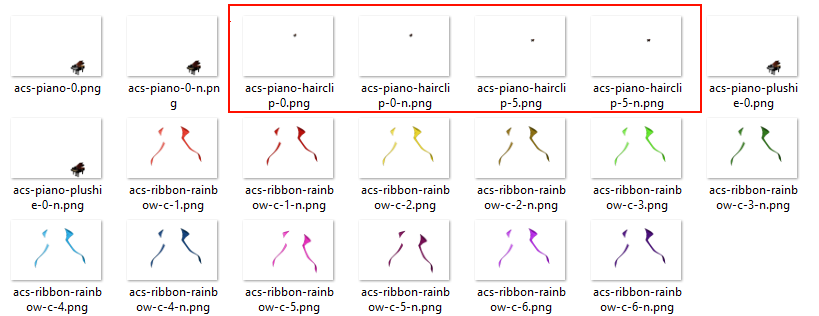Multipose ACS T(Three or more poses, in this case all six)
This is an example from Multipose ACS that I did. There are six poses and a day/night version for each of them. 1. steepling 2. crossed 3. restleftpointright 4. pointright 5. leaning 6. down 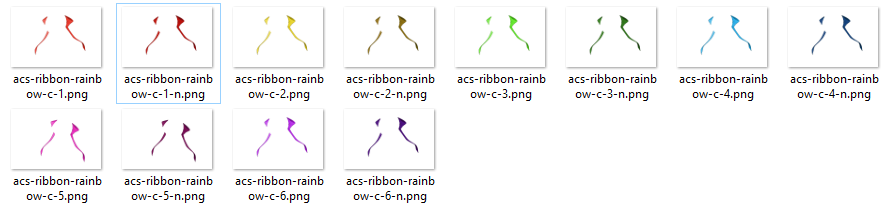Preparing Images for Hair
Contents
Hair is a bit different. So the name are for upright are `hair-Preparing Images for clothes
Contents
The naming style for clothes is a bit different then ACS. Firstly the path for clothes is `mod_assest\monik\c`. For clothes in the template `img_sit` you specify a **folder** name not a **file** name! This is very important. The rest of naming can pretty much be exactly the same. 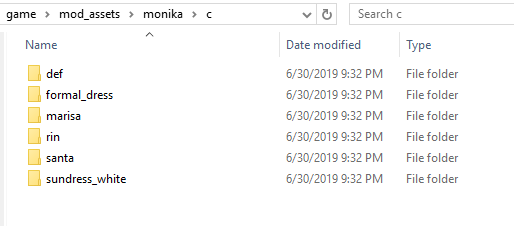 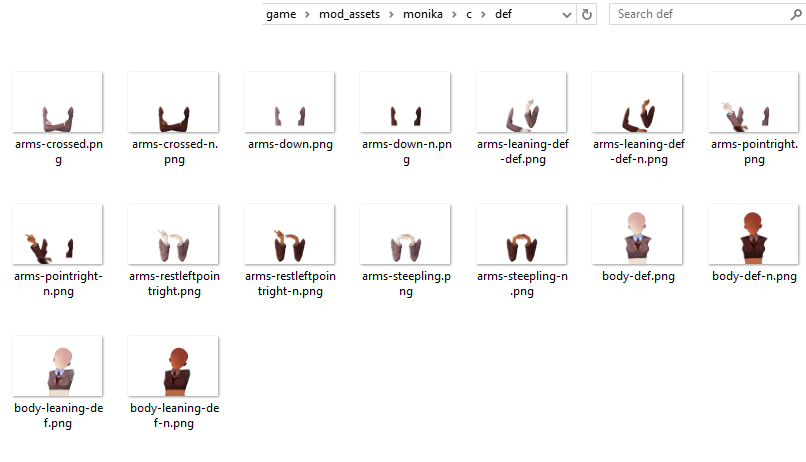 Don't worry about how they are named. My advise is just make a copy of the `def` clothing folder and overwrite images as you go that way you can use the already established naming convention. Also for thumbs you will need to name the file `clothes-Preparing thumbs
Contents
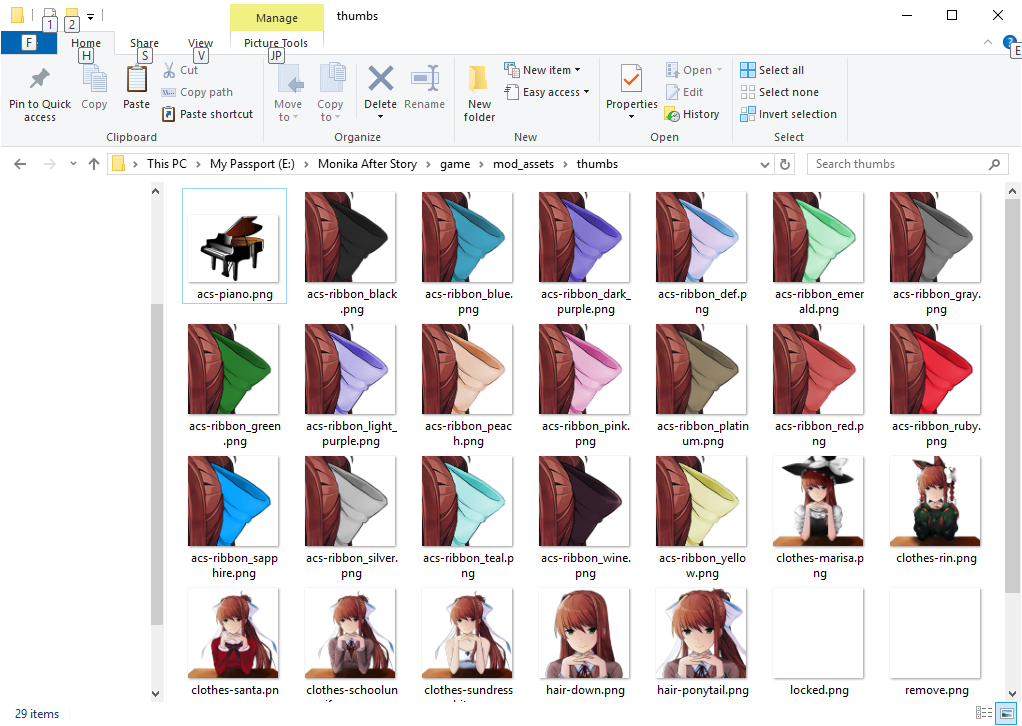
Thumbnails are stored in `mod_assests\thumbs` folder. - thumbs start with prefix for the type its `acs-`, `clothes-`, or `hair-` then `your name` and finally `.png` - Make your image is 180 by 180 - Example name is `acs-piano-hairclip.png` - Copy it to your `mod_assests\thumbs` folderLike this
Here is an example of making a ribbon Thumbnail
The easiest way to make a ribbon thumb is to take an existing ribbon thumbnail and your new ribbon. Put the new ribbon over the thumbnail. Basically just open both up and cut the part of the new ribbon and paste it in a new layer over the thumbnail being careful not to expand the canvas size. Then just use your arrow keys to line up pixel to pixel and hide the layers to check your work against the original. Like this. (Using paint.net btw) 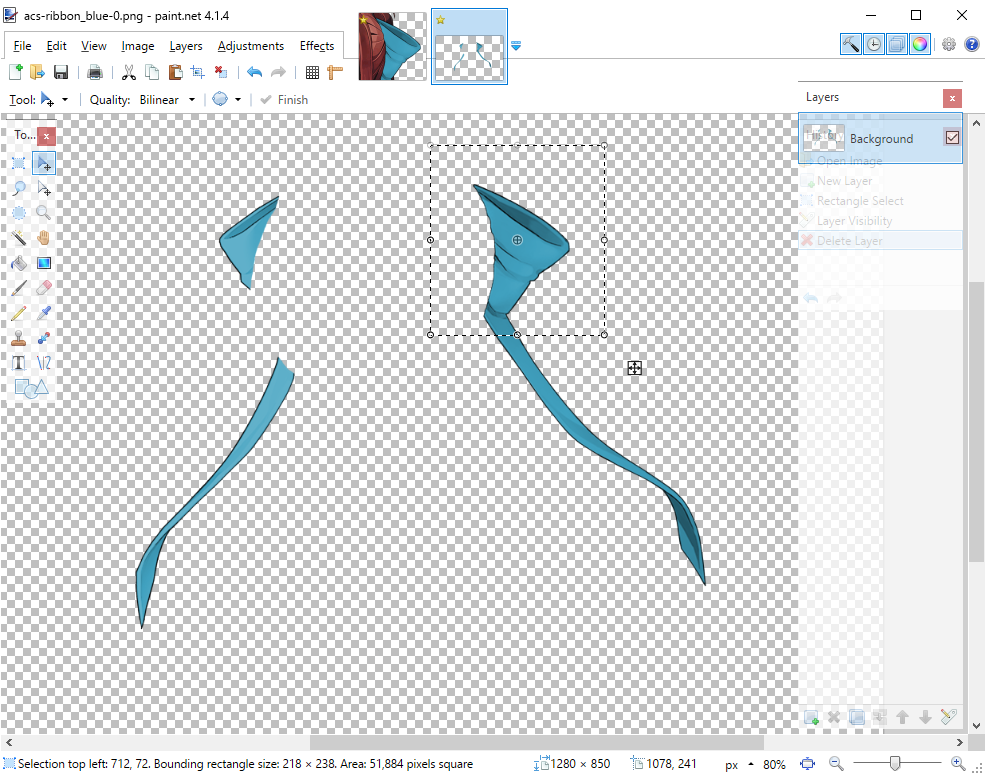 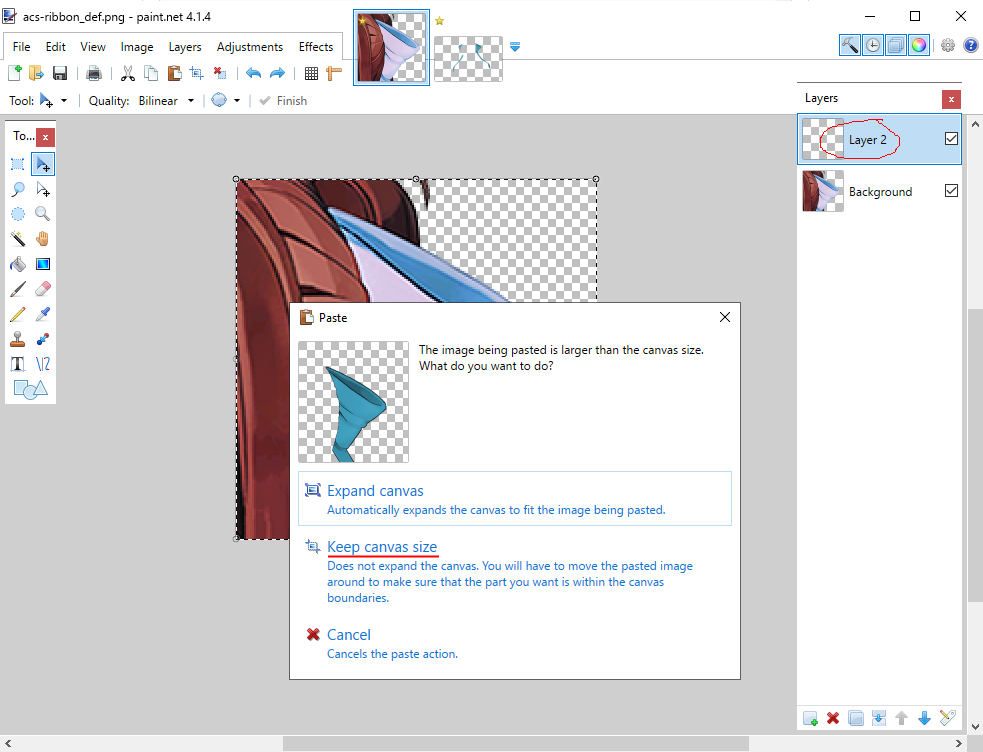 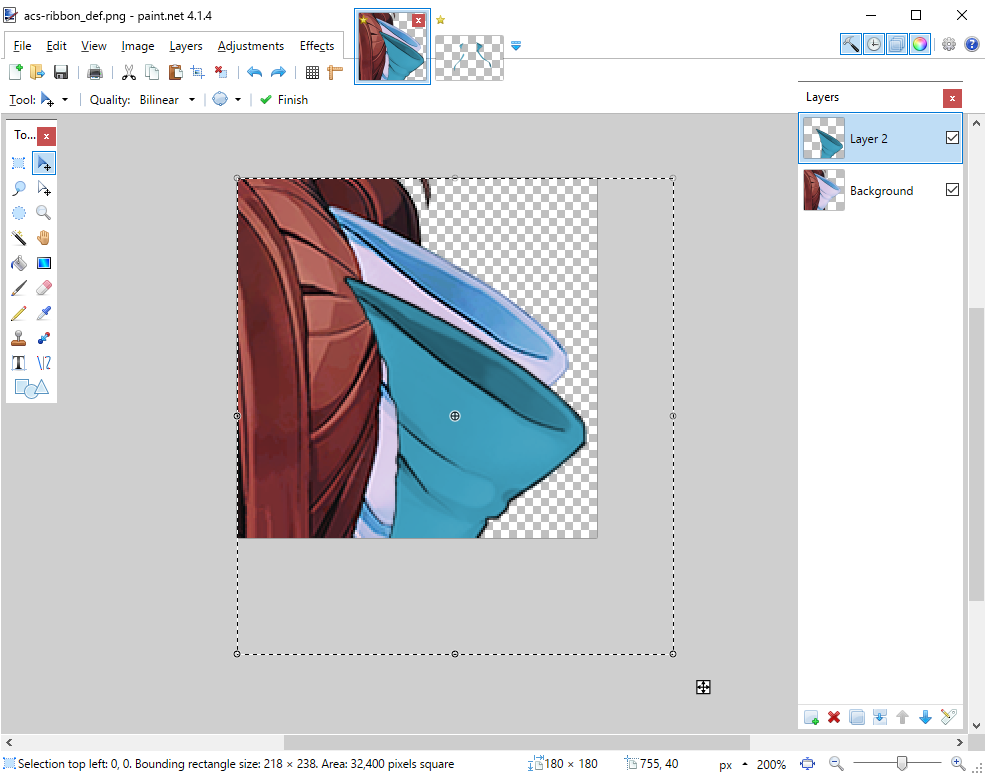 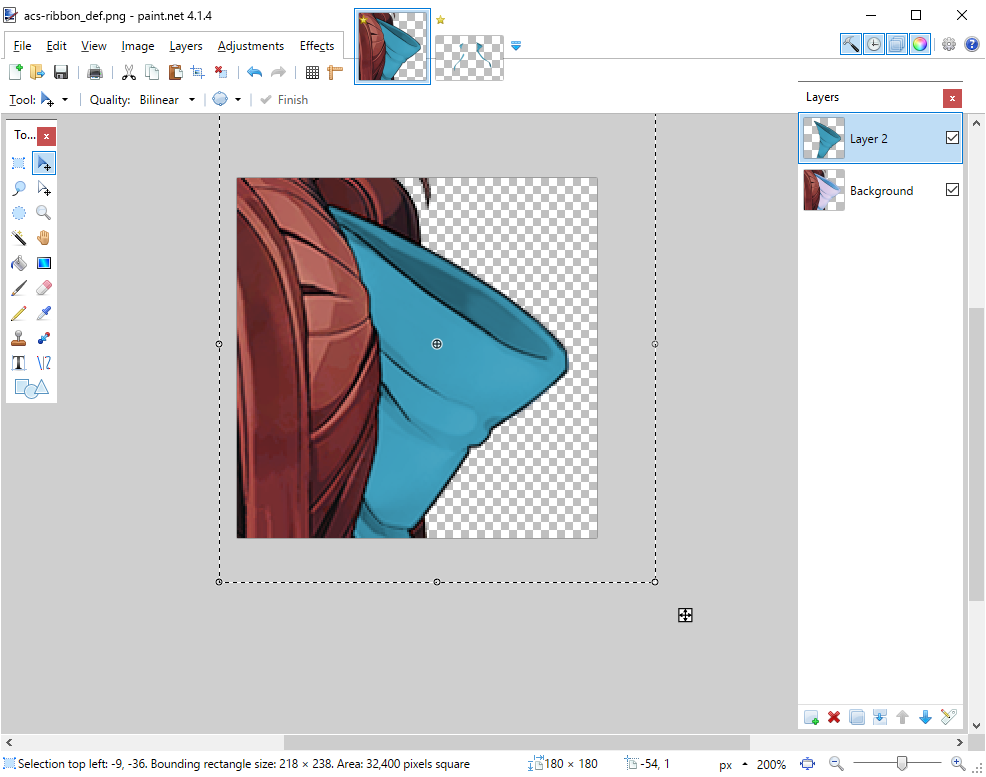
Coding
Basic ACS (For demonstration purposes only. Don't use otherwise)
Contents
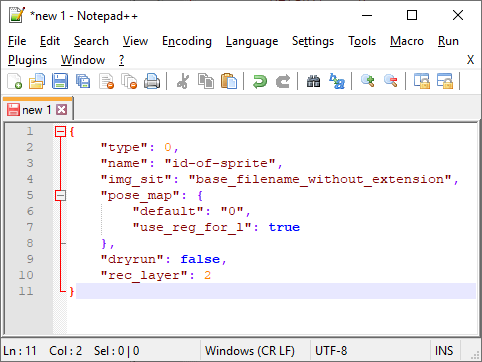
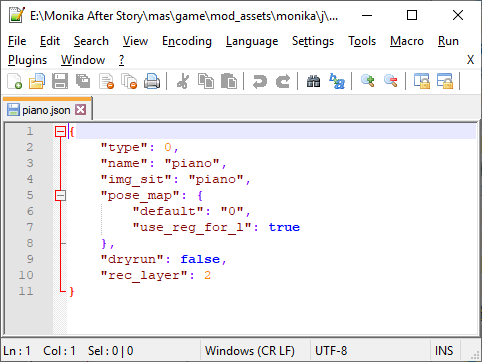
Read the **Preparing Images for ACS** before following this section. This is a really simple template just to get something in game. This is not really good for anything but this example but I just want you to get your feet wet.REALLY simply ACS Code Template
```java { "type": 0, "name": "id-of-sprite", "img_sit": "base_filename_without_extension", "pose_map": { "default": "0", "use_reg_for_l": true }, "dryrun": false, "rec_layer": 2 } ```
My code example
 Filling Out Templates (Read me before reading below sections)
Contents
In the following sections you will be filling out templates. Here are the important section you will need to fill out. Before your proceed you must know. Only gift her the sprite **AFTER** after you remove the `dryrun `line! (read entry 8 of this section). If gift her something before hand and it it is not in the game she wont be able to see it. Plus if she reacts to something that doesn't work then when you add it properly she won't react at all. See Advanced Section(Coming Soon) to fix the gifted to soon problem. Once you fill out the below section you are gonna save whatever template as a `.json` in the `game\mod_assests\monika\j` folder. Look at templates.zip for examples 1. `name`, this is the name that the game will see. 2. `img_sit` this is the name of the image/or images you will be using -for acs this is the file name without any prefixies or suffixes without any prefixes see **Preparing Images for ACS** for reference. - For clothes you specify a **folder** name not a **file** name! see **Preparing Images for Clothes** for reference. 3. `display_name`, this is the name that will appear in selectors like for ribbons and hairclip 4. `thumb` this is the name of your thumbnail without the prefix. See **Preparing Thumbnails** for more info 5. `hover_dlg` This is what will be said when your mouse is over the ACS in a selector menu 6. `select_dlg` This is what is said when you select a ACS to be worn. - Note for both of these you can have multiple lines which are there own reactions. They as far as I know choosen by random. Here is some example code. - Make sure the last line does NOT have a comma. as you can see `select_dlg` has no comma and `hover_dlg` on the `"I love this one."` line has no comma but the one before it does. ```java "hover_dlg": [ "This is a cute hairpin", " I love this one." ], "select_dlg": [ "Alright" ] ``` 7. `giftname` this is the name of the gift file without the `.gift` extention you will put in your `characters` folder 8.- 'dryrun` this tells the game to not offically add it but to just test to make sure it works. Once you check your 'log/spj.txt` you can remove this entire string and give her a gift. Say you had ``` "giftname": "gift_filename_without_extension", "dryrun": false, "rec_layer": 5, ``` it would end up like this ``` "giftname": "gift_filename_without_extension", "rec_layer": 5, ```Giving Gifts
Contents
Before your proceed you must know. Only gift her the sprite **AFTER** after you remove the `dryrun `line! from the template (read **Filling Out Templates**f for more details). If gift her something before hand and it it is not in the game she wont be able to see it. Plus if she reacts to something that doesn't work then when you add it properly she won't react at all. See Advanced Section(Coming Soon) to fix the gifted to soon problem. To make a gift make a new text document and rename it to `yourgiftname.gift` and put it in your `characters` folder - If she doesn't see it immediately this is normal. Try saying I love you or just Repeat a conversation, if all else fails reload your game. If it still doesn't work consult the troubleshoot section (comming soon).Hairclip
Contents
Read the **Preparing Images for ACS** and **Filling Out Templates** Sections before proceedingHairclip ACS Template
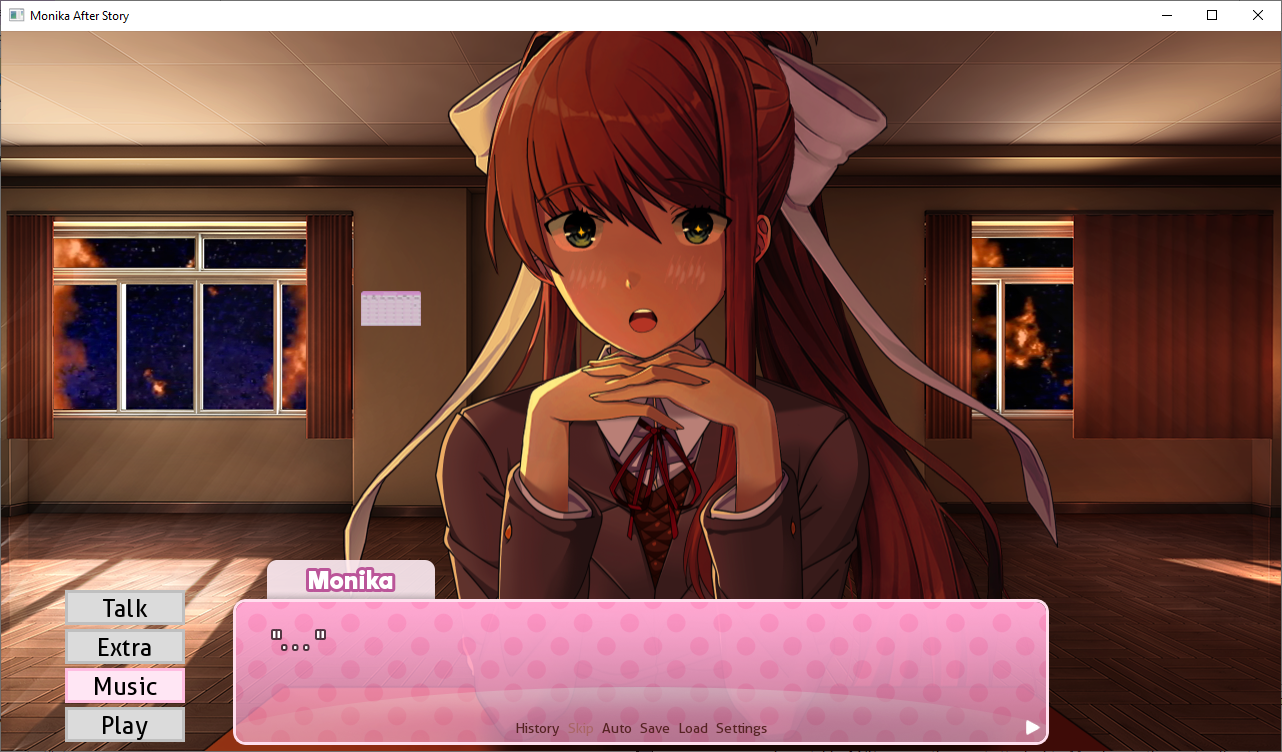
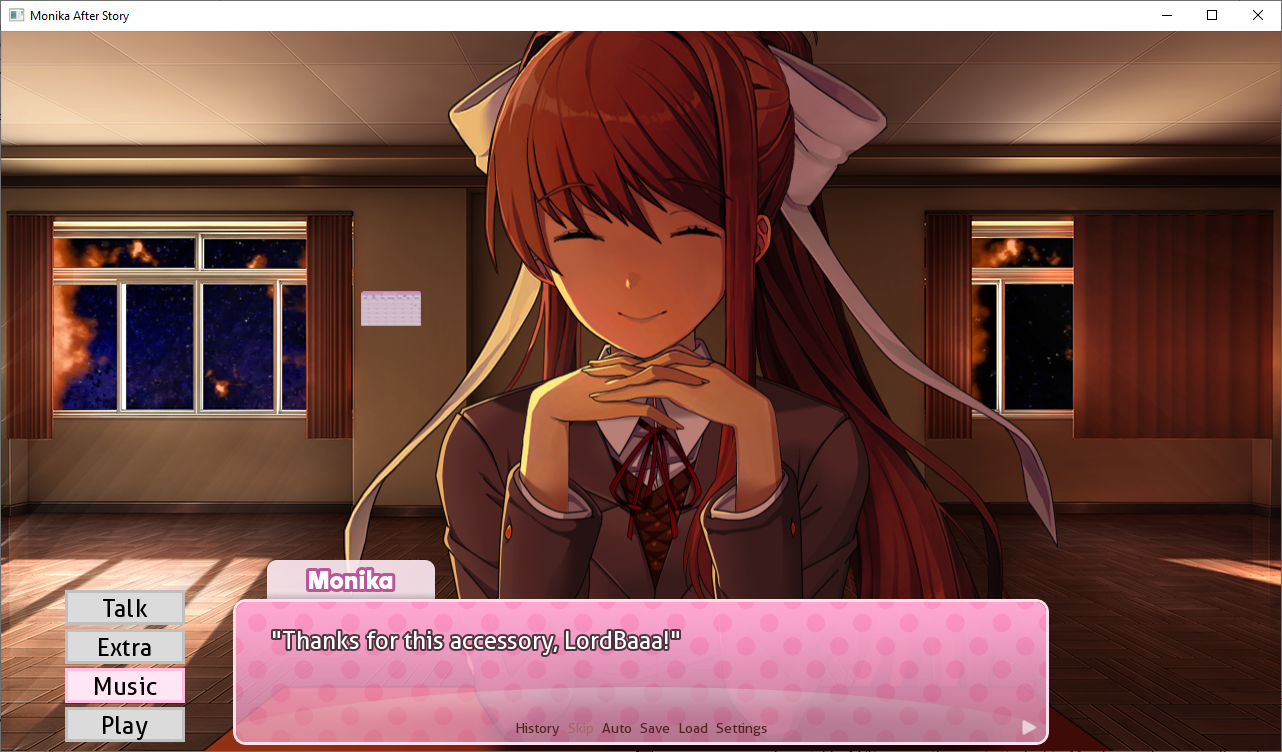
```java { "type": 0, "name": "id-of-sprite", "img_sit": "base_filename_without_extension", "pose_map": { "default": "0", "l_default": "5" }, "stay_on_start": true, "ex_props": { "left-hair-strand-eye-level": true }, "select_info": { "display_name": "User Friendly Name", "thumb": "thumbnail_filename_without_extension", "group": "left-hair-clip", "visible_when_locked": false, "hover_dlg": [ "list of dialogue to show when hovered" ], "select_dlg": [ "list of dialogue to show when selected" ] }, "giftname": "gift_filename_without_extension", "dryrun": false, "rec_layer": 5, "priority": 10, "acs_type": "left-hair-clip", "mux_type": [ "left-hair-clip" ] } ```She saw it.
 Ribbon
Contents
Read the **Preparing Images for ACS** and **Filling Out Templates** Sections before proceedingRibbon Template
```java { "type": 0, "name": "id-of-sprite", "img_sit": "base_filename_without_extension", "pose_map": { "default": "0", "l_default": "5" }, "stay_on_start": true, "ex_props": { "propname": "propvalue" }, "select_info": { "display_name": "User Friendly Name", "thumb": "thumbnail_filename_without_extension", "group": "ribbon", "visible_when_locked": false, "hover_dlg": [ "list of dialogue to show when hovered" ], "select_dlg": [ "list of dialogue to show when selected" ] }, "giftname": "gift_filename_without_extension", "dryrun": false, "rec_layer": 3, "priority": 10, "acs_type": "ribbon", "mux_type": [ "ribbon" ] } ```
Add/Replace Plushie
Contents
Okay so we already basically made a plushie in Basic ACS Section. Lets actually make something out of it. Start by grabbing this plushie template for json code. Fill out the template except for `mux_type`. What we will do with that is dependent on the next bit.Json Plushie Template Code
```java { "type": 0, "name": "id-of-sprite", "img_sit": "base_filename_without_extension", "pose_map": { "default": "0", "use_reg_for_l": true }, "stay_on_start": false, "giftname": "gift_filename_without_extension", "dryrun": false, "rec_layer": 2, "priority": 10, "acs_type": "plush_Replace quetzal plushie(Simple)
If you just want to replace the quetzal plushie with your own and don't want any others, use this template.Replacing Plushie Template Rpy Override Code Simple
```java init 10 python: def mas_startupPlushieLogic(chance=4): """ Runs a simple random check for the quetzal plushie. IN: chance - value that determines the chance of that determines if the plushie will appear Defualts to 4 """ # do we even have plushe enabled? if not persistent._mas_acs_enable_quetzalplushie or mas_isF14(): # run the plushie exit PP in case plushie is no longer enabled mas_acs_quetzalplushie.exit(monika_chr) return if renpy.random.randint(1,chance) == 1: monika_chr.wear_acs_pst(store.mas_sprites.ACS_MAP["your-plushie-name-here"]) else: # run the plushie exit PP if plushie is not selected mas_acs_quetzalplushie.exit(monika_chr) return ```Adding new Plushies (Advanced)
We are gonna add a plushie. 1. Set your json `acs_type` to something unique for I set it to `plush_p` for piano. 2. Copy the two template scriptsAdding More Plushie Template
```java init 10 python: def mas_startupPlushieLogic(chance=4): """ Runs a simple random check for the quetzal plushie. IN: chance - value that determines the chance of that determines if the plushie will appear Defualts to 4 """ # how many pluhies are there? number_of_total_plushies = 2 # do we even have plushe enabled? if not persistent._mas_acs_enable_quetzalplushie or mas_isF14(): # run the plushie exit PP in case plushie is no longer enabled mas_acs_quetzalplushie.exit(monika_chr) return if renpy.random.randint(1,chance) == 1: if persistent._mas_d25_deco_active: #if in d25 mode, it's seasonal, and also norm+ monika_chr.wear_acs_pst(mas_acs_quetzalplushie_santahat) #default quetal plush if renpy.random.randint(1,number_of_total_plushies) == 1: monika_chr.wear_acs_pst(mas_acs_quetzalplushie) if renpy.random.randint(1,number_of_total_plushies) == 2: monika_chr.wear_acs_pst(store.mas_sprites.ACS_MAP["your-plushie-name"]) # Plushie template add more ifs as needed, just remove #'s # if renpy.random.randint(1,number_of_total_plushies) == 3: # monika_chr.wear_acs_pst(store.mas_sprites.ACS_MAP["your-plushie-name"]) else: # run the plushie exit PP if plushie is not selected mas_acs_quetzalplushie.exit(monika_chr) return ```Quetzalplushie mux_type overrider
```java init 10 python: ### QUETZAL PLUSHIE ## quetzalplushie # Quetzal plushie that sits on Monika's desk # thanks aldo ## This line deletes the existing ACS so it can be overide del store.mas_sprites.ACS_MAP["quetzalplushie"] mas_acs_quetzalplushie = MASAccessory( "quetzalplushie", "quetzalplushie", MASPoseMap( default="0", use_reg_for_l=True ), stay_on_start=False, acs_type="plush_q", # NOTE: this shouldn't be muxed with heart choc as heart choc # needs to add mid version of this # added plush_p so it reacts to piano properly mux_type=["plush_mid", ""],
entry_pp=store.mas_sprites._acs_quetzalplushie_entry,
exit_pp=store.mas_sprites._acs_quetzalplushie_exit
)
store.mas_sprites.init_acs(mas_acs_quetzalplushie)
```
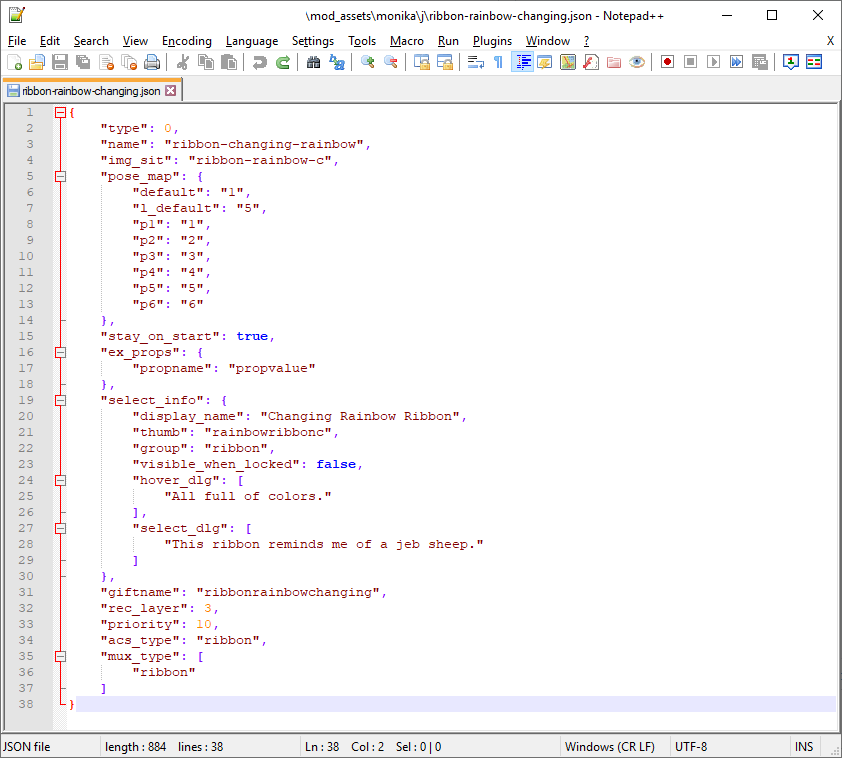
Multi Posed ACS
Contents
Read the **Preparing Images for ACS** and **Filling Out Templates** Sections before proceeding. The best in game example of this I can think of is the `Hairties-Braclet` It has a different image for each pose. See `zz_spriteobjects.rpy` for more details. However we are gonna do something a bit simplier by making a changing color ribbon! (Note again this an example not an art tutorial) I started by making 6 differently colored bows to kinda represent the rainbow, maybe someone could make better colors, did this kinda quick and dirty. Again day and night time versions and appropriate naming. See **Preparing images for ACS** for more info.  Okay onto coding For this we can basically use the wiki page template, however we will have to remove this comma as it will throw this error if we don't. So we are left with this template.Comma Error
 Multipose ACS Template
```java { "type": 0, "name": "id-of-sprite", "img_sit": "base_filename_without_extension", "pose_map": { "default": "0", "l_default": "5", "use_reg_for_l": false, "p1": "1", "p2": "2", "p3": "3", "p4": "4", "p5": "5", "p6": "6" }, "stay_on_start": true, "ex_props": { "propname": "propvalue" }, "select_info": { "display_name": "User Friendly Name", "thumb": "thumbnail_filename_without_extension", "group": "id-of-selection-group", "visible_when_locked": false, "hover_dlg": [ "list of dialogue to show when hovered" ], "select_dlg": [ "list of dialogue to show when selected" ] }, "giftname": "gift_filename_without_extension", "dryrun": false, "rec_layer": 3, "priority": 10, "acs_type": "accessory-type", "mux_type": [ "list-of-mutually-exclusive-types" ] } ```Here is my code
What this looks like in game
 ![Uploading 2.png…]()  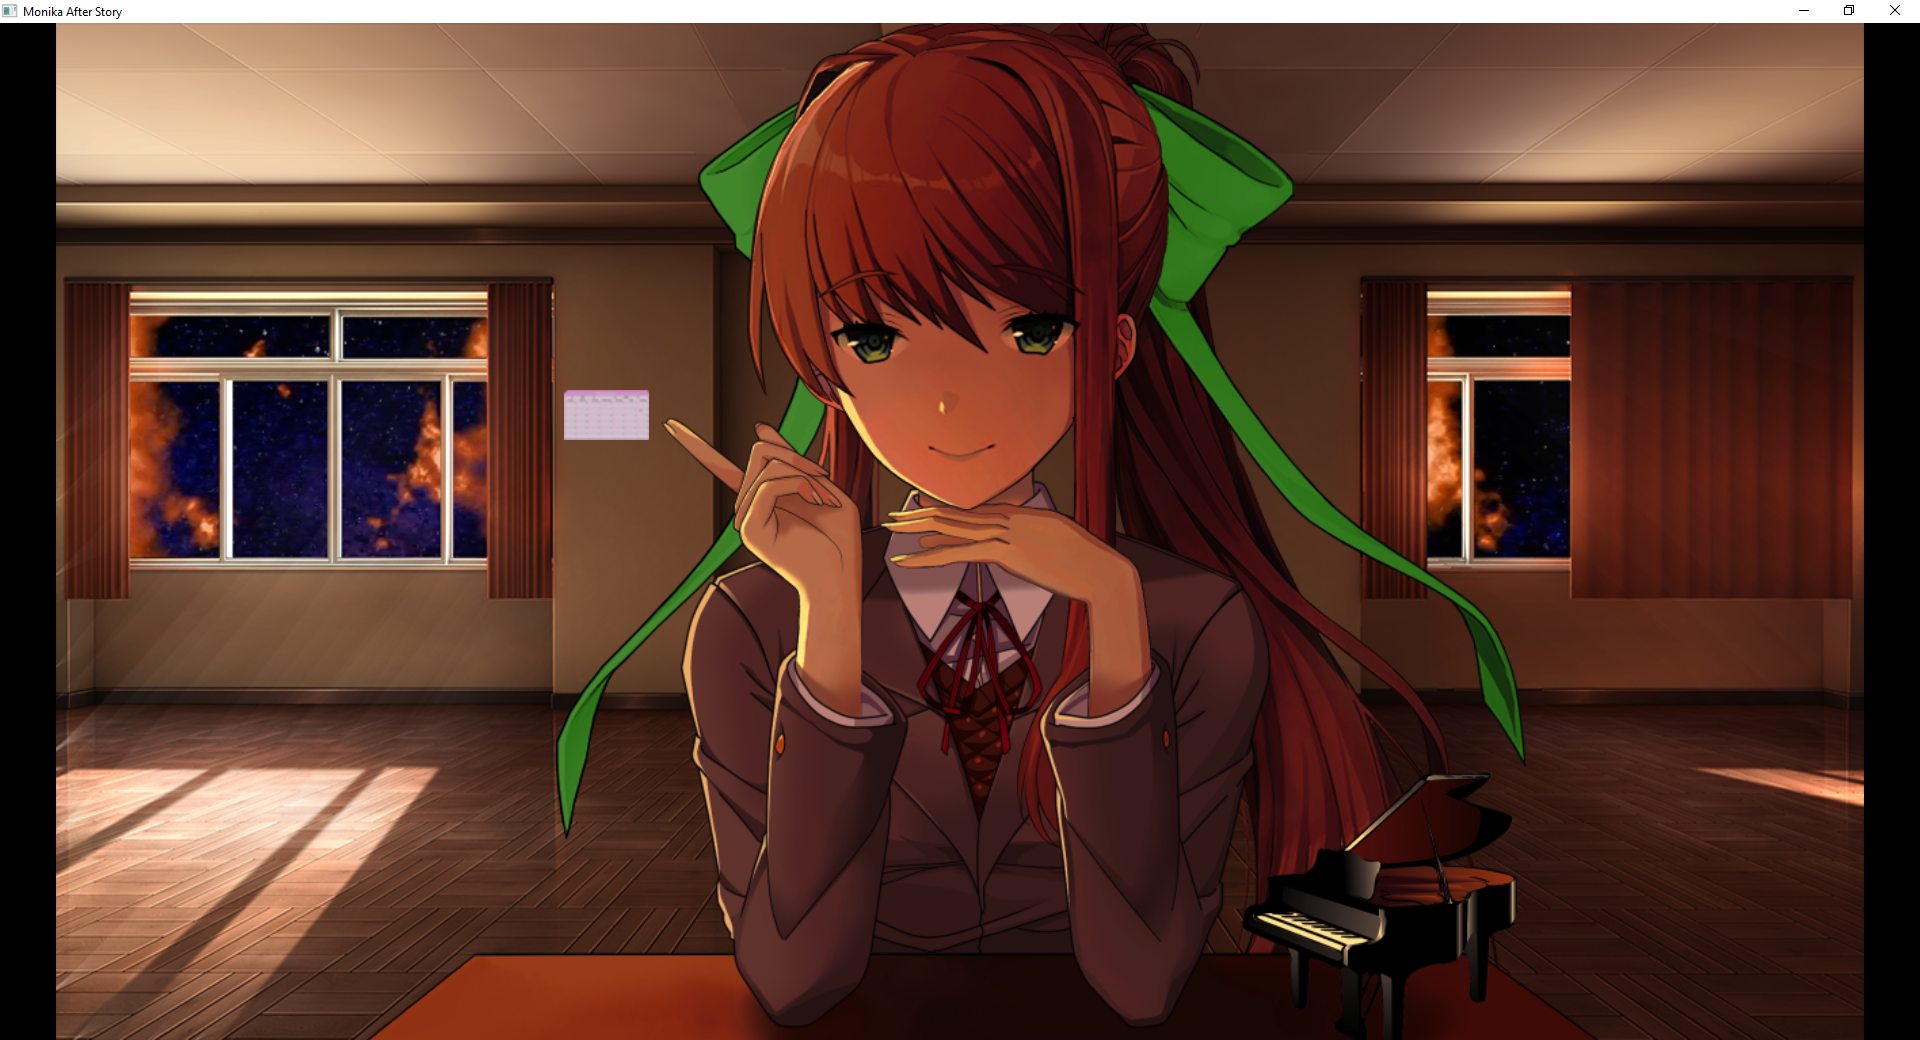Hair
Contents
Read the **Preparing Images for ACS** and **Filling Out Templates** Sections before proceeding Template ```java { "type": 1, "name": "id-of-sprite", "img_sit": "base_filename_without_extension", "pose_map": { "default": true, "use_reg_for_l": true, }, "stay_on_start": true, "ex_props": { "propname": "propvalue" }, "select_info": { "display_name": "User Friendly Name", "thumb": "thumbnail_filename_without_extension", "group": "hair", "visible_when_locked": true, "hover_dlg": [ "list of dialogue to show when hovered" ], "select_dlg": [ "list of dialogue to show when selected" ] }, "unlock": true, "dryrun": false, "fallback": false } ```Clothes
Contents
Read the **Preparing Images for ACS** and **Filling Out Templates** Sections before proceeding.Clothes Template
```java { "type": 2, "name": "id-of-sprite", "img_sit": "base_filename_without_extension", "pose_map": { "default": "steepling", "l_default": "def|def", "p1": "steepling", "p2": "crossed", "p3": "restleftpointright", "p4": "pointright", "p5": "steepling", "p6": "down" }, "stay_on_start": true, "ex_props": { "propname": "propvalue" }, "select_info": { "display_name": "User Friendly Name", "thumb": "thumbnail_filename_without_extension", "group": "clothes", "visible_when_locked": true, "hover_dlg": [ "list of dialogue to show when hovered" ], "select_dlg": [ "list of dialogue to show when selected" ], }, "giftname": "gift_filename_without_extension", "dryrun": false, "fallback": true, "hair_map": { "all": "def", "down": "down" } } ```Prog Point
Contents
Prog Points are bits of code that can be run when the a ACS, Hair, or Clothes are worn. Here are the lablels - ACS: - _acs_name_entry - _acs_name_exit - HAIR: - _hair_name_entry - _hair_name_exit - CLOTHES: - _clothes_name_entry - _clothes_name_exit an example would be this ```java init -2 python in mas_sprites: def _clothes_name_entry(_moni_chr, **kwargs): #Gets previous hairclip and ribbon prev_ribbon = monika_chr.get_acs_of_type("ribbon") prev_hairclip = monika_chr.get_acs_of_type("hairclip") #Checks if ribbon is unlocked and wears it if it is if store.mas_SELisUnlocked(store.mas_sprites.ACS_MAP['ribbon_red'], 0) = True: monika_chr.wear_acs(store.mas_sprites.ACS_MAP['ribbon_red']) #Checks if hairrcip is unlocked and wears it if it is if store.mas_SELisUnlocked(store.mas_sprites.ACS_MAP['jmo_hairclip_heart'], 0) = True: monika_chr.wear_acs(store.mas_sprites.ACS_MAP['jmo_hairclip_heart']) def _clothes_name_exit(_moni_chr, **kwargs): #Checks if monika had hairclip on before and if so puts it back on if prev_hairclip is not None: monika_chr.wear_acs(prev_hairclip) #Checks if monika had a ribbon on before and if so puts it back on if prev_ribbon is not None: monika_chr.wear_acs(prev_ribbon) ``` This code would tell what ever clothes your specify in `name` to store whatever hairclip, and ribbon monika has on and then to wear the red ribbon and the heart hairclip. So lets break down the code a bit 1. prev_ribbon = monika_chr.get_acs_of_type("ribbon") - `monika_chr.get_acs_of_type()`: (function) It gets the acs that has the `acs_type` of whatever is specififed in this case `ribbon` 2. if store.mas_SELisUnlocked(store.mas_sprites.ACS_MAP['ribbon_red'], 0) - ` store.mas_SELisUnlocked()`: (function) checks if something is unlocked - `store.mas_sprites.ACS_MAP` : (dictionary) Stores the `name` and a `MASAcessory object. It is the location for all ACS - `store.mas_sprites.ACS_MAP["red_ribbon"]` to access a dictionary you must enter in a key to return a value This is done through `["name"]` or you can use `.get("name")` 3. `monika_chr.wear_acs()`: Takes (MAS Object) Makes monika wear a specifited ACS - `store.mas_sprites.ACS_MAP['ribbon_red'])`. As we learned a moment ago with this code we can specify a `MASAccessory object` which is basically all the data used to wear a ACS. 4. `if prev_hairclip is not None` Checks if prev_hairclip has a value, if she wasn't wearing a hairclip `prev_hairclip` would be `None`. This is says as long as `prev_hairclip` does not equal `None` to do the next bit - In this case that is `monika_chr.wear_acs(prev_hairclip)` or to wear the last hairclip You can do alot more but this is just a simple exampleGood functions to know for prog points
Contents
1. `monika_chr.wear_acs()`: Takes (MAS Object). Makes monika wear a specifited ACS - ACS are stored in `gstore.mas_sprites.ACS_MAP["name"]` - Used to wear hairclips, ribbons, plushie, etc 2. `monika_chr.change_clothes()` : Takes (MAS Object).This changes her clothes. - Clothes are stored in `store.mas_sprites.CLOTH_MAP["name"]` 3. `monika_chr.change_hair()`: Takes (MAS Object). This changes her hair - Hair are stored in `store.mas_sprites.HAIR_MAP["name"]` 4. `store.mas_SELisUnlocked()`: Checks if somthing is unclocked - Takes two arguments, sprite(MAS Object) and type(int) - example `store.mas_SELisUnlocked(store.mas_sprites.ACS_MAP['ribbon_red'], 0)` - `store.mas_sprites.ACS_MAP['ribbon_red']` is the code to get to the MASAcessory `red_ribbon` - `0` is the sprite type - `0` is ACS `1` is Hair, `2` is clothes 5. `monika_chr.get_acs_of_type()`: Takes (string). It gets the acs that she is wearing that has the `acs_type` of whatever is specified in. Useful to store things for later - Takes one argument, `acs_type` same one from jsons.Reactions
Contents
This is the syntax for the different sprite types. - ACS : mas_reaction_gift_acs_Advanced Section (Coming Soon)
I didnt have enought to finished, I was going out of town for a few days. I will finishe it when I am back