OpenHantek / OpenHantek6022

OpenHantek6022 is a DSO software for Hantek USB digital signal oscilloscopes 6022BE / BL. Development OS is Debian Linux, but the program also works on FreeBSD, MacOS, RaspberryPi and Windows. No support for non-Linux related issues unless a volunteer steps in!
GNU General Public License v3.0
865 stars 152 forks source link

Full support for Sainsmart DDS120 #69

Closed alimoche closed 4 years ago

alimoche commented 4 years ago

There is an offset between the vertical position of the trace and the channel marking CH1 in DDS120, please see screenshot, this might be related or be the same as bug #39 but it is already closed. I would expect that the channel marking would be at the base of the trace as in the images shown in the readme. dds120

Ho-Ro commented 4 years ago

There are two possibilities to get offset and gain calibration values: 1) Read the *.conf file 2) If this file is not available or contains no valid data the factory (or user) calibration values of HANTEK6022 are read from EEPROM.

I suspect that the DDS120 firmware does not support the reading of EEPROM content, so reading of calibration values failed and uninitialised memory content was used.

alimoche commented 4 years ago

I tested the fix with v3.0.3 and it seems to be working very well, thanks a lot. In the terminal window, however, it still says "Couldn't get calibration data from oscilloscope", it might be a different problem but I could help by testing any new firmware or patch. dds120-fix

alimoche commented 4 years ago

I suspect that the DDS120 firmware does not support the reading of EEPROM content, so reading of calibration values failed and uninitialised memory content was used.

If it is using the sigrok opensource firmware then this is what they implemented https://sigrok.org/wiki/SainSmart_DDS120/Info#Vendor_firmware

alimoche commented 4 years ago

there is also some additional information but about the vendor firmware that you might already know, but just in case it might be useful here http://www.360customs.de/en/2014/10/usb-oszilloskop-sainsmart-dds120-2-kanal-20mhz-50msps-buudairocktech-bm102/

Ho-Ro commented 4 years ago

OpenHantek6022 tries to read calibration data from the EEPROM and as the sigrok firmware for DDS120 does not support EEPROM reading it fails and informs you about this, but this is an info/warning message and not an error. Also as the DDS120 has own firmware in EEPROM (in this case a so called big EEPROM (capacity > 256 Byte with different 16 bit addressing mode compared to the small Hantek EEPROMs capacity <= 256 Byte, 8 bit addressing). Therefore it is not possible to store calibration values in EEPROM in a consistent way and without destroying the original firmware.

Some more details: The Hantek6022 has factory offset calibration values stored in the small EEPROM (capacity <= 256 Byte) read more. Further calibration values (gain calibration as well as sub-sample offset correction) can be written with my calibrate.py tool. Getting the correct calibration takes tree steps: 1) On detecting a scope the according ~/.config/OpenHantek/*.conf file is read and applied to specification->voltageScale and specification.voltageOffset. 2) On opening the device the EEPROM calibration values are read into controlsettings.calibrationValues, if this fails the message is shown. 3) On sampling data the calibration values are used to correct offset and gain. If the values from step 1 (specification->voltage...) are valid they take priority over the values from step 2 (controlsettings.calibrationValues).

Root cause of #69 was that there was no valid *.conf available so the values from step 2 should be used. As the reading from EEPROM failed the (unpopulated) calibration structure controlsettings.calibrationValues was used. My correction was to invalidate this structure in case of read errors.

    memset(controlsettings.calibrationValues, 0xFF, sizeof( CalibrationValues ) );

I checked the sigrok firmware that your scope uses and this FW doesn't support the EEPROM. So you must use the config file to compensate offset and gain error and live with this (not critical) info message.

alimoche commented 4 years ago

The Hantek6022 has factory offset calibration values stored in the small EEPROM (capacity <= 256 Byte) read more. Further calibration values (gain calibration as well as sub-sample offset correction) can be written with my calibrate.py tool.

I installed Hantek6022API-2.06 and made small modifications to be able to run calibrate_6022.py (attached file), as the reading of EEPROM is not supported, first I run openhantek to load the open source firmware and then patched and run the python tool. The offsets look fine, however, the gains computed with the tool don't work well in my case (maybe because it is not for DDS120), e.g.

ch0\500mV=1.2159
ch1\500mV=1.1885

whereas if I compute the corrections manually (taking the DC average from the gui) I get better results, e.g.

ch0\500mV=1.0414
ch1\500mV=1.0067

Without the corrections, the error is relatively small for high voltages (<5%) but it could be as large as 15% for lower voltage ranges (20-50mV), in any case, it works quite well, thanks a lot!

calibrate_dds120.txt

Ho-Ro commented 4 years ago

Hi, thx for providing this info. The observed discrepancy between the automatic gain and your manual gain is caused by the different analog front end hardware of the 120 compared to the 6022. This difference can be seen in modelDSO6022.cpp:

// Define the scaling between ADC sample values and real input voltage
// Everything is scaled on the full screen height (8 divs)
// The voltage/div setting:      20m   50m  100m  200m  500m    1V    2V    5V
// Equivalent input voltage:   0.16V  0.4V  0.8V  1.6V    4V    8V   16V   40V
// Theoretical gain setting:     x10   x10   x10   x5    x2     x1    x1    x1
// mV / digit:                     4     4     4     8    20    40    40    40
// The real input front end introduces a gain error
// Input divider: 100/1009 = 1% too low display
// Amplifier gain: x1 (ok), x2 (ok), x5.1 (2% too high), x10.1 (1% too high)
// Overall resulting gain: x1 1% too low, x2 1% to low, x5 1% to high, x10 ok
// The sample value for full screen (8 divs) with theoretical gain setting
specification.voltageScale[0] = { 40 , 100 , 200 , 202 , 198 , 198 , 396 , 990 };

... and modelDDS120.cpp:

// This data was based on testing and depends on divider.
// The sample value at the top of the screen with gain error correction
specification.voltageScale[0] = { 64 , 160 , 160 , 155 , 170 , 165 , 330 , 820 };

calibration_6022.py uses the same (theoretical) gain error for the four different gain steps (10/10/10/5/2/1/1/1) of 6022:

# theoretical gain error of 6022 front end due to nominal resistor values (e.g. 5.1 kOhm instead 5.0)
# these values are considered also in OpenHantek6022
error = ( 1.00, 1.01, 0.99, 0.99 ) # gainSteps 10x, 5x, 2x, 1x

while the 120 uses five different gain steps (20/20/10/5/2/1/1/1) models/modelDDS120.cpp:

specification.gain = {  // ID, HW gain, full scale voltage
    { 20,  0.16},        // 0     20         160mV =  20mV/div
    { 20,  0.40},        // 1     20         400mV =  50mV/div
    { 10,  0.80},        // 2     10         800mV = 100mV/div
    {  5,  1.60},        // 3      5          1.6V = 200mV/div
    {  2,  4.00},        // 4      2          4.0V = 500mV/div
    {  1,  8.00},        // 5      1          8.0V =    1V/div
    {  1, 16.00},        // 6      1         16.0V =    2V/div
    {  1, 40.00}         // 7      1         40.0V =    5V/div
};

These lines should be fixed:

# corresponding amplifier gain settings
gains = ( 10, 10,  10,   5,   2,    1,    1,    1 )
# available amplifier gains
gainSteps = ( 10, 5, 2, 1 )

The firmware flashing can also be incorporated in your modified calibrate_dds120.py similar to upload_firmware_to_DSO2020.py:

scope = Oscilloscope(0x8102,0x8102)
scope.setup()
scope.open_handle()
scope.flash_firmware_from_hex( "dds120-firmware.hex" )
scope.close()

scope = Oscilloscope(0x1d50, 0x608e)
scope.setup()
scope.open_handle()
...
alimoche commented 4 years ago

Hi, I replaced lines L122-125 with

# corresponding amplifier gain settings
gains = ( 20, 20,  10,   5,   2,    1,    1,    1 )
# available amplifier gains
gainSteps = ( 20, 10, 5, 2, 1 )

and L215 with

error = ( 1.00, 1.00, 1.01, 0.99, 0.99 ) # gainSteps 20x, 10x, 5x, 2x, 1x

but still I'm getting similar results, maybe there are some more parameters specific of DDS120 that are in OpenHantek but not in the Hantek6022API-2.06 that are needed for reading or correctly setting the parameters of DDS120 with the python tool, in any case, the manual config works very well

Ho-Ro commented 4 years ago

You must adapt the values in line 215 to your settings according specification.voltageScale from above for your scope, e.g. 1st gain = 64/40 (or 40/64, :) just try which way round) and so on. The 6022 needs 40 digits difference from bottom to top of screen i n the 20mV/div range, the 120 needs 64 digits in the same range.

alimoche commented 4 years ago

I changed line 215 with

error = ( 1.60, 0.80, 0.77, 0.86, 0.83 ) # gainSteps 20x, 10x, 5x, 2x, 1x

and now it gives similar values to the manual calibration, e.g.

ch0\500mV=1.0521
ch1\500mV=1.0283

except for 20mV and 50mV where sometimes it gives no value or the values are too large. Comparing with the value obtained manually, 1.60 should be around 0.77. The file calibrate_dds120.txt contains the modifications of calibrate.py script except the part of the firmware loading.

alimoche commented 4 years ago

Alternatively, this is how I obtained the correction values "manually":

  1. Create a new file ~/.config/OpenHantek/modelDDS120.conf or use the file created by the calibrate script as template :
[offset]
ch0\20mV=0
ch1\20mV=0
...
[gain]
ch0\20mV=1.0
ch1\20mV=1.0
...
  1. Read the offset from the scope screen for both channels and all voltage ranges and change the sign, -1 worked for me, or use the values obtained with the calibrate script (only one or two entries turns out to be -2)

  2. Save the file and restart the scope

  3. Calculate the gain correction for both channels and all voltage ranges: set your voltage supply (e.g. a voltage divider with a potentiometer) to a value that is on the middle of the scale and measure it with a multimeter, Vin, and then take the DC average given by the scope on the bottom of the screen, Vout, the correction factor would be Vin/Vout

  4. Save the file, restart the scope and compare the values with the multimeter to check that they are correct. If you need to change some entry, you need to revert the value to 1.0 and restart the scope.

Ho-Ro commented 4 years ago

The 1.60 value must be of course half as big (0.77 looks good), because 6022 has gain=10 and 120 has gain=20 in the two lowest ranges: error = ( 0.77, 0.80, 0.77, 0.86, 0.83 ) # gainSteps 20x, 10x, 5x, 2x, 1x Otherwise you'll fall out of the valid range, this is why the calibration gives no result, check this code snippet:

    if raw1 > 250 or value1 < 80 or value1 > 120: # overdriven or out of range
        gain1[ gain ] = None # ignore setting, no correction
    else:
        gain1[ gain ] = target / value1 # corrective gain factor
    if raw2 > 250 or value2 < 80 or value2 > 120: # same as for 1st channel
        gain2[ gain ] = None
    else:
        gain2[ gain ] = target / value2

BTW: did you check the latest pre-release? I made some improvements for the calibration output especially for the 120 (now you can select 100Hz, 1kHz, 10kHz and 50kHz, this is all the sigrok FW delivers). Also the marker handling got two new features: double click (left mouse button) draws two nearby markers that will give zoom=100, while right double click moves the markers out of the way to left and right margin.

alimoche commented 4 years ago

The 1.60 value must be of course half as big (0.77 looks good), because 6022 has gain=10 and 120 has gain=20 in the two lowest ranges:

ok, very good, this explains why it didn't work and the value 0.77 ~ 0.80 = 64/40/2 = 160/100/2 (so maybe 0.80 should go in the script). This fixes the issue, the changes could be integrated in your script with an additional command line parameter, e.g. --model DDS120 (default: Hantek6022) or else with the modifications from here or else with the manual calibration :)

BTW: did you check the latest pre-release? I made some improvements for the calibration output especially for the 120 (now you can select 100Hz, 1kHz, 10kHz and 50kHz, this is all the sigrok FW delivers) ...

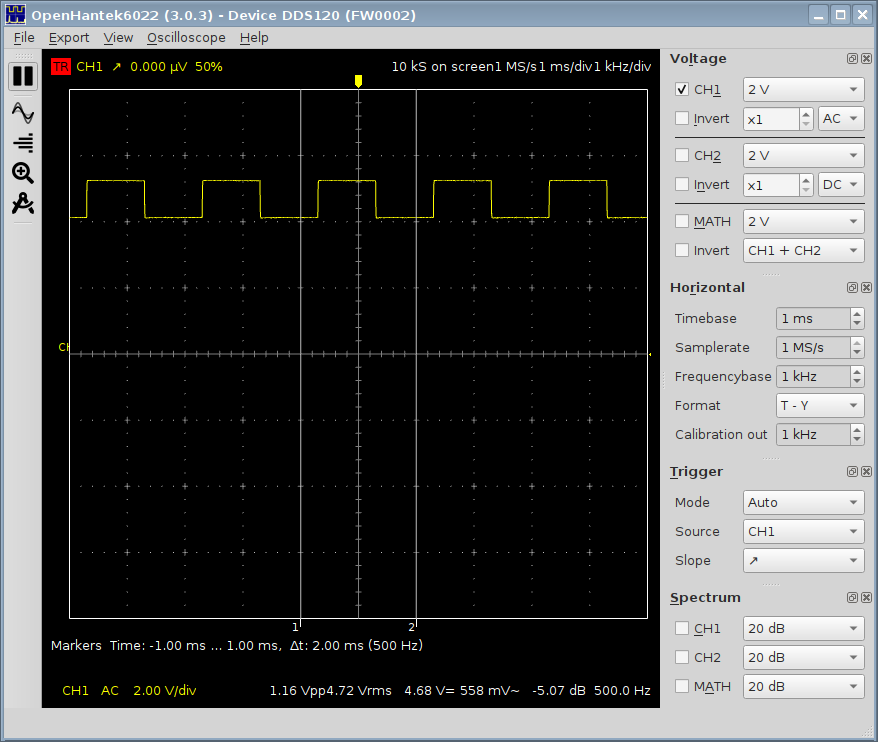
I have just compiled and noticed that the calibration out frequency is twice the value reported by the scope, this can be seen in any of the two screenshots above, i.e. calibration out 1kHz, scope 500 Hz, is this the expected behaviour? for all the calibration frequencies the value reported by the scope is half (and less than 2V pp)

Ho-Ro commented 4 years ago

The voltage ist hardwired and fixed, the frequency is a bug in the sigrok firmware. I know what to change and will file an issue report/pull request.

alimoche commented 4 years ago

ok, thanks a lot!

Ho-Ro commented 4 years ago

Rebuilt the patched sigrok fw from https://github.com/sigrokproject/sigrok-firmware-fx2lafw. Please check latest OH6022 commit 18f58d5.

alimoche commented 4 years ago

ok, very good, it works now very well for 100Hz, 1kHz and 10kHz, please see attached screenshot for 1kHz as an example. For 50kHz, however, it generates 25kHz instead, if this is not another firmware bug then a possible easy fix would be to change the text 50kHz to 25kHz ...

dds120-3

Ho-Ro commented 4 years ago

I don't see a reason for this 50kHz/25kHz behaviour, did you measure the 50/25 thing at the same timebase setting as e.g. the 10kHz? The timer 2 runs with 1MHz (@ 12MHz system clock) and toggles the sync out pin when it overflows (T2 will be reloaded from RCAP2 register). So for the 50 it should toggle every 10µs. The only cause for this issue could be that it fires to often and misses every 2nd interrupt.

--- scope.inc.orig      2020-04-04 17:54:51.247691750 +0200
+++ scope.inc   2020-04-04 17:59:08.208876670 +0200
@@ -266,19 +266,19 @@
 {
        switch (fs) {
        case 0:         // 100Hz
-               RCAP2L = -10000 & 0xff;
-               RCAP2H = (-10000 & 0xff00) >> 8;
+               RCAP2L = -5000 & 0xff;
+               RCAP2H = (-5000 & 0xff00) >> 8;
                return TRUE;
        case 1:         // 1kHz
-               RCAP2L = -1000 & 0xff;
-               RCAP2H = (-1000 & 0xff00) >> 8;
+               RCAP2L = -500 & 0xff;
+               RCAP2H = (-500 & 0xff00) >> 8;
                return TRUE;
-       case 10:        // 1kHz
-               RCAP2L = (BYTE)(-100 & 0xff);
+       case 10:        // 10kHz
+               RCAP2L = (BYTE)(-50 & 0xff);
                RCAP2H = 0xff;
                return TRUE;
        case 50:        // 50kHz
-               RCAP2L = (BYTE)(-20 & 0xff);
+               RCAP2L = (BYTE)(-10 & 0xff);
                RCAP2H = 0xff;
                return TRUE;
        default:

My own 6022 firmware runs @ 48MHz to allow 100kHz (IIRC 200kHz didn't work). So I will roll another FW, please try 0e50d59...

alimoche commented 4 years ago

Unfortunately the new commit does not change the frequency, I adjusted the time-base for a clear measurement of the frequency, please see the attached screenshot, the calibration signal is not very square at high frequencies but definitively 25kHz...

dds120-4

alimoche commented 4 years ago

Sorry, my fault, the last commit does fix the problem, I didn’t unplug the scope when I tested last commit so the scope was using the previous firmware, this is the screenshot with the new firmware (although it shows the same version FW0002), good job, thanks a lot!

dds120-5

Ho-Ro commented 4 years ago

although it shows the same version FW0002

sigrok doesn't use an individual PID for different HW like Hantek, Sainsmart etc., but uses the USB version ID to differentiate the devices. These are the relevant parts of the descriptor source files for the supported scope devices:

VID = 0x501d    ; Manufacturer ID (0x1d50)
PID = 0x8e60    ; Product ID (0x608e)
VER = 0x0100    ; Product "version". 0x0001 == Hantek 6022BE.

VID = 0x501d    ; Manufacturer ID (0x1d50)
PID = 0x8e60    ; Product ID (0x608e)
VER = 0x0300    ; Product "version". 0x0003 == Hantek 6022BL.

VID = 0x501d    ; Manufacturer ID (0x1d50)
PID = 0x8e60    ; Product ID (0x608e)
VER = 0x0200    ; Product "version". 0x0002 == SainSmart DDS120.

VID = 0x501d    ; Manufacturer ID (0x1d50)
PID = 0x8e60    ; Product ID (0x608e)
VER = 0x0400    ; Product "version". 0x0004 == YiXingDianZi MDSO.

But as I already incorporate the firmware hex files into OH, maybe I'll switch to my versioning scheme with 04B5/0120 and VER counting up with API changes. This will give me more speed and flexibility, e.g. to add more calibration frequencies like 50,60,100,200,500,1000,2000...100000 Hz.

Ho-Ro commented 4 years ago

So - 1st try with own DDS120 FW: 0e8583f Please check... BTW: thx for the ES translation!

alimoche commented 4 years ago

very good, I updated the udev rules for this new firmware 04b5:0120 ROHM LSI Systems USA, LLC and deleted old config files, but there might be something wrong or missing because the scope is not working properly, please see the attached screenshot

dds120-6

Ho-Ro commented 4 years ago

I need your input to track this issue down:

1.) Does it also happen with the config file in place?

If not, the issue is caused by using the factory firmware in EEPROM as calibration data.

2.) If yes, does it also look the same with sample rate 30 MS/s (CH1 only)?

30 MS/s gets its sample clock directly from the 30MHz IFCLK output of the EzUSB, while the lower frequencies are created from the GPIF subsystem and coming from CTL2 output. As I do not have schematics at hand I have to rely on the sigrok source.

alimoche commented 4 years ago

1.) Does it also happen with the config file in place?

it does with and without modelDDS120.conf but it does not complain about getting calibration data from oscilloscope.

2.) If yes, does it also look the same with sample rate 30 MS/s (CH1 only)?

it cannot be changed to 30MS/s only up to 5MS/s and it does look the same in all samplerates.

There is some information compilation about the DDS120 in the sigrok wiki with some pictures of the pcb that might help.

Ho-Ro commented 4 years ago

Yes, I read the long EEVBLOG thread and found out that the timing is created differently in comparison with Hantek and I cannot use a common source code base for both scopes. So I decided to switch back to the sigrok FW, only with small improvements for the calibration output frequency; it provides 50, 60, 100, 200, 500, 1000, 2000, 5000, 10000 and 20000 Hz. To distinguish from the original sigrok I'll stay with the OpenHantek VID 0x04B5 and define PID 0x0120, but use the FW version 1.00 instead of the 2.06 version of Hantek. -> 476b78d Thank you for testing and providing valuable feedback - it's quite difficult to develop embedded SW without the target HW and without detailed schematics.

alimoche commented 4 years ago

If there is no significant improvement it might not have much sense to rewrite the sigrok firmware, you did a lot of work and the scope is working very well with the latest commit including all calibration frequencies (50Hz-20kHz), it could be used as a small frequency generator and it only needs a config file if you need a precision much less than 5% for voltage ranges > 50 mV, thanks a lot!

alimoche commented 4 years ago

I gave it another try with commit b2c5492 and I was able to change to 30MS/s by changing the timebase and the scope does not behave the same as you already pointed out :) With the updated sigrok firmware I overlooked one of the calibration frequencies, 60Hz -> 75Hz, please see attached screenshot, all low frequencies show the same characteristic shape.

dds120-7

Ho-Ro commented 4 years ago

60Hz -> 75Hz

ok, one wrong value slipped in, fixed with be8142a

all low frequencies show the same characteristic shape

The sloping roof comes from the time constant of the AC filter, if you switch to DC you'll see the horizontal roof. Even if your corner frequency is very low compared with the signal frequency you'll see some percent signal drop (because the constant flat roof has frequency 0 Hz).

Note to myself: DDS120 ADC timing is different than 6022.

6022: ADC is clocked from IFCLK @30MS/s (and @48MS/s), but at lower sample rates the slower clock comes from CTL2 (6022BE) or CTL0 (6022BL) in sync with the GPIF DATA bit (OPCODE.1).

CLK     ⎺⎺⎽⎽⎺⎺⎽⎽⎺⎺⎽⎽⎺⎺⎽⎽⎺⎺⎽⎽⎺⎺⎽⎽⎺⎺⎽⎽⎺⎺⎽⎽
CTLx    ⎽⎽⎽⎽⎽⎽⎽⎽⎽⎽⎽⎽⎽⎽⎽⎽⎺⎺⎺⎺⎺⎺⎺⎺⎺⎺⎺⎺⎺⎺⎺⎺     -> ENCA/ENCB 
DATA    ⎺⎺⎺⎺⎺⎺⎺⎺⎺⎺⎺⎺⎺⎺⎺⎺⎽⎽⎽⎽⎽⎽⎽⎽⎽⎽⎽⎽⎽⎽⎽⎽      (one sample -> FIFO)

DDS120: ADC is always clocked from IFCLK @30MS/s or @48MS/s, only the DATA bit is slowed down to the sample rate.

CLK     ⎺⎺⎽⎽⎺⎺⎽⎽⎺⎺⎽⎽⎺⎺⎽⎽⎺⎺⎽⎽⎺⎺⎽⎽⎺⎺⎽⎽⎺⎺⎽⎽    -> ENCA/ENCB
DATA    ⎺⎺⎺⎺⎺⎺⎺⎺⎺⎺⎺⎺⎺⎺⎺⎺⎽⎽⎽⎽⎽⎽⎽⎽⎽⎽⎽⎽⎽⎽⎽⎽    (one sample -> FIFO)
alimoche commented 4 years ago

very good, I have just tested it and it works very well, thanks a lot!

rio-rattenrudel commented 1 year ago

It was mentioned here that a firmware can be loaded on the DDS120 to fix the wrong halfed value (test-signal of the dds129 device is 1khz but however 500Hz are determined).

https://github.com/OpenHantek/OpenHantek6022/blob/main/openhantek/res/firmware/dds120-firmware.hex

How can I flash this firmware dds120-firmware.hex to the device? I find almost no helpful information about it. OS: Win64

Ho-Ro commented 1 year ago

The correct FW is automatically uploaded to the device when you start OpenHantek6022. Even when this is called "flashed" the FW is not written into flash - the CY7C68013A does not have user programmable flash memory, the FW is uploaded into device RAM, this has to be done every time you power the device on. So it doesn't make sense to do it on your own unless you're doing FW development. For more info please check the Infineon-EZ-USB_TECHNICAL_REFERENCE_MANUAL.

rio-rattenrudel commented 1 year ago

Ah ok, then I understand it so that the own dds120 firmware (which I had found in that folder) is uploaded at startup of open hantek. The question is, why does openhantek show me the test signal (supposedly 1khz) only at 500Hz as a whole pulse only? as seen above in the first screen of the OP.

Ho-Ro commented 1 year ago

Please post a screenshot of the main screen as well as from the about screen. Did you unplug and replug the scope before using OH6022?

rio-rattenrudel commented 1 year ago

oh1

Did you unplug and replug the scope before using OH6022? Yes, I do it more often beforehand. The 3.0.4rc1 detects the device as DDS120, the openhantek version 3.3.3 (as can be seen below) however as MDSO. both shows however the same behavior.

rio-rattenrudel commented 1 year ago

oh2

rio-rattenrudel commented 1 year ago

By the way: it is only related to the test signal or calibration signal of the DDS120, which is specified/documented in the specs with 1kHz, but shows 500Hz only in the OH. Other measurements of any kind give/show correct values with that device - only this specific test signal is not 1kHz. Is this a wrong description of Sainsmart in their specs and the real test signal is only ejected in 500Hz?

Ho-Ro commented 1 year ago

I'll have a look at your issue when I'm back home next week. It's always difficult for me to handle these "exotic" devices that I don't own - I have to debug virtually by looking at the FW source code. But nevertheless I think it can be solved.

rio-rattenrudel commented 1 year ago

i thought it was already fixed here: https://github.com/OpenHantek/OpenHantek6022/issues/69#issuecomment-609106683

However, it only affects the test signal (i.e. the internal test generator of DDS120). It may well be that DDS120 simply spits out a 500Hz signal only and the docs are wrong about it. Everything else works correctly (including the measurement of things displayed in the correct range of values). So I'm going to assume that this issue is just a minor thing.

Ho-Ro commented 1 year ago

Is this a wrong description of Sainsmart in their specs and the real test signal is only ejected in 500Hz?

This is a known bug of the sigrok FW, I issued a patch that was never applied, iirc. The link in the communication is broken, you must remove the trailing ). to get the correct link. Therefore I forked the FW and applied the fix plus an improvement that allows more calibration frequencies. But I have to get the complete picture back from the attic of my brain...

alimoche commented 1 year ago

I have given a try to mine and it works fine, please see attached pictures, I'm using version 3.3.2.2 and firmware FW0100 this might help img001 img002

Ho-Ro commented 1 year ago

Question - why is @rio-rattenrudel's device recognised as MDSO? It would be interesting to see his VID/PID pair when plugged in w/o OH running. On a Windows system it can be seen as described there for example.

alimoche commented 1 year ago

maybe it is a MDSO oscilloscope https://sigrok.org/wiki/Fx2lafw#Oscilloscopes if @rio-rattenrudel cannot find its VID and PID maybe with some pictures https://www.sigrok.org/wiki/YiXingDianZi_MDSO

rio-rattenrudel commented 1 year ago

1 it's definitely a Sainsmart DDS120

alimoche commented 1 year ago

could you take the same picture without running openhantek? you need to close openhantenk, unplug the oscilloscope, connect the oscilloscope again and then take the picture

rio-rattenrudel commented 1 year ago

1b

alimoche commented 1 year ago

then there might be a problem with openhantek in windows for not to load the patched firmware FW0100, firmware FW0002 won't work, @Ho-Ro fixed the problem in firmware FW0100

rio-rattenrudel commented 1 year ago

BTW: nice GUI of OH and how it has evolved over the years.

rio-rattenrudel commented 1 year ago

And it's quite a minor issue. It only affects the test signal. Fortunately, not the actual measurements.