Open MikeTheWatchGuy opened 5 years ago
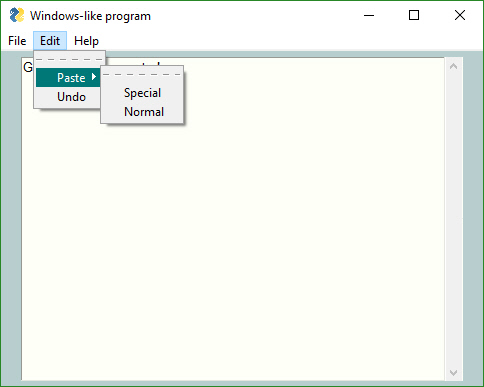
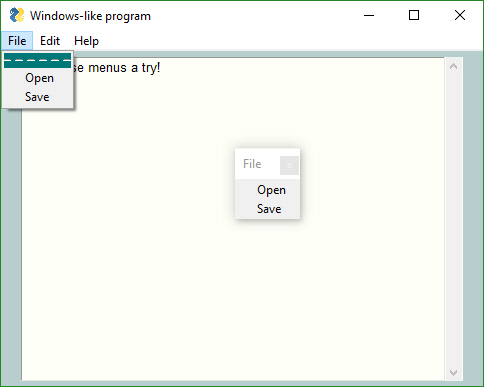
keys
can be used to lookup Elements. As a result, all Elements are capable of having a key, including non-output elements such as a Text Element.
To get an element object from a form, you call form.FindElement(key)
This is the new, preferred method for doing Updates on elements.
Previously if you wanted to output something to a Text Element, you needed to create the text element outside of the form layout and keep that text element variable around so you can call text_element. Update('new text')
The new design pattern is thus: In your form layout, include a key on your Element:
layout = [[sg.Text('My text', key='text')]]
Later in your code you can update this Text Element by making this call, assuming the variable form is your FlexForm object:
form.FindElement('text').Update('new text')
The Demo programs have all been updated to use this new technique. This capability and its impact on the length of programs led to pushing version 2.30 out the door quickly.
Try them on your next form.
Add this to your FlexForm call:
no_titlebar = True
You can expect to see some of these in the Demo programs.
You can click anywhere on the window and drag to move it. Don't forget to put an exit key on these windows.
Be sure and make an "exit" button or you'll be running task manager to close your windows. The reason is the when you turn on this option, you will not see an icon on your taskbar for the window. This happens on both Windows and Linux. Thus, if you do not supply an exit button, the user will have no means to close the window.
Tonight's change is perhaps going to be a really cool thing or one that is going to piss people off.
But, hey, I like it this way. If you don't, setgrab_anywhere = False
in your call to FlexForm.
As the name implies, you can grab and drag your window using any point on the window, not just the title bar. I was only enabling this when the title bar was turned off. I think it's a much superior way to interact with a window.
FlexForm is becoming quite the call!
def __init__(self, title, default_element_size=DEFAULT_ELEMENT_SIZE, default_button_element_size = (None, None), auto_size_text=None, auto_size_buttons=None, scale=(None, None), location=(None, None), button_color=None, font=None, progress_bar_color=(None, None), background_color=None, is_tabbed_form=False, border_depth=None, auto_close=False, auto_close_duration=DEFAULT_AUTOCLOSE_TIME, icon=DEFAULT_WINDOW_ICON, return_keyboard_events=False, use_default_focus=True, text_justification=None, no_titlebar=False, grab_anywhere=True):
So, enjoy a lazy way of interacting with windows on me.
You will want to turn if off for forms with a SLIDER. you need the slider to move, not the window. I'll update the Demos that use sliders to turn off the grab_anywhere.
This one has been requested a number of times. Rather than make a Table Element, decided to see if the current PySimpleGUI is capable of making nice tables using standard Elements. The answer seems to be yes, it's possible with existing Elements. The key was to enable text justification in the InputText element. By right justifying the text in those Elements, it's possible to create a nice looking table.
Here's an example using a ComboBox and Input Elements.
You'll find the code that generated the table in the file Demo_Table_Simulation.py. It requires the latest PySimpleGUI from GitHub in order to use the justification setting.
This is a "live keyboard" demo. It updates the table values as you are typing.
There are 3 fields at the top of the table. If you enter a value into the 3rd field, the cell that the other 2 cells represents will be changed to that value. Enter 1, 2, 1234 and cell (1,2) will be changed to 1234.
There is a new trick demonstrated in this demo that shows off the power of Python. Rather than pass in a string as the key to the Input Elements, I passed a tuple. Nothing about the key requires it to be a string. The only requirement is that you use the same type to look up the element when you call FindElement or use the key to read the return values.
This is the code that makes the Input Elements:
for i in range(20):
inputs = [sg.In('{}{}'.format(i,j), size=(8, 1), pad=(1, 1), justification='right', key=(i,j), do_not_clear=True) for j in range(10)]
See how the key is set to (i,j). This allow me to easily find the Element that is represented by (i,j) later. What to access the cell at (0,0)? This you would make this call:
form.FindElement((0,0))
Hopefully this is enough capability for the folks that need tables in their forms/window.
So maybe I kinda screwed up the numbering when the last one became 2.30. I didn't think about it looking like 2.3 also. Doh!
There have been a lot of changes lately so perhaps it's time for a major bump.
It's a clean slate
keep_on_top = True
What might this setting do in a call to FlexForm? If you guessed create a window that's ways on top you're right.
This one little flag enables cool floating toolbars that stay on top of all of your other windows. I'll admit a large portion of this project is for selfish purposes, that I have a platform to develop tools on top of.
Now I've got this nifty toolbar on the top part of my screen, always ready to launch or do something.
3.0.2 release today to turn off the grab_anywhere feature for non-blocking forms. tkinter is printing out a warning/error message when the form is closed using a button. Doesn't appear to have any effect on the overall functioning, but it's distressing to see. Better to disable this feature for now.
Plan is to add back an override mechanism should a user want it.
This is an always-on-top, compact floating toolbar. They are super-handy to leave running. Something satisfying about writing code that then gets used often, especially if they make you much more efficient.
Updated the Readme / primary doc to discuss the use of non-block forms.
As explained in the documentation there are a number of techniques to move away from async forms including using the change_submits = True
parameter for elements and return_keyboard_events = True
I've discovered that in about 30 lines of code you can create a floating desktop widget.
If you click the pause button, it switches to Run.
This "Widget" is always on top of the other windows.
Looking for a way of launching these in a way that have no taskbar icons. If launched from PyCharm it behaves this way. If launched from a Toolbar, the toolbar's window is attached to the timer. Close it and the timer closes.
This demo is the first time I've ever combined a ReadNonBlocking with a Read in the same form. The reason for using it in this program is that while the timer is paused, there' s nothing happening so why have the program running the loop when it can wait for the user to do something like click a button. When the button is clicked we return from the Read call.
Thank you to jfong for sending an interesting version of this program. His ideas have rolled into a into the project code many times.
The last of the big features, Menus, was just released to GitHub. With it comes the ability to get the look and feel of a windows program. I don't know if the architecture will lend itself to being used this way or not, but it did seem like a useful feature to add..
Thanks to @mrstephenneal we can now say that PySimpleGUI works on Python 3.7. There was a button issue causing trouble. Looks like it's fixed now so I think 3.7 is now safe to with PSG.
Menus! (and a Listbox.Update bug) are the big features.
Since the Menu code is somewhat isolated, and I want to get some users on it, decided to go ahead and push it all out there in 3.01.00
I didn't mention this in the readme section on menus, but by default (you can't currently turn it off) menus are detachable. If you double-click the dashed line then you get a floating version of that menu. Should make for some pretty interesting user interfaces?
There have been enough bug fixes to trigger another PyPI release. People have been doing more and more with the Update method. These fixes were mostly in those methods.
Added the ability to enable / disable all input elements. Set parameter disable=True to disable, disable=False to enable, disable=None to leave it alone
A number of Demo programs also refreshed.
Expect a PyPI release soon.
Note that some Update method changes also changed parameter names from new_value to value, newvalues to values. Some were different than others. Removed new so they all match now. Sorry to those living on the bleeding edge!
Here's a before/after. Elements towards the bottom of the window were disabled.
Yes, even buttons can be disabled now. No more needing to gray out your own buttons!
Big change this time around is the ability to disable widgets. All input widgets have an Update method that has the parameter disabled
that you set to True
if you want to disable it.
A few critical bugs in there too which pushed up the release to today.
You can stretch windows bigger now and some of the elements will resize with the window. **
The Input Text Elements did not have a functioning Font setting. Doh! Don't know how that got missed.
The very beginnings of the Treeview element are in there.
Hopefully nothing was broke. Any time I make changes to the core widget packing I get nervous!
** Had to turn off some of the Resizable windows features....Buttons and other elements were moving / expanding in forms that I didn't want the to expand. The change fucked up too many elements to leave on for now.
Added another Desktop Widget to the demos. This one shows the CPU utilization.
The spinner allows you to change how often it's refreshed
The Spinner Compound Element was done in response from a user wanting to see a different kind of spinner. This one has larger buttons and is laid out horizontally.
The point of this demo is that it's possible to put together multiple Elements into a higher level element. There aren't many of these I can think of at the moment, but given how many user questions are asked, something else is bound to be asked for.
You can blame the Popup changes on this issue: https://github.com/MikeTheWatchGuy/PySimpleGUI/issues/204
All of the Popups were rewritten to use a long list of customization parameters. The base Popup function remained more or less the same.
Decided while I was going all the Popup work that it's time to completely remove MsgBox. Sorry all you early adopters. You'll need to do a bulk rename and then you'll be fine.
Finally have something to show in the form of tables. The element name is Table
. While the tkinter Treeview widget was used, many of the parameters were not exposed. If they were, the caller could really mess things up. Better to present a nice "Table-friendly'" interface than something specific to tkinter. After all, the plan is to expand PySimpleGUI to use other GUI frameworks.
A Demo program is in the works.
It's possible to add scrollbars to the Table element by simply placing it into a Column element.
There's still work to do and a good number of bugs, but I encourage you to give it a try.
If you do not put the Table Element inside of a Column, then you can still view and scroll the table, it just will not have scrollbars.
There is a problem currently with keyboard input when placed into a Column. The keyboard keys work fine when NOT inside of the Column but stop working when placed inside a Column Element.
This program will read a CSV file and display it in a window.
import csv
import PySimpleGUI as sg
filename = sg.PopupGetFile('filename to open', no_window=True, file_types=(("CSV Files","*.csv"),))
# --- populate table with file contents --- #
data = []
if filename is not None:
with open(filename, "r") as infile:
reader = csv.reader(infile)
try:
data = list(reader) # read everything else into a list of rows
except:
sg.PopupError('Error reading file')
exit(69)
sg.SetOptions(element_padding=(0, 0))
col_layout = [[sg.Table(values=data, headings=[x for x in range(len(data[0]))], max_col_width=8,
auto_size_columns=False, justification='right', size=(8, len(data)))]]
layout = [[sg.Column(col_layout, size=(1200,600), scrollable=True)],]
form = sg.FlexForm('Table', grab_anywhere=False)
b, v = form.LayoutAndRead(layout)
It's another bit of PySimpleGUI "challenge code"..... The challenge is to do the same operation in another GUI framework in less lines of code. I would enjoy seeing the tkinter code required to create the window that this 20 line PySimpleGUI program creates. Most of the code deals with reading the CSV file 👍
I finally installed VirtualBox and am running Ubuntu Linux. I tried to install the Mint distro, but the display was scrambled when it booted.
I was surprised how close the Linux screen shots look to the Windows.
Even Pong worked the first time.
I don't believe that Python has been labelled the "go to language" for doing cross-platform GUI work. I guess I never stopped to think about it. I don't recall seeing this kind of thinking in posts or books I've read on Python. Perhaps it's time for that to change?
Released a new release to PyPI. Sorry about all these releases, but features continue to pour into the code. I'm finding even the folks that are actively using PySimpleGUI only run the pip installed version rather than the GitHub version. That means if I want runtime on the code, I'm only going to get any is to do a full release.
There were a number of changes that could f-up, so be on the lookout. The biggest addition to 3.2.0 was the Table Element (beta quality at the moment).
If you are running older programs then you may crash due to missing functions, MsgBox and several others. This is because I've moved 100% to Popup calls. It's not like I haven't been warning people so I don't expect complaints.
Some people are calling ReadNonBlocking
prior to your Event Loop so that the form gets fully made. This call is needed if you want to perform actions on elements prior to calling Read. For example, if you want your form to be shown with some Elements set in the disabled state (using calls to Update), you will need to make an additional call after your Layout call.
Instead of calling ReadNonBlocking
in these situations, you can call Finalize
/PreRead
/PrepareForUpdate
. I have not been able to standardize on a name, so I'm providing multiple. I'm sure a winner will emerge. I've been using Finalize.
The call sequence becomes this:
form.Layout(layout)
form.Finalize()
element.Update(.....)
while True:
b, v = form.Read()
You'll also find the Finalize call used in the scripts that use the Canvas Element.
See the Readme for more info on what's in the release. Note that the readme has not yet been updated with the Table Element and several other changes. There's only so much I can do.
PySimpleGUI has always had a one-line progress meter called EasyProgressMeter. However, that function has a limitation of only 1 meter being active at a time.
The new way to do Progress Meters is the function OneLineProgesssMeter.
All of the documentation and examples will reflect this new function.
Have to say it's nice to be able to run as many meters as desired without having to worry about more than 1 being on the screen at a time.
I intend to remove EasyProgressMeter within the next 5 or 6 releases to PyPI. I tried to insert a warning in the code, but too much code was shared to fit the message in.
I'm sorry about the change, but really would like to both add this function and rename the capability to something very descriptive. If there is enough revolt over removing EasyProgressMeter, I'll leave it in and simply drop it from all the documentation.
Yea, yea, it seems like only yesterday that version 3.2.0 was released. That's because it WAS only yesterday. I've been busy.
There are 2 changes I wanted out quickly....
OneLineProgressMeter
functionThe Progress Meter feature alone is a great use of PySimpleGUI. A number of users are using it only for this purpose in their programs.
New demo program - graph ping using canvas. I'm thinking about creating a Graph Element, something that makes it super easy to users tog create graphs, both line and x,y plot. The demo should how to take a canvas element and graph ping times.
There is another ping-graph demo using Matplotlib. This graph only uses tkinter.
Finally, because the pings take a long time, I moved the ping calls outside of the GUI event loop. Calling ping inside event loop was causing the GUI to respond sluggishly. This is because the ping was taking 1 second which means the gui wasn't being refreshed / wasn't responsive during the second. Now the GUI sleeps for 200 ms while the ping is done by a thread.
This is yet another toe in the water with threading. The problems I saw in the past are no longer there, it would appear.
I also checked in the ping.py file that you need for this demo. It's a pure python implementation of ping and works pretty well, even if slow.
Thanks to @JorjMcKie I've learned more about the performance of the EasyProgressMeter and thus probably the OneLineProgressMeter. The more arguments to display the longer it takes.
Was going to document in the Cookbook / Readme that if you have performance concerns, you can call the progress meter less frequently. You don't have to update it 1 count at a time. It could be like this:
for i in range(10000):
if i % 5 == 0: sg.OneLineProgressMeter('My 1-line progress meter', i+1, 10000, 'single')
This meter is only called every 5 times through the loop. It finished quite a bit quicker than the test updating the meter every single time.
The biggest thing to hit PySimpleGUI since Colors.... the ability to run programs written for PySimpleGUI as an exe file. ALL credit goes to @JorjMcKie for this.
There is no need to distribute Python with your programs. It's all included in the exe and folder of supporting files.
From what I understand of nuitka, this code is compiled C++ code, not python code. The performance is thus potentially better! It's the best of both worlds.
Working to get the process documented. It's tricky and required a special script. Stay tuned....
This one is pretty exciting as it does something new on the screen. The Graph Element allows you to easily create a canvas and draw on it using your own coordinate system. You don't need to do conversions from your graph coordinates to the tkinter canvas graph coordinates.
The Demo program for it is a good example. It displays a pint graph. The graph we're creating is a line graph what we would like to to from 0,0 in the bottom left to 100, 500 in the upper right. This will give us 100 data points along the x axis and up to 500 ms on the y axis.
After creating the Graph Element, we can do 3 operations on it:
The draw line draws a line from 1 point to another. The points are specified using your graph coordinates, not the tkinter canvas coordinates.
I know I have a LOT of documentation to do.
In the meantime, try using Control+P if you're using PyCharm. Press Control+P while you are typing in the parameters and you'll see a popup showing you what the legal parameters are. This feature is almost necessary when using PySimpleGUI because functions have SO many optional parameters.
I hope to see some cool creations using the capability. I'm starting to see more and more projects pop up on GitHub that use PySimpleGUI! Keep those examples coming! And keep the requests for new features coming too. They have made this such a better package because of your help.
Sample code:
This is your layout:
layout = [ [sg.T('Ping times to Google.com', font='Any 18')],
[sg.Graph((300,300), (0,0), (100,500),background_color='white', key='graph')],
[sg.Quit()]]
form = sg.FlexForm('Canvas test', grab_anywhere=True)
form.Layout(layout)
To draw a line, call DrawLine:
form.FindElement('graph').DrawLine(from_point, to_point)
Made the Graph Element "movable". This means the graph can be shifted when it reaches the "End".
Here's a 1,000 data-point ping graph or 16 minutes woth of pining
keys
rather than button textJust dropped in a sizable change in how buttons work. For buttons that have a key value, the key is returned rather than the button text. This is needed for forms that have multiple buttons with the same text.
The 'best' way to rework existing code is to get your key == button_text
.
Expect a number of Demos and Recipes to change. Lots to do to explain this one.
It's another excellent suggestion provides by @mrstephenneal.
Keep those ideas coming people! They're turning PSG into an event better package! Don't be shy if you need a change.
Not sure what happened, but I can't seem to load the Nuitka .EXE file by double clicking. It doesn't do anything but flash a command window like it has crashed.
However, when I type the exe filename on a command prompt, it works GREAT. Perhaps if I added to a batch file then double-click would work. Will try soon.
I noticed on some GUIs it's possible to determine when someone clicks on text. I experimented and found a way to duplicate this behavior
The 'Clear' text is actually a button with the border_width = 0 and color = black like the background. Poof... instant clickable text
Cross that feature off the list
Just when you think I'm out of new elements to spring on you, I cough up another.
For those people with an eye for design and want their forms to look as good ad possible, give you the Frame
Element
The frame element allows you to group your Elements into a nice box with a text label.
It takes 2 required parameters - title
& layout
.
You can customize the text font, size, color, relief style. I do not yet have a setting where you can specify the location of the label.
You can think of these as Column Elements with a label and an outline because that is exactly what they are, except you cannot scroll a Frame Element.
The implementation uses the tkinter labelframe
widget. I decided to name this Element Frame since that's exactly what it is. I do not have a labelled and unlabeled Frame. If you want a frame without a label, specify None
for the title
This is one of those features that have zero impact on your form's capabilities, but has a big impact on the appearance of a form.
Released 3.4.0 today. I'm sure most of you head straight to the readme file, scroll to the bottom and read the release notes. I'll go ahead and post them here just to humor myself.
There is significant amounts of work to be done on the docs to get the new Frame and Graph elements documented in the readme, Cookbook and tutorial. Soon I hope. In the meantime, all you advanced users can quickly figure them out using PyCharms Control+P feature.
3.4.0
I've been watching both StackOverflow and Reddit for opportunities to help people out using PySimpleGUI.
I answered on StackOverflow question about adding a GUI onto a command line program that I'm particularly proud of. A sample GUI was provided that was made in Visual Studio. It took 15 lines of code in PySimpleGUI to duplicate the design.
Check it out if you get the chance: StackOverflow Post
I'm 1/2 way through my 6,000 ping graph :-) The top is 500 ms.
Deleted release 3.4.0. Everyone will have to wait on the new release. You can always get and test against the Master Branch to see if you're going to have trouble in the upcoming releases. It would be great if someone people could be running from Master rather than PyPI.
This backed out the button change as well as the laundry list of new features and bug fixes. It'll all have to wait until I can make sure all Demos work with new code and there is more documentation updated.
My ping graph has finally finished and is scrolling nicely. It's spanning 3 monitors
I see three different repositories popped up, at the same time, with the same structure. They all implement a calculator using PyGame and PySimpleGUI. It sure looks like some class is teaching PSG!
That's crazy!
I dunno if PySimpleGUI is ready to be used in a class just yet. Heck, I'm still breaking features.
https://github.com/ozone94/Calculator_PySimpleGUI/tree/2d2d8898ce51f2ca223434acd2af6c8682ddf5c3
https://github.com/poschananT/CalculatorPySimpleGUI_6001012620033
OK, the release is back to being a release, now that there's the required Button.GetText call which allows you to figure out the current text value on a button.
This release shouldn't break anyone's code.... unless you're one of those super-advanced users that are changing the text on their buttons (smarty pants's). Those folks have a the special Button.GetText method just for them so that the button text can be retrieved.
For those of your that are writing a lot of code that uses ReadFormButton, I have created a shortcut, ReadButton, so that you save a few characters in your layout.
Overall this is a pretty strong release with two new elements, Graph and Frame. The Frame element enables PSG windows to look even better, more professional.
I can't WAIT to see what people do with these things. I see something new that you guys create every day and it's quite motivating. Keep the ideas and inspiration coming!
Holy crap.... I saw this in a readme today: My reference :: Introduction to Computer Science Using Python and Pygame by Paul Vincent Craven Can't wait to see if more text is added to this: https://manachanok94.blogspot.com/2018/09/calculator-using-pygame-vs-pysimplegui.html
Sure looks like there's a computer science class using it! Part of the exercise also appears to be the students
This is one of the goals I originally had for the package, make something usable by students, people just starting so that they get exposed to doing good user interfaces from the beginning of their career. It seems like a good thing to learn how to lay out a screen in a pleasing and functional way.
"Be careful what you ask for" is definitely fitting for this situation.
https://github.com/Manachanok/Calculator
Some students already commenting on how much more compact PySimpleGUI is at their calculator assignment than their PyGame implementations.
One student wrote this:
It's a total of 34 lines compared to Pygame written in a hundred lines. Simple by name
I try to remain neutral when speaking of other packages. Everyone working on these packages has fantastic intentions, works hard, is altruistic, and we all have a slightly different outlook on how to create a simple GUI. It's not my place to knock any, any, of the GUI packages.
Oh what a relief it is.
Continuing on polishing the look and feel of PySimpleGUI. Today's feature is the ability to add a relief to Text Elements.
It's part of the Demo_All_Widgets.py code along with the new Frame Element.
The first line of the layout reads:
sg.Text('All graphic widgets in one form!', size=(30, 1), justification='center', font=("Helvetica", 25), relief=sg.RELIEF_RIDGE)
Previously Listboxes always submitted when the return key was pressed. Now it's controlled using a new bind_return_key. Listbox is like the other Elements now. I also added double-clicking! I find myself double clicking the listbox and nothing happens. I have to click a button or press return key. Now you'll get control back on double-click if you've set bind_return_key
I bet some nuclear power plants have less gauges and controls. 1/2 of one of my monitors. 3 of those widgets are PySimpleGUI powered.
There are a handful of design patterns that we all have been using. Two of the blocking style ones are:
The simple form:
form = sg.FlexForm('My form')
button, value = form.LayoutAndRead(layout)
The perpetual form:
form = sg.FlexForm('My form')
form.Layout(layout)
while True:
button, value =form.Read()
I have disliked the second one of those since I wrote the code. It felt wordy. In Python, I am constantly scanning trying to simplify, compact, make easier. Nothing is more fun than combining function calls. So I was elated when I stumbled in to a code change that allows this new pattern:
form = sg.FlexForm('My form').Layout(layout)
while True:
button, value =form.Read()
It was a super simple change to the code, and damn, the result is awesome.
You can expect this one to get released quickly and have the demos, cookbook updated too.
It's great when community members write some of this stuff... I get a lot of behind the scenes help from you guys whether it's advice on naming, determining new parameters, how to implement a new element. Otherion wrote a couple of Table Element demos. One uses the CSV library the other pandas. There are more bugs to work out with the table element. I'm not happy with now I used the size parameter and I'm not sure the autosizing it sizing correctly. These Demos will make excellent patterns for folks wanting to work with tables. I have a 3rd one that I'll post soon that works with databases!
The upcoming release will include new shorter names for buttons. You'll still be able to use all the same names as before. However, they'll change in the Demos, particularly new demos, and the Cookbook.
This comes from 2 things. 1 - I'm fundamentally lazy. You may have noticed my frequent use of sg.T() and sg.In() instead of sg.Text and sg.InputText. 2 - I saw the incredibly wordy looking programs the students made. They were calculator programs so naturally the UI was crammed with buttons. There were 20+ sg.ReadFormButton() calls in every program. Ugh, too much clutter.
The change required me to shuffle around some parameters in the Button Element. I learned a big lesson as well in NOT relying on positional arguments when making internal function calls. I have more cleanup to do. I needed to make the Button Element have the text in the first position if I was to steal it and make it a user callable function rather than only internally used. It's such a great name, Button() that it seemed a shame to hide.
Here are the new names:
SimpleButton
becomes Button
ReadFormButton
becomes ReadButton
or RButton
You can easily guess which of these you'll see me using the most.
Thus, all of the buttons, in their shortest form, are:
Button
RButton
RealtimeButton
If someone right a program with a ton of RealtimeButton
then maybe I'll shorten it too. I can't think of another name for that one.
Again, you do not need to change your code. The wordy-buttons will continue to work, but won't be used in examples anymore.
Thanks to the help of @rtrrtr we now have tooltips on all of the Elements... or almost all of them... or the ones that matter.
If you find a tooltip parameter in the call to the Element, then you can add a tooltip to it.
This includes the shortcut buttons like Submit(), Yes(), etc.
It really helps when someone supplies code like this. It enables me to hook in the new feature quickly and easily.
Since this touched every Element and shortcut, there's a good chance I f-ed something up, so be on the lookout.
As usual, it's in the Master Branch. I'll let it sit for a day or two and then off to PyPI it'll go along with the other features and bug fixes made since 3.4.1
Another day, another truckload of features. Seemed like plenty of stuff saved up over the past few days that it's worthy of a released. Seems like pretty much everyone wants to run the pip installed version rather than pulling the latest Master Branch. So, I'm going to push stuff out there and hope that if it breaks someone speaks up quickly. So far that's what happened, someone speaks up when something breaks. Keep speaking up!
The feature list
The biggest reason I wanted it out is so I can use Button
and RButton
! That's going to save a lot of keystrokes and it'll compact the code. Maybe I should make Btn
? Or how about just B
? LOL
Then there's tooltips which multiple people asked for.
I also killed off Scaling in this release. That touched SO many parts of the code so I hope it survived OK. If you were using the scaling feature..... uhm, I'm sorry? I don't think anyone is however.
Enjoy!
This is the latest Recipe addition to the Cookbook. I created a 10-line program that created this lovely screenshot.
import math
import PySimpleGUI as sg
layout = [[sg.Graph(canvas_size=(400, 400), graph_bottom_left=(-100,-100), graph_top_right=(100,100), background_color='white', key='graph')],]
form = sg.FlexForm('Graph of Sine Function').Layout(layout)
form.Finalize()
graph = form.FindElement('graph')
for x in range(-100,100):
y = math.sin(x/20)*50
graph.DrawPoint((x,y))
button, values = form.Read()
What I like about working with these Graph Elements is that I don't have to worry about translating into on-screen coordinates. It's always a pain in the ass dealing with the converting into screen coordinates. Having that removed so that I'm working in my desired coordinates is really satisfying.
In this case I wanted a graph that went from -100 to 100 in both X and Y axis. Defining those values as well as the size of the screen area to use is all done in the call to Graph
.
sg.Graph(canvas_size=(400, 400), graph_bottom_left=(-100,-100), graph_top_right=(100,100), background_color='white', key='graph')
The actual graphing of the data points is this little loop, again, working in my own coordinates to draw the points:
for x in range(-100,100):
y = math.sin(x/20)*50
graph.DrawPoint((x,y))
And add just a couple more lines of code and you can get axis and another graph
for x in range(-100,100):
y = x**2/20-100
graph.DrawPoint((x,y))
y = math.sin(x/20)*50
graph.DrawPoint((x,y), color='red')
Announcements - New Features, Design Patterns, and Methods
I'm unsure how GitHub sends out updates. I don't think people are informed about Wiki changes for example. I've been announcing new features and more importantly, new ways of doing things, on the Wiki. I'm going to put announcements here so they are more visible. If there are objections about the traffic, well, what can I say, it's a busy/active project.