ROBOTIS-GIT / DynamixelShield

DynamixelShield Library for Arduino
Apache License 2.0
17 stars 10 forks source link

No detection Using dynamixelShield and AX12W with MX12W #18

Closed ECEquentin closed 3 years ago

ECEquentin commented 4 years ago

Hi,

So i'm using Mega 2560 with dynamixel Shield and 2 Motors Shield linked to Arduino, Motors connected to the shield by TTL 3P (the plug seems not to be perfect for this ttl3p, had to use simple wire to connect it properly, DATA V GND), code uploading (UART SW toggle upload). Then, UART SW toggle dynamixel.

What is happening :

No matter what Baud i put in serial monitor, no matter what declaration of softwareserial i use (i know difference between hardware serial and swserial)

What i see outside : Motors Led blink one time when i power up the Arduino (already tried with USB and the 9V plug).

I know the motors works well because i use an other shield (not dynamixel :( ) with, i just wanted to use the one designed for them from the same company without result for now.

i have this result (attached file). Result

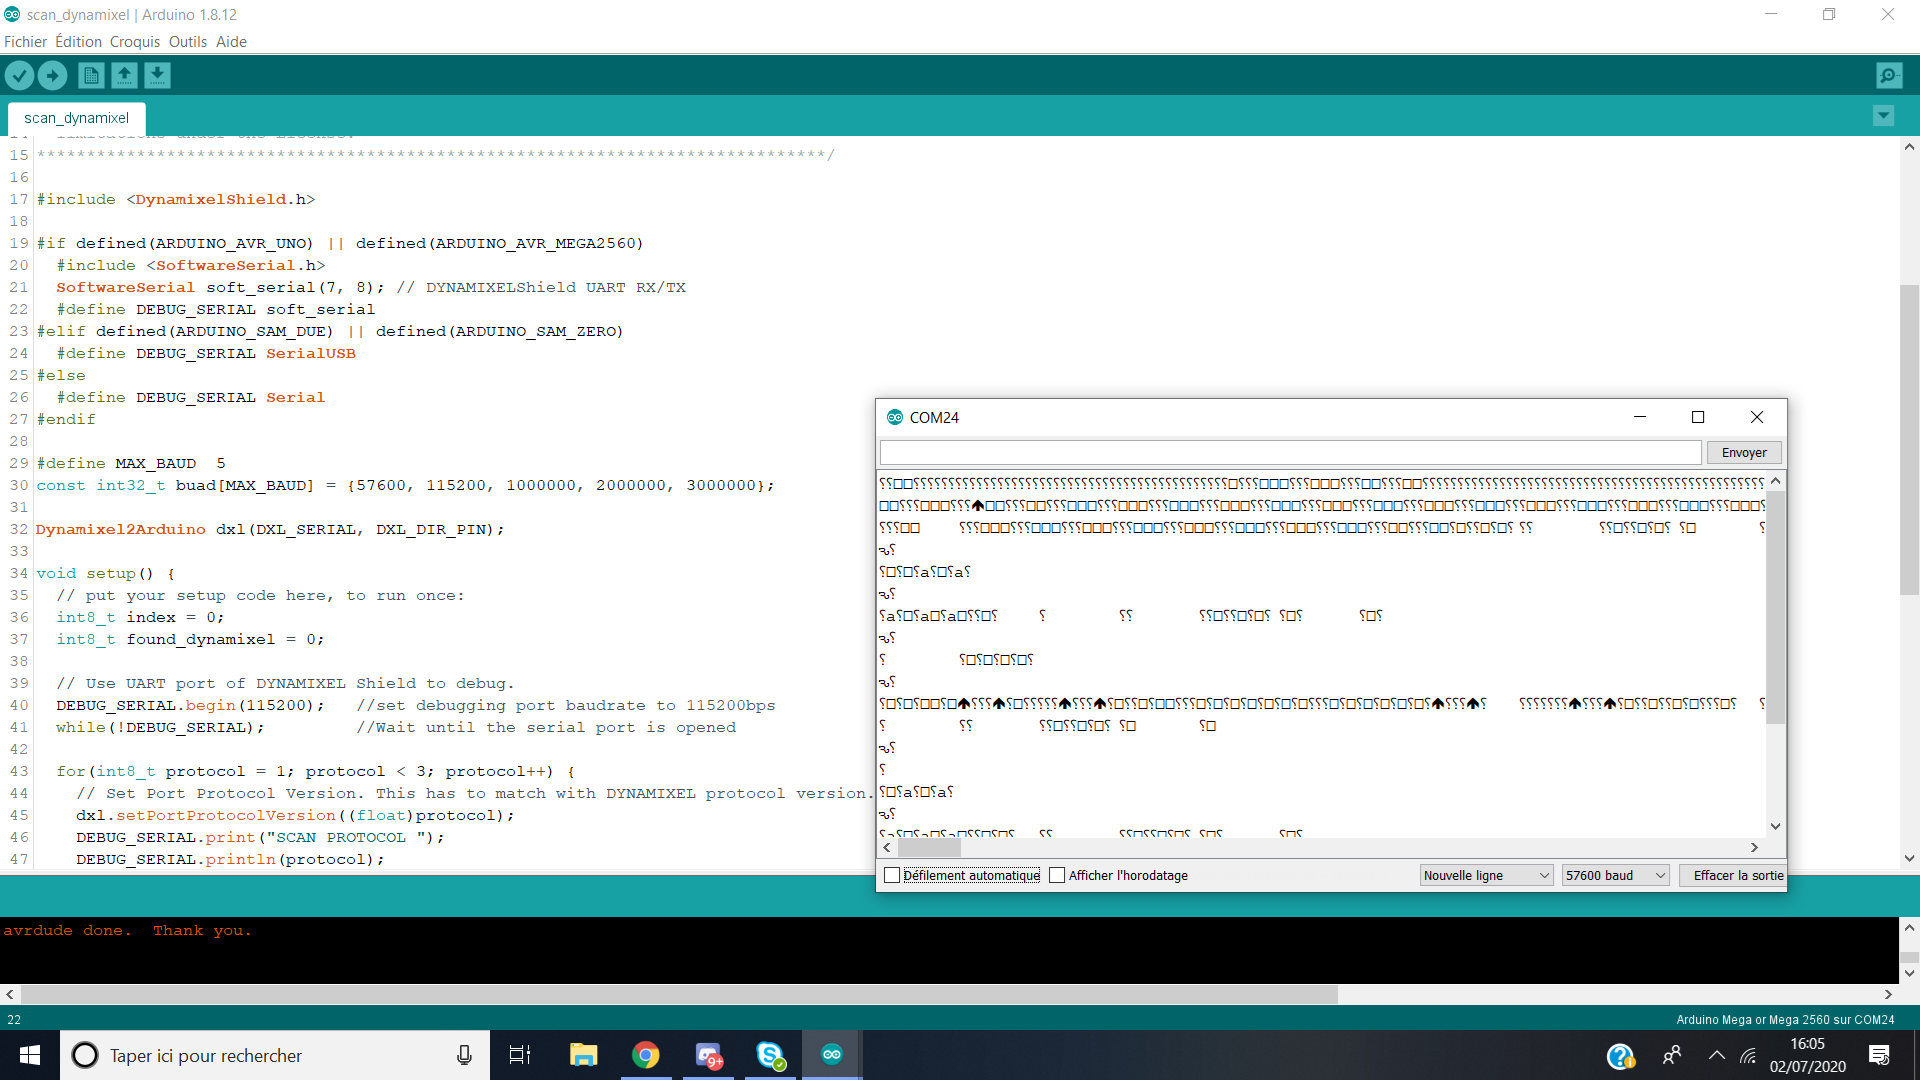
Can someone Help me pls, i am struggling so hard on this.

ROBOTIS-Will commented 4 years ago

Hi,

DYNAMIXEL Shield use 0, 1 pins of Arduino mega for DYNAMIXEL communication. Since Arduino Mega shares these pins for USB CDC, you cannot use the USB port to read data while controlling DYNAMIXEL. To properly read from DYNAMIXEL shield with Arduino Mega, you should use the SW TX/RX pins https://emanual.robotis.com/docs/en/parts/interface/dynamixel_shield/#layout You may use your own USB-serial converter or LN-101. Thank you.

ECEquentin commented 4 years ago

Ok thanks for informations, I will try asap to use the SW RX/TX pins with a USB to TTL (can you confirm if my wish is fine? or LN 101 is mandatory? )

Anyway, the fact is, when i upload my test code (like position mode exemple from dynamixelShield library) on my MEga and Then i unplug my USB to Arduinmega so that my PC is not connected to my Arduino and still, motors do nothing, no Led blinking. Nothing is happening. Like i said, motors are linked to the shield by the ttl 3P, and my arduino is powered by the power supply connector ( 9V plug).

In that case, the system should work since there is no reading data on PC while controlling dynamixel am i wrong?

Thank you

ROBOTIS-Will commented 4 years ago

Hi, You can also use other UART-USB converter on SW TX/RX port if you have any. The code while(!DEBUG_SERIAL); will hold until serial port is opened so if you disconnect the DEBUG SERIAL port from the PC, the code won't run. You can comment it out to run the code as soon as Arduino is powered. Thank you.

grndctrl2majtom commented 3 years ago

Are there any instructions on how to read prints from the LN-101?

ROBOTIS-Will commented 3 years ago

@grndctrl2majtom You can refer to the eManual, but if you are using DYNAMIXEL Shield library examples, you don't need to do anything. Simply plug the LN-101 to the DYNAMIXEL Shield serial port and use a terminal software or Arduino terminal to open the USB port that is connected with LN-101. Thank you.

grndctrl2majtom commented 3 years ago

@ROBOTIS-Will Thank you for the help, this is for a 6-axis robotic arm for NASA so it is appreciated. I am using the shield and the LN-101 is connected to port 6, I tried switching the arduino port to 6 but nothing was printing. Does it sound like I'm doing something wrong?

grndctrl2majtom commented 3 years ago

Scratch that. Your example works, I believe that is my bad

ROBOTIS-Will commented 3 years ago

@grndctrl2majtom Thank you for the update. Please feel free to contact us if you need additional help. You can also contact at support@robotis.com if you cannot disclose certain information for your query.

saraswanlund commented 3 years ago

I was having the same problem with the scan_dynamixel code. I am also building a 6 axis robotic arm with dynamixel servos, specifically AX-12A. I'm using the Dynamixel shield with an arduino uno. I do not know the id and baudrate of these motors because someone has used them before and likely changed these values (on other example codes, the default values wouldn't do anything). No matter what I do, I can't seem to get the code to cooperate. I have narrowed it down to specific lines of code that are causing trouble, but not sure why. All I have rn is the dynamixel shield, the arduino uno, and my computer. Do I really need more external hardware to control these servos?

saraswanlund commented 3 years ago

edit: apologies in advance for the long post

for reference, after much experimentation, this is what I've done to the code for scan_dynamixel: some of the stuff is commented out because I was testing it but basically my findings are this: the line dxl.begin(buad[index]); is weird, it does not cause any errors but anything printed to DEBUG_SERIAL after it does not print. hence the line DEBUG_SERIAL.println("Test1"); prints "Test1" to the serial monitor as expected whereas the line DEBUG_SERIAL.println("Test2"); does nothing. Other issues I've found: when the for loop that iterates through the id's was NOT commented out, the lines if(dxl.ping(id)) { and DEBUG_SERIAL.println(dxl.getModelNumber(id)); were the ones causing the unreadable characters that @ECEquentin was getting on their serial monitor. I am hoping to get this code working so that I can find the baudrate and id of my servo, so that I can get it to move. It seems that without these values known, I can't get it to do anything (even on the broadcast frequency there was no response).

`/*******************************************************************************
* Copyright 2016 ROBOTIS CO., LTD.
*
* Licensed under the Apache License, Version 2.0 (the "License");
* you may not use this file except in compliance with the License.
* You may obtain a copy of the License at
*
*     http://www.apache.org/licenses/LICENSE-2.0
*
* Unless required by applicable law or agreed to in writing, software
* distributed under the License is distributed on an "AS IS" BASIS,
* WITHOUT WARRANTIES OR CONDITIONS OF ANY KIND, either express or implied.
* See the License for the specific language governing permissions and
* limitations under the License.
*******************************************************************************/

#include <Dynamixel2Arduino.h>

// Please modify it to suit your hardware.
#if defined(ARDUINO_AVR_UNO) || defined(ARDUINO_AVR_MEGA2560) // When using DynamixelShield
  #include <SoftwareSerial.h>
  SoftwareSerial soft_serial(0, 1); // DYNAMIXELShield UART RX/TX
  /*#include <AltSoftSerial.h>
  AltSoftSerial DEBUG_SERIAL;*/
  #define DXL_SERIAL   Serial
  #define DEBUG_SERIAL soft_serial
  const uint8_t DXL_DIR_PIN = 2; // DYNAMIXEL Shield DIR PIN
#elif defined(ARDUINO_SAM_DUE) // When using DynamixelShield
  #define DXL_SERIAL   Serial
  #define DEBUG_SERIAL SerialUSB
  const uint8_t DXL_DIR_PIN = 2; // DYNAMIXEL Shield DIR PIN
#elif defined(ARDUINO_SAM_ZERO) // When using DynamixelShield
  #define DXL_SERIAL   Serial1
  #define DEBUG_SERIAL SerialUSB
  const uint8_t DXL_DIR_PIN = 2; // DYNAMIXEL Shield DIR PIN
#elif defined(ARDUINO_OpenCM904) // When using official ROBOTIS board with DXL circuit.
  #define DXL_SERIAL   Serial3 //OpenCM9.04 EXP Board's DXL port Serial. (Serial1 for the DXL port on the OpenCM 9.04 board)
  #define DEBUG_SERIAL Serial
  const uint8_t DXL_DIR_PIN = 22; //OpenCM9.04 EXP Board's DIR PIN. (28 for the DXL port on the OpenCM 9.04 board)
#elif defined(ARDUINO_OpenCR) // When using official ROBOTIS board with DXL circuit.
  // For OpenCR, there is a DXL Power Enable pin, so you must initialize and control it.
  // Reference link : https://github.com/ROBOTIS-GIT/OpenCR/blob/master/arduino/opencr_arduino/opencr/libraries/DynamixelSDK/src/dynamixel_sdk/port_handler_arduino.cpp#L78
  #define DXL_SERIAL   Serial3
  #define DEBUG_SERIAL Serial
  const uint8_t DXL_DIR_PIN = 84; // OpenCR Board's DIR PIN.    
#else // Other boards when using DynamixelShield
  #define DXL_SERIAL   Serial1
  #define DEBUG_SERIAL Serial
  const uint8_t DXL_DIR_PIN = 2; // DYNAMIXEL Shield DIR PIN
#endif

#define MAX_BAUD  5
const int32_t buad[MAX_BAUD] = {57600, 115200, 1000000, 2000000, 3000000};

Dynamixel2Arduino dxl(DXL_SERIAL, DXL_DIR_PIN);

//This namespace is required to use Control table item names
using namespace ControlTableItem;

void setup() {
  // put your setup code here, to run once:
  int8_t index = 0;
  int8_t found_dynamixel = 0;

  // Use UART port of DYNAMIXEL Shield to debug.
  DEBUG_SERIAL.begin(115200);   //set debugging port baudrate to 115200bps
  //while(DEBUG_SERIAL.available() );         //Wait until the serial port is opened

  for(int8_t protocol = 1; protocol < 3; protocol++) {
    // Set Port Protocol Version. This has to match with DYNAMIXEL protocol version.
    dxl.setPortProtocolVersion((float)protocol);
    DEBUG_SERIAL.print("SCAN PROTOCOL ");
    DEBUG_SERIAL.println(protocol);

    for(index = 0; index < MAX_BAUD; index++) {
      // Set Port baudrate.
      DEBUG_SERIAL.print("SCAN BAUDRATE ");
      DEBUG_SERIAL.println(buad[index]);
      DEBUG_SERIAL.println("Test1");
      dxl.begin(buad[index]);
      DEBUG_SERIAL.println("Test2");
     /* for(int id = 0; id < DXL_BROADCAST_ID; id++) {
        iterate until all ID in each buadrate is scanned.
        if(dxl.ping(id)) {
          DEBUG_SERIAL.print("ID : ");
          DEBUG_SERIAL.print(id);
          DEBUG_SERIAL.print(", Model Number: ");
          DEBUG_SERIAL.println(dxl.getModelNumber(id));
          found_dynamixel++;
        }
      }*/
       DEBUG_SERIAL.print("ID : ");
      // DEBUG_SERIAL.print(id);
       DEBUG_SERIAL.print(", Model Number: ");
     //  DEBUG_SERIAL.println(dxl.getModelNumber(id));
       found_dynamixel++;
    }
  }

  DEBUG_SERIAL.print("Total ");
  DEBUG_SERIAL.print(found_dynamixel);
  DEBUG_SERIAL.println(" DYNAMIXEL(s) found!");
}

void loop() {
  // put your main code here, to run repeatedly:
}`
ROBOTIS-Will commented 3 years ago

Hi @saraswanlund , Thank you for attaching detailed information to explain your issues. I noticed that you are running DYNAMIXEL2Arduino examples, which only works with ROBOTIS's Arduino supporting boards(OpenCR or OpenCM9.04). Since you are using DYNAMIXEL Shield with Arduino Uno, you should install DYNAMIXEL Shield library and run its example.

Arduino Uno only has one serial port that is shared with USB, therefore, you cannot use the USB port as debugging port while operating DYNAMIXEL or else you'll get bunch of broken characters and reversed question marks. For debugging, you can connect USB-serial interface such as LN-101 to software serial port next to the green power terminal block. Or you can simply use Arduino boards that comes with separate serial port such as Arduino Leonardo. image

saraswanlund commented 3 years ago

So the scan_dynamixel code won't work at all without extra hardware? If so, is there a way I can determine the id and baudrate of my servos without extra hardware? Also, the example code for the DynamixelShield library for scan_dynamixel looks the same as the one for the Dynamixel2Arduino code. What is the main difference?

saraswanlund commented 3 years ago

I just tested the DynamixelSheild library, and the servo worked! Thanks a lot.

ROBOTIS-Will commented 3 years ago

Hi @saraswanlund Thank you for the update. FYI, DYNAMIXEL Shield library is a wrapper of DYNAMIXEL2Arduino for easier use and defines GPIO pins for various Arduino boards. Without these definition, DYNAMIXEL Shield won't be able to communicate with Arduino boards and that is why DYNAMIXEL2Arduino examples don't work with DYNAMIXEL Shield. Thank you.

abusphere commented 5 months ago

@ROBOTIS-Will I am having similar issues trying to run the scan_dynamixel example for the DYNAMIXEL Shield to find the ID and baud rate of AX-12A servos. With the serial output baud rate set to 115200 just as the example, random characters are still outputted.

My computer is connected via USB to an Arduino Uno connected to the DYNAMIXEL Shield. I have two AX-12A servos connected to the shield via the TTL ports.

Code:

/*******************************************************************************
* Copyright 2016 ROBOTIS CO., LTD.
*
* Licensed under the Apache License, Version 2.0 (the "License");
* you may not use this file except in compliance with the License.
* You may obtain a copy of the License at
*
*     http://www.apache.org/licenses/LICENSE-2.0
*
* Unless required by applicable law or agreed to in writing, software
* distributed under the License is distributed on an "AS IS" BASIS,
* WITHOUT WARRANTIES OR CONDITIONS OF ANY KIND, either express or implied.
* See the License for the specific language governing permissions and
* limitations under the License.
*******************************************************************************/

#include <DynamixelShield.h>

#if defined(ARDUINO_AVR_UNO) || defined(ARDUINO_AVR_MEGA2560)
  #include <SoftwareSerial.h>
  SoftwareSerial soft_serial(7, 8); // DYNAMIXELShield UART RX/TX
  #define DEBUG_SERIAL soft_serial
#elif defined(ARDUINO_SAM_DUE) || defined(ARDUINO_SAM_ZERO)
  #define DEBUG_SERIAL SerialUSB
#else
  #define DEBUG_SERIAL Serial
#endif

#define MAX_BAUD  5
const int32_t buad[MAX_BAUD] = {57600, 115200, 1000000, 2000000, 3000000};

Dynamixel2Arduino dxl(DXL_SERIAL, DXL_DIR_PIN);

//This namespace is required to use Control table item names
using namespace ControlTableItem;

void setup() {
  // put your setup code here, to run once:
  int8_t index = 0;
  int8_t found_dynamixel = 0;

  // For Uno, Nano, Mini, and Mega, use UART port of DYNAMIXEL Shield to debug.
  DEBUG_SERIAL.begin(115200);  //set debugging port baudrate to 115200bps
  while(!DEBUG_SERIAL);         //Wait until the serial port is opened

  for(int8_t protocol = 1; protocol < 3; protocol++) {
    // Set Port Protocol Version. This has to match with DYNAMIXEL protocol version.
    dxl.setPortProtocolVersion((float)protocol);
    DEBUG_SERIAL.print("SCAN PROTOCOL ");
    DEBUG_SERIAL.println(protocol);

    for(index = 0; index < MAX_BAUD; index++) {
      // Set Port baudrate.
      DEBUG_SERIAL.print("SCAN BAUDRATE ");
      DEBUG_SERIAL.println(buad[index]);
      dxl.begin(buad[index]);
      for(int id = 0; id < DXL_BROADCAST_ID; id++) {
        //iterate until all ID in each buadrate is scanned.
        if(dxl.ping(id)) {
          DEBUG_SERIAL.print("ID : ");
          DEBUG_SERIAL.print(id);
          DEBUG_SERIAL.print(", Model Number: ");
          DEBUG_SERIAL.println(dxl.getModelNumber(id));
          found_dynamixel++;
        }
      }
    }
  }

  DEBUG_SERIAL.print("Total ");
  DEBUG_SERIAL.print(found_dynamixel);
  DEBUG_SERIAL.println(" DYNAMIXEL(s) found!");
}

void loop() {
  // put your main code here, to run repeatedly:
}

Screenshot 2024-03-20 083442