 github-learning-lab[bot]
commented
6 years ago
github-learning-lab[bot]
commented
6 years ago Step 9: Use emphasis
Great job with those lists! Let's try something new. You can also use bold and italic text in Markdown. Sometimes in Markdown there are multiple ways to accomplish the same goal.
*This text will be italic*
_This will also be italic_

**This text will be bold**
__This will also be bold__

_You **can** combine them_
:keyboard: Activity: Add some emphasis
- Edit the file
_includes/05-emphasis.mdin this pull request. - By using the Preview tab and your :sparkles: new Markdown knowledge, add emphasis (like bold or italics) to your skills.
- Commit your changes.
Step 8: Add a list
In this pull request, you'll learn lists and emojis. You'll also list a few details in your resume!
:point_down: These are expandable dialogues! Click to open and see more information.
Emoji
### Emoji Emoji are fun :sparkles:, and they can be silly :stuck_out_tongue_winking_eye:, but they can also be an important communication tool when working with remote teams ✅. Tone doesn't come across as clearly when reading text as it comes speaking face to face, and emojis can be helpful in conveying context and emotions. :heart: Here are some examples of popular emojis in markdown. | What you see | What you type | | ---------- | ------------ | | :heart: | `:heart:` | | :+1: | `:+1:` | | :smile: | `:smile:` | | :sparkles: | `:sparkles:` | | :tada: | `:tada:` | If you aren't sure what emojis are possible, you can [look them up on a cheatsheet](https://gist.github.com/rxaviers/7360908). In many places on GitHub, you can type `:` and then begin to type the name of an emoji. A fuzzy search will bring up the 5 best guesses and let you select one. 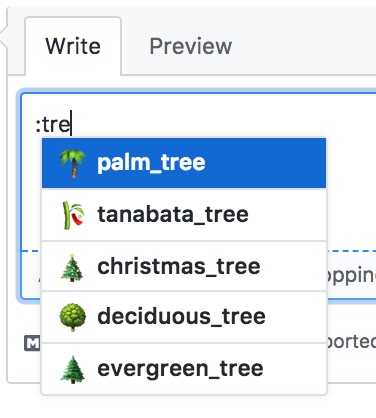
Ordered Lists
### Ordered Lists Ordered lists have numbers and can have indented children that are also ordered. When you're creating ordered lists, you can type out the exact number you want to show in order, (1, 2, 3, etc.) but you can also type every number as "1.". Markdown will take care of the rest of the numbering for you, and your list will be easier to maintain. ``` 1. Item 1 1. Item 2 1. Item 3 1. Item 3a 1. Item 3b ``` 1. Item 1 1. Item 2 1. Item 3 1. Item 3a 1. Item 3b
Unordered Lists
### Unordered Lists To create an unordered list, you can use the `-` character or the `*` character. To do an indented child list item, you need to type a tab or at least two spaces. ``` * Item 1 * Item 2 * Item 2a * Item 2b ``` * Item 1 * Item 2 * Item 2a * Item 2b
Adding accomplishments
I've started a list for you in the "accomplishments" section. Your next steps are to fill out that list, or add another one somewhere else.
:keyboard: Activity: Complete the lists
_includes/04-lists.mdin this pull request.Watch below for my response!