 gametester3322
commented
1 year ago
gametester3322
commented
1 year ago pip install -r requirements.txt doesnt work for me
Open SrijanSharma21 opened 1 year ago
gametester3322
commented
1 year ago pip install -r requirements.txt doesnt work for me
 SrijanSharma21
commented
1 year ago
SrijanSharma21
commented
1 year ago @gametester3322 do you have python installed?
 stancho44
commented
1 year ago
stancho44
commented
1 year ago pip install -r requirements.txt doesnt work for me
try this instead. You might have a different version of python interfering with the installation. Python 3.10 is what worked out for me. If you're lazy I've made a one click script that installs everything including docker to run it locally. Note you should read the actual code before running untrusted code and understand what it's doing.
py -3.10 -m pip install -r requirements.txt
https://github.com/stancho44/LanguageLeapAI/releases/tag/v1.0.0
 KoroVT
commented
1 year ago
KoroVT
commented
1 year ago Is having a 20 seconds delay between me speaking and voicevox speaking what i say normal? x_x
 coolshaeds
commented
1 year ago
coolshaeds
commented
1 year ago wdym run pip install -r requirements.txt?
 maisan186
commented
1 year ago
maisan186
commented
1 year ago the pip install -r requirements.txt did work but I'm having problem with python voice_translator.py and holding down F key to record
 TheyCallMeXTC
commented
5 months ago
TheyCallMeXTC
commented
5 months ago ModuleNotFoundError: No module named 'distutils' Got this when doing pip install -r requirements.txt Can anybody here help?
This is a guide to get the LanguageLeapAI running using google colab(I will not make one for docker since most people i’ve seen use google colab) ———————————————————————————————————— Prerequisite •Have Git installed •Open a command prompt and than type(cd Desktop) after that run
git clone https://github.com/SociallyIneptWeeb/LanguageLeapAI/•Have Python Installed •Have VoiceMeeter And VB-Virtual Cable Installed(Both require a system reboot) •Have an account in Ngrok •Once signed up go Here to get your auth key(leave this page open) •Go to Whisper_And_Voicevox and click on file(top left) then click Save A Copy To Google Drive(wait for it to auto open the one in your google drive)Guide •Once you have done the step from the prerequisite close the first Whisper And Voicevox page and keep the second one open •Scroll down to the Configuration Cell and where it says Insert text here put your Ngrok auth key there(Click Me To Get It) •After you do the last step click on Runtime and then click Run All and wait for it everything to run at the last cell you will see it say
•once you got the link go to the LanguageLeapAI folder in your desktop than edit the .env.simple with your text editor of choice than where you see WHISPER_BASE_URL=http://localhost:9000 VOICEVOX_BASE_URL=http://localhost:50021
•replace the http://localhost:9000 and http://localhost:50021 with the link you got from the google colab •Scroll down to where it says (DEEPL_AUTH_KEY=) above where it says that it has a guide on how to get the auth key(This step is optional but I highly recommend it This Does require a credit or debit card if you don’t want to do this set the USE_DEEPL=true to a false) •Minimize the text editor for now and then press the Windows Key and than look for VoiceMeeter Banana make sure yours looks like that(where it says Speakers (Razer Kraken Kitty Edition) and Microphone(Razer Kraken Kit) in my picture for the speakers click on A1 where it says hardware input and use your main speakers and for hardware input 2 click in where it says (Select input device) click on it and than set it as your main microphone and for the Hardware input 1 to the one you see in the picture after that where the A1-3 and B1-2 to these set them to one from the picture below
 •After doing the last step on the Top Right you will see menu click on it and then select the ones from the picture below
 •After that you can close VoiceMeeter Banana
•Open up control panel and than click on Hardware and Sound than click on
•After that you can close VoiceMeeter Banana
•Open up control panel and than click on Hardware and Sound than click on
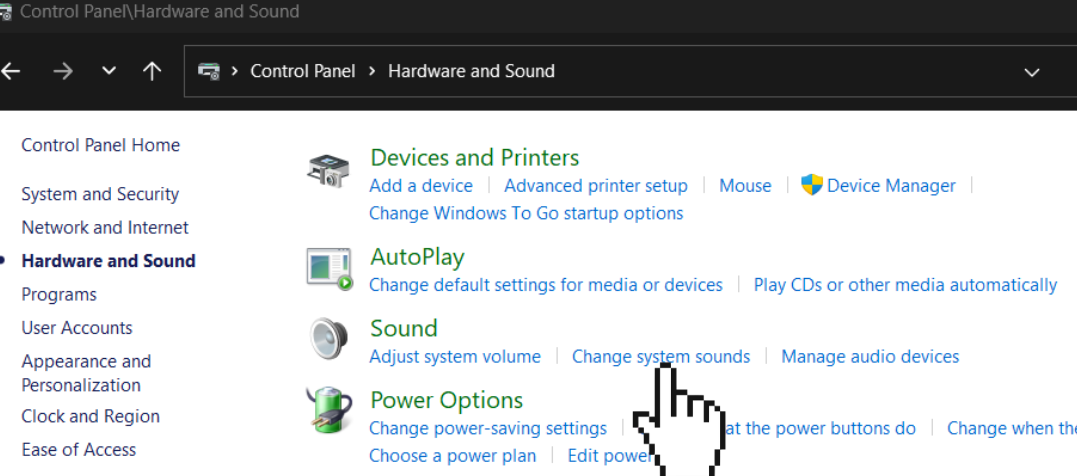 and after clicking on that select the playback tab scroll down until you see the voicemeeter stuff and do this
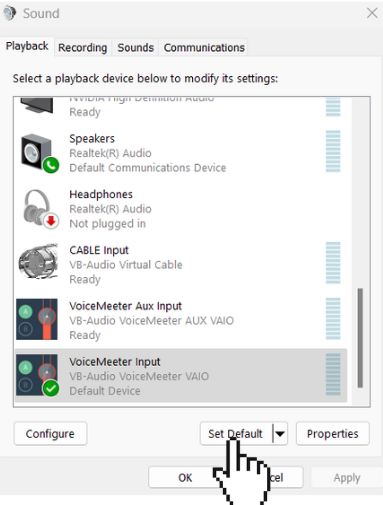 than click apply and than you can close control panel
•Go back to the LanguageLeapAI and than open a CMD in that page and than run
than click apply and than you can close control panel
•Go back to the LanguageLeapAI and than open a CMD in that page and than run
pip install -r requirements.txtand wait for it to finish than typepython src/modules/get_audio_device_ids.pyand hit enter than reopen the .env.simple from the text editor you choose scroll down until you see to get the id of this look in the command prompt where you ranpython src/modules/get_audio_device_ids.pyand than look for your main microphone to the left side of where it says Microphone you will see it’s ID than set the MICROPHONE_ID= to the ID you got(find the lowest ID) •For VOICEMEETER_INPUT_ID= do the same thing you did to find your microphone id but instead of looking for your main mic look for something that says (VoiceMeeter Input (VB-Audio) and put the id that you found it on as the ID for the VOICEMEETER_INPUT_ID= •For the CABLE_INPUT_ID= do the same thing but now look for (CABLE Input (VB-Audio) and copy it’s id and put in as the id for the CABLE_INPUT_ID •and for AUX_OUTPUT_ID= now in the command prompt with the id that is near (VoiceMeeter Aux Output (VB-Audio) and then save the .env.simple use ctrl+s •open a new cmd on the LanguageLeapAI/src page and then runpython voice_translator.pyand then hold the "F" key and talk into the mic and release the "F" key afterwards wait like few seconds and it will work •open another cmd on LanguageLeapAI/src and runpython subtitler.pyto get subtitles if you need help with anything I will be more than happy to help youingame settings •Use the images below for help


Guide Proudly Made By