Open Yukyukuon opened 4 years ago
模拟一个基于CPU 的光栅化渲染器的简化版本。
填写一个旋转矩阵和一个透视投影矩阵。给定三维下三个点 \ v0(2.0, 0.0,−2.0), v1(0.0, 2.0,−2.0), v2(−2.0, 0.0,−2.0) \ 需要将这三个点的坐标变换为屏幕坐标并在屏幕上绘制出对应的线框三角形。简而言之,我们需要进行模型、视图、投影、视口等变换来将三角形显示在屏幕上。
结果:光栅化器会创建一个窗口显示出线框三角形。由于光栅化器是逐帧渲染与绘制的,所以可以使用A 和D 键去将该三角形绕z 轴旋转,当按下Esc 键时,窗口会关闭且程序终止。 \ 提高:将三角形绕任意过原点的轴旋转。
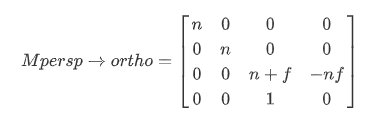
透视投影转正交投影矩阵 n: near plane's z-axis f: far plane's z-axis
Translate and scale the resulting rectangle to [-1, 1]² forY: field-of-view (垂直可视角) aspect ratio: width / height (宽高比) t: top plane's y-axis
b: bottom plane's y-axis r: right plane's x-axis
l: left plane's x-axis
rasterizer.hpp 文件作用是生成渲染器界面与绘制。
#pragma once
#include "Triangle.hpp"
#include <algorithm>
#include <eigen3/Eigen/Eigen>
using namespace Eigen;

namespace rst {
enum class Buffers
{
    Color = 1,
    Depth = 2
};

inline Buffers operator|(Buffers a, Buffers b)
{
    return Buffers((int)a | (int)b);
}

inline Buffers operator&(Buffers a, Buffers b)
{
    return Buffers((int)a & (int)b);
}

enum class Primitive
{
    Line,
    Triangle
};

/*
 * For the curious : The draw function takes two buffer id's as its arguments.
 * These two structs make sure that if you mix up with their orders, the
 * compiler won't compile it. Aka : Type safety
 * */
struct pos_buf_id
{
    int pos_id = 0;
};

struct ind_buf_id
{
    int ind_id = 0;
};

class rasterizer
{
  public:
    rasterizer(int w, int h);
    pos_buf_id load_positions(const std::vector<Eigen::Vector3f>& positions);
    ind_buf_id load_indices(const std::vector<Eigen::Vector3i>& indices);

    void set_model(const Eigen::Matrix4f& m);
    void set_view(const Eigen::Matrix4f& v);
    void set_projection(const Eigen::Matrix4f& p);

    void set_pixel(const Eigen::Vector3f& point, const Eigen::Vector3f& color);

    void clear(Buffers buff);

    void draw(pos_buf_id pos_buffer, ind_buf_id ind_buffer, Primitive type);

    std::vector<Eigen::Vector3f>& frame_buffer() { return frame_buf; }

  private:
    void draw_line(Eigen::Vector3f begin, Eigen::Vector3f end);
    void rasterize_wireframe(const Triangle& t);

  private:
    Eigen::Matrix4f model;
    Eigen::Matrix4f view;
    Eigen::Matrix4f projection;

    std::map<int, std::vector<Eigen::Vector3f>> pos_buf;
    std::map<int, std::vector<Eigen::Vector3i>> ind_buf;

    std::vector<Eigen::Vector3f> frame_buf;
    std::vector<float> depth_buf;
    int get_index(int x, int y);

    int width, height;

    int next_id = 0;
    int get_next_id() { return next_id++; }
};
} // namespace rst
在main.cpp 中,我们模拟了图形管线。我们首先定义了光栅化器类的实例,然后设置了其必要的变量。然后我们得到一个带有三个顶点的硬编码三角形。在主函数上,我们定义了三个分别计算模型、视图和投影矩阵的函数,每一个函数都会返回相应的矩阵。接着,这三个函数的返回值会被set_model(),set_view() 和set_projection() 三个函数传入光栅化器中。最后,光栅化器在屏幕上显示出变换的结果。
实现视图变换
Eigen::Matrix4f get_view_matrix(Eigen::Vector3f eye_pos) //eye_pos = [0, 0, 5]
{
    Eigen::Matrix4f view = Eigen::Matrix4f::Identity();

    Eigen::Matrix4f translate;
    translate << 1, 0, 0, -eye_pos[0], 0, 1, 0, -eye_pos[1], 0, 0, 1,
        -eye_pos[2], 0, 0, 0, 1;

    view = translate * view;
    return view;
}
逐个元素地构建模型变换矩阵并返回该矩阵。在此函数中,实现三维中绕z 轴旋转的变换矩阵,而不用处理平移与缩放。
Eigen::Matrix4f get_model_matrix(float rotation_angle)
{
    Eigen::Matrix4f model = Eigen::Matrix4f::Identity();
    // TODO: Implement this function
    // Create the model matrix for rotating the triangle around the Z axis.
    // Then return it.

    float radian = rotation_angle / 180 * MY_PI;
    Eigen::Matrix4f rotate(4, 4);
    rotate << cos(radian), -sin(radian), 0.0, 0.0,
              sin(radian), cos(radian), 0.0, 0.0,
              0.0, 0.0, 1.0, 0.0,
              0.0, 0.0, 0.0, 1.0;
    model = rotate * model;

    return model;
}
实现透视变换
Eigen::Matrix4f get_projection_matrix(float eye_fov, float aspect_ratio, float zNear, float zFar)
{
    Eigen::Matrix4f projection = Eigen::Matrix4f::Identity();

    // TODO: Implement this function
    // Create the projection matrix for the given parameters.
    // Then return it.

    // perspective prjection -> orthographic projection Matrix(投影转正交)
    Eigen::Matrix4f M_persp2ortho(4, 4);

    // Center cuboid by transMatrix
    Eigen::Matrix4f M_ortho_trans(4, 4);

    // Scale into 'Canonical' cube
    Eigen::Matrix4f M_ortho_scale(4, 4);

    M_persp2ortho << zNear, 0, 0, 0,
                     0, zNear, 0, 0,
                     0, 0, zNear + zFar, -zNear * zFar,
                     0, 0, 1, 0;

    float radian = eye_fov / 180 * MY_PI;
    auto top = -zNear * tan(radian / 2);
    auto bottom = -top;
    auto right = top * aspect_ratio;
    auto left = -right;

    M_ortho_scale << 2 / (right - left), 0, 0, 0,
                     0, 2 / (top - bottom), 0, 0,
                     0, 0, 2 / (zNear - zFar), 0,
                     0, 0, 0, 1;
    M_ortho_trans << 1, 0, 0, -(right + left) / 2,
                     0, 1, 0, -(top + bottom) / 2,
                     0, 0, 1, -(zFar + zNear) / 2,
                     0, 0, 0, 1;

    projection = M_ortho_scale * M_ortho_trans * M_persp2ortho * projection;

    return projection;
}
使用到的库为Eigen 与OpenCV 虚拟机并用CMake 进行编译,请在终端(命令行) 下输入以下内容:
mkdir build // 创建build文件夹以保留的工程文件。
2 cd build // 进入build文件夹。
3 cmake .. // 通过提供CMakeLists.txt文件的路径
4 // 作为参数来运行CMake。
5 make −j4 // 通过make编译代码, −j4 表示通过
6 // 4个内核进行并行化编译。
7 ./Rasterizer // 运行代码。
GAMES101(作业1)
模拟一个基于CPU 的光栅化渲染器的简化版本。
作业描述
填写一个旋转矩阵和一个透视投影矩阵。给定三维下三个点 \ v0(2.0, 0.0,−2.0), v1(0.0, 2.0,−2.0), v2(−2.0, 0.0,−2.0) \ 需要将这三个点的坐标变换为屏幕坐标并在屏幕上绘制出对应的线框三角形。简而言之,我们需要进行模型、视图、投影、视口等变换来将三角形显示在屏幕上。
结果:光栅化器会创建一个窗口显示出线框三角形。由于光栅化器是逐帧渲染与绘制的,所以可以使用A 和D 键去将该三角形绕z 轴旋转,当按下Esc 键时,窗口会关闭且程序终止。 \ 提高:将三角形绕任意过原点的轴旋转。
要点
1. 3D Rotation around z-axis
2. Perspective projection --> Orthographic projection
透视投影转正交投影矩阵

n: near plane's z-axis
f: far plane's z-axis
3. Orthographic Projection
Translate and scale the resulting rectangle to [-1, 1]²

forY: field-of-view (垂直可视角)
aspect ratio: width / height (宽高比)
t: top plane's y-axis
b: bottom plane's y-axis

r: right plane's x-axis
l: left plane's x-axis

代码
rasterizer.hpp框架
rasterizer.hpp 文件作用是生成渲染器界面与绘制。
Main.cpp
在main.cpp 中,我们模拟了图形管线。我们首先定义了光栅化器类的实例,然后设置了其必要的变量。然后我们得到一个带有三个顶点的硬编码三角形。在主函数上,我们定义了三个分别计算模型、视图和投影矩阵的函数,每一个函数都会返回相应的矩阵。接着,这三个函数的返回值会被set_model(),set_view() 和set_projection() 三个函数传入光栅化器中。最后,光栅化器在屏幕上显示出变换的结果。
get_view_matrix(Eigen::Vector3f eye_pos)
实现视图变换
get_model_matrix(float rotation_angle)
逐个元素地构建模型变换矩阵并返回该矩阵。在此函数中,实现三维中绕z 轴旋转的变换矩阵,而不用处理平移与缩放。
get_projection_matrix(float eye_fov, float aspect_ratio, float zNear, float zFar)
实现透视变换
结果
使用到的库为Eigen 与OpenCV
虚拟机并用CMake 进行编译,请在终端(命令行) 下输入以下内容: