 dhalbert
commented
1 year ago
dhalbert
commented
1 year ago Check out this guide: https://learn.adafruit.com/how-to-add-a-new-board-to-circuitpython
Closed jainvandit99 closed 1 year ago
dhalbert
commented
1 year ago Check out this guide: https://learn.adafruit.com/how-to-add-a-new-board-to-circuitpython
 jake1164
commented
1 year ago
jake1164
commented
1 year ago Added an espressif PID for this board & Bootloader. 0x81A2 | Waveshare ESP32-S3-Pico - UF2 Bootloader 0x81A3 | Waveshare ESP32-S3-Pico - CircuitPython
 tirtharajsinha
commented
1 year ago
tirtharajsinha
commented
1 year ago I have added this board to circuitpython 9.x.x. also created backporting Pull request have been submitted for circuitpython 8.2.x.
On merge you can download .bin and .uf2 from this page.
you are welcome.
tirtharajsinha
commented
1 year ago here is a my version of the pin diagram.
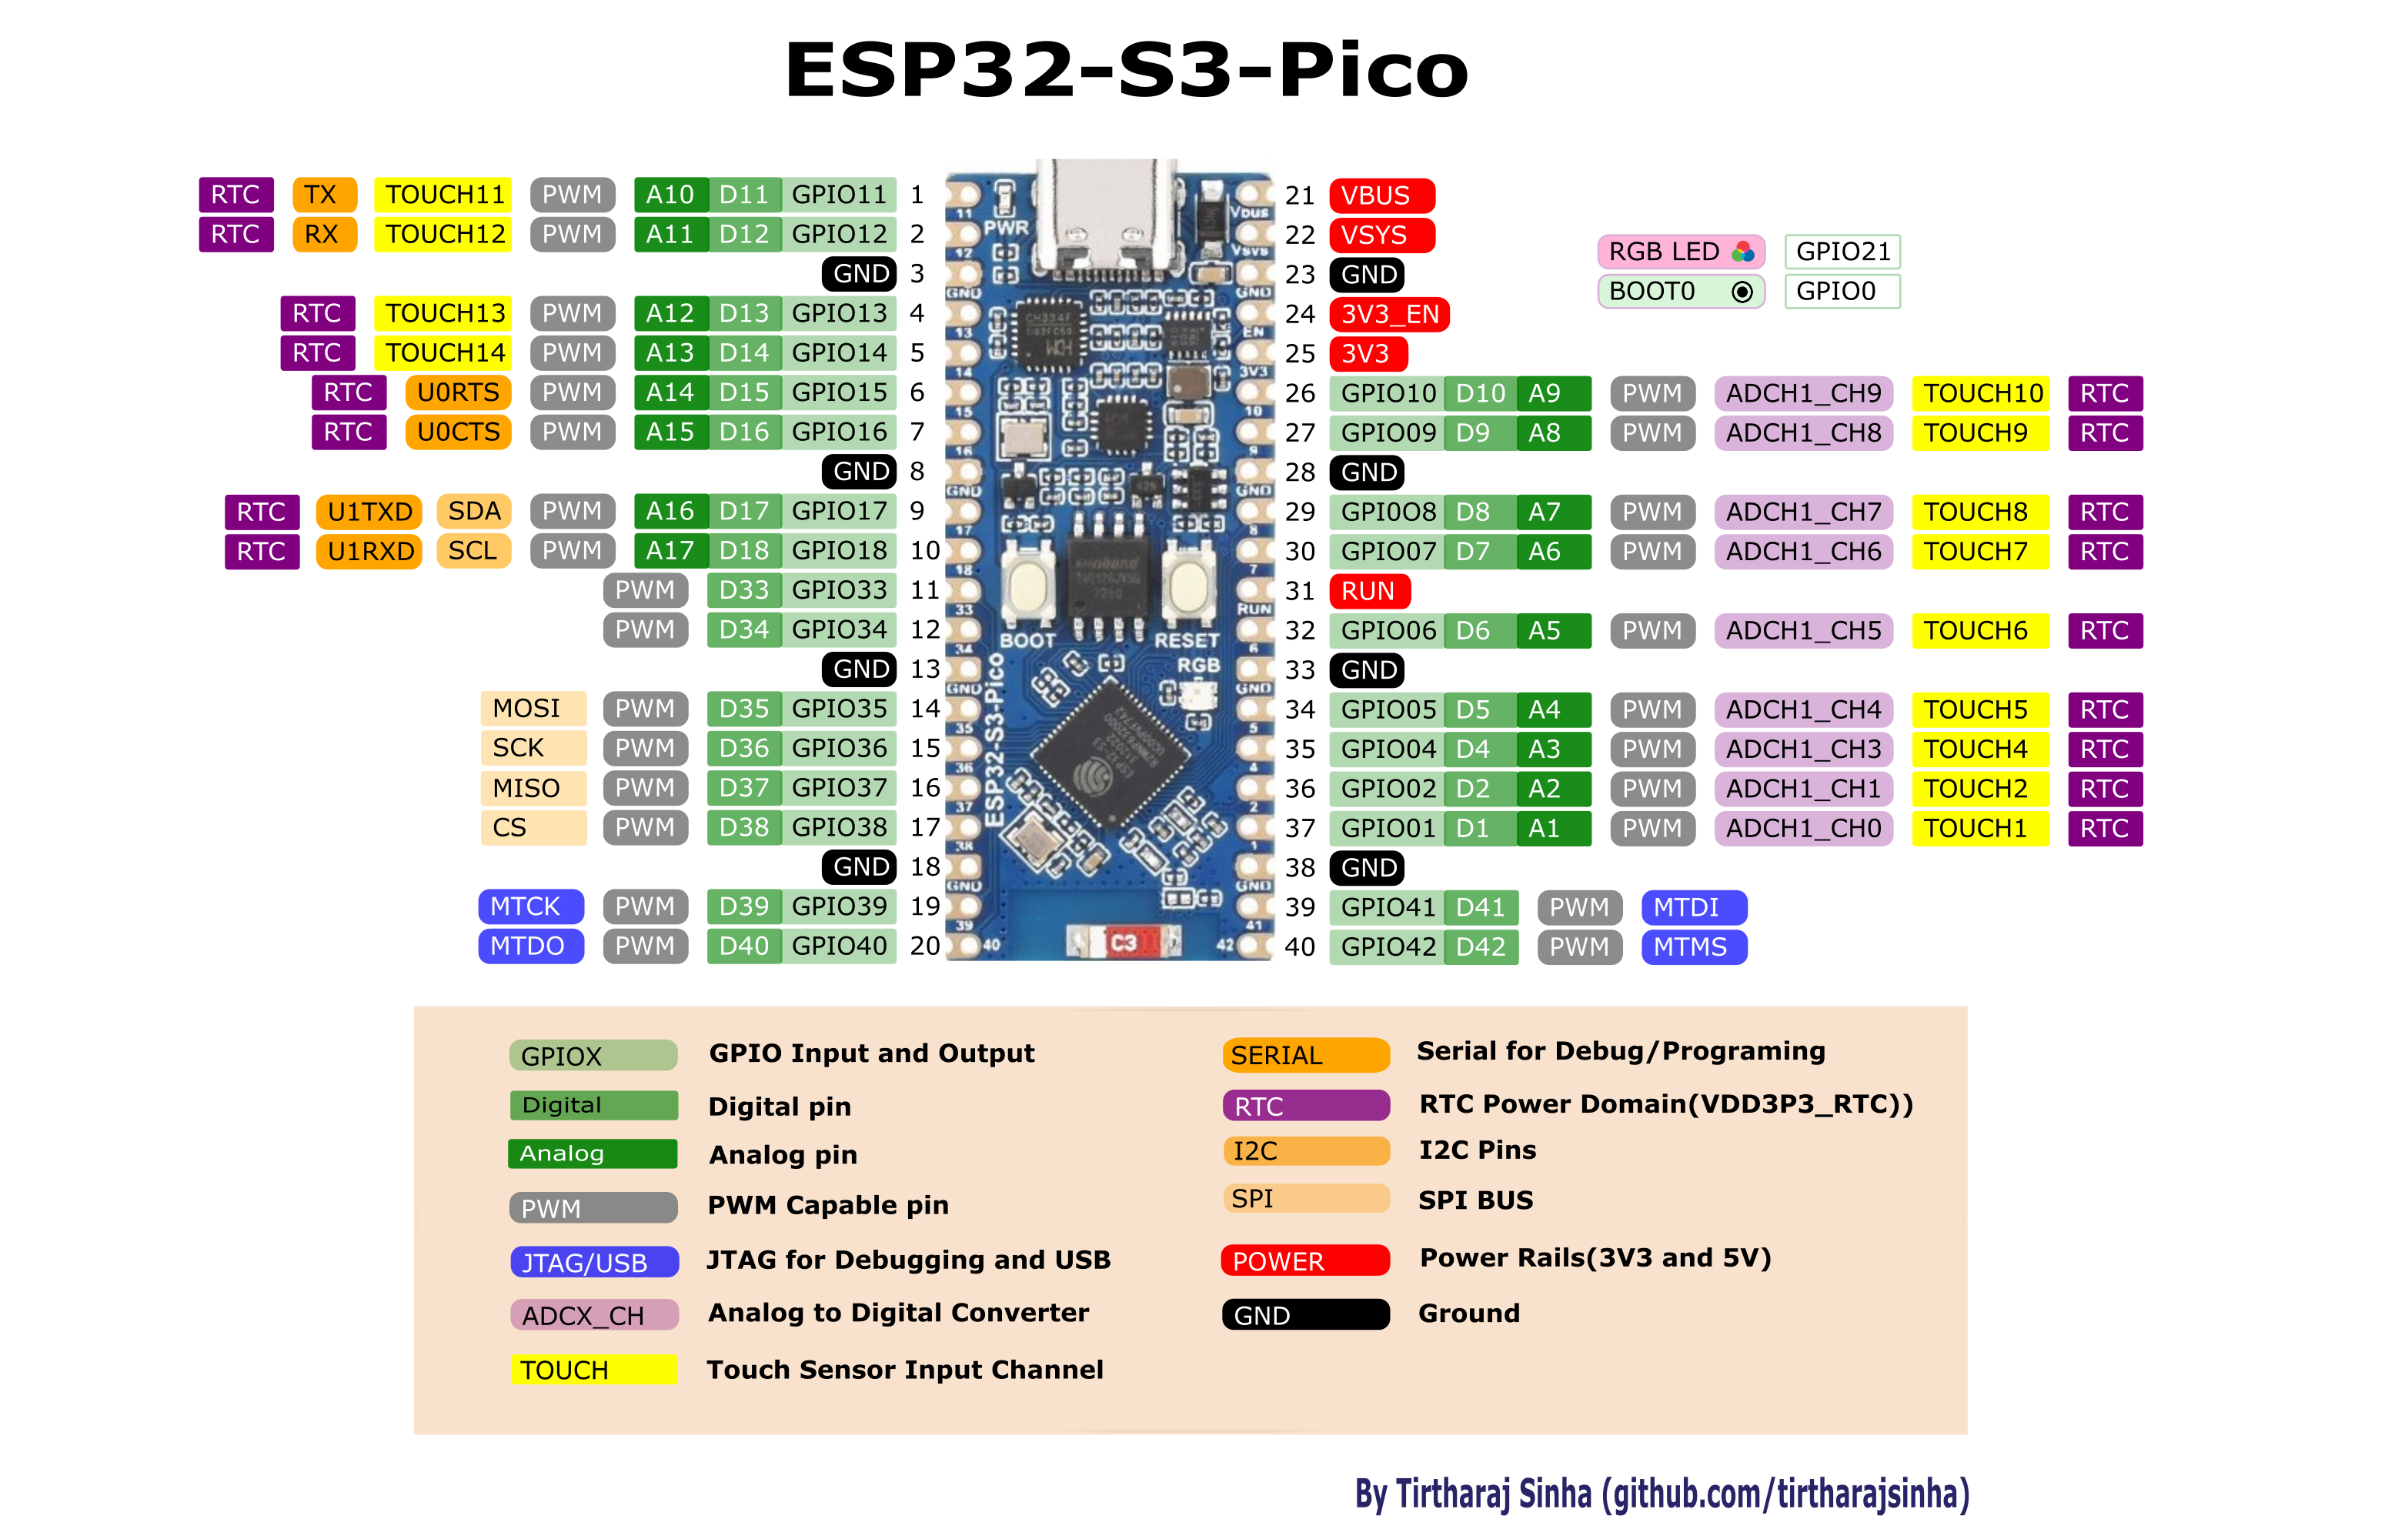
Open for any suggestion.
 tannewt
commented
1 year ago
tannewt
commented
1 year ago Done in #8372. Thanks @tirtharajsinha. Feel free to keep dropping info on this issue even once it is closed.
 ed0106
commented
1 year ago
ed0106
commented
1 year ago here is a my version of the pin diagram.
Open for any suggestion.
Hi @tirtharajsinha, I noticed the drawing you published today. I have been working with the Waveshare ESP32-S3 Pico for over a week now (with great pain I might add)... I was not able to get the SPI interface to operate on the pins you indicated :
Pin 36 - MOSI Pin 37 - SCK Pin 39 - CS Pin 40 - MISO
I have my Waveshare Pico board connected to a ILI9341 TFT display on those pins and was unable to get it to operate. I have also been unsuccessful at getting any of the GPIO pins to operate as a SPI interface for the ILI9341, although I get it working on an Arduino Uno without fail.
Also you are using a bright orange for the UART 0 and 1 interface but that is not visible in the legend.
My experience with this board so far has not been stellar... there is no official documentation on accessing the onboard Winbod w25q128 SPI Flash IC, they are dependent on the Official ESP32 Library for sample code, and when running the ESP32->GPIO->BlinkRGB sample sketch in the Arduino IDE (version 2.2.1, via Debian 11) the onboard RGB LED does nothing. And I've have had a failure with the TFT_eSPI Library .
tirtharajsinha
commented
1 year ago first thing first there is a wrong color for UART and TOUCH pins in legend, thanks for pointing out.
Second, ESP32 chips allow for 'multiplexing' of almost all signals so it isn't like some pins can do SPI and others can't. You can connect any of the available PWM channels, I2S channels, UART, I2C or SPI ports to any pin. I have added the pins as default. you can Ignore the pins that are in diagram.
As you said you could not able to use the rgb led, the rgb led is connected to GPIO 21 . And about the example I have not tested that, But you can use this simple code which I have used and works fine on waveshare-esp32-s3-pico.
#include <Adafruit_NeoPixel.h>

#define LED_COUNT 1
#define LED_PIN 21

Adafruit_NeoPixel strip(LED_COUNT, LED_PIN, NEO_GRB + NEO_KHZ800);

unsigned long noti;

void setup() {
  strip.begin();
  strip.show();
  strip.setBrightness(50);
  Serial.begin(9600);
}

void loop() {
  rainbow(10);
}

void rainbow(int wait) {
  for (long firstPixelHue = 0; firstPixelHue < 5 * 65536; firstPixelHue += 256) {
    for (int i = 0; i < strip.numPixels(); i++) {
      int pixelHue = firstPixelHue + (i * 65536L / strip.numPixels());
      strip.setPixelColor(i, strip.gamma32(strip.ColorHSV(pixelHue)));
    }
    strip.show();
    delay(wait);
    if(millis()-noti>5000){
      Serial.println("neopixel rainbow with arduino framework");
      noti=millis();
    }

  }
}
If you successfully upload this code it must create a rainbow effect.
And About the SPI connection you can use any pins for connection it will work just fine. Check your connections, code bug and the driver you are using is correct.
You can follow this Youtube Video - Drive ILI9341 SPI TFT on ESP32-S3 using TFT_eSPI library, in Arduino Framework.
 Laurent6012
commented
3 months ago
Laurent6012
commented
3 months ago Hello,
Just started yesterday with this board, many problems with the Waveshare's Wiki web page. First someone put a faulted firmware on the Wiki, without their pico-gpio file for the Pins number. So many of their examples even didn't work as they use this file cause examples are written for their "raspberry's pico kit". For who're interested the good micropython firmware is in the examples zip file.
I tried also circuitpython, who's more easy to flash, and it even surprised me, the RGB LED, who no more light up before, started again to work immediatly at boot.
So, 2 things that i'm certain, i'll use circuitpython even i did the things to make the builtin Led working in micropython. The builtin LED is indeed on the GPIO21.
Best regards
 bablokb
commented
3 months ago
bablokb
commented
3 months ago Just two notes:
I have a CP version of this board with pin-names compatible to the Pico-W. And I am using this board with this CP version as a drop-in replacement for the real Pico. My code works without (almost) no change. Connectivity is better and the ESP32-S3 has much more RAM, so I don't run into the problems I have with the Pico-W.
The only things that are not working are the VSYS-ADC (this is because of technical reasons, the ESP32-S3 always has 3V3 on VSYS) and the neopixel-LED. The latter does kind of work, but not reliably. Seems to be a timing problem, because "filling" in one color and then turning it off (i.e. filling with zero) and back again sometimes works and sometimes doesn't. But maybe this is a problem of one specific board.
 oddscome
commented
3 months ago
oddscome
commented
3 months ago // Define the pin and the number of LEDs
// Initialize the NeoPixel library Adafruit_NeoPixel strip = Adafruit_NeoPixel(LED_COUNT, LED_PIN, NEO_GRB + NEO_KHZ800);
void setup() { strip.begin(); // Initialize the strip strip.show(); // Initialize all pixels to 'off' strip.setBrightness(50); // Set brightness (0-255) }
void loop() { // Cycle through different colors setColor(255, 0, 0); // Red delay(1000); setColor(0, 255, 0); // Green delay(1000); setColor(0, 0, 255); // Blue delay(1000); setColor(255, 255, 0); // Yellow delay(1000); setColor(0, 255, 255); // Cyan delay(1000); setColor(255, 0, 255); // Magenta delay(1000); setColor(255, 255, 255); // White delay(1000); setColor(0, 0, 0); // Off delay(1000); }
void setColor(uint8_t red, uint8_t green, uint8_t blue) { strip.setPixelColor(0, strip.Color(red, green, blue)); // Set the color of the first pixel strip.show(); // Update the strip to show the color }
Açıklamalar LED Tanımları:
LED_PIN: RGB LED'nin bağlı olduğu pin (bu örnekte pin 6). LED_COUNT: Bağlı LED sayısı (bu örnekte 1). Kurulum:
strip.begin(): LED şeridini başlatır. strip.show(): Tüm pikselleri kapatır. strip.setBrightness(50): LED parlaklığını ayarlar (0-255 arası değer alır). Ana Döngü (loop):
Farklı renkleri döngüsel olarak ayarlamak için setColor işlevini kullanır ve her renk için 1 saniye bekler. setColor İşlevi:
setColor(uint8_t red, uint8_t green, uint8_t blue): RGB değerleriyle bir renk ayarlar. strip.setPixelColor(0, strip.Color(red, green, blue)): İlk pikselin rengini ayarlar. strip.show(): Rengi göstermek için LED şeridini günceller. Bu örnek kod, bir RGB LED'yi farklı renklere ayarlamayı ve bu renkler arasında geçiş yapmayı gösterir. NeoPixel kütüphanesini kullanarak daha karmaşık aydınlatma efektleri de oluşturabilirsiniz.
Waveshare has an updated ESP32 board: the S3-Pico. The pin mapping is different from the S2 Pico. Can somebody help with building Circuitpython for this? Or- a quick way for me to add support myself? - Not affiliated to Waveshare in any way.
Link to Board and Specs: https://www.waveshare.com/wiki/ESP32-S3-Pico