 baixiaoji
commented
4 years ago
baixiaoji
commented
4 years ago 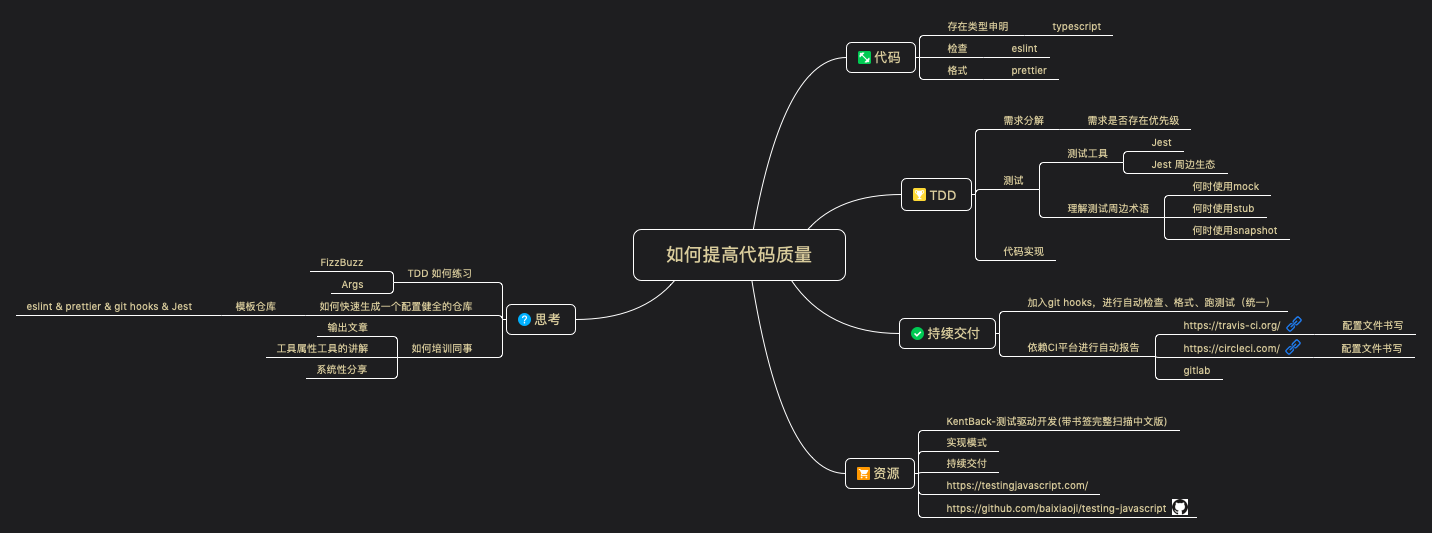
Closed baixiaoji closed 4 years ago
baixiaoji
commented
4 years ago
baixiaoji
commented
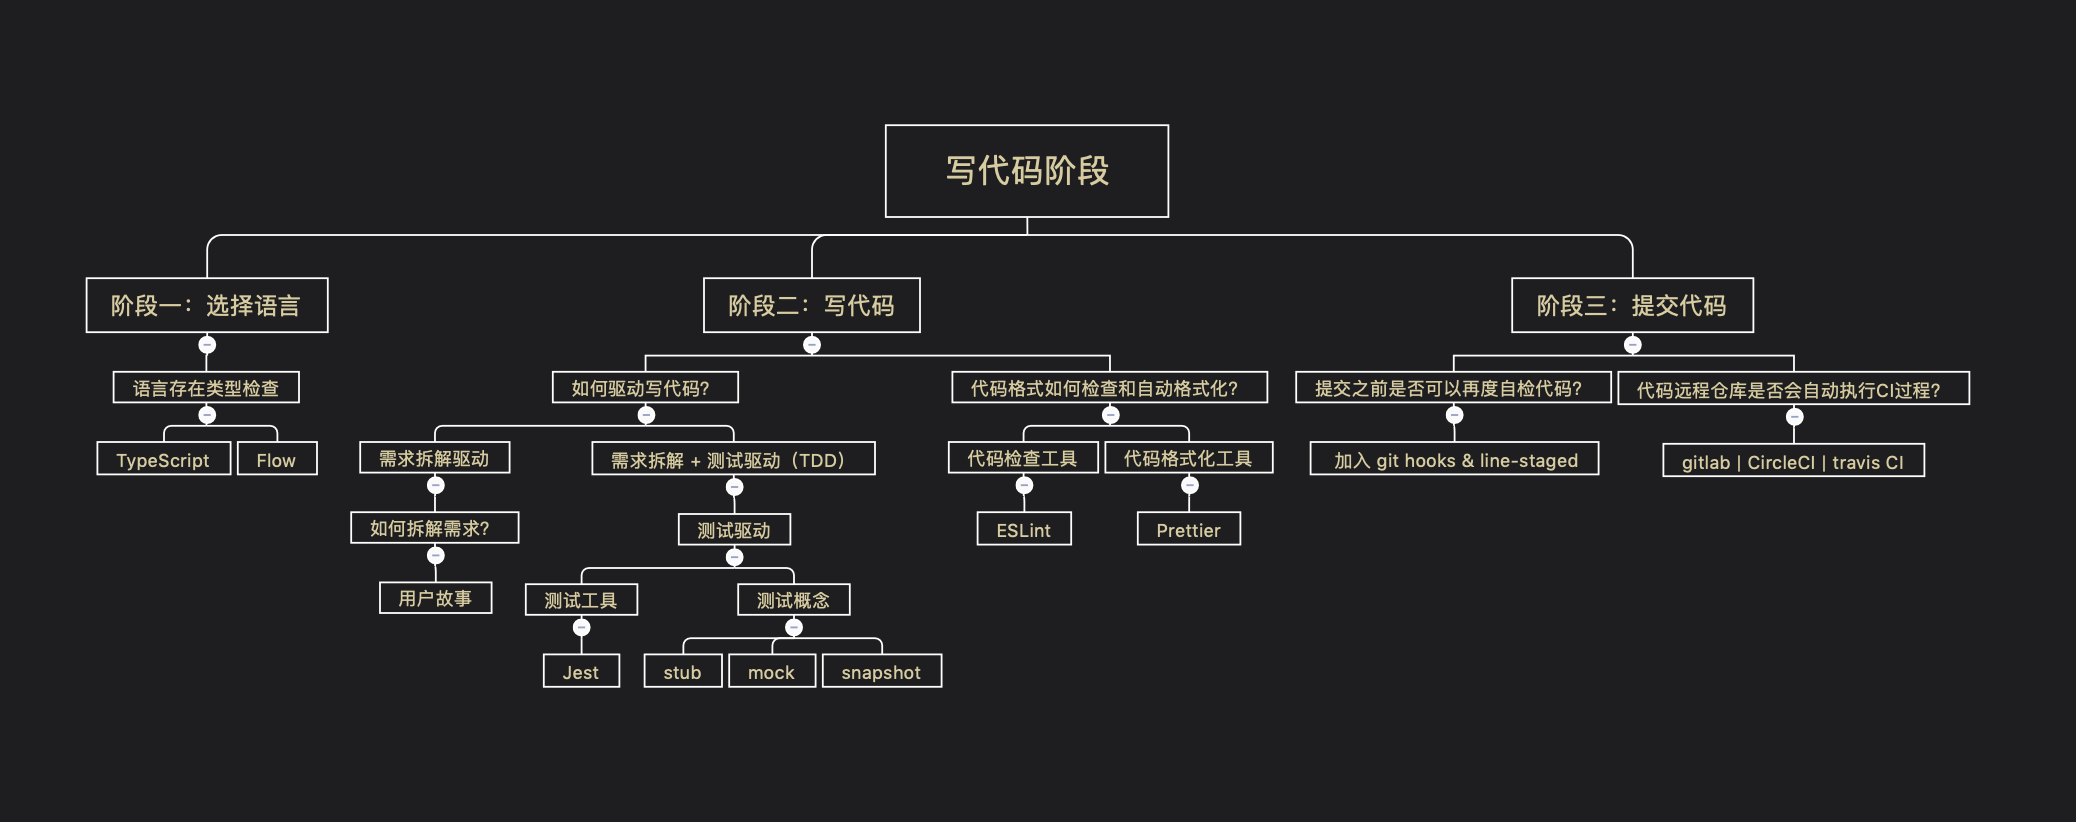
4 years ago parseOption 指定想要支持的JS版本的配置,
{
"parserOptions": {
    "ecmaVersion": 6,
    "sourceType": "module",
    "ecmaFeatures": {
        "jsx": true
    }
},
}
parser 解析器
指定对应的解析代码的解析器,主要目的是将代码解析,然后方便检查对应的编写规范是否正确,支持自定义的解析器,但是不保证解析过程中能够有效的检查出eslint配置的规则。
使用第三方的解析器的使用,记得要配合 parseOption 使用,因为这会让parser知道如何正确解析书写代码。
作用是将JS提取出来进行处理,一般会配合一些插件使用,然而出现想要在原有的处理器上拓展什么,可以使用overrides属性进行处理【可能理解错误】
{
    "plugins": ["a-plugin"],
    "processor": "a-plugin/a-processor"
}
{
"plugins": ["a-plugin"],
"overrides": [
{
"files": ["*.md"],
"processor": "a-plugin/markdown"
},
{
"files": ["**/*.md/*.js"],
"rules": {
"strict": "off"
}
}
]
}标定对应生成的环境,会检查一些环境是否存在全局变量,比如设置为node环境下,代码中会出window则会报错。 环境配置有很多,可以查看这里。
如果eslint 保存no-undef表现当前的环境并没有这个全局变量,造成原因多种可能是env环境错误,或是parseOption中支持的js版本较低,或是script引入部分全局变量等情况 。解决方案就是在eslint中的globals中添加对应的变量,让eslint知道该变量的存在。
eslint可以添加部分的插件,其中填写插件的名字时候可以省略eslint-plugin-等字样,这个存在一个BUG的,好像是依赖你的eslint的版本问题。
{
    // ...
    "plugins": [
        "jquery",   // eslint-plugin-jquery
        "@foo/foo", // @foo/eslint-plugin-foo
        "@bar"      // @bar/eslint-plugin
    ],
    "extends": [
        "plugin:@foo/foo/recommended",
        "plugin:@bar/recommended"
    ],
    "rules": {
        "jquery/a-rule": "error",
        "@foo/foo/some-rule": "error",
        "@bar/another-rule": "error"
    },
    "env": {
        "jquery/jquery": true,
        "@foo/foo/env-foo": true,
        "@bar/env-bar": true,
    }
    // ...
}
当你使用对应插件中的规则时候实话,对应的简写规则如下:
当然还可以使用注释去解除文件中某种规则的检查
/* eslint-disable */

alert('foo');

/* eslint-enable */

/* eslint-disable-next-line */
如果想单独某几个文件解除部分的规则检查可以结合使用overrides属性
{
  "rules": {...},
  "overrides": [
    {
      "files": ["*-test.js","*.spec.js"],
      "rules": {
        "no-unused-expressions": "off"
      }
    }
  ]
}eslint:recommended或是eslint:all
当然可以使用三方插件中的规则,使用的方法是plugin:<plugin_name>/< configuration_name>{
"plugins": [
"react"
],
"extends": [
"eslint:recommended",
"plugin:react/recommended"
],
"rules": {
"no-set-state": "off"
}
}yarn add -D @typescript-eslint/parser @typescript-eslint/eslint-plugin typescript添加自定义的parser,extend的规则使用typescript-eslint中的:
{
    "parser": "@typescript-eslint/parser",
    "extends": ["plugin:@typescript-eslint/recommended"],
    "plugins": ["@typescript-eslint"],
}两者在集成当中,会存在一些规则的冲突,当然你如果设置里保存的时候就会自动的使用Prettier格式化代码的话,前期的冲突会造成一定的困扰,解决的方法是使用
yarn add --dev eslint-config-prettier在.eslintrc中添加的对应配置:
{
  "extends": ["prettier"]
}防止同伴代码不正确的现象
baixiaoji
commented
4 years ago what is it? 简短:就是为了测试方便,覆写一些依赖的功能,但是测试结束记得恢复 仅仅是为了在运行测试的时候改变某个方法的实现方式,目的是防止被测试的代码存在某些外部引用会阻塞以及复杂化测试过程,一般采用这种方式。
It's simply the dynamic replacement of attributes at runtime. 具体代码像这样
const thumbWar = require('./src/thumb-war');
const utils = require('./src/utils');
const originalGetWinner = utils.getWinner;
test('thumbWar', () => { // in the same way we mocked getWinner in the non-framework file, we can mock // it here utils.getWinner = (p1, _) => p1;
const p1 = 'Kent C Dodds'; const p2 = 'Ken Wheeler'; const winner = thumbWar(p1, p2);
expect(winner).toBe(p1);
// and clean up the mock here ⭐️ 这边记得要还原原有的实现,因为会影响其他测试模块 utils.getWinner = originalGetWinner; });
但是 monkey patching 仅仅是帮助我们解决了被测试代码中第三方引用问题,但是如何检验 monkey patching的函数或是属性的变化呢?

为什么需要测试monkey patching的函数,因为外部依赖防止后续是否会变化,所以在本次中也需要进行测试。[ContractTest](https://martinfowler.com/bliki/ContractTest.html)

那问题来了,如何测试被monkey patching的函数呢?一般测试点是
1. 这个函数是否被调用过?
2. 这个函数调用时候的参数是什么?
3. 这个函数调用的返回值是什么?

这时候就需要使用 Jest,其中`jest.fn()`可以帮助我们测试上述被monkey patching的函数,代码改写成这样:
```js
test('returns winner', () => {
  const originalGetWinner = utils.getWinner;
  // we use jest.fn to mock this instead, so that we can inspect what it's being
  // called with
  // utils.getWinner = (p1, _) => p1;

  const p1 = 'Kent C Dodds';
  const p2 = 'Ken Wheeler';
  utils.getWinner = jest.fn((p1, p2) => p1);
  // With our previous mock, if thumbWar passed only 1 variable through to getWinner
  // we would not pick up that there's an error
  const winner = thumbWar(p1, p2);

  expect(winner).toBe(p1);
  expect(utils.getWinner).toHaveBeenCalledTimes(2);

  // with Jest we can evaluate the parameters a function is called with
  expect(utils.getWinner).toHaveBeenCalledWith(p1, p2);

  // we can even inspect what it was called with at the nth call
  expect(utils.getWinner).toHaveBeenNthCalledWith(1, p1, p2);
  expect(utils.getWinner).toHaveBeenNthCalledWith(2, p1, p2);

  // or, we can wrap the 3 tests above into a single test
  expect(utils.getWinner.mock.calls).toEqual([[p1, p2], [p1, p2]]);

  // and clean up the mock here
  utils.getWinner = originalGetWinner;
});
当然使用Jest给我们提供的mock工具,我们可以将被测试代码中的外部依赖都mock掉。 Q:为什么需要mock掉这些外部依赖? A:一般我们进行都是单元测试,单元测试仅仅关心被测试代码的逻辑,而被测试代码中依赖外部函数,这会让测试变得不可控,以及可能会IO行为测样会增加测试的复杂度,而mock的就是帮助我们将这些外呼依赖变得可控,甚至是便于测试。
Q:那问题来了,有没有mock工具可以允许不改动原有外部依赖函数的实现,又能让做到让我进行测试的呢?
A: 有jest.spy(),代码如下:
test("calls math.add", () => {
  const addMock = jest.spyOn(math, "add");
  expect(app.doAdd(1, 2)).toEqual(3);
});

// 当然也可以覆盖之前的实现

test('returns winner', () => {
  // with spyOn we no longer need to keep track of the original function
  jest.spyOn(utils, 'getWinner');
  // we can still mock the original function, however
  // utils.getWinner = jest.fn((p1, p2) => p1);
  // but because the function is being spied on, we get an additional
  // mockImplementation property on our spied-on function which allows us to
  // override the original in a simiar way to jest.fn
  utils.getWinner.mockImplementation((p1, p2) => p1);

  const p1 = 'Kent C Dodds';
  const p2 = 'Ken Wheeler';
  const winner = thumbWar(p1, p2);

  expect(winner).toBe(p1);
  expect(utils.getWinner).toHaveBeenCalledTimes(2);

  expect(utils.getWinner.mock.calls).toEqual([[p1, p2], [p1, p2]]);

  // and instead of explicitly restoring the original function, we can use
  // mockRestore on the on mock implementation
  utils.getWinner.mockRestore();
});请记住,每一次测试运行结束之前,请将mock的部分还原,不然可能会影响其他的测试用例。
Q:那问题来了,既然存在外部依赖,我为什么不把整个外部依赖的模块整个mock掉呢?
A:当然是可以的,Jest提供了jest.mock()功能。修改代码如下:
jest.mock('./src/utils', () => {
  return {
    getWinner: jest.fn((p1, _) => p1),
  };
});

test('returns winner', () => {
  // because we're now mocking the entire utils module with jest.mock, and not
  // monkey-patching it, we no longer need to use jest.spyOn and create a mock
  const p1 = 'Kent C Dodds';
  const p2 = 'Ken Wheeler';
  const winner = thumbWar(p1, p2);

  expect(winner).toBe(p1);
  expect(utils.getWinner).toHaveBeenCalledTimes(2);

  expect(utils.getWinner.mock.calls).toEqual([[p1, p2], [p1, p2]]);

  // instead of using mockRestore to restore the monkey-patched implementation,
  // we reset the mock implementation using mockReset
  // This will clean up the calls
  utils.getWinner.mockReset();
});如果其他测试用例中也存在同样的外部依赖的时候,可以将这个需要被mock的模块写在__mocks__/<module_name>.js,然后在测试文件中直接mock对应的模块即可。
其实mock和spyOn都是基于jest.fn实现的
baixiaoji
commented
4 years ago what: Snapshot testing is the technique of assertion by comparing two different outputs. when: 当你需要测试部分数据驱动视图变化的场景下,若事件或是数据驱动视图无法变更视图场景不适用。
当 snapshot 失败的时候,我们往往会快速更新当前的snapshot,当这样往往会忽视细节错误,此刻你需要做的就是仔细比对两者不同,确认无误之后再次更新snapshot
baixiaoji
commented
4 years ago 使用工具:@vue/test-utils ,Jest
建议使用@vue/cli工具帮忙生成基本的codebase,不然后续容易出现错误。
当然想要勇敢的的自己搭建对应环境,可以借鉴 仓库配置Jest工具,然后需要配置vue-jest的工具。
注:setMethods功能更新存在问题,若后续事件较快触发,设置的更新是来不及更新的。
配置完成,然后运行测试,可能产生诸多 babel 编译的错误,请修改了 Jest config文件。
记得注意环境的区分,运行测试的时候,node 的NODE_ENV为test,你可以依旧这个去配置测试环境下babel的编译的方式;当然你直接根据babel提供的env进行设置即可,但是需要注意的是一旦区分不同环境,请将同样区分出开发和生产环境的配置,因为若写出全局的默认配置,可能会出现编译问题。
接下来是如何实践的问题,具体可以查看手册。
手册内容超赞,几乎覆盖你日常开发中绝大多数的测试需求。
若需要对 Store 进行测试,意见是将 Vuex 中的各属性拆分成单独的文件,然后这样测试的难度较低。
这是什么东西?(明白该想project的定义)
一个帮助自己提高代码质量的项目
为什么要做这个东西?(想想做这个东西的动机)
因为日常编码中会犯一些错误:
如何做这个东西?(拆解细节)
自身整理了对应的执行步骤,需要自己一点一点的探索下去
注意点
下一步行动
回顾(项目过程中的执行、以及心态的变化)