 by-lynn-priestley
commented
3 years ago
by-lynn-priestley
commented
3 years ago Creating this visual rhetoric piece was my first time working with Photoshop, and I am honestly quite happy with what I feel I accomplished. A lot of the work that went into creating it was done behind the scenes. I started off in the first few days doing research on accessibility standards and finding tools to measure things like contrast. Building a color palette, even though it only consisted of 4 colors, proved to be a lot of work because of the challenge of making sure the colors contrasted enough from both the background and from each other (especially with the red and blue, which needed to be different enough in tone that they were distinguishable in grayscale). The below screenshot shows a bit of my work with color.

I was excited when I found the collection of body icons on the Noun Project, because I think it gave the project a sense of stylistic uniformity that allowed for the bodily variation of the icons to be highlighted. When making the pattern (and also working with the text), I found that creating the layer groups made it much easier to control the consistency of alignment and keep track of which copies of icons were next to each other. (screenshot below, before whiteout layer was added)

With regard to workshop feedback, the comment I got from all three peer reviews was on the not-equal sign making my message confusing. (screenshot below)

Additionally, there were notes on the spacing of the first part of my message. I was forcing the spacing a bit to try to make some of the letters line up as heads for the icons but looking at it in light of those comments made me aware of how awkward it was. I altered the wording of the slogan in a way that made the alignment more natural and removed the not-equal sign from the message. (screenshot of before/after below)

In response to the broad advice given to the class, I added a follow-up source. I made the text small, but kept it well above minimum font size from an accessibility standpoint. This definitely helped my argument have more directionality in terms of giving viewers a way to do something about their design practices if they feel compelled.
Breaking down the baseline criteria, I feel like I was able to meet each point on the list. For example, I used largely color, size, and negative space to establish design hierarchy and guide viewer attention. I made my dominant element, the “Design With” text, bright red, the largest element, and also surrounded it with the largest amount of negative space in the project. For the subdominant element, the remaining “Design For” piece of the message, I used color distinction. While the background and icon pattern were both shades of blue, I used black to distinguish it. The pattern/visual rhythm of the body icons in the background, along with the small tagline at the bottom, were then my subordinate portion of the hierarchy. I think, especially with the feedback from workshop, I was able to clearly articulate my message through the text, which I displayed in a clean sans-serif that reflects the minimalism of the body icons. For sources, I created a list in my CREDITS.md file of my repository, as well as including a small citation in the bottom right of my actual .psd file. In my project, I had 3-4 layers interacting with each other at various points, between the background, white-out, body pattern, and text layer groupings. For the white-out layer, one tool I used beyond the select, move, and text tools was the brush tool. Some of my icons imported with a strange outline, so I used a layer above the pattern group and a brush matched the background color to “white-out” those outlines in a non-destructive manner. Lastly, with commit messages, I made sure to include detailed messages so I could track when certain design choices were being tested (like when I was testing the readability of incorporating the cane into the W of “answer”).
I think I also met some of the goals from the aspirational criteria list. I kept my layers very organized with labeling (lining the names up with how they were named on The Noun Project to assist with tracking used assets) and layer groups (to keep my pattern in line). I also used folders and a navigation note in my README.md to make my repository navigable. While I did have more than 3 overlapping layers, a lot of the tools with layer blending didn’t apply to my project. I experimented briefly with varying layer opacity, but overall, anything that made the project more visually complex tended to make it less accessible, which I felt like went against the core argument of my project. In terms of accessibility, that was largely what drove my design choices. My color palette was picked to avoid problematic color combinations for people with colorblindness, my font was a sans-serif typeface, emphasized only with bold, to be more readable for those with dyslexia (I also picked a light background that wasn’t bright white for the same reason). As previously stated, I also made sure my colors contrasted in tone as well as shade to make the design accessible for monochromacy. I put a text description in the metadata of the file to offer a text alternative to the image. To check that my message and audience was clear, I asked a friend to look at the piece and respond with what she thought my intentions were and she said the following:
“I think the message is that for design to be inclusive, it should be designed with the intended users. Designing for people without their input erases their voice and is not truly accessible. I think the argument is directed at other designers to spread awareness. People in the field may be oblivious to the ways their designs are impacting other communities, and they should consider that before creating their designs.”
As a piece of nuance to the design that perhaps falls somewhere between the subdominant and subordinate elements (trying to make my work reveal itself gradually) are the bodies with heads replaced by the letters of the “Design For” text. I was trying to make a visual representation of how paternalistic design often overlooks the individuality of people that the designs are for and erases them. Additionally, there is a heart shape in the negative space around “Design With”, to emphasize the humanity the guides this approach to design.

Overall, I think this project taught me a lot about the complexity of making a final product simple.
 reaial


 paytonareed
 I began working on my poster with the background. I used GIMP to create a custom color palette for the poster. I then watched a video on how to make a custom gradient using the palette. After the background, I moved on to the focal point of my poster. I watched another video on how to have images appear inside of text. I imported from Unsplash, scaled and cropped my three images. I merged the layers and inserted a text layer with "1". I added a layer mask to the climate images layer and used the bucket fill tool on the "1" text and hid the text layer. I also added a stroke to add a white border. In order to make the "1" the focal point of the poster, I scaled it the largest, and outlined it in white to add contrast to the resto of the blue text. The "1" is also the only color on the page besides blue, I chose the images to add different colors like pink and green, that also draws attention. The "1" is also the most dense on the poster with many images and no negative space. All these visual dominance domains draw the viewer's eyes to this first.
 This is a screenshot of the first preview with my first round of text. I sourced the smart watch image from the Noun Project and used the alpha select/bucket fill tool to color it blue. I did not like the layout of the text and the proximity of all the features.
 For the full draft, I finalized my word choice and text arrangement. I utilized proximity to split the top of the page representing the first half of the sentence, from the bottom of the page, representing the ladder half. I used the rotate tool to rotate "planet..." in parallel with the "1". I also changed the resource link at the bottom of the page to white text to make it stand out more from the background. I chose to make the "TIME" text larger to also add emphasis to the time sensitive matter of this issue. I used the font Tw Cen MT Condensed, Bold to keep the text simple and clear and organic to fit the theme of the poster and make sure the message of the poster is the most capturing thing.
 After listening to feedback, I decided to darken the shade of blue of my text and lighten the background gradient to make the text easier to read. I also added a drop shadow on the text to make it stand out even more. I also sourced a globe from Unsplash and used the magic scissor selector tool to crop it and add it as the period after "TIME". The comments confirmed that my message was clearly received and the visual hierarchy was established, per the comment "Description: There is the sentence "we only have 1 planet and we are running out of time" with a large "1" figure in the center and a smart watch for the "i" in time to emphasize time. The 1 is definitely caught my attention first with the white outline and especially the green in the plants".
 For the baseline criteria, I think I used visual arrangement to guide viewer's attention, I also had a clear message of support for climate preservation efforts, I chose a font that was simple, clean, and organic-like my argument. I have assets sourced in my repository under ASSETS.md. In GIMP, I used more than 3 layers, more than 1 tool. I also wrote several reflections explaining my visual arrangement choices and have several commit messages explaining what has evolved each updated version. As for aspirational criteria, I have layer labeling and grouping. In the smart watch and in the "1", I have more than 3 layers overlapping, and several layers overlap in other places on the visual argument. I used more than three tools including the rotate tool, bucket fill tool, gradient tool, color selector tool, crop, and scale tools. No one in the feedback mentioned my audience, but I hope it is clear that I am trying to convince average individuals that climate change is real and we need to act now. That is why I made my poster a 8.5x11 page size- so that it could be hung easily around campus for other college kids to see and think twice. My feedback did however confirm that my message was clear. I think with my added visual contrast of the text and the choice of clear font, makes my visual argument accessible to a variety of people. Also, with color blindness, I think the features of my poster are clear enough to still be understood. I explained my choice of design strategies earlier, mainly to highlight the idea that we only have one planet, so we must protect this one, and that we are running out of time, so we have to act now. According to Thompson, the scale, value, color, and density make the "1" a focal point. The value, scale, and shape of the "i" also make the "TIME" a secondary focal point. I think the three layers of dominance are the "1", then the rest of the text, then the gradient. According to Design Lab, humanist fonts are clean, modern, empathetic, and handwriting resembled. I chose a humanist font because my cause of climate protection is authentic and requires compassion from the viewer. I also wanted to have a target audience of the younger generation because they are the ones that have the ability to make these necessary changes. A modern text appeals to this audience, and a clean text shows the cause is important and serious. I also think that my design is bright and bold. Overall I think I achieved all of the baseline and some of the aspirational criteria.
  Gley21
 I began with this image as my template that I would work off of. I thought the idea of a key unlocking a brain in a cage would convey the thought I was going for. Then to ensure my point was heard I added a few words at the top and bottom to help describe the idea. As you will see, this initial layout underwent some serious changes.
 After reading through the feedback I received it was clear what I had to fix. The background and text just were not working and both were going to have to be changed. I also noticed the concern with the jail bars over the brain and I absolutely agreed that they looked out of place.

 hua-tori


 aer84
aer84


 rmanyeka


 young1m030


 patrickjmeyer


 annaruz
 I also formatted the argument to be a stronger statement rather than a subtle phrase per Greg's suggestion as shown in the photographs below.
 I met the criteria of the project well by using arrangement of the masks and vaccines at the top, the textual argument below, and the larger argument at the bottom of the graphic. I also inverted the colors by making the background blue color the same color as the text of the main argument sentence. I filled the text box with a gray color to make the text visible, and I then made the text describing the photographs below the same gray color as the text box. This inversion of the colors created a visible contrast between the text background and the photograph background. I chose a sans-serif font that would not be distracting but also not boring. I also staggered the arrangement of the images on the bottom half of the graphic to show some movement while the repeated images on the top lie in a straight line. This draws the viewers' attention and helps illustrate the idea that there is much more to public health than masks and vaccines. All of my sources are credited properly in the assets.md file on my repository. Peer feedback proved that my argument was clear even in my first draft, and my addition of image descriptions below my examples of public health at work further clarify the intention of this message. I used meaningful commit messages to distinguish each draft. In addition to select, move, and text, I also used fill color, color dropper, flip, rotate, and pencil, and I used more than 3 layers. While there are many different layers and aspects to the argument, I organized the overall image to not overwhelm viewers but to convey the message clearly. In the future, I may adjust this graphic by adding perspective in the piece to make the argument statement stand out even more from the rest of the piece. I am very proud of the work that I did for this assignment, and I am glad that I have a final project that I am happy with!
 anatems1


 TBrusilovsky


 gregsexauer
 I totally agree with this sentiment, as my project was rather lacking in terms of explicit political grounding.
Here is what my project originally looked like:
I totally agree with this sentiment, as my project was rather lacking in terms of explicit political grounding.
Here is what my project originally looked like:
 Then before the feedback:
 Then the final project, after the feedback:

 kle39
kle39


 cmgo412
 Sjo, Peter. 8 Nov. 2018. Unsplash,
  My preview submission
 My draft submission


 jackie216


 TrentFoster


 boredhero
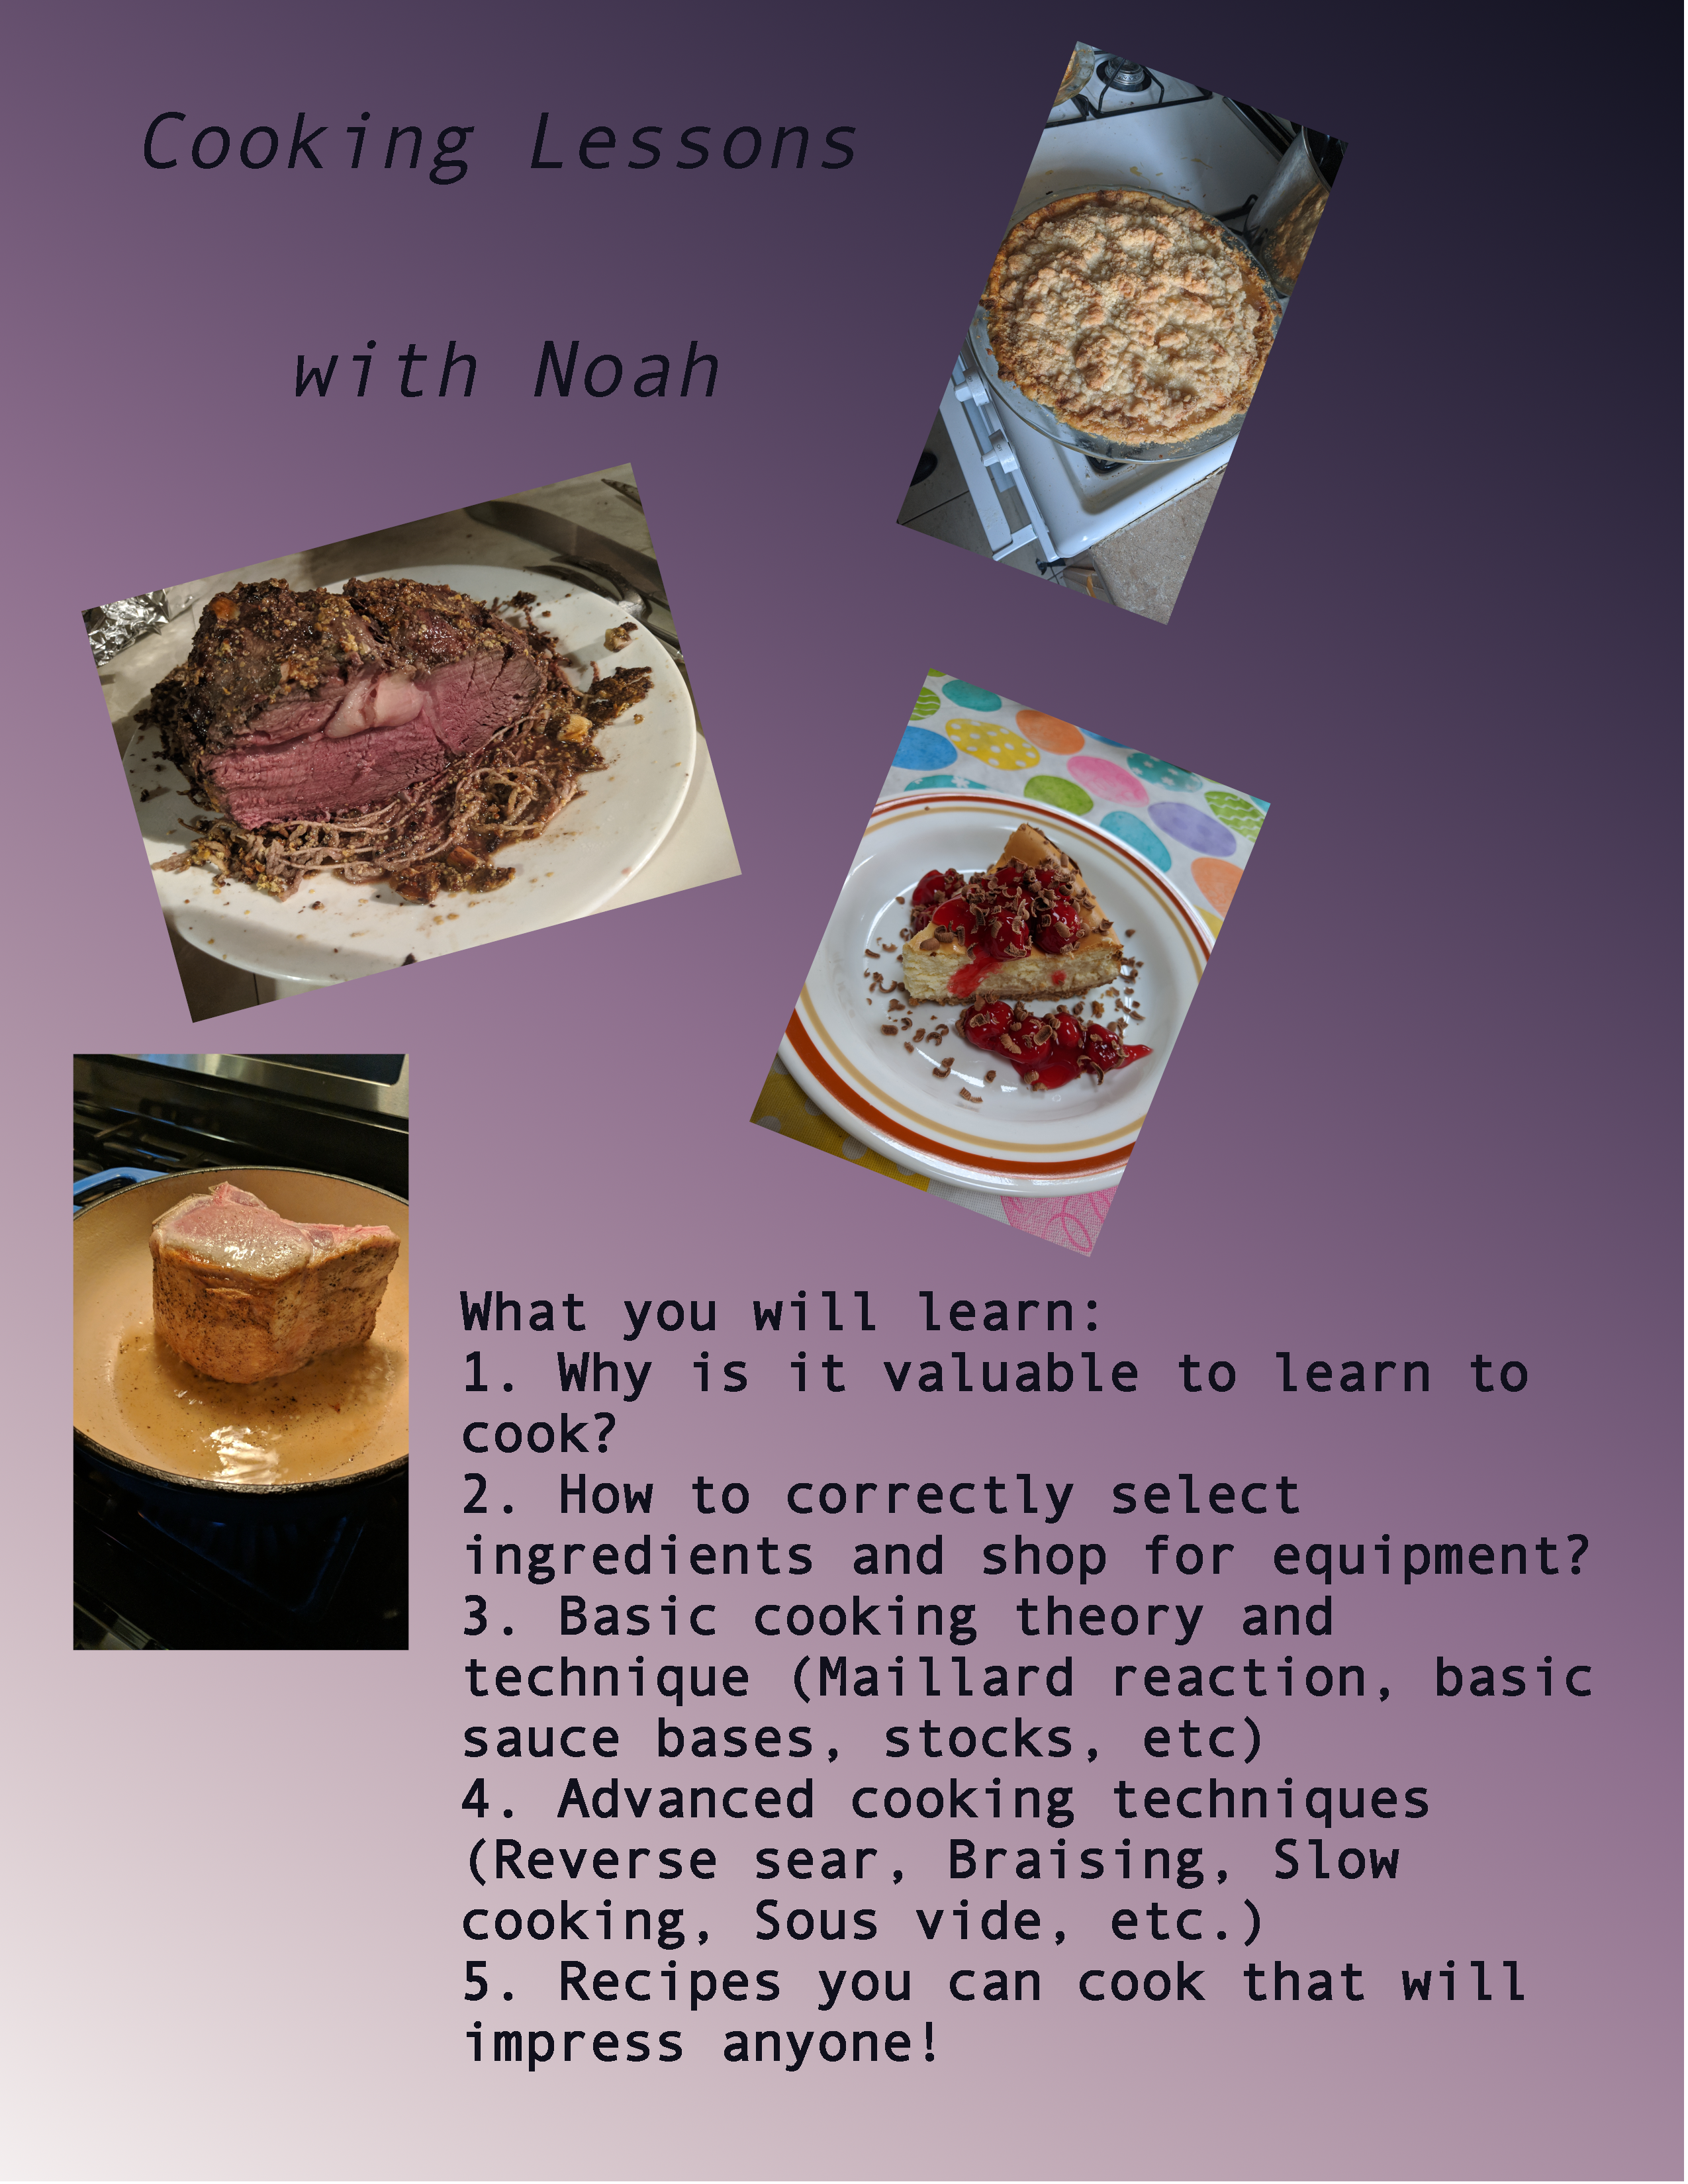
 gdelallo


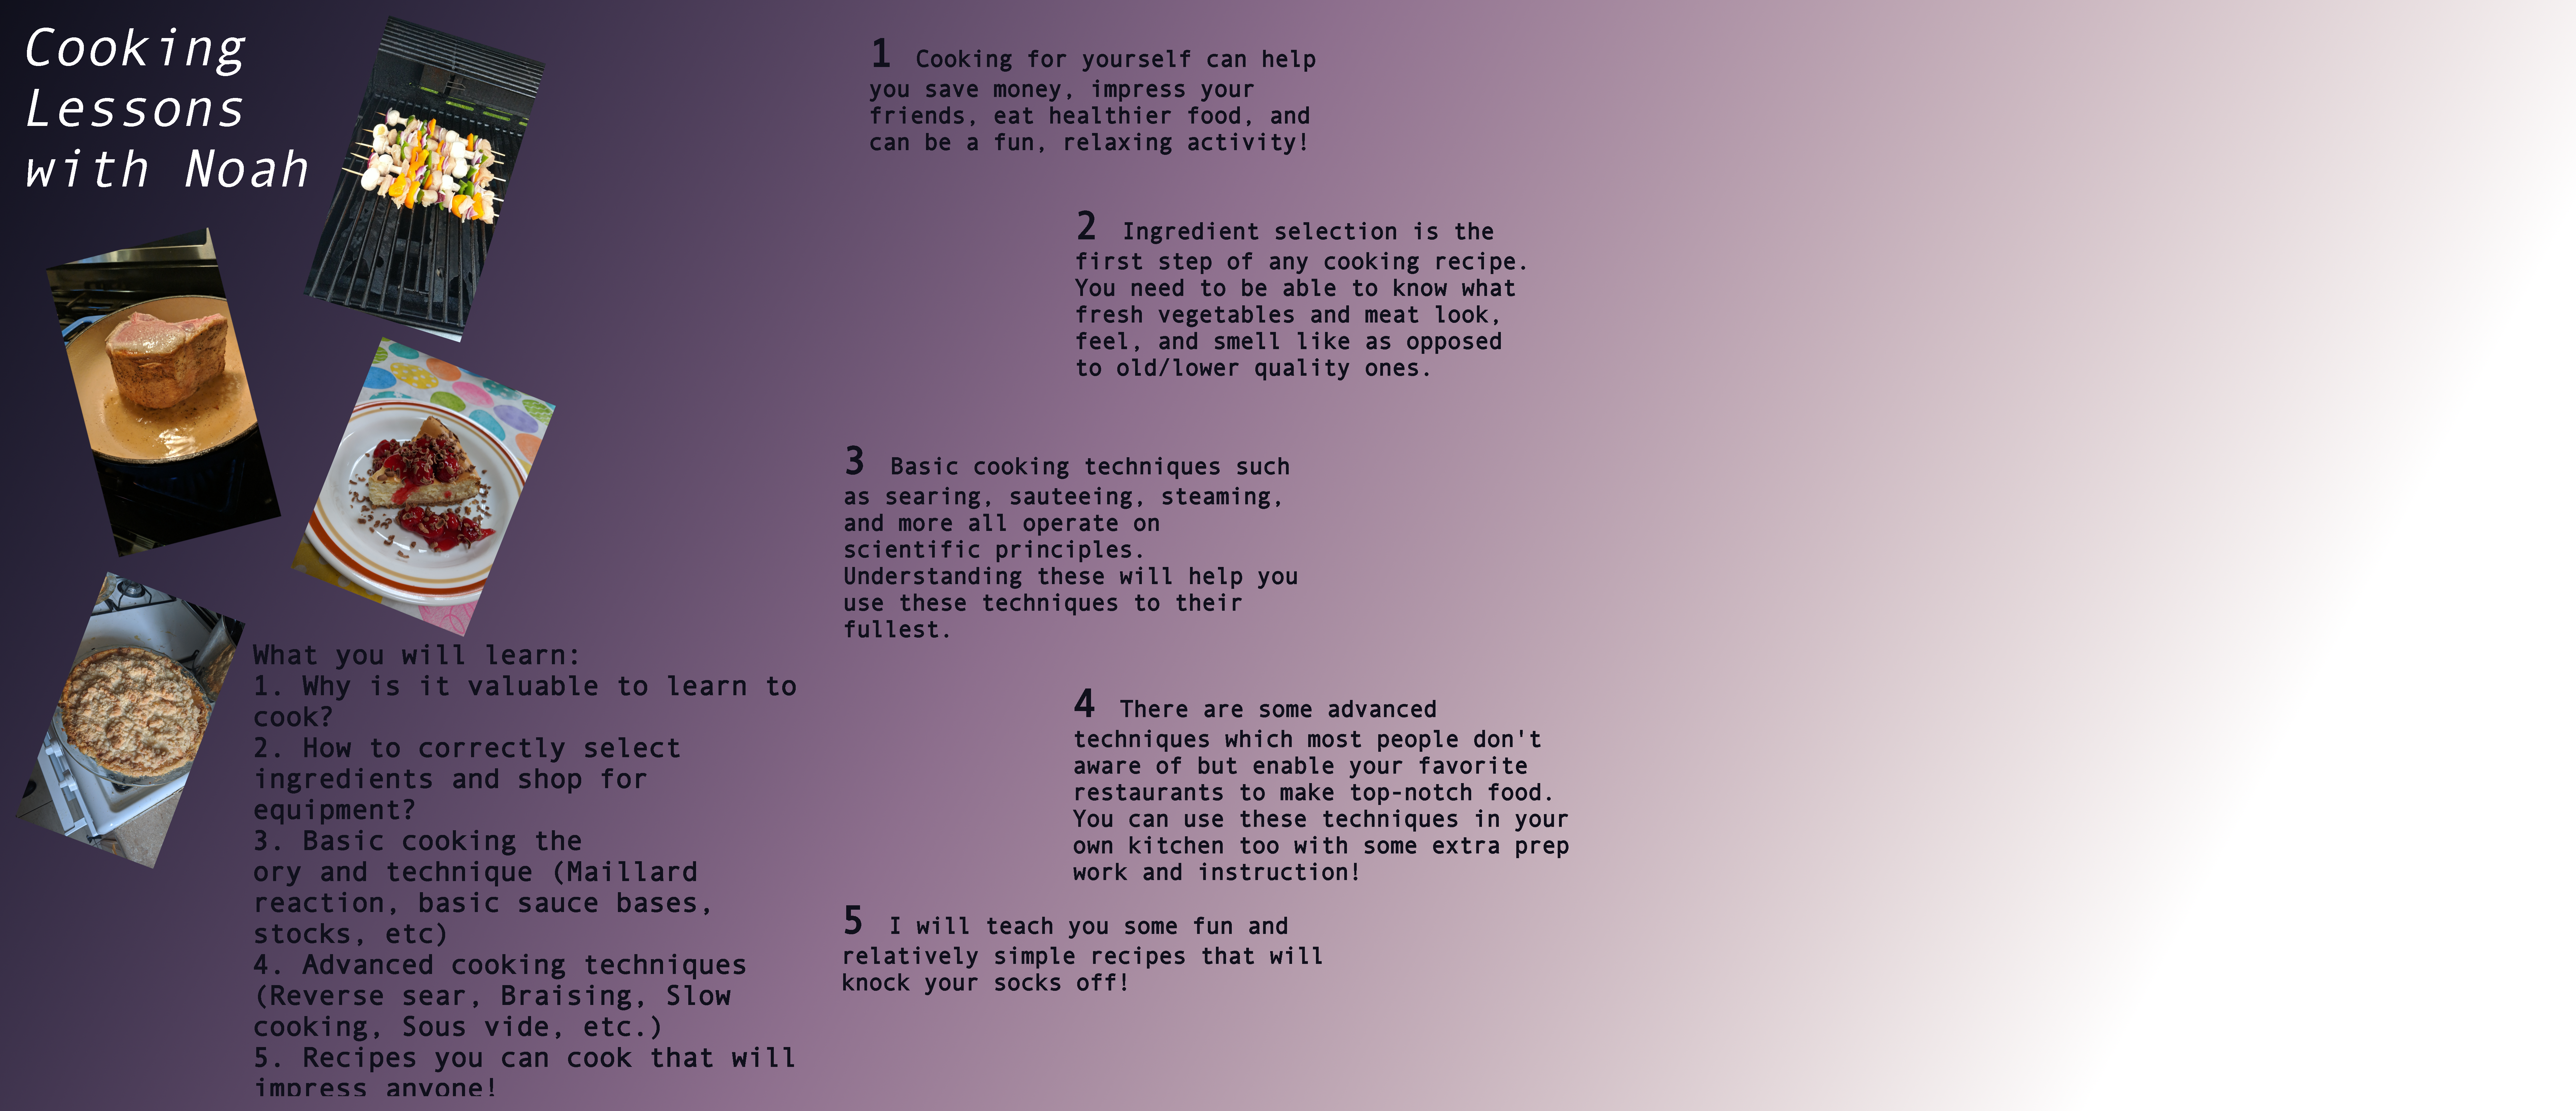
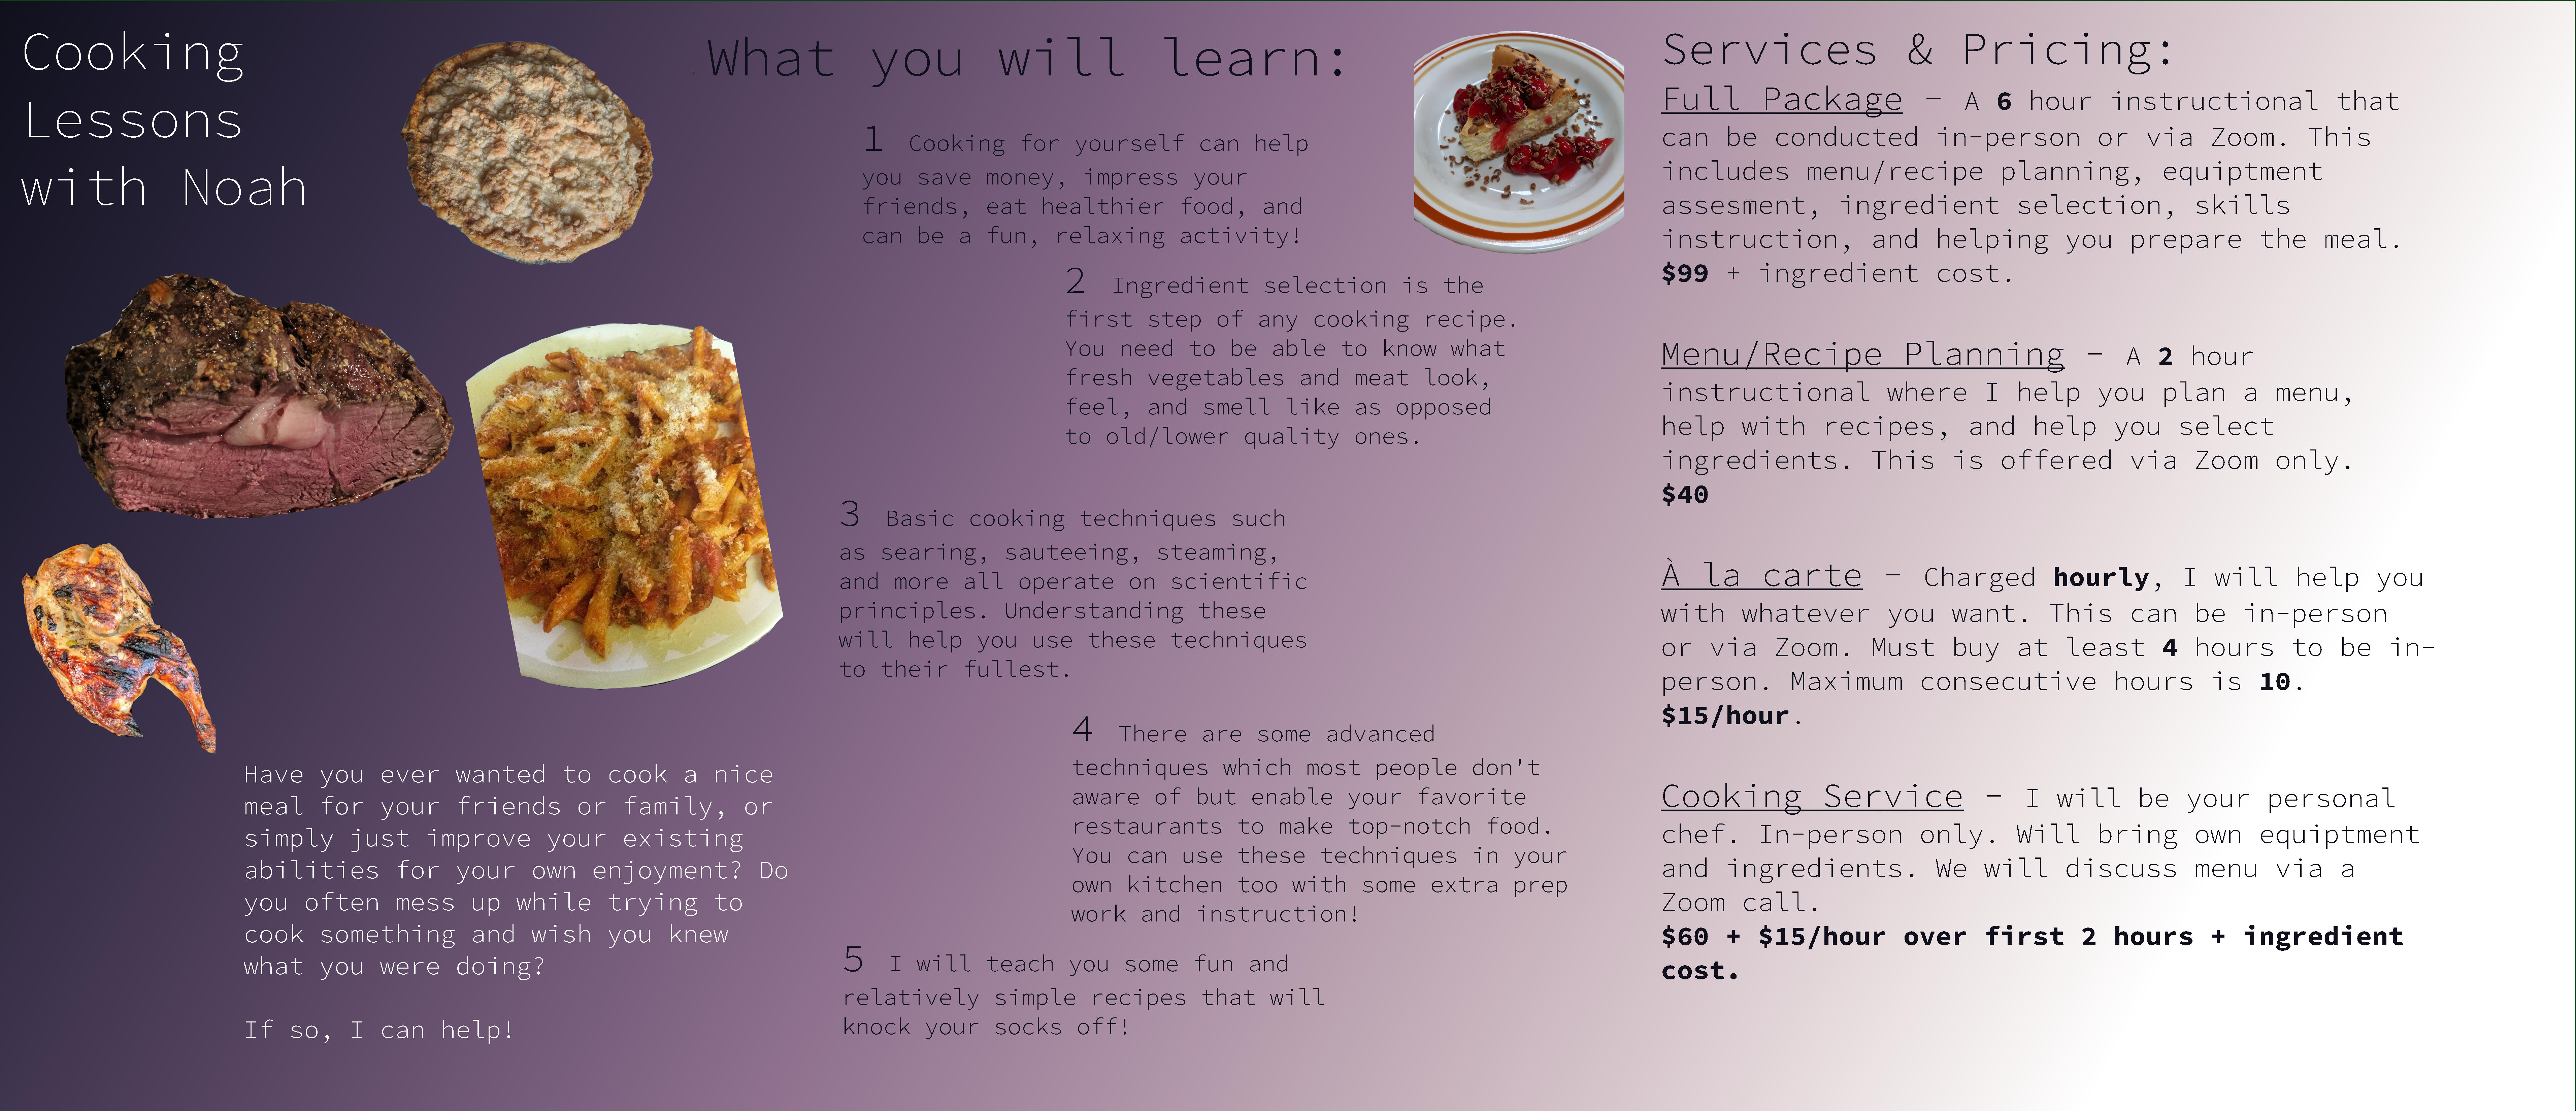
This is a space where you'll be able to post your final-for-now thoughts on your visual unit projects, your rhetorical collages. We've talked in class about what that should include, but the main goals are to give a sense of what you've learned from doing this project, the work you put into it, and whether it accomplishes what you wanted it to.
At a minimum, please include:
NB: After using the formatting buttons and drag/drop tools to add images here in the Issue queue, you can optionally copy the source code and paste it into a new reflections.md file in your repository: it should then have the same formatting there!