chaneeii / iOS-Study-Log

✨ iOS에 대해 공부한 것들을 기록합니다 ✨
19 stars 0 forks source link

UITableView (테이블뷰) #18

Open chaneeii opened 2 years ago

chaneeii commented 2 years ago

UITableView 에 대해 공부한 내용 정리하기! -> 풀커스텀이 가능한 수준으로!

여러종류의 셀 다루기

Collapse

border

Header

Sticky header

in 스크롤뷰

chaneeii commented 2 years ago

Section 다루기

section : https://hururuek-chapchap.tistory.com/153

TableView Section 간 Space 를 설정하는 법

chaneeii commented 2 years ago

TableView 속성다루기

테이블뷰 셀 구분선 없애기

tableView.separatorStyle = .none

Scroll 막기

tableView.alwaysBounceVertical = false
tableView.isScrollEnabled = false

상단여백제거

self.tableHeaderView = UIView(frame: CGRect(x: 0.0, y: 0.0, width: 0.0, height: CGFloat.leastNonzeroMagnitude))
chaneeii commented 2 years ago

간단하게 Expandable UITableViewCell 만들기

SampleCode

TestTableViewController ```swift // // TableTestViewController.swift // DonWorry // // Created by Chanhee Jeong on 2022/08/13. // Copyright © 2022 Tr-iT. All rights reserved. // import UIKit struct DecoItem { let title: String let content: String var isHidden = true init(title: String, content: String, isHidden: Bool = true){ self.title = title self.content = content self.isHidden = isHidden } } class TableTestViewController: UIViewController { private let tableView = UITableView() var decoItems: [DecoItem] = [ DecoItem(title: "배경 선택", content: "Let’s focus on the cellForRowAt function. After configuring the cell with the title and the description we need to configure the bottomView in order to be hidden when the cell is tapped. We simply set the isHidden property of the bottomView with our value in the array. If you need also to change the icon (up or down) you can set the image based on the isHidden property."), DecoItem(title: "날짜 선택", content: "날짜 달력있음"), DecoItem(title: "계좌번호 입력 (선택)", content: "계좌번호 셀"), DecoItem(title: "파일 추가 (선택)", content: "파일추가 셀"), ] override func viewDidLoad() { super.viewDidLoad() view.addSubviews(tableView) tableView.translatesAutoresizingMaskIntoConstraints = false NSLayoutConstraint.activate([ tableView.centerXAnchor.constraint(equalTo: view.centerXAnchor), tableView.leadingAnchor.constraint(equalTo: view.leadingAnchor, constant: 0), tableView.trailingAnchor.constraint(equalTo: view.trailingAnchor, constant: 0), tableView.topAnchor.constraint(equalTo: view.topAnchor, constant: 60), tableView.bottomAnchor.constraint(equalTo: view.bottomAnchor, constant: -60), ]) self.tableView.register(UINib(nibName: "TestCell", bundle: nil), forCellReuseIdentifier: "TestCell") self.tableView.dataSource = self self.tableView.delegate = self self.tableView.estimatedRowHeight = 50 self.tableView.rowHeight = UITableView.automaticDimension self.tableView.separatorStyle = .none } } extension TableTestViewController: UITableViewDelegate { func tableView(_ tableView: UITableView, heightForRowAt indexPath: IndexPath) -> CGFloat { let expandableItem = self.decoItems[indexPath.row] if expandableItem.isHidden { return 48 }else { return 300 } } func tableView(_ tableView: UITableView, didSelectRowAt indexPath: IndexPath) { decoItems[indexPath.row].isHidden = !(decoItems[indexPath.row].isHidden)// toggle tableView.reloadRows(at: [indexPath], with: UITableView.RowAnimation.automatic) } } extension TableTestViewController: UITableViewDataSource { func tableView(_ tableView: UITableView, numberOfRowsInSection section: Int) -> Int { return decoItems.count } func tableView(_ tableView: UITableView, cellForRowAt indexPath: IndexPath) -> UITableViewCell { let cell = tableView.dequeueReusableCell(withIdentifier: "TestCell", for: indexPath) as! TestCell cell.selectionStyle = .none let expandableItem = self.decoItems[indexPath.row] cell.topTitleLabel.text = expandableItem.title cell.bottomDescriptionLabel.text = expandableItem.content cell.bottomView.isHidden = expandableItem.isHidden cell.chevronImageView.image = UIImage(systemName: expandableItem.isHidden ? "chevron.down" : "chevron.up") return cell } } ```
TestCell 스크린샷 2022-08-14 오전 2 08 55 ```swift // // TestCell.swift // DonWorry // // Created by Chanhee Jeong on 2022/08/13. // Copyright © 2022 Tr-iT. All rights reserved. // import UIKit class TestCell: UITableViewCell { @IBOutlet private weak var containerStackView: UIStackView! @IBOutlet weak var topTitleLabel: UILabel! @IBOutlet weak var bottomDescriptionLabel: UILabel! @IBOutlet weak var chevronImageView: UIImageView! @IBOutlet weak var bottomView: UIView! { didSet { bottomView.isHidden = true } } @IBOutlet weak var button: UIButton! override func awakeFromNib() { super.awakeFromNib() self.containerStackView.layer.cornerRadius = 10 self.containerStackView.layer.masksToBounds = true // Initialization code } override func setSelected(_ selected: Bool, animated: Bool) { super.setSelected(selected, animated: animated) // Configure the view for the selected state } @IBAction func buttonDidTap(_ sender: Any) { print("버튼이 눌림") } } ```

section 없이 expandable tableview cells 을 만들기 위해서는 UIStackView를 사용하면 된다!

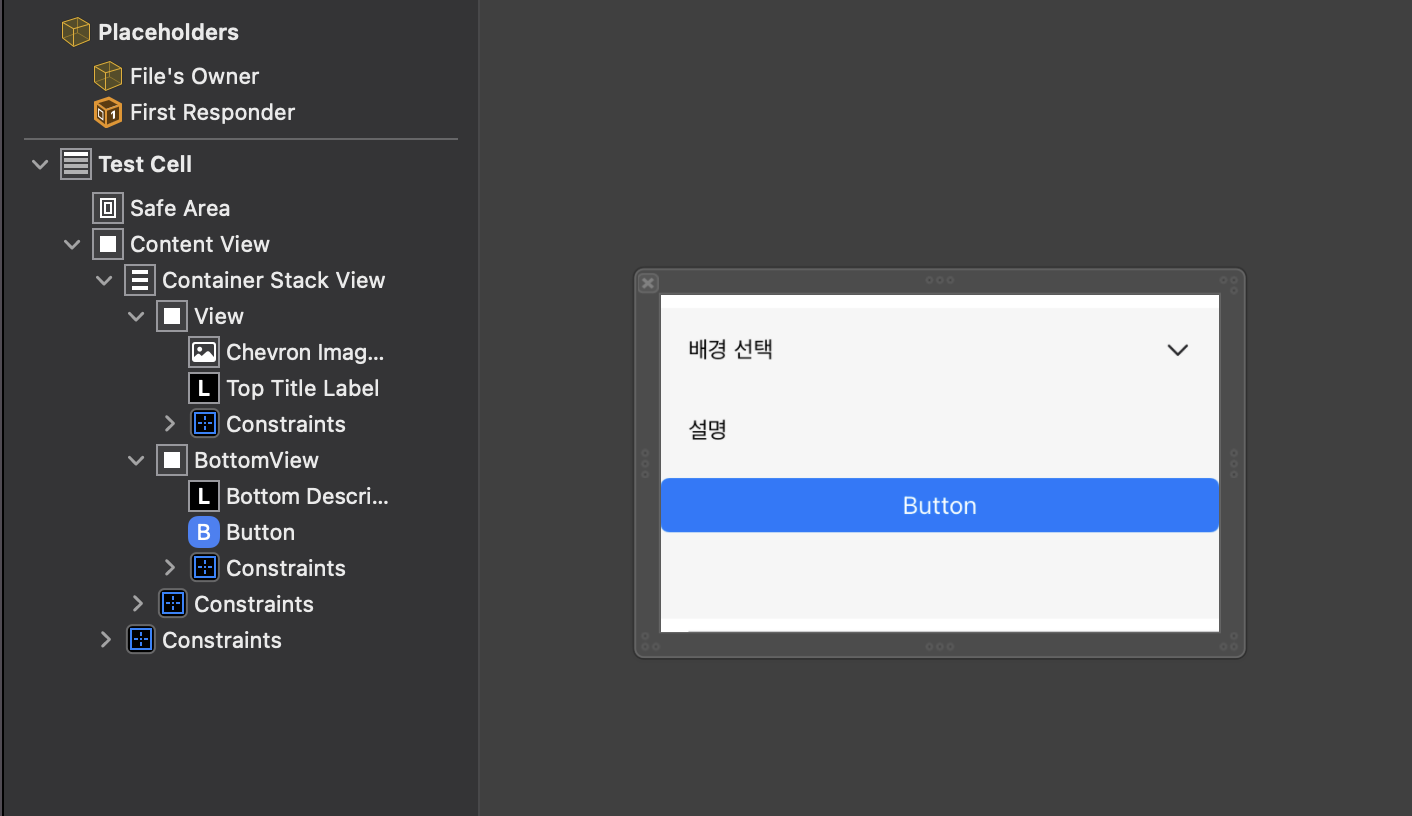
먼저 UITableViewCell 을 설정해주자

스크린샷 2022-08-13 오후 9 59 32

xib 파일이 다음과 같이 생겨야한다, ContentView 안에 UIStackView 를 넣고 contstraints 를 추가해야한다. StackView 안에서 헤더가 될 부분과 / content 가 들어갈 부분을 같은 수준의 계층에 있게 쌓아야 한다. 이때 content 가 들어갈 부분을 bottom 뷰라고 명명하겠다.

코드는 다음과 같을 것이다.

class TestCell: UITableViewCell {

    @IBOutlet private weak var containerStackView: UIStackView!
    @IBOutlet weak var topTitleLabel: UILabel!
    @IBOutlet weak var bottomDescriptionLabel: UILabel!
    @IBOutlet weak var chevronImageView: UIImageView!
    @IBOutlet weak var bottomView: UIView! {
        didSet {
            bottomView.isHidden = true
        }
    }

    override func awakeFromNib() {
        super.awakeFromNib()
        // Initialization code
    }

    override func setSelected(_ selected: Bool, animated: Bool) {
        super.setSelected(selected, animated: animated)

        // Configure the view for the selected state
    }

}

근데, bottomView 에는 isHidden 이라는 didSet을 넣어 이것이 바뀌면 view 가 사라지게 해야한다.

다음으로 UIViewCotnroller 를 보자

image

위 코드에서 detailsTableView 가 우리의 UITableView가 될 것이다. cell 을 register 하고 UITableViewDelegate 와 UITableViewDatasource을 채택하여 deleagate 와 datasource 를 설정한다.

그리고 estimatedRowHeight을 100 으로 편의상추가하고, rowHeight 을 automaticDimension 로 해서 cell 의 컨텐츠에 높이가 맞도록 해준다.

UITableViewDelegate와 UITableViewDatasource을 설정해주기

image

먼저 UITableViewDelegate 쪽을 보면, didSelectRowAt 메소드만 설정해주면된다. 이 예제에서는 expandable cell 의 상태를 유지하기위한 model들의 array 가 있다. 그래서 cell 을 누르면 isHidden 을 바꿀 수 있도록 하였고, 여기서 reloadRows 함수를 호출하는 것이 트릭이다.

tableView.reloadRows(at: [indexPath], with: UITableView.RowAnimation.automatic)

다음은 Cell을 expand 하는 trick을 보자 UITableViewDataSource 을 구현해보자.

image

numberOfRowsInSection 은 단순히 array 의 개수를 셀 것이다. cellForRowAt 함수에 집중해보자!

cell 을 title 과 description으로 configuring 하고나서, 우리는 bottomView 가 tap 되면 hidden 되도록 설정해야한다. 우리는 이때 간단하게 우리 model array 의 value 와 bottomView의 isHidden 속성을 set 할 것이다.

만약 icon 의 방향 (위,아래) 설정등이 필요하다면, isHidden property 에 기반하여 바뀌도록 설정하면 된다.

chaneeii commented 2 years ago

DataSource 와 Delegate 차이

DataSources 의 메소드

protocol UITableViewDataSource
 @required 
 // 특정 위치에 표시할 셀을 요청하는 메서드
 func tableView(UITableView, cellForRowAt: IndexPath) 

 // 각 섹션에 표시할 행의 개수를 묻는 메서드
 func tableView(UITableView, numberOfRowsInSection: Int)

 @optional
 // 테이블뷰의 총 섹션 개수를 묻는 메서드
 func numberOfSections(in: UITableView)

 // 특정 섹션의 헤더 혹은 푸터 타이틀을 묻는 메서드
 func tableView(UITableView, titleForHeaderInSection: Int)
 func tableView(UITableView, titleForFooterInSection: Int)

 // 특정 위치의 행을 삭제 또는 추가 요청하는 메서드
 func tableView(UITableView, commit: UITableViewCellEditingStyle, forRowAt: IndexPath)

 // 특정 위치의 행이 편집 가능한지 묻는 메서드
 func tableView(UITableView, canEditRowAt: IndexPath)

 // 특정 위치의 행을 재정렬 할 수 있는지 묻는 메서드
 func tableView(UITableView, canMoveRowAt: IndexPath)

 // 특정 위치의 행을 다른 위치로 옮기는 메서드
 func tableView(UITableView, moveRowAt: IndexPath, to: IndexPath)

Delegate의 메소드

protocol UITableViewDelegate
// 특정 위치 행의 높이를 묻는 메서드
 func tableView(UITableView, heightForRowAt: IndexPath)
 // 특정 위치 행의 들여쓰기 수준을 묻는 메서드
 func tableView(UITableView, indentationLevelForRowAt: IndexPath)

 // 지정된 행이 선택되었음을 알리는 메서드
 func tableView(UITableView, didSelectRowAt: IndexPath)

 // 지정된 행의 선택이 해제되었음을 알리는 메서드
 func tableView(UITableView, didDeselectRowAt: IndexPath)

 // 특정 섹션의 헤더뷰 또는 푸터뷰를 요청하는 메서드
 func tableView(UITableView, viewForHeaderInSection: Int)
 func tableView(UITableView, viewForFooterInSection: Int)

 // 특정 섹션의 헤더뷰 또는 푸터뷰의 높이를 물어보는 메서드
 func tableView(UITableView, heightForHeaderInSection: Int)
 func tableView(UITableView, heightForFooterInSection: Int)

 // 테이블뷰가 편집모드에 들어갔음을 알리는 메서드
 func tableView(UITableView, willBeginEditingRowAt: IndexPath)

 // 테이블뷰가 편집모드에서 빠져나왔음을 알리는 메서드
 func tableView(UITableView, didEndEditingRowAt: IndexPath?)

Reload

reloadData() : Reloads the rows and sections of the table view.

func reloadData()

reloadSections(_:with:) : Reloads the specified sections using a given animation effect.

func reloadSections(_ sections: IndexSet, 
               with animation: UITableView.RowAnimation)
// 섹션에 관계없이 모든 데이터를 reload
self.tableView.reloadData()

// 2번째 section의 데이터만 reload, 애니메이션 적용
self.tableView.reloadSections(IndexSet(2...2 ), with: UITableView.RowAnimation.automatic )
chaneeii commented 2 years ago

내부 크기에 따라 tableview 사이즈 다르게

https://ios-development.tistory.com/400