classicrocker883 / MRiscoCProUI

This is optimized firmware for Voxelab Aquila & Ender3 V2/S1 3D printers.
https://classicrocker883.github.io/
Other
82 stars 17 forks source link

[BUG] aquila-N32-MP #118

Closed Fireball122 closed 5 months ago

Fireball122 commented 6 months ago

Did you test the latest release build?

Yes, and the problem still exists.

Bug Description

hello i have an aquila with a n32 board with a MP i have downloaded every version you have for this config but every time i go to home the printer the x and y work perfectly but when i got to level the z it head goes back to the middle and goes up then goes up again and then it starts to go back down and then after 10-20mm it says leveling failed printer killed and for context if i put something under the MP and set it off before it kills the leveling it works so i was wondering if this was a problem with the firmware or a setting i can change in the firmware.

Printer Model

Voxelab Aquila

Model Type

x3

Your Mainboard

Aquila N32

Other Mainboard Type

No response

Add-ons that could be involved

biqu microprobe v2

ProUI?

ProUI

Bed Leveling

UBL - Unified Bed Leveling

Did you include your own configuration files?

Additional information & file uploads

No response

classicrocker883 commented 6 months ago

the biqu Microprobe V2 was recently added and for the most part should work. the only firmware which works for this probe has "-MP" in the file name, like the one which you'd want is Aquila_N32_UBL-ProUI-MP.bin

another thing is as the 5 pins connected to the board and probe, it should be in a row, like where a CR-touch, or BL-touch go normally. in other words, you might find a 3 pin connected and a 2 pin. the 2 pin should have a black and white wires. this should all be in a row on the same connector, and not split. also if there is another Z end stop plugged in the other connector that must be unplugged.

normal firmware like for a BLTOUCH is not compatible with the MicroProbe.
just to be clear, as for the Aquila X3, as far as I understand this printer comes with a different stock probe type as well. so you have swapped this out with the MicroProbe? because typical -X3 firmware couldn't work.

as for the issue you are having I'm trying to picture the situation you've described. if you could possibly create a quick video that would help. but basically the probe should end up in the center/middle of the print bed.

as for why it may be failing you can adjust the Z-offset through the Z-offset Wizard in the Prepare Menu.
another thing is since the BIQU MicroProbe V2 is unlike the BLTOUCH or any other probe, it is very tiny compared, you will need a certain way to mount it to the hotend. when the probe is extended (deploy), it should be further than the nozzle. and then the nozzle should stick down further than the probe retracted (stow).

so technically the probe should end up in the middle of the bed when getting the Z home reading, that is normal. the nozzle should not hit the bed first when the probe is extended, but when it is retracted that is fine because that is how it is supposed to print.

Fireball122 commented 6 months ago

ok i will upload a video when i get home and i did use the Aquila_N32_UBL-ProUI-MP.bin and i don't have anything plugged into the z switch port and did get the biqu microprobe mounted correctly onto the printer after a few different variations of mounts i modeled and printed and wile i will upload a video later i try to be more specific. the firmware i flashed successfully and everything is working except the homeing feature. when i try to home or build a mesh it homes the x and y axis without a problem then the printhead moves out to the middle of the build plate and then it goes up on the z axis around 10 millimeters stops for about a second then goes back up around 10 millimeters again and this isn't the problem i just thought it was strange but then it starts to go back down to probe the bed but it will only go down 15 millimeters on the z axis before it says leveling failed printer killed so i was wondering if there is a limit on how far the z axis can go down before the leveling fails because if there is could it be removed?

classicrocker883 commented 6 months ago

so there is a limit how far the Z axis is able to go "below" the bed. it is 3 or 5mm, ill have to check. the configurations for the BIQU MicroProbe aren't the same as for the BLTOUCH. I had to search for which settings to use and well wasn't able to fully test it out myself.

a video would be helpful if you can. im trying to think what parameters could be changed... or I wonder if having the two pin connector (black + white wires) should go where the Z end stop connector goes - this would require changes in the firmware. or maybe those wires are backwards on yours? im not sure if that matters as well, it should install in the BLTOUCH port like so


but when you say when the printhead moves to the center, then goes up 10mm (Z-axis) stops, goes up another 10mm - does this mean it is now at 20mm? that should not be that way. moving up only to 10mm is a safe homing feature, after homing that is basically where it "rests". moving up another 10mm to be @ 20.00 isn't supposed to do that.

i'll have to research why that would be, because since this isn't a BLTOUCH, that parameter is disabled in the firmware, so I wonder with that disabled it isn't registering the MicroProbe as it's replacement when its supposed to. in other words, this might be more of a Marlin issue than this firmware specific.

classicrocker883 commented 6 months ago

and your printer is X3 right? which comes with the inductive probe? and its not X2? because I found something interesting https://reprap.org/forum/read.php?415,893383 from this website:

define Z_MIN_ENDSTOP_HIT_STATE LOW

define Z_MIN_PROBE_ENDSTOP_HIT_STATE LOW

Changed both the previous values because the print head was always going up when I tried to home the printer

it seems this person had the same kind of issue- printhead going up when trying to home.

another thing is that apparently the MicroProbe V2 should be connected to an external pull-up resistor, the Z-axis endstop should have one, while the BLTOUCH port does not... so i'll try making another firmware file having the Z-min endstop instead

classicrocker883 commented 6 months ago

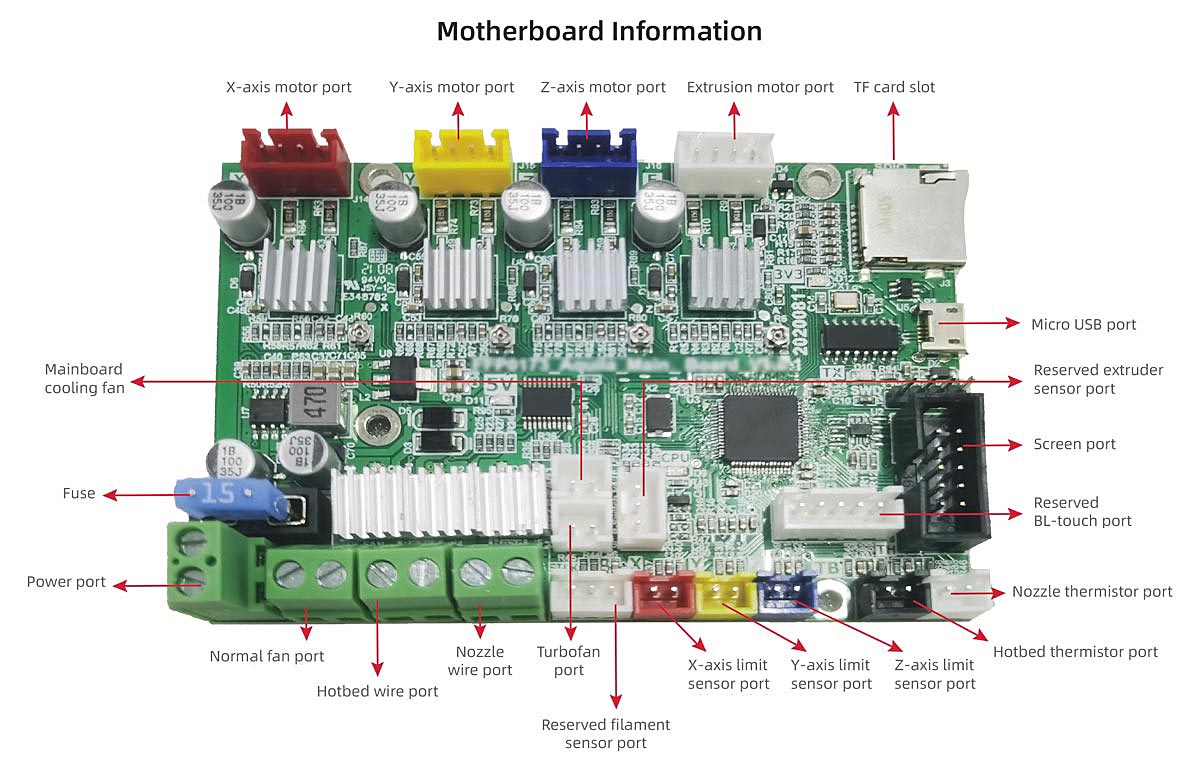
Aquila_MP-Z-MIN.zip here are a couple firmware files you can try. one is for the X3, the other for X2, the difference is the two wires (black and white) go where in Z-MIN endstop. you know next to the X and Y endstop limit switches?

so like where the blue connector labeled Z-axis limit sensor port

Fireball122 commented 6 months ago

Ok this is helpfull i currently have it pluged in like a bl touch but ill try that firmware and hook it up to the z axis also sorry for not sending the video i have gotten busy recently and this actualy is not my printer its a freinds so i am uplaoding my video to google drive right now and ill send a link when thats finished the video isnt the best video and its hard to see some of the things that i have mentioned but i hope it could help

Fireball122 commented 6 months ago

https://drive.google.com/file/d/1Z8JM5xkLZrvvlXe2om8uMZIiQJmaeJZr/view?usp=sharing_eil_m&ts=660420f9

Fireball122 commented 6 months ago

Thank you for all of your help i just pluged it in to the z-axis port and it works now. Again thank you for your help Also this is still on the firmware that you have uploaded for the n32 mp so nothing is wrong with any of the code just me being dumb aka user error.

Fireball122 commented 6 months ago

I spoke to soon it now wont kill the printer but it wont detect the probe anymore

classicrocker883 commented 6 months ago

Thank you for all of your help i just pluged it in to the z-axis port and it works now. Again thank you for your help Also this is still on the firmware that you have uploaded for the n32 mp so nothing is wrong with any of the code just me being dumb aka user error.

no not at all, so you didn't try the firmware files I uploaded here in previous comment? because technically the original code was supposed work with the 5-pin BLTOUCH connector, having all 3+2 in the same port. and the firmware I just made if you wish to test only changed the code - so that Z-axis connector (2-pin) can be used. that is odd because in the original firmware it shouldn't have worked moving to the 2-pin Z-axis port... but it does work now?

maybe there is something when MicroProbe is enabled it automatically disables one port being used to enabling the other, I just had the impression it was supposed to work like any other BL or 3D or CR touch. I mean its great it is working, but I can't explain how if the code for the Probe is set up for a different port on the board.

Fireball122 commented 6 months ago

Nope got it working again not sure if this info will help you but i took the black and white wires and conected them to other wires i had so that the black broke off into two diffrent cables and same for the white and conected them into bolth bl touch port and z axis and yes i am still useing the pro firmware you compiled

Fireball122 commented 6 months ago

just an update i printed things yesterday ( i didn't manually level the bed so it was very off) but i got great results thanks to the ubl and auto mesh.

classicrocker883 commented 6 months ago

Nope got it working again not sure if this info will help you but i took the black and white wires and conected them to other wires i had so that the black broke off into two diffrent cables and same for the white and conected them into bolth bl touch port and z axis and yes i am still useing the pro firmware you compiled

im sorry i dont understand how you had this done. for future reference and for anyone who would need help, would you mind taking a pic or if you can draw up a diagram?
sort of like this?

Fireball122 commented 6 months ago

sorry i never responded i will take a pic and try to describe it

Fireball122 commented 6 months ago

what i did is i took wires that i had and soldered them to two outputs on the ground and trigger signal so they where now 4 wires instead of 2 then i wired it to both the bltouch area and z axis area

Fireball122 commented 6 months ago

20240407_142452 20240407_142457 20240407_143624

Fireball122 commented 6 months ago

And i guess wile im at it the heating on the printer sometimes "struggles to get up to heat" "edit: it doesnt have a problem with heating" when i preheat fillement to 210c it not always but sometimes says printer killed temp to low and this also happend once durring a print and it killed the printer midprint is this a setting i may have acidently chamged or am i useing the wrong firmware?

classicrocker883 commented 6 months ago

you need to update your PID tune, thats in Control menu, under Temperature, do an Autotune and it should be fine. if not it might help to reset the Kp Ki Kd values to 0 and do it again.

but i'm wondering... so you split the connections and plugged them into both of those ports? that is interesting. I mean, it should be 1 or the other, not both. but both cause it to work normally??

so the firmware with Z-MIN, did you try that with having only 2 connectors in the z limit switch port?

Fireball122 commented 6 months ago

Ok thanks. And yes i split it into bolth on the original firmware that i used from you the n32 proui mp And when i tryed it with just the z axis pluged in it would go down correctly but it wouldnt stop after the probe had been pushed down and drove it into the bed only when i connected both did it go down and work properly.

classicrocker883 commented 5 months ago

Ok thanks. And yes i split it into bolth on the original firmware that i used from you the n32 proui mp And when i tryed it with just the z axis pluged in it would go down correctly but it wouldnt stop after the probe had been pushed down and drove it into the bed only when i connected both did it go down and work properly.

I have updated the firmware in a new release. it should work using just one connection - into the Z axis port. if you dont mind if or when you update the firmware, could you let me know if it works now with just 1 port connector?

Fireball122 commented 5 months ago

Of course i will try it as soon as i can witch will hopefully be in 2-3 days becuse its actually a buddys 3d printer.

Fireball122 commented 5 months ago

i just finished flashing and homing his printer and your new firmware for the mp works perfectly thank you very much and yes it is now only plugged into the z axis not both ports.

github-actions[bot] commented 3 months ago

This issue has been automatically locked since there has not been any recent activity after it was closed. Please open a new issue for related bugs.