cocozxu / serverless-reader

GNU General Public License v3.0
0 stars 1 forks source link

Bunnimage #17

Closed cocozxu closed 3 years ago

ghost commented 3 years ago

Week 3 Step 2 ⬤⬤◯◯◯◯◯◯◯ | 🕐 Estimated completion: 10-20 minutes

Upload it!

This week, you will be going through steps to upload images to blob storage using Azure's SDK.

✅ Task:

🚧 Test Your Work

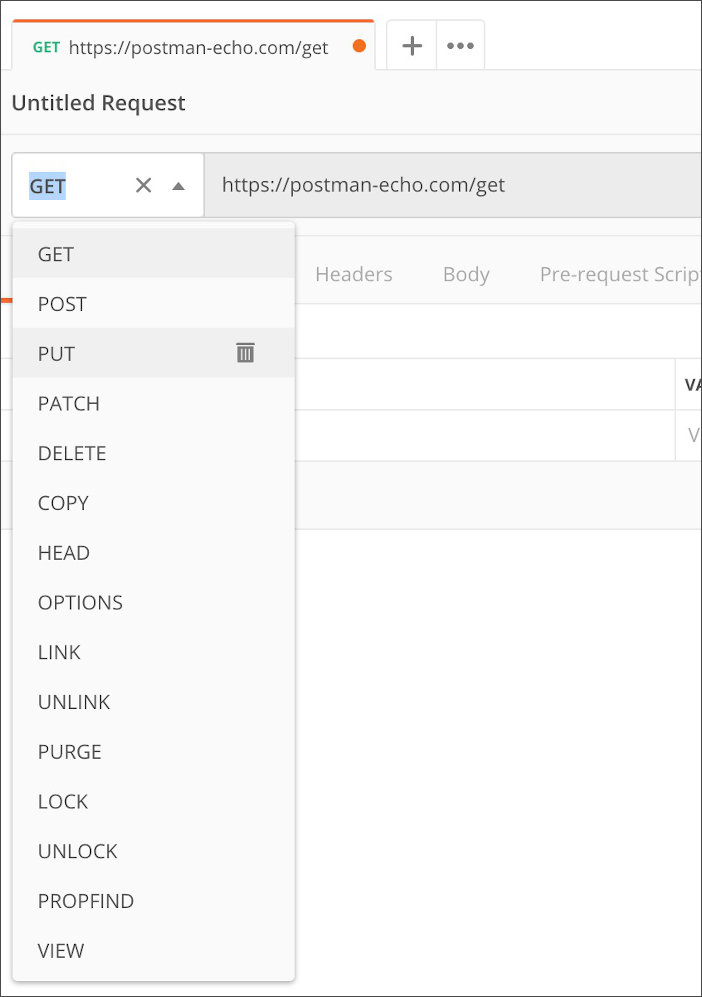
To test your work, you'll be using Postman to send a POST request in Postman with an image in the body to your function url. You should see a response similar to the below:

{
  "body" : "File Saved"
}

💡 Yay! This means it was successfully saved.

:question: How do I attach an image to my POST request?
1. Get your `bunnimage` function url 2. Use Postman to make a POST request to your functional url ![image](https://user-images.githubusercontent.com/49426183/120075487-4e669c00-c056-11eb-8049-d2e00c766525.png) 3. You will need to send body data with your request: - The Body tab in Postman allows you to specify the data you need to send with a request - You can send various different types of body data to suit your API - Website forms often send data to APIs as multipart/form-data - You can replicate this in Postman using the form-data Body tab - Be sure to check File instead of Text, since we'll be posting an image instead of a JSON object ![image](https://user-images.githubusercontent.com/49426183/120075704-393e3d00-c057-11eb-8d99-7dfe8d5fd584.png)
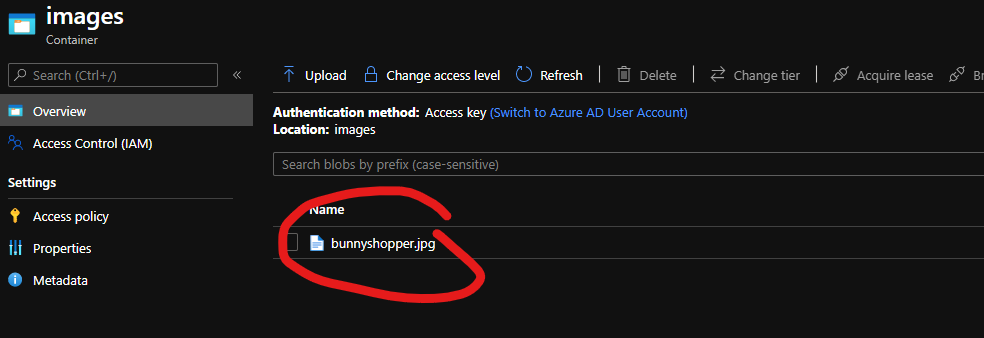
:exclamation: Check your blob storage container to see if the image is stored there:
![https://user-images.githubusercontent.com/69332964/99189316-9c592980-272e-11eb-9870-dbc1f9352599.png](https://user-images.githubusercontent.com/69332964/99189316-9c592980-272e-11eb-9870-dbc1f9352599.png)

Writing our First Azure Function to Upload an Image

:exclamation: How do I initialize packages in code?
1. Use this [tutorial](https://docs.microsoft.com/en-us/azure/azure-functions/functions-how-to-use-azure-function-app-settings) to add in your own connection string from your storage container - The storage container is the one you created in step 1 - Navigate to the container and find your connection string 2. Add the following lines of code to the top of your index.js file: ```js var multipart = require("parse-multipart") const connectionString = process.env.AZURE_STORAGE_CONNECTION_STRING; const { BlobServiceClient } = require("@azure/storage-blob"); ``` - Take note of the `process.env` value being assigned to `connectionString`. `AZURE_STORAGE_CONNECTION_STRING` is the name of the environment variable.

:question: How do I find my secret strings?
These are the same ones you added in your repository secrets in step 1. Here is a review: ![https://user-images.githubusercontent.com/69332964/99161822-ec4ed680-26c3-11eb-8977-f12beb496c24.png](https://user-images.githubusercontent.com/69332964/99161822-ec4ed680-26c3-11eb-8977-f12beb496c24.png) - *Note: You'll need to store these strings in [environment variables](https://docs.microsoft.com/en-us/azure/app-service/configure-common) as well, if you don't want to accidentally commit them. You can access these with `process.env['thesecretname']`*

1. Reviewing parse-multipart to receive an image

In your main module.exports function, you'll want to use the parse-multipart library to parse the image from the POST request. Then you'll determine the fle extension, and then upload the file using an uploadFile() function we'll write later on.

:question: Can we review syntax for `parse-multipart`?
To parse a request's body, you can use the following lines of code: ```js var boundary = multipart.getBoundary(req.headers['content-type']); var body = req.body; var parsedBody = multipart.Parse(body, boundary); ```

2. Uploading the image

Let's start out by writing the function we can call to upload an iamge.

Uploading the image blob to your container

Our uploadFile function will be an asynchronous function that uses the BlobServiceClient to get a reference to the container, create a blob, and upload the data to that blob.

:question: What should my parameters be? The signature of your `uploadFile()` function should look something like: ```js async function uploadFile(parsedBody, ext) ```
:question: How can I get a reference to the container? ```js const blobServiceClient = BlobServiceClient.fromConnectionString(connectionString); const containerName = ""; const containerClient = blobServiceClient.getContainerClient(containerName); // Get a reference to a container ```
:question: How can I create a blob? ```js const blobName = 'test.' + ext; // Create the container const blockBlobClient = containerClient.getBlockBlobClient(blobName); // Get a block blob client ``` Based on previous code we've written and logic, fill in the blanks!
:question: How can I upload data to the blob? ```js const uploadBlobResponse = await blockBlobClient.upload(parsedBody[0].data, parsedBody[0].data.length); ```

:bulb: Be sure to return a string like "File Saved" from this function when the file has been uploaded!

Heading back to the module.exports main function

:exclamation: Name your image file as test.png or test.jpg (depending on the submitted file extension) in our code for testing purposes.

:question: How can I determine file extension?
You can use a series of if-else statements like the ones below: ```js var filetype = parsedBody[0].type; if (filetype == "image/png") { ext = "png"; } else if (filetype == "image/jpeg") { ext = "jpeg"; } else if (filetype == "image/jpg") { ext = "jpg" } else { username = "invalidimage" ext = ""; } ```
:question: How can I upload the file?
In this case, we'll just call the `uploadFile()` function that we wrote earlier. ```js var responseMessage = await uploadFile(parsedBody, ext); context.res = { body: responseMessage }; ```

🚀 Add your Blob URL as a secret

You'll need to add your Blob URL to the github repository as a secret so we can test it! Name our secret to blob_url and set it equal to your blob url, which should look like "https://bunnimagestorage.blob.core.windows.net". To find your url, simply place your storage account name in this template:

https://<your account name>.blob.core.windows.net


ghost commented 3 years ago

Week 3 Step 3 ⬤⬤⬤◯◯◯◯◯◯ | 🕐 Estimated completion: 10-20 minutes

Codename Blob + 3RR0R Handling

This week, you will be going through steps to handle POST requests with no data.

✅ Task:

🚧 Test Your Work

To test your work, use Postman to send a POST request without an image attached. You should see a response similar to the below:

{
  "body" : "Sorry! No image attached."
}

💡 Yay! This means the error was successfully caught.

1: Modify the Function

Handle Empty Data

Now we'll want to handle cases where the POST request's body happens to be empty. In your original module.exports function, before you parse the body, make sure it exists! Only then should you upload your file to blob storage.

:question: How do I catch empty POST requests? Use an if-else statement to catch when `body == null`. If it's empty, set the `responseMessage` to "Sorry! No image attached." Otherwise, you can safely parse the body! ```js var responseMessage = "" if (body == null) { responseMessage = "Sorry! No image attached." } else { var password = // get the header called "codename" // use parse-multipart to parse the body // determine the file-type here! responseMessage = await uploadFile(parsedBody, ext, ?); } ``` > :bulb: Hint: `responseMessage` is what we're returning to the user as the output.

:bulb: Hint: You'll need to code the uploadFile function another parameter since it now has to receive the body, extension, AND filename!

Headers

Headers are yet another way to pass on information in HTTP requests. Here's how to access them:

var the_header_value = req.headers['insert_header_name'];

In this case, the header value will be used to name our picture.

ghost commented 3 years ago

Week 3 Step 4 ⬤⬤⬤⬤◯◯◯◯◯ | 🕐 Estimated completion: 10-20 minutes

Your time's up....

This week, you will be going through steps to create a Timer Trigger Function delete all files in your Blob storage container every 5 minutes. This allows for greater security for your users.

✅ Task:

:bulb: Tip: Cron expressions might help you with the last task.

🚧 Test Your Work

To test your work, use Postman to send a POST request with an image to your previous HTTP trigger function that will save your file within your blob. Recall that a successful save of your file will cause you to see a response similar to the below:

{
  "body" : "File Saved"
}

You should also double check that your file has been saved by navigating to your storage blobs.

Now run your timer trigger function and re-check your storage blobs - they should be gone. Your logs notifying you of the blobs' deletions should also be displayed in your trigger function's console.

💡 Yay! This means your timer trigger function worked.


1. Create your Timer Trigger Function

First, we'll need to create a new Azure Function that runs on a schedule with the Timer Trigger template.

  1. Create a new Function, naming it bunnimage-timer and select Timer trigger

image

  1. Leave the Schedule as 0 */5 * * * * to have the function be triggered every 5 minutes.

image

  1. Press enter on your keyboard.

1. Code your Timer Trigger Function

:question: How do I create the global variables above? To reference the `@azure/storage-blob` package: ```js const { BlobServiceClient } = require("@azure/storage-blob"); ``` To reference your connection string and account name: ```js const connectionstring = process.env["AZURE_STORAGE_CONNECTION_STRING"]; const account = "YOUR_ACCOUNT_NAME"; ```

To delete all the blobs in the container, you can first list all the blobs, then loop through deleting each one as you go.

:question: How do I delete a blob? First, your `deleteBlob` function will have to be asynchronous, so its signature should look like `async function deleteBlob(filename)`. Inside your function, create a `BlobServiceClient` object that will be used to create a container client. ```js const blobServiceClient = await BlobServiceClient.fromConnectionString(connectionstring); ``` Create a variable that references the name of the container that contains the file you want to delete. ```js const deletecontainer = "images"; ``` Fetch the container with that name. ```js const deletecontainerClient = await blobServiceClient.getContainerClient(deletecontainer); ``` Within that container, fetch the block blob client that has the name of `filename`. ```js const deleteblockBlobClient = deletecontainerClient.getBlockBlobClient(filename); ``` [Download](https://docs.microsoft.com/en-us/javascript/api/@azure/storage-blob/blockblobclient?view=azure-node-latest#download_number__number__BlobDownloadOptions_) the blob from the system and fetch a reference to the readable stream. ```js const downloadBlockBlobResponse = await deleteblockBlobClient.download(0); // 0 refers to the position of the blob to download ``` Delete the blob. ```js const blobDeleteResponse = deleteblockBlobClient.delete(); ``` Set and return `result` with a progress statement on the blob's deletion. ```js result = { body : { deletename: filename, success: true } }; return result; ```
:question: How do I call the `deleteBlob` function within `module.exports` and loop through existing blobs? Exactly like the beginning of your `deleteBlob` function, you'll want to: 1. Create a `BlobServiceClient` object using your connection string. 2. Create a variable that references the name of the container that contains the file you want to delete. 3. Fetch the container with that name. ```js const blobServiceClient = await BlobServiceClient.fromConnectionString(connectionstring); const deletecontainer = "images"; const deletecontainerClient = await blobServiceClient.getContainerClient(deletecontainer); ``` Now you'll want to use the [`listBlobsFlat`](https://docs.microsoft.com/en-us/javascript/api/@azure/storage-blob/listblobsflatsegmentresponse?view=azure-node-latest) function to retrieve a reference to an enumeration of your blobs. Loop through these blobs, and delete each one. ```js for await (const blob of deletecontainerClient.listBlobsFlat()) { context.log('\t', blob.name); await deleteBlob(blob.name) // access the blob's name and call deleteBlob to delete it! } ``` You can also add a log after your for loop that notifies you that all the blobs have been deleted. ```js context.log("Just deleted your blobs!") ```
cocozxu commented 3 years ago

6 23 *

ghost commented 3 years ago

Week 3 Step 5 ⬤⬤⬤⬤⬤◯◯◯◯ | 🕐 Estimated completion: 10-20 minutes

Download it!

This week, you will be going through steps to create an HTTP Trigger that takes parameter inputs and returns a download link for the given image.

✅ Task:

🚧 Test Your Work

To test your work, use Postman to send a GET request with a "username" in the header. You should see a response similar to the below:

:bulb: The username value should be the name of an image you have already uploaded to the blob storage. Do it fast, or your timer trigger will delete it!

{
  "body" : {
     "downloadUri" : "https://<YOUR_BLOB_STORAGE_URL>.blob.core.windows.net/images/<USERNAME>.png",
     "success": true
  }
}

💡 Yay! This means you successfully fetched a download link to your image.

:question: How do I add "username" to the header?
Click on the headers tab below the request URL. ![image](https://user-images.githubusercontent.com/69332964/122677983-cd14ac00-d1b2-11eb-83d3-1d5c3d1283b5.png)

1. Modifying your Function

In our module.exports function, we'll want to:

  1. Use the node-fetch package we installed earlier this week to determine if the requested image is available.

  2. Use if-else statements to determine the success of the retrieval. Remember to test for both jpeg and png extentions!

  3. Send back a JSON object containing the download link.

:question: How do I use fetch to test extensions? Outside of the main function, you'll first want to create a variable called `fetch` that calls your `node-fetch` package: `var fetch = require("node-fetch");`. Then, within your main function, you'll need to create references to your username as well as variables for `download`, `downloadpng`, and `downloadjpg`. Since we don't know whether the image is a png or jpeg file, we need to test for both. ```js var username = req.headers['username']; var download = "" var downloadpng = "https://.blob.core.windows.net/images/" + username + ".png"; var downloadjpg = "https://.blob.core.windows.net/images/" + username + ".jpeg"; ``` To attempt to download the image, call `fetch` asynchronously. This way, we can test all possible links to the image and determine which one works. ```js let pngresp = await fetch(downloadpng, { method: 'GET', }) let pngdata = await pngresp; let jpgresp = await fetch(downloadjpg, { method: 'GET', }) let jpgdata = await jpgresp; ```
:question: How do I determine the right image link? Your data will contain an attribute "status text" that lets you know if a blob doesn't exist. To use these to our advantage, we can create if-else statements that notify us if our `fetch` method was successful. ```js if (pngdata.statusText == "The specified blob does not exist." && jpgdata.statusText == "The specified blob does not exist." ) { success = false; context.log("Does not exist: " + pngdata) context.log("Does not exist: " + jpgdata) } else if (pngdata.statusText != "The specified blob does not exist.") { success = true; download = downloadpng context.log("Does exist: " + pngdata) } else if (jpgdata.statusText != "The specified blob does not exist.") { success = true; download = downloadjpg context.log("Does exist: " + jpgdata) } ```
:question: How do I return the download link? To return the download link, just set `context.res` to a JSON object with your download link. ```js context.res = { body: { "downloadUri" : download, "success": success, } }; context.log(download); context.done(); ```
ghost commented 3 years ago

⏰ Time to merge!

Go ahead and merge this branch to main to move on. Great work finishing this section!

merge

⚠️ If you receive a Conflicts error, simply press Resolve conflicts and you should be good to merge!