dalaolala / blog

用issue来写博客 和别人学的
MIT License
73 stars 24 forks source link

在 Heroku 搭建 V2Ray #9

Open dalaolala opened 4 years ago

dalaolala commented 4 years ago
1、首先注册账号

https://signup.heroku.com/login

2、部署应用

去这里,然后点击下面的部署按钮

https://github.com/dalaolala/v2ray-heroku

如下图所示

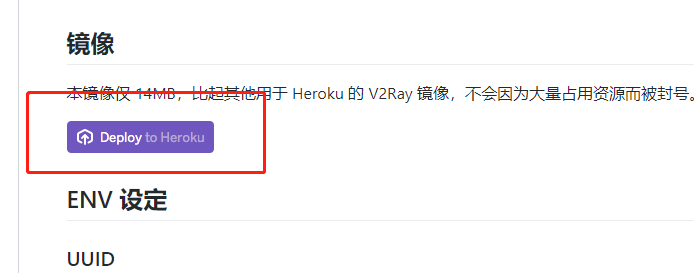
3、输入一个uuid (此处默认的也可以使用),默认的路径是/wss

4、部署完成以后获取给的二级域名

在应用里面找到【setting】,下面可以找到送的二级域名

这里如果要绑定自己的域名,需要绑定信用卡

但是也可以用cloudflare的反向代理(部署参考:https://github.com/dalaolala/blog/issues/4

注意反向代理的配置用这个:

addEventListener(
  "fetch",event => {
     let url=new URL(event.request.url);
     url.hostname="应用名称.herokuapp.com";
     let request=new Request(url,event.request);
     event. respondWith(
       fetch(request)
     )
  }
)

5、另外可以部署多个app,然后客户端通过下面配置达到负载均衡效果

{
  "inbounds": [
    {
      "port": 1080,
      "listen": "127.0.0.1",
      "protocol": "socks",
      "sniffing": {
        "enabled": true,
        "destOverride": ["http", "tls"]
      },
      "settings": {
        "auth": "noauth",
        "udp": false
      }
    }
  ],
  "outbounds": [
    {
      "protocol": "vmess",
      "settings": {
        "vnext": [
          {
            "address": "1st.herokuapp.com",
            "port": 443,
            "users": [
              {
                "id": "40c98649-847b-412c-a229-5e68ca9985eb",
                "security": "auto",
                "alterId": 64
              }
            ]
          },
          {
            "address": "2nd.herokuapp.com",
            "port": 443,
            "users": [
              {
                "id": "40c98649-847b-412c-a229-5e68ca9985eb",
                "security": "auto",
                "alterId": 64
              }
            ]
          }
        ]
      },
      "streamSettings": {
        "network": "ws",
        "security": "tls"
      }
    }
  ]
}
dalaolala commented 4 years ago
文章参考 https://ibcl.us/Heroku-V2Ray_20191014
SoraKasvgano commented 1 year ago

试试https://github.com/LoeiFy/Mirror