一切的根源都要从 new AnnotationConfigApplicationContext() 方法开始,这是 Spring 启动的入口,先准备如下代码:
public class ContextDemo {
    public static void main(String[] args) {

        AnnotationConfigApplicationContext context = new AnnotationConfigApplicationContext(Config.class);
        context.getBean("car",Car.class);
    }
}

@Configuration
@ComponentScan(basePackageClasses = {Car.class})
class Config{
    @Bean
    public User1 user(){
        return new User1(10, "dc1");
    }
}

@Component
class Car  {
    private int color;
    private String name;
}

class User1 {
    private int age;
    private String name;

}
进入 new AnnotationConfigApplicationContext(Config.class); 方法可见如下:
public AnnotationConfigApplicationContext(Class<?>... annotatedClasses) {
    this();
    register(annotatedClasses);
    refresh();
}
再进入 this() 方法,如下:
public AnnotationConfigApplicationContext() {
    this.reader = new AnnotatedBeanDefinitionReader(this);
    this.scanner = new ClassPathBeanDefinitionScanner(this);
}
/**
* Convenient adapter for programmatic registration of annotated bean classes.
* This is an alternative to {@link ClassPathBeanDefinitionScanner}, applying
* the same resolution of annotations but for explicitly registered classes only.
*
* @author Juergen Hoeller
* @author Chris Beams
* @author Sam Brannen
* @author Phillip Webb
* @since 3.0
* @see AnnotationConfigApplicationContext#register
*/
public class AnnotatedBeanDefinitionReader {....}
   // 在 DefaultListableBeanFactory 类下面
    @Override
    public boolean containsBeanDefinition(String beanName) {
        Assert.notNull(beanName, "Bean name must not be null");
        return this.beanDefinitionMap.containsKey(beanName);
    }
public void register(Class<?>... annotatedClasses) {
    Assert.notEmpty(annotatedClasses, "At least one annotated class must be specified");
    // 使用 reader 注册配置类
    this.reader.register(annotatedClasses);
}
上面已经说过,reader 是用来显式注册 beanDefinition 的。这里还是指定一个具体的 class 来注册,属于显式注册,所以用 reader 中的注册方法,没毛病。进入方法:
/**
* Build and validate a configuration model based on the registry of
* {@link Configuration} classes.
*/
public void processConfigBeanDefinitions(BeanDefinitionRegistry registry) {
//....
}
本文从源码层面简要介绍一下 Spring IoC 加载过程,以及这个过程遇到的重点方法,重点类。
new AnnotationConfigApplicationContext()
一切的根源都要从
new AnnotationConfigApplicationContext()方法开始,这是 Spring 启动的入口,先准备如下代码:进入
new AnnotationConfigApplicationContext(Config.class);方法可见如下:再进入
this()方法,如下:发现调用的
AnnotationConfigApplicationContext无参构造器, 再调用一个类的无参构造器时,会先调用父类的无参构造器, 同时发现这个类的父类构造器如下:方法很简单,只是 new 了一个
beanFactory, 从名称来看,这个属性是 bean 工厂。现在只知道AnnotationConfigApplicationContext中有一个beanFactory的字段,这个字段是从父类继承来的。父类的构造方法已经结束,接着往下看,
this.reader = new AnnotatedBeanDefinitionReader(this);,this.scanner = new ClassPathBeanDefinitionScanner(this);。初始化reader和scanner.reader属性,会发现它是AnnotatedBeanDefinitionReader类型。看一下这个类型的注释说明:翻译一下:
意思就是可以替代
ClassPathBeanDefinitionScanner使用,但是它只能用于我们手动注册的类。scanner属性,发现它正是ClassPathBeanDefinitionScanner类型。再看一下这个类的注释说明:先翻译一下这个方法的注释,以及参数和返回值:
注释:
参数:
register, 这个是从最开始传入的AnnotationConfigApplicationContext对象Object source这个传入的 null, 暂不关心它返回值:
返回的是
Set<BeanDefinitionHolder>集合,到这里先暂停一下,需要看BeanDefinitionHolder是什么,它里面都是什么属性,以及干嘛用的:BeanDefinition
进入这个类,查看它的注释和内部结构: 通过注释可以知道它是 具有名称和别名的 BeanDefinition 的持有者
由此可知道关键信息不在它,而是
BeanDefinition,BeanDefinitionHolder只是BeanDefinition的持有者,只比BeanDefinition多了beanName以及别名属性。为的是可以有一个具体的名称来描述BeanDefinition. 所以要接着看BeanDefinition:先看翻译下
BeanDefinition的注释:它说 BeanDefinition 描述了 bean 的实例。也就是建筑图纸和建筑物的关系,BeanDefinition 会存有 某个 bean 的字段,构造方法等等。可以根据 BeanDefinition 构造出应的 bean。就如同可以通过建筑图纸还原出建筑物一样。
这里就非常巧妙了,一个系统中的有各式各样的 bean,功能不同,类型不同。用一个相同的东西去描述,操作这些 bean,是一个非常有利的转换。因为它们都是对象,是对象就会有方法,字段,类型。把这些方法,字段,类型再抽象,聚合就形成了 BeanDefinition.
看一下 BeanDefinition 内部结构:
内容很多,都是设置,获取 某个对象类型信息的,挑几个看一下:
好了,对 BeanDefinition 的了解暂时到此。不再深入了。继续上面的
registerAnnotationConfigProcessors方法:第一行:
DefaultListableBeanFactory beanFactory = unwrapDefaultListableBeanFactory(registry);进入方法后,发现没有做太多的是事情,就是把注册器的 beanFactory 包装一下,再返回。这里的 register 就是最开始 main 方法中的
AnnotationConfigApplicationContext对象。接着看下面:
对 beanFactory 添加
依赖比较器和Autowire 候选解析器暂时不知道设么作用,跳过。继续:先构造了一个
BeanDefinitionHolder的集合,也就是这个方法要返回的集合,if 语句中, 判断注册器是否包含某个 BeanDefinition, 进去看一下怎么判断的:最终会进入
DefaultListableBeanFactory类中的containsBeanDefinition方法,也就是说这个方法不是注册器提供的,而是它的 beanFactory 属性提供的。并且在 beanFactory 中有一个Map<String, BeanDefinition> beanDefinitionMap;通过名字就可以知道,存放的是 BeanDefinition, 判断注册器是否包已经包含某个 BeanDefinition, 就是看这个 map 是否包含相应的 key 了。这个功能是由它所辖的 beanFactory 实现的。这也比较符合常理: bean 工厂去管理 bean 定义。到这里就可以猜测出注册 bean 时,也是放入这个 Map, 取出 bean 时,也是从这个 Map 中获取。再看一下传入的 key 是什么:
CONFIGURATION_ANNOTATION_PROCESSOR_BEAN_NAME是写死在源码中的常量:org.springframework.context.annotation.internalConfigurationAnnotationProcessor某个类的全名称。继续向下看将
ConfigurationClassPostProcessor.class作为参数,构造了一个 RootBeanDefinition , 查看类关系,发现 RootBeanDefinition 是 BeanDefinition 的一个实现类。这里只需明白把一个 class 转成了 BeanDefinition 就行了。至于怎么转的,可以自行查看def.setSource(source)刚刚说过 source 参数是 null, 先跳过。不深究它是什么意思。再看
registerPostProcessor(registry, def, CONFIGURATION_ANNOTATION_PROCESSOR_BEAN_NAME)这一行,方法名是注册后置处理器, 把注册器,BeanDefinition, 和 类全名作为参数传入方法,再一路跟踪下去发现最后还是进入了 DefaultListableBeanFactory 类。执行的是registerBeanDefinition方法:从上面代码可知,注册 BeanDefinition 也是有注册器的 beanFactory 实现的。还记得
AnnotatedBeanDefinitionReader这个类的注释说道:用于注解 bean 类的编程注册。这是 ClassPathBeanDefinitionScanner 的替代方案,应用相同的注解,但仅适用于显式注册的类. 显示注册 就是手动把事先定义好的类添加到 beanDefinitionMap。 那么猜测一下ClassPathBeanDefinitionScanner是不是自动扫描我们系统自定义的类,然后把我们自定义类自动添加到 beanDefinitionMap 中的。比如被 @Service @Controller @Bean 修饰的类。我们使用 Spring 时,可没有把这些类向 bean 工厂手动注册这个方法的后面还注册了很多其他内置的类。就不一一罗列了。之后这个方法就结束了。
总结一下
this.reader = new AnnotatedBeanDefinitionReader(this);都干了哪些事情:AnnotatedBeanDefinitionReaderBean 定义读取类从这个方法中我们可以知道:
目前为止我们只知道向注册器中注册了一堆内置的类。还没有看到这些类的用法, 大胆猜测一下,这些内置类是一些创世纪的类,后面用到的类扫描,属性注入,切面等,可能都是由这些类实现的。
初始化 ClassPathBeanDefinitionScanner
这里主要是初始化一个扫描器,扫描器的作用就是把某个路径下的 class 文件加载 jvm 中,然后找到这些类中可以使用的 Bean, 把这些 bean 注册进来。
初始化 reader 后,接着就是初始化 scanner 字段了:
一层层进入方法后,会到达这个地方:
这是一个构造器,第一个参数是
register, 和 reader 一样,是 AnnotationConfigApplicationContext 的对象,第二参数默认传的 true, 第三个参数是环境相关信息,第四个参数是一个 resourceLoader, 这里传入的也是 AnnotationConfigApplicationContext.其中
registerDefaultFilters();是一个默认的过滤器,其方法实现是:这个方法想把 @Component 、@ManagedBean、 @Named 注解加入过滤器中,但是由于系统没有后面两个包,会走到异常处理块。所以过滤器中只会有 @Component.
然后下面就是为扫描器设置环境信息,和资源加载信息了。这时候并没有开始扫描包。只是完成了扫描器的初始化。到此我们可以知道扫描器 scanner 中有下面几个属性:
猜测应该是使用资源加载器把某个包下的所有 class 加载到 jvm 中,然后根据反射遍历每个 class 的信息,看看类上的注解是否在默认的过滤器中,如果在就注册到 bean 工厂中。 我们还需要了解一下资源加载器是什么?
ResourceLoader
进入
setResourceLoader方法,最后会进入PathMatchingResourcePatternResolver类。这个类的根是 ResourceLoader. 进入这个接口看一下他都有哪些方法:就只有两个方法,到这里就比较明显了,不同的 ResourceLoader 实现类都会实现特定的 getResource 方法,功能就是根据一个位置,获取一个 Resource. 进入 Resource 类中可知,里面有很多和文件相关的方法。它保存着一个文件的详细信息,比如 文件所在的路径,文件的 File 对象等等。可以理解为 ResourceLoader 把某个路径的下的 class 文件封装成了 Resource 对象。
而 PathMatchingResourcePatternResolver 正是 ResourceLoader 的一个实现,从这个类的注释可知它能够将指定的资源位置路径解析为一个或多个匹配的资源。源路径可以是与目标 Resource 一对一映射的简单路径,或者可以包含特殊的“ classpath*: ”前缀和/或内部 Ant 样式的正则表达式
到这里已经知道 ResourceLoader 是什么了,暂不向下深究了。
已经浏览完 AnnotationConfigApplicationContext 无参构造器中的功能了。接着往下看:
通过
this()这个构造方法,注册器 AnnotationConfigApplicationContext 中有了 reader, scanner, bean 工厂中有了一些内置类的 beanDefinition. scanner 中有了资源加载器。注册配置类
进入
register(annotatedClasses):上面已经说过,reader 是用来显式注册 beanDefinition 的。这里还是指定一个具体的 class 来注册,属于显式注册,所以用 reader 中的注册方法,没毛病。进入方法:
这里已经把配置类注册到工厂中了。 这里仅仅是把系统中的配置类进行注册,并没有开始扫描配置类中的代码。接下来就是 refresh 方法了:
refresh
invokeBeanFactoryPostProcessors
进入
invokeBeanFactoryPostProcessors(beanFactory):refresh 方法中的
invokeBeanFactoryPostProcessors()作用是:还记得在初始化 reader 时,注册了很多内置类到 bean 工厂中吗?其中第一个注册的就是:
而
ConfigurationClassPostProcessor正是实现了 BeanDefinitionRegistryPostProcessor 接口,所以会调用这个类的 postProcessBeanDefinitionRegistry 方法:翻译一下注释:
也就是说这个方法会解析我们传入的配置类,如果配置类上有 @ComponentScan 注解,还会扫描给定的包下的所有 class, 找到所有需要注册的 bean. 也就是在这里会把系统中我们定义的 bean 注册成 BeanDefinition 到工厂中。具体的扫描动作在 ClassPathBeanDefinitionScanner 类中的 doScan() 方法: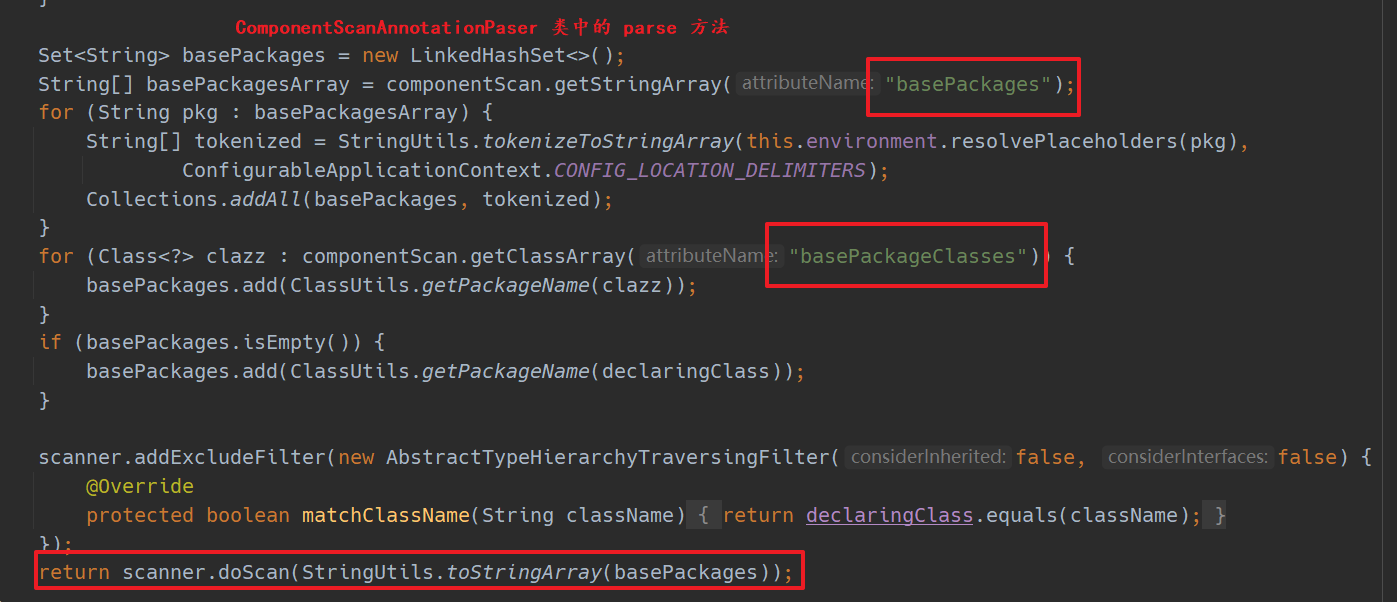
BeanFactoryPostProcessor
上面我们说了。 spring IoC 容器在加载过程中会找到所有实现了 BeanFactoryPostProcessor 接口的 bean,然后调用他们的 postProcessBeanFactory 方法。而这个时机是在 bean 定义注册到工厂之后,bean 实例生成之前。所以如果我们自己的 bean 想在 bean 通过 bean 工厂做一些事情的时候,可以实现这个接口,做一些特殊的操作:下面是对加密的配置进行解密,
数据库配置:
代码:
结果
finishBeanFactoryInitialization(beanFactory);
实例化剩余非懒加载的 bean, 为什么说是剩余的? 因为在前面的 invokeBeanFactoryPostProcessors 方法中,可能有的 bean 已经调用 getBean() 方法进行实例化了。
这里会看到 bean 实例化过程会执行留给用户的扩展点。下面列出过程重要的步骤:
1. 实例化 bean
2. 填充属性
3. Aware 系列接口的回调
aware 系列接口的回调位于 initializeBean 中的 invokeAwareMethods 方法:
下面是 aware 方法:
4. postProcessBeforeInitialization
5. afterPropertiesSet 和 init-method
在 invokeInitMethods 方法中又掉了两个回调方法:
6. postProcessAfterInitialization
Spring Bean 的生命周期
写个程序验证一下:
结果: