Week 2 Step 2
Checkpoint #1
Congrats! You've made it to the first checkpoint. We're going to make sure your Azure Function can complete its first task: parsing the image.
- In order to make sure your function is correctly receiving and parsing the image, we are going to be adding a line of code in the module.exports function to print out the image data in our Azure console.
Hint: take a look at the var parts... line
Need an explanation?
* Use context.log() to print to console * Our last line of code, `var parts = multipart.Parse(body, boundary);`, stored our parsed image... * We only have one image, so let's access it in the array with the index of 0: `parts[0]` Final line of code: `context.log(parts[0]);`
- Let's use our Postman skills to make a POST request to the Azure Function.
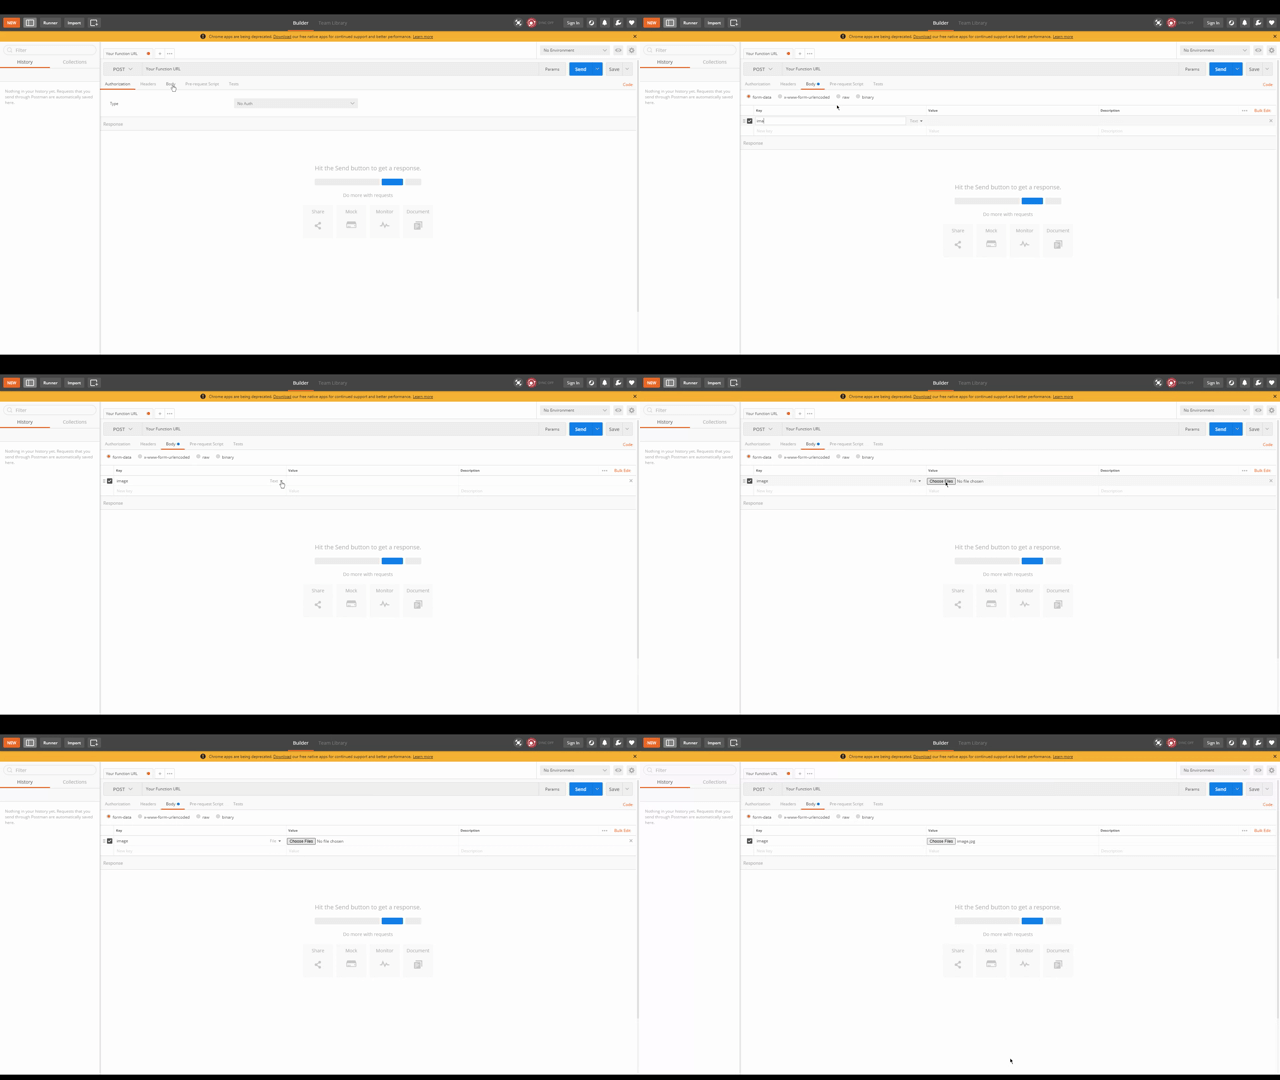
- Navigate back to the Postman Chrome extension app and change GET to POST
 po
po
- Copy your function's url from the Azure Function App portal like this:

- Use the function url and any image you want to send the POST request. By default, the request is going to be in the form of a "Param" and you want to change this to "Body" > "form-data". Remember to attach the file in Body! You will need to add the name of the file (e.g. "image") in Key and upload the image in "Value". You can add a description if you'd like but this is not entirely necessary.

- When you hit send to send the request, make sure to have your Function open in another tab to observe what happens. You should get something like this:

Remember, we are using Postman to test the request before we go ahead and create the website that will allow us to upload an image and make the request. If you come across any errors here, make sure to debug them (Google is a great resource) before moving forwards.
 * Click on the resource you need the keys for
 * On the left menu bar, locate the Resource Management section and click on "Keys and Endpoint"


 Credits:
Week 2 Step 1
Parsing Multipart
In your Azure Portal, go into your HTTP function and into the index.js file. You should see starter code there that has something like
module.exports.... This is the file that we will be editing.The Azure Function needs to:
What is happening in this flowchart?
HTML Page: Where the user will submit an image; this page will also make a request with the image to the Azure Function.
Azure Function: Receives the request from HTML Page with the image. In order to receive it, we must parse the image...
Concepts to know:
We're going to be focusing on Part 1, which involves parsing multipart form data.
📝 Task 1: Analyze image input using the Face API
❓How do I parse image data?
In any HTML `❓What data is needed to parse the image?
Go to https://www.npmjs.com/package/parse-multipart for documentation and context on what the package does. Look specifically at the example in the "Usage" section and what they are doing, as we're going to do something similar. Notice that `multipart.Parse(body, boundary)` requires two parameters. I've already gotten the boundary for you – just like the documentation example, our boundary is a string in the format `"----WebKitFormBoundary(random characters here)"`. In the `multipart.Parse()` call, you need to figure out what the body parameter should be. Hint: It should be the request body. Think about the example Azure function. How did we access that? ```js //here's your boundary: var boundary = multipart.getBoundary(req.headers['content-type']); // TODO: assign the body variable the correct value var body = '🏕️ To move on, commit your new code to this repository and add your function URL to a repository secret named
FUNCTION_URL.Once it successfully parses an image, you can move on!