First of all, thank you to write a helpfull installation guide. I had an error. Please help on that. Step 4 ended with an error for me. Here is the ss:

I have made the path like that :
 Please help me about it
Open Ice-Panda opened 5 years ago
First of all, thank you to write a helpfull installation guide. I had an error. Please help on that. Step 4 ended with an error for me. Here is the ss:

I have made the path like that :
 Please help me about it
@krsad Hi, I think you can change the "cl.exe" dir path like this.
 And please ensure the priority of 'cl.exe' dir path~
First of all, thank you to write a helpfull installation guide. I had an error. Please help on that. Step 4 ended with an error for me. Here is the ss:
I have made the path like that :
Please help me about it
do not run python under anaconda, just run under visualstudio Command Prompt
Thanks for giving us the advice!
But I had tried a lot and eventually got stuck in steps 4, and when I open "vs2015 x64 本机工具命令提示符", the problem arise:
 Please help me out! Thanks a lot!
First of all, thank you to write a helpfull installation guide. I had an error. Please help on that. Step 4 ended with an error for me. Here is the ss:
I have made the path like that :
Please help me about it
Hi, have you figure it out? I have that problem too. And I have tried the ways @Ice-Panda and @opentld mentioned about, it still have that problem.
你好,必须用VS2015吗?如果用VS2013可以吗?
@qwarmq Yes, you have to use vs2015.
 你好我想问一下,这个问题该怎么办?
你好我想问一下,这个问题该怎么办?
First of all, thank you to write a helpfull installation guide. I had an error.I need your help urgently now! thank you~
 I have the error and want help!@Ice-Panda
你好,必须用VS2015吗?如果用VS2017可以吗?

你好,必须用VS2015吗?如果用VS2017可以吗?
我安装的是vs2019的,同时勾选了2015编译环境,实际使用2015可以编译成功
I have the error and want help!@Ice-Panda Please make sure that CUDA is installed correctly.
I have the error and want help!@Ice-Panda
环境变量没配置好,检查一下那个cl.exe的环境变量路径,我之前也卡在这一步
你好,必须用VS2015吗?如果用VS2017可以吗?
我安装的是vs2019的,同时勾选了2015编译环境,实际使用2015可以编译成功
非常感谢,这个问题按你方法解决了,但是编译结束提示这个错误
 我尝试了将Windows Kits/8.1/x64下的rc.exe和rcdll.dll两个文件拷贝到Microsoft Visual Studio 14.0\VC\bin目录下,仍然没有解决?想问下是否有其他解决方法呢?再次感谢!
Preface
What a good news that I've been already worked out the method to run demo.py on windows with GPU. Let's take a look at the results. Firstly, thanks to the author @eragonruan , #43 zhao181, #73 ZhuMingmin9123 and amberblade/gpu_nms_windows.
my hardware is: NVIDIA GTX970M
my environment is: windows 10 , python 3.6 , tensorflow-gpu 1.10, CUDA 9.0, cuDNN for CUDA 9.0, vs2017
These are proven to work properly. You can also download and install the corresponding version of CUDA and cuDNN for your own hardware. Due to version incompatibility between tensorflow and CUDA , please select the appropriate version to download and install after inquiry. The specific process is no more explained here. We need to compile with the following tools:
Let's do it
Some steps are the same as #73
step 1:make some change
cython_nms.pyx
Change "np.int_t" to "np.intp_t" in line 25 of the file lib\utils\cython_nms.pyx. Just one in this line, other "np.int_t" does not need to be changed. Otherwise appear " ValueError: Buffer dtype mismatch, expected 'int_t' but got 'long long' " in step 6.
gpu_nms.cpp
Change the generated file "gpu_nms.cpp" in line 2150:
to:
Otherwise the following error occurred in step 4:
step 2:updata c file
execute:cd your_dir\text-detection-ctpn-master\lib\utils execute:cython bbox.pyx execute:cython cython_nms.pyx execute:cython gpu_nms.pyx
step 3:create a new file named setup_new.py
step 4:build .pyd file
setup_new.py
The Python compiled version must be consistent with the runtime version execute:python setup_new.py install copy "bbox.cp36-win_amd64.pyd" and "cython_nms.cp36-win_amd64.pyd" to "your_dir\text-detection-ctpn-master\lib\utils"
setup.py
Before proceeding with this step, please be sure to add the "bin" folder containing compilation-related files such as "cl.exe" to the "System Environment Variable"
rewrite setup.py
Rewrite the file "setup.py", and all you need to do is modify the directory of cuda_libs and include_dirs
build gpu_nms.cp36-win_amd64.pyd
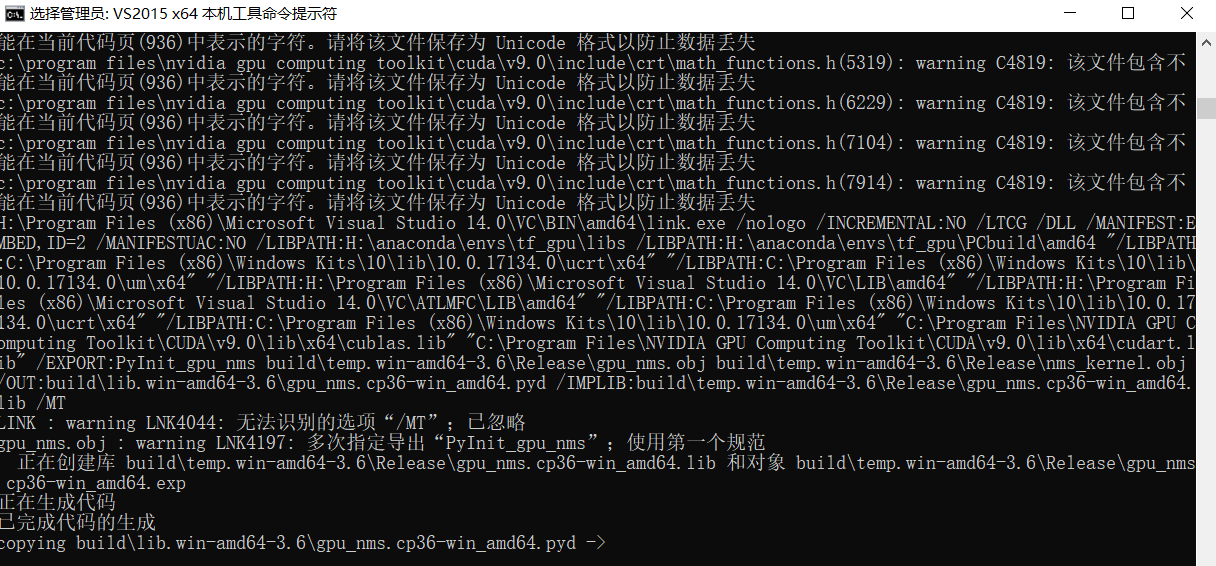
Open "VS2015 x64 本机工具命令提示符", activate your virtual environment execute:cd your_dir\text-detection-ctpn-master\lib\utils execute:python setup.py build_ext --inplace If you see the picture as follows, that means you've succeeded. Enjoy it~
step 5:make some change
change "base_name = image_name.split('/')[-1]" to "base_name = image_name.split('\\')[-1]" in line 24 of the file "ctpn\demo.py"
step 6:run demo
execute:cd your_dir\text-detection-ctpn-master execute:python ./ctpn/demo.py