ermtl / Open-Source-Ventilator

Complete control software for an emergency medical ventilator.
GNU General Public License v3.0
52 stars 30 forks source link

No schematic available #2

Closed ZakCodes closed 4 years ago

ZakCodes commented 4 years ago

As far as I know, there is currently no schematic of your system available on GitHub. Therefore, there's no way for people to understand how to reproduce your circuits.

If you haven't done your design in any CAD software, you can always post a drawing in the comments of this issue and someone could do the schematic in Fritzing, Eagle, KiCad, LibrePCB or whatever.

The important is for people to be able to reproduce your hardware as quickly as possible.

ermtl commented 4 years ago

You are right, a schematic diagram is in the Todo list and it would be important to have it. Would you like to do it ? (if possible with Kicad) That would really be helpful.

As of now, the various pins used are listed in the source code, here is the snippet:

//********************************   CONNECTION PINS   ********************************

#ifdef TM1638
#define  pin_Strobe_TM         2
#define  pin_Clock_TM          3
#define  pin_DIO_TM            4
#endif

#ifdef I2C
#define pin_SDA               A4
#define pin_SCL               A5
#endif

#ifdef Beeper
#define pin_Beep               8
#endif

#ifdef Led
#define pin_LED               13
#endif

#ifdef stepDirMotor
#define pin_Stepper_DIR        6
#define pin_Stepper_Step       7
#define StepGen
#endif

#ifdef disableMotorctrl
#define pin_Stepper_Disable    5
#endif

#ifdef CurrentSense
#define pin_current_Sense     A3  // do not use A6 or A7 presence detection needs a regular pin with pullup
#endif
ZakCodes commented 4 years ago

Sure! I only have experience with Eagle, but I'll figure out how to use KiCad and I'll do it. I'll try to be done with it today and I'll keep you updated with my advancements at least every day if I don't finish today. However, I live in Québec, so I'm in lockdown right now and I don't have much else to do.

ermtl commented 4 years ago

Nice ! KiCad 5 is much better than the previous versions, and it seems like a good time to learn it ...

BTW, I'm from Montreal.

ZakCodes commented 4 years ago

I did see that you were from Montreal from your Youtube Channel name lol. I'm from Montreal too, but I live in Gatineau right now. Are you at home right now or do you work for an essential service? Personnally I'm a student, so I'll be at home until May 1st.

ZakCodes commented 4 years ago

I have sketched out the schematic of what I think you've done and I think that I have everything right. image

However, I read the UK's Rapidly manufactured ventilator system specification and it is mandatory to have a 20min battery backup and to have an alarm go off whenever power gets disconnected.

I've searched for battery backup circuit on Google and I found circuits looking like this one again and again: image 
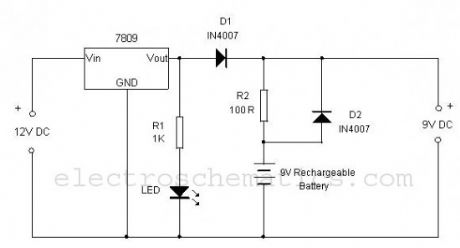
When the power is connected and the battery is slowing charging and the LED turns on. As soon as it's disconnected, the battery gets used instead and the LED turns off.

This circuit could be slightly modified so whenever the power get's disconnected, an alarm gets turned on. A voltage divider could also be used to read the battery's voltage and therefore level with the Arduino Nano.

ZakCodes commented 4 years ago

Here's what I mean: image

It might also be possible to find a 12V UPS

ermtl commented 4 years ago

Your first schematic diagram is incomplete. I see a nano, but not much else. The power supply is more complicated. To get torque from the motor, you need at least 24V 1A to 2A peak, so the supply needs a step-up converter. Nanos can withstand 12V, but it's not spike resistant, so we need a 2nd regulator for the +5V. The machine should be able to get power from a regular wall wart 9 or 12V, up to around 22V if people use a laptop supply (all without releasing the magic smoke). For the battery, I'm currently looking at designing a 3D printed socket for Bosch cordless drill batteries as they are ubiquitous, powerful and have their own charger. Maybe we should discuss this in the slack at https://osventilator.slack.com

If you do a schematic diagram, the first thing would be to start from the modules and show how to interconnect them. Maybe it's more of a Fritzing thing, after all...

ZakCodes commented 4 years ago

Fritzing would indeed probably be a better idea.

I tried to sketch the schematic while only knowing about the 7 parts listed in the README file of this project, so I didn't even realize that the motors were powered with 24V and that they had a charge pump circuit to make 24V out of 12V.

Now I've taken a closer look at the Youtube video you posted and I can't see where's your charge pump circuit.

Except for the charge pump circuit, is there anything else I need to change?

uxvrob commented 4 years ago

Hey @ZakCodes I've been working on adding this circuit to the OpenLung project.
Rev2 has some errors but should be fixed by tomorrow. The design most likely will diverge from Erics' so haven't add the beepers and TM1638. Would you like me to make an exact copy of the circuit like Eric's? https://gitlab.com/uxvrob/OpenLung/-/tree/feature/issue109/concepts/controller-concept-1/P1A1/kicad/sch_pdf

ZakCodes commented 4 years ago

You could do. I tried making the schematic for this project, but I genuinely don't understand how the motor are powered since Eric said they are powered with 24V and they need a charge pump circuit, but I don't have any details on whether he made a custom charge pump circuit or whether he's using an existing part.

I'm stuck right now, so if anyone knows how to do it, please do it, because I don't want to slow down anything.

uxvrob commented 4 years ago

Would a fritzing version be helpful? I can do the kicad schematic then perhaps you could help draw up a fritzing version for better visuals.

ermtl commented 4 years ago

ZakCodes: I actually use a 24V supply, but in a final version, we want it to also be compatible with 12V sources that are far more common, such as wall warts, 12V batteries, 20V drill batteries, 16V to 24V laptop supplies, etc ...

Thanks to uxvrob we now have a complete schematic diagram so that the controller can be tested.

Your schematic diagram is very clear, I don't see the need for a Fritzing version at this point as it would mean having to update both every time there is a change, it's as you wish, please tell me either way so that we can close the issue.

ermtl commented 4 years ago

uxvrob Is now doing the schematic diagrams for the project, thanks to everyone !