There's nothing more frustrating than a cable that doesn't stay where you put it. Falling down the back of the desk, the side of the bed, between the car seat and a whole host of other mildly frustrating scenarios. But if you add a knot of weight at one end of the cable then it stays where you left it. Stylish and functional, follow the steps below to make your own!
What you'll need
Half a stick of FixIts (or equivalent)
3m long charging cable (you can use shorter if you'd like)
Step 1
Take half a stick of FixIts, or 2 quarter sticks of different colours, heat them until soft and then roll in the palms of your hand to form a sphere. It can take a while for the FixIts to fully cool like this so if you want to help speed the cooling down you can run it under cold water whilst you keep rolling it in the palms of your hand.
Step 2
The type of knot we're going to be creating is more commonly known as a "Monkey Fist Knot". Prepare your cable (we've used a braided cable but it works with non braided) and place it on your palm as show with the large usb end facing down. Loop the long part of the cable around your non dominant hand as show (we'll refer to this as the Y axis loop) until it's about the same width as the ball of FixIts. With our cable that's 5 loops. Using your pinky finger as a holder continue as if you were going to do another loop but curl it around the pinky as shown.
Note: As you're looping the cable during all this, try to avoid kinks in the cable as that can damage the internal structure, don't fight the tension in the cable, try to twist it in the direction it wants to go before completing a loop.
Laying the cable down your palm with the large usb as the short end. Loop around your hand until width of the ball.
Step 3
Now, you're going to loop the cable around the outsize of the Y axis section forming what we'll refer to as the X axis. Looping from the bottom up, once again, the same amount of times as the width of your ball. From the pinky up you can see I have 5 rows of cables, the same as the Y axis.
2nd loop on the X axis
Step 4
Carefully remove your index and middle fingers from the loop you've created. You can change up your grip if this helps, just make sure you keep the shape of the loops. Then insert the FixIts ball into the centre of the loops you have.
Inserting FixIts ball into centre of cable loops
Step 5
Now, with the ball in the centre of the loops we're going to take the long end of the cable and create what we'll call the Z axis. Loop the cable over the X axis but under the Y axis, again the same amount of times as the previous loops. You'll be left with a loose knot that is beginning to form a ball, with the changing end of the cable being quite far from the ball.
Loop the cable over the X axis, but inside of the Y axis.
Step 6
Tighten and adjust from the charging end of the cable by pushing it through the loose loops you currently have. Make the length of the charging end shorter than you want it to be. Work this length through each part of the knot until you've made the knot much tighter and structured. But make sure it's still a little bit loose like the image below.
Adjust the cable to tighten the knot from the longest end first.
Step 7 (Final Step)
Finally adjust back the other way, tightening to form a firm knot as you work your way around. If once you reach back to the charging cable end you find that that end is too long then you can work it back again until the desired length.
Tighten the knot back in the final direction to finish it off
And there you have it, a weighted knot cable using FixIts.
What you'll need
Step 1
Take half a stick of FixIts, or 2 quarter sticks of different colours, heat them until soft and then roll in the palms of your hand to form a sphere. It can take a while for the FixIts to fully cool like this so if you want to help speed the cooling down you can run it under cold water whilst you keep rolling it in the palms of your hand.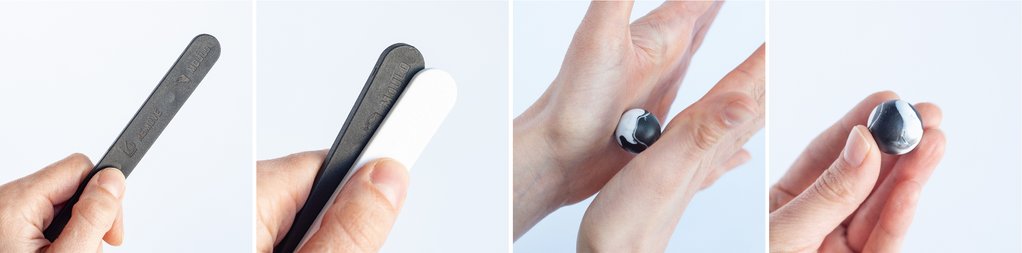
Step 2
The type of knot we're going to be creating is more commonly known as a "Monkey Fist Knot". Prepare your cable (we've used a braided cable but it works with non braided) and place it on your palm as show with the large usb end facing down. Loop the long part of the cable around your non dominant hand as show (we'll refer to this as the Y axis loop) until it's about the same width as the ball of FixIts. With our cable that's 5 loops. Using your pinky finger as a holder continue as if you were going to do another loop but curl it around the pinky as shown.
Note: As you're looping the cable during all this, try to avoid kinks in the cable as that can damage the internal structure, don't fight the tension in the cable, try to twist it in the direction it wants to go before completing a loop.
Laying the cable down your palm with the large usb as the short end. Loop around your hand until width of the ball.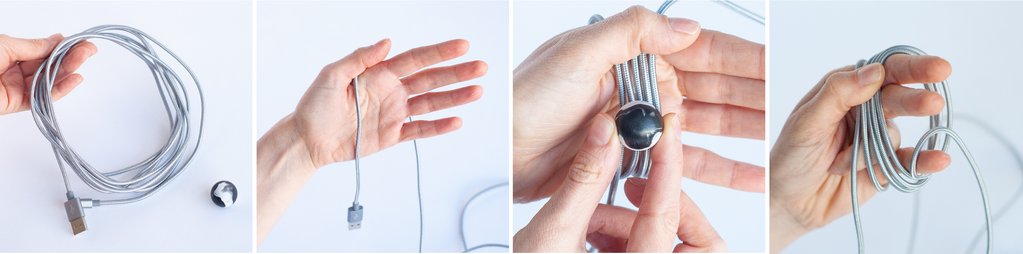
Step 3
Now, you're going to loop the cable around the outsize of the Y axis section forming what we'll refer to as the X axis. Looping from the bottom up, once again, the same amount of times as the width of your ball. From the pinky up you can see I have 5 rows of cables, the same as the Y axis.
2nd loop on the X axis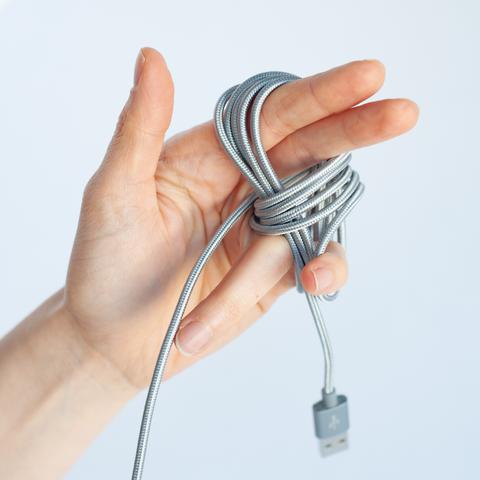
Step 4
Carefully remove your index and middle fingers from the loop you've created. You can change up your grip if this helps, just make sure you keep the shape of the loops. Then insert the FixIts ball into the centre of the loops you have.
Inserting FixIts ball into centre of cable loops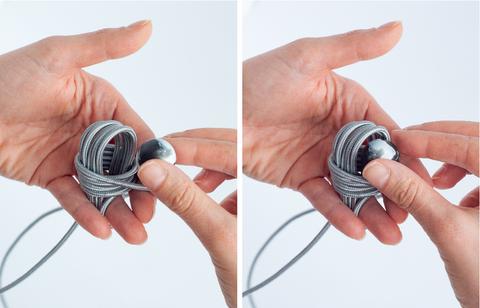
Step 5
Now, with the ball in the centre of the loops we're going to take the long end of the cable and create what we'll call the Z axis. Loop the cable over the X axis but under the Y axis, again the same amount of times as the previous loops. You'll be left with a loose knot that is beginning to form a ball, with the changing end of the cable being quite far from the ball.
Loop the cable over the X axis, but inside of the Y axis.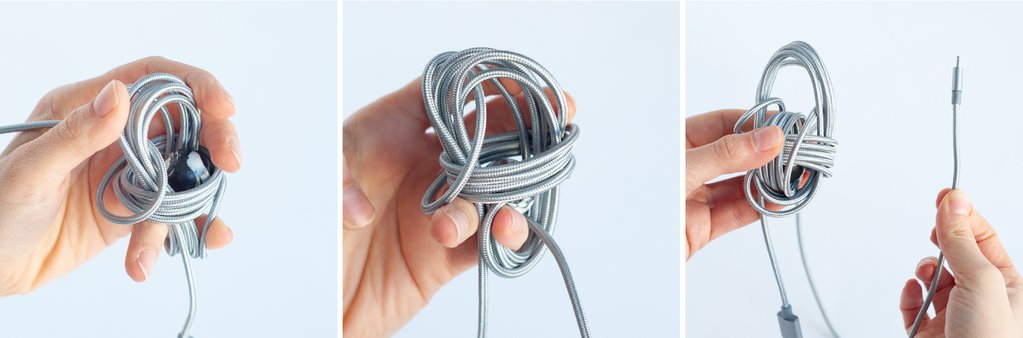
Step 6
Tighten and adjust from the charging end of the cable by pushing it through the loose loops you currently have. Make the length of the charging end shorter than you want it to be. Work this length through each part of the knot until you've made the knot much tighter and structured. But make sure it's still a little bit loose like the image below.
Adjust the cable to tighten the knot from the longest end first.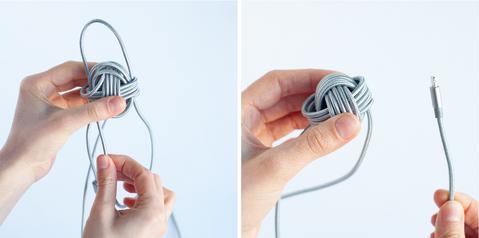
Step 7 (Final Step)
Finally adjust back the other way, tightening to form a firm knot as you work your way around. If once you reach back to the charging cable end you find that that end is too long then you can work it back again until the desired length.
Tighten the knot back in the final direction to finish it off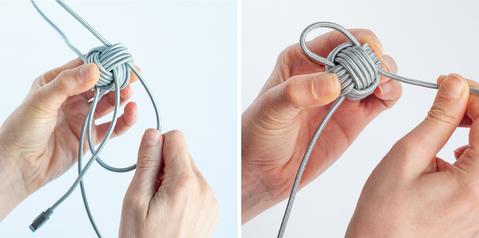
And there you have it, a weighted knot cable using FixIts.