Open goldEli opened 5 years ago
Declarative programming is a programming paradigm which focuse on what you do rather than how you do. It expresses the logic without explicitly defining the steps. What it means is we need declare the component depending on the computation of the log. It doesn't describe the control flow steps. Examples of declarative programming are HTML, SQL, JSX, etc.
Declarative programming is written in such a way that it describes what should be done. Imperative programming describes how to do it. In declarative programming, you let the compiler decide how to do the things. Declarative programming is easy to reading because of the code itself describe what is it doing.
Here is an example where we want to increment each element in an Array. with declarative, we are using map function and let the compiler do the rest. with imperative, we are writing all the control flow steps.
const numbers = [1,2,3,4,5,6]
// declarative programming
const doubleWithDec = numbers.map(number => number*2)
console.log(doubleWithDec)
// imperative programming
const doubleWithImp = []
for (let i = 0; i < numbers.length; ++i) {
const numberDouble = numbers[i] * 2
doubleWithImp.push(numberDouble)
}
console.log(doubleWithImp)
Functional programming is a part of declarative programming. Functions in javascript are first class citizen which means functions are data and you can save, retrieve, and pass those functions throughout your application.
There are some core concepts of functional programming:
Immutability means unchangeable. In functional programming, you can't change the data and it never changes. if you want to mutate or change the data, you have to copy data and change the copied version and uses it.
Prue functions are the functions which always take one or more arguments and computes on arguments and return data or functions. It doesn't have the side effect such as set a global state, changing application state and it always treats arguments as immutable data.
Higher-order functions are the functions which take functions as arguments or return function or sometimes they do both. The higher-order functions can manipulate other functions.
Array.map
, Array.filter
and Array.reduce
are higher-order functions since they take functions as arguments.
Recursion is a technique where the functions can call itself until the condition is met. It's better to use recursion instead of the loop whenever possible. You should be careful to use this since browsers can't handle too much recursion and throw errors.
In React, we divide the features into reusable pure functions and we have to put them together to make it product eventually. we combine all those smaller functions and eventually, you would get an application. It called composition.
There are a lot of methods or implementations to implement composition. one of we familiar method from javascript is chaining, Chaining invokes a function on the return value of the previous function with the dot notation.
In React, we use a different method other than chaining because of it hard to do chaining more functions like 30. The goal here is to combine all smaller functions to generate a higher order function.
React is a UI Library for building efficient user interfaces. It is a lightweight library which makes it popular. It follows the component design pattern, declarative programming paradigm, and functional programming concepts to make front end apps efficient. It uses virtual DOM to efficiently manipulates DOM. It follows the one-way data flow from higher order components to lower order components.
Angular is a full blown MVC framework and comes with a lot of opinionated features such as servers, templates, directives, resolvers, etc. React is a very lightweight UI library which focuses only on the view part of MVC. Angular follows two-directional data flow whereas React follows uni-directional data flow which is top to down approach. React gives a lot of freedom for developers when it comes to developing features. For examples, the way you call API, routing, etc. you don't have to include router library unless you need it in your project.
React use virtual DOM to update real DOM which makes it efficient and faster. Let's discuss those in detail.
The browser follows HTML instructions to document object model or DOM. All the elements became DOM elements when the browser load HTML and renders the user interface.
DOM is a hierarchy of elements starting with the root element. For example, look at the following HTML:
<div>
<div>
<h1>This is heading</h1>
<p>this is paragraph</p>
<div>
<p>This is just a paragraon</p>
</div>
</div>
<div>
<h1>This is heading</h1>
<p>this is paragraph</p>
<div>
<p>This is just a paragraon</p>
</div>
</div>
<div>
<h1>This is heading</h1>
<p>this is paragraph</p>
<div>
<p>This is just a paragraon</p>
</div>
</div>
</div>
When you load this HTML in the browser, all the HTML elements translate DOM elements like blew.
When it comes to SPA application. you load the index.html for the first time and updated data or another HTML in that index.html. As users navigate through the site, we update the same index.html with the new content. Every time DOM changes, the browser recalculates the CSS, do layout, and repaint the web page.
React use Virtual DOM to construct DOM efficiently, which makes it a very complicated and time-consuming task of DOM manipulation easier for us. React abstracts away all this from developers to build the efficient UI with the help of Virtual DOM.
Virtual DOM is nothing but javaScirpt object representation of real DOM. Updating javaScript object is easier and faster when compared with updating the real DOM. With this in mind, let's see how it works.
React keeps the entire copy of DOM as a virtual DOM.
Whenever there is an update comes, It miantains tow virtual DOMs to compare the previous state and current state and figures out what objects have ben changed. For instance, paragraph text changed to change.
Now It finds out the changes by comparing two virtual DOMs and sends throse updates to real DOM.
Once real DOM updates, the UI updates as well.
JSX is a syntax extension to javascript. It's a template language with the full power of javascirpt. It produces React elements which will be rendered in the DOM. React recommands use JSX for components. In JSX, we combine both HTML and Javascript and produces React elements which can be rendered in the DOM.
Here is an example of JSX, we can see how we are combining javascript and HTML. If there is any dynamic variable included in HTML, we should use the expression language {}
function App() {
const content = "Hello World!"
return (
<div>{content}</div>
)
}
Everything is a component in React. We usually break up the entire logic of the application into small individual pieces. We call each individual piece as a component. In general, A component is a javascript function which takes the input, process it and return React element which renders in the UI.
There are different types of components, let's see throse in detail.
A functional or stateless component is pure function which takes props or no props and returns React element. There are pure functions which don't have any side effects. Those components don't have state and lifecycle methods。Here is an example.
import React from 'react'
export const App = (props) => {
return <div>{props.name}</div>
}
Class or stateful components hava state or lifecycle methods and it can change the state of the component with the help of this.setState
. Class components create by extending React.component
and it is initialized in constructor and might have child components as well. Here is an example.
import React from 'react
import ToDoList from './ToDoList'
export default class Dashbord extends React.component{
constructor(props){
super(props)
this.state = {}
}
render() {
return(
<div >
<ToDoList />
</div>
)
}
}
}
Controlled component is technique which handles input form, Form elements typically maintain there own state, React maintain state in the state property of the component. we can combine both to control input forms, This is call it a controlled component. So, In controlled component form data is handled by React component.
Here is an example. when user enter the name on todo item and we can invoking javascript function onChange()
to caputure the value of every keystroke and put it into the state so that we can use the data from the state in onSubmit()
.
import React from 'react';
import Form from 'react-bootstrap/Form';
import Button from 'react-bootstrap/Button';
import Row from 'react-bootstrap/Row';
import Col from 'react-bootstrap/Col';
export class ToDoForm extends React.Component {
constructor(props) {
super(props);
this.state = {value: ''};
this.handleChange = this.handleChange.bind(this);
this.handleSubmit = this.handleSubmit.bind(this);
}
handleChange(event) {
this.setState({value: event.target.value});
}
handleSubmit(event) {
alert('A name was submitted: ' + this.state.value);
event.preventDefault();
}
render() {
return (
<div className="todoform">
<Form>
<Form.Group as={Row} controlId="formHorizontalEmail">
<Form.Label column sm={2}>
<span className="item">Item</span>
</Form.Label>
<Col sm={5}>
<Form.Control type="text" placeholder="Todo Item" />
</Col>
<Col sm={5}>
<Button variant="primary" type="submit">Add</Button>
</Col>
</Form.Group>
</Form>
</div>
);
}
}
Most of times it is recommended to use a controlled component, but there is an alternative approach called uncontrolled component to handle form data for this by using Ref
. In controlled component, Ref
used to access form value directly from the DOM instead of event hendles.
Here is an example. We create the same form with Ref
instead of using React state. Wo define Ref
with React.createRef
and pass that input form and accessing form value directly from the DOM in hanldeSubmit
method.
import React from 'react';
import Form from 'react-bootstrap/Form';
import Button from 'react-bootstrap/Button';
import Row from 'react-bootstrap/Row';
import Col from 'react-bootstrap/Col';
export class ToDoForm extends React.Component {
constructor(props) {
super(props);
this.state = {value: ''};
this.input = React.createRef();
this.handleSubmit = this.handleSubmit.bind(this);
}
handleSubmit(event) {
alert('A name was submitted: ' + this.input.current.value);
event.preventDefault();
}
render() {
return (
<div className="todoform">
<Form>
<Form.Group as={Row} controlId="formHorizontalEmail">
<Form.Label column sm={2}>
<span className="item">Item</span>
</Form.Label>
<Col sm={5}>
<Form.Control type="text" placeholder="Todo Item" ref={this.input}/>
</Col>
<Col sm={5}>
<Button variant="primary" onClick={this.handleSubmit} type="submit">Add</Button>
</Col>
</Form.Group>
</Form>
</div>
);
}
}
Container components are the components which deal with feching data, subscribing to redux store
. They contain presentational components and other container components. But they don't have any HTML in it.
Higher Order Components are the components which take a component as a argument and produce another component. Redux connect
is the example of a higher order component. This is a powerful technique for producing reusable components.
Props are read-only properties which are passed to the components to render the UI and with the state, we can change the output of the component over time.
Here is an example of a class component which has both props and state defined in the constructor. Whenever we modify the state with this.setState
, render
function will be called again to change the output of the component in the UI.
import React from 'react';
import '../App.css';
export class Dashboard extends React.Component {
constructor(props){
super(props);
this.state = {
name: "some name"
}
}
render() {
// reading state
const name = this.state.name;
//reading props
const address = this.props.address;
return (
<div className="dashboard">
{name}
{address}
</div>
);
}
}
Type-checking is important for your app as grows bigger and bigger over time. PropTypes provides type checking for your component and serves as nice documentation to other developers. It's always recommended to add PropTypes for your component as your project is not in Typescript.
We can also define Default props for each component to display if the component doesn't receive any props.
Here is an example, UserDisplay
has three props: name
, age
, and address
, and we are defining default props and prop types for those.
import React from 'react';
import PropTypes from 'prop-types';
export const UserDisplay = ({name, address, age}) => {
UserDisplay.defaultProps = {
name: 'myname',
age: 100,
address: "0000 onestreet"
};
return (
<>
<div>
<div class="label">Name:</div>
<div>{name}</div>
</div>
<div>
<div class="label">Address:</div>
<div>{address}</div>
</div>
<div>
<div class="label">Age:</div>
<div>{age}</div>
</div>
</>
)
}
UserDisplay.propTypes = {
name: PropTypes.string.isRequired,
address: PropTypes.objectOf(PropTypes.string),
age: PropTypes.number.isRequired
}
we should not modify the state directly, the only place to assign the state is in the constructor. Updating the state directly doesn't trigger the re-render. React merge the state when we use this.setState
.
// wrong way
this.state.value = 123
// right way
this.setState({value: 123})
It's always safe to use the second form of this.setState
, because props and state updated are asynchonous. Here we are updating the state base on props
// wrong way
this.setState({
value: this.state,value + this.props.value
})
// right way
this.setState((props, state) => {
value: state,value + props.value
})
Component goes through a series of the lifecycle method as it enters and leaves the DOM. Let's see those lifecycles.
This lifecycle method is called when the component enters the DOM and you have the last chance to edit the state so that it will be displayed on the screen. It occurs only once.
This lifecycle method is called when the component entered the DOM and you call the API. It occurs only once.
Whenever there is a change in the props, the component enters into the update phase, the lifecycle method is called to receive the props. You can check the current props and previous props and you can update the state depend on the result.
The lifecycle method is called whenever there is a change in props or state and it returns the boolean value true by default. we can return false if we don't want to render the DOM for this change. It's really useful to improve the perfomance of the app.
Whenever there is a change in props or state, the lifecycle method is called, we can have a chance to access the state and edit it before rendering the UI.
The lifecycle method is called when there is an update to the component is complete. Never call this.setState
in the lifecycle.
The lifecycle is called before the component get remove from the DOM. It's right place to remove the third library or clean all the events.
This lifecycle method is used in ErrorBoundary. Actually, any component became error boundary class of it use this lifecycle method. It's used to render the fallback UI if something goes wrong in the component tree instead of displaying some wired errors on the screen.
This lifecycle method is used in ErrorBoundary. Actually, any component became error boundary class of it use this lifecycle method. It's used to log the errors if something goes wrong in the component tree.
React always use composition over inheritance. We already discussed what is composition in the functional programming section. This is a technique of combining simple reusable component to generate a higher-order component. Here is an example of composition, we use two small components TodoForm
and TodoList
in the dashboard component.
import React from 'react';
import '../App.css';
import { ToDoForm } from './todoform';
import { ToDolist } from './todolist';
export class Dashboard extends React.Component {
render() {
return (
<div className="dashboard">
<ToDoForm />
<ToDolist />
</div>
);
}
}
There are three ways to apply styles to React component
In this method, we can import the external stylesheet to the component use classes, But we should use className
instead of class
to apply styles for the React elements. Here is an example:
import React from 'react';
import './App.css';
import { Header } from './header/header';
import { Footer } from './footer/footer';
import { Dashboard } from './dashboard/dashboard';
import { UserDisplay } from './userdisplay';
function App() {
return (
<div className="App">
<Header />
<Dashboard />
<UserDisplay />
<Footer />
</div>
);
}
export default App;
In this method, we can directly pass the props to the HTML element with the property called style
. Here is an example, the important thing we should notice here is that we are passing javascript object to the style prop, that why we use backgroundColor
instead of the CSS way background-color
.
import React from 'react';
export const Header = () => {
const heading = 'TODO App'
return(
<div style={{backgroundColor:'orange'}}>
<h1>{heading}</h1>
</div>
)
}
Since we are passing javascript object to style
property, we can define a style object in the component and use it. Here is an example, we are passing the style object down the component tree as props as well.
import React from 'react';
const footerStyle = {
width: '100%',
backgroundColor: 'green',
padding: '50px',
font: '30px',
color: 'white',
fontWeight: 'bold'
}
export const Footer = () => {
return(
<div style={footerStyle}>
All Rights Reserved 2019
</div>
)
}
Redux is a state management library for the React. It is base on flux. Redux facilitates the one way data flow in React. Redux abstracts state management away from React entirely.
In react, the component are connected to Redux stone, if you want to access Redux stone. you should dispatch an action containing id and payload. The payload in action is a optional. The action forward it to reducer.
When the reducer receives the action, it will compare the action id with the predefined case statements, when it matches, it will change the accordingly state for corresponding action and return the new state.
When the redux state changes, the component connected to the redux store well receive the new state as the props. When the component receives the new props, it will get into the update phase and renders the UI.
Let see the whole redux cycle in detail.
Action: Action is nothing but the JSON object with type and payload, Type is mandatory and the payload is optional. Here is an example of action:
// action
{
type:"SEND_EMAIL",
payload: data
};
Action creator: Those are functions which create ations so that we don't have to write every action manually in our component when we dispatch an action. Here is an example of an action creator.
// action creator
export function sendEmail(data) {
return { type:"SEND_EMAIL", payload: data};
}
Reducer: Reducer is a pure function which takes action and current state and compute the nesissary logic and return a new state. It dosen't mutate the state instead awayls return the state. Here is an example of reducer.
export default function emailReducer(state = [], action){
switch(action.type) {
case "SEND_EMAIL": return Object.assign({}, state, {
email: action.payload
});
default: return state;
}
}
mapStateToProps:This function map state to your props whenever there is a change in the state you receive a new state as props. This is how we subscribe to the redux store.
mapDispatchToProps:This function used to bind your action creators as props so that you can dispatch an action using this.props.actions.sendEmail()
.
connect
and bindActionCreator
are from the redux library. The former is used to connect the redux store and the laster is used to bind your action creator to your props.
// import connect
import { connect } from 'react-redux'
import { bindActionCreators } from 'redux'
// import action creators
import * as userActions from '../../../actions/userActions';
export class User extends React.Component {
handleSubmit() {
// dispatch an action
this.props.actions.sendEmail(this.state.email);
}
}
// you are mapping you state props
const mapStateToProps = (state, ownProps) => ({user: state.user})
// you are binding your action creators to your props
const mapDispatchToProps = (dispatch) => ({actions: bindActionCreators(userActions, dispatch)})
export default connect(mapStateToProps, mapDispatchToProps)(User);
We navigate through pages in the large web applications and react-router-dom
is a library for the routing in the app. The routing capabilities don't come with react. We have to install react-router-dom
separately, we need to install react for react-router-dom
to work.
react-router-dom
provides two routers broswerRouter
and hashRouter
, the former is used if you have a server serving static pages, the latter is used if you render the component by the hash in the url.
BroswerRoute
and HashRoute
are routers.Route
is used for route matching.Link
is used to create links which render as an anchor tag in the HTML.NavLink
is a special Link
which highlights the currently active Link
.Switch
is not required, but it's useful when combining the routes.Redirect
is used to force the navigation in the component.Here is an example of Link
, Route
, and Redirect
.
// normal link
<Link to="/gotoA">Home</Link>
// link which highlights currently active route with the given class name
<NavLink to="/gotoB" activeClassName="active">
React
</NavLink>
// you can redirect to this url
<Redirect to="/gotoC" />
Here is an example of react-router-dom. We are matching the path and render the appropriate component by using Switch
and Route
:
import React from 'react'
// import react router DOM elements
import { Switch, Route, Redirect } from 'react-router-dom'
import ComponentA from '../common/compa'
import ComponentB from '../common/compb'
import ComponentC from '../common/compc'
import ComponentD from '../common/compd'
import ComponentE from '../common/compe'
const Layout = ({ match }) => {
return(
<div className="">
<Switch>
<Route exact path={`${match.path}/gotoA`} component={ComponentA} />
<Route path={`${match.path}/gotoB`} component={ComponentB} />
<Route path={`${match.path}/gotoC`} component={ComponentC} />
<Route path={`${match.path}/gotoD`} component={ComponentD} />
<Route path={`${match.path}/gotoE`} component={ComponentE} />
</Switch>
</div>
)}
export default Layout
In react, we usually have a component tree. If an error happens in any one of the components, it will break the whole component tree. There is no way of catching these errors. We can gracefully handle those errors with Error Boundaries
.
Error Boundaries does two things:
Here is an example of ErrorBoundary class. Any class becomes ErrorBoundary if it implements any lifecycle of getDeviedStateFromError
or componentDidCatch
, the former return {hasError: true}
to render the fallback UI and the latter is used to log errors.
import React from 'react'
export class ErrorBoundary extends React.Component {
constructor(props) {
super(props);
this.state = { hasError: false };
}
static getDerivedStateFromError(error) {
// Update state so the next render will show the fallback UI.
return { hasError: true };
}
componentDidCatch(error, info) {
// You can also log the error to an error reporting service
console.log('Error::::', error);
}
render() {
if (this.state.hasError) {
// You can render any custom fallback UI
return <h1>OOPS!. WE ARE LOOKING INTO IT.</h1>;
}
return this.props.children;
}
}
Here is how we can use ErrorBoundary in one of the components. We are wrapping TodoForm
and TodoList
with the Error boundary. If any error occurs in those components. We will log the errors and display the fallback UI.
import React from 'react';
import '../App.css';
import { ToDoForm } from './todoform';
import { ToDolist } from './todolist';
import { ErrorBoundary } from '../errorboundary';
export class Dashboard extends React.Component {
render() {
return (
<div className="dashboard">
<ErrorBoundary>
<ToDoForm />
<ToDolist />
</ErrorBoundary>
</div>
);
}
}
In React, We need to have a parent element While returning React element from the component. Sometimes it is annoying to put an extra node into DOM. with fragments, we don't need to put an extra node into DOM. All we need to wrap the content with React.Fragments
or with shorthand notation <>
.
Here is an example, with fragments, we don't need to put an extra div into DOM if it is not impossible.
// Without Fragments
return (
<div>
<CompoentA />
<CompoentB />
<CompoentC />
</div>
)
// With Fragments
return (
<React.Fragment>
<CompoentA />
<CompoentB />
<CompoentC />
</React.Fragment>
)
// shorthand notation Fragments
return (
<>
<CompoentA />
<CompoentB />
<CompoentC />
</>
)
By default, all children component renders on the UI depending on the component hierarchy. Portals make it possible to render the children component outside of the DOM hierarchy of the parent component.
Here is an example, parent component has children component in the DOM hierarchy.
We can move the children component out of the parent component and attach to the DOM node id someid
.
First, we get reference id and create an element div in the constructor
and append to the node someRoot
in the componentDidMount
. Finally, we pass the this.props.children
to the particular DOM with the help of React.createProtail()
.
const someRoot = document.getElementById('someid');
class Modal extends React.Component {
constructor(props) {
super(props);
this.el = document.createElement('div');
}
componentDidMount() {
someRoot.appendChild(this.el);
}
componentWillUnmount() {
someRoot.removeChild(this.el);
}
render() {
return ReactDOM.createPortal(
this.props.children,
this.el,
);
}
}
Sometimes we have to pass the props down to the component tree although the middle components don't need those. The context is a way to pass the props without passing down the component tree on every level.
Hooks are a new feature in react from version 16.8, before that we can't use the state in functional components since they aren't a class component. Hooks make it possible to use the state and other features in the functional component without a class.
There are no breaking changes at this time, we don't have to abandon out the class component yet. With Hooks, we can take out stateful logic and can be tested independently and let we use react without classes. There are a bunch of Hooks that we can use such as useState
, useEffect
,useContext
, useReducer
, ect.
there are fundamental rules of using Hooks:
Let's see an example to understand the hooks. This is a functional component which takes props and displays those on the UI. We convert the functional component into the stateful component with the help of a useState
hook.
useState
return two items one is user
and another is setUser
. user
is an object which can be used directly and setUser
is a function which can be used to set the state.
import React, { useState } from 'react';
export const UserDisplay = ({name, address, age}) => {
const [user, setUser] = useState({ name: 'myname', age: 10, address: '0000 onestreet' });
return (
<>
<div>
<div class="label">Name:</div>
<div>{user.name}</div>
</div>
<div>
<div class="label">Address:</div>
<div>{user.address}</div>
</div>
<div>
<div class="label">Age:</div>
<div>{user.age}</div>
</div>
<button onClick={() => setUser({name: 'name changed'})}>
Click me
</button>
</>
)
}
There are a number of ways that we can improve your app performance. There are important ones:
componentShouldUpdate
lifecycle method apporpretily. It aviod unnecessarily render for the child component. If you have 100's of components down the tree, not re-render the entire component tree definitely improve your app performance.Always use create-react-app
to scaffold the project, this creates entire project structure out of the box with a lot of optimizations.
Immutability data is the key to improve performance, instated of mutating the data, always create new collectiond on the top of the existing one to keep copying minimum which could improve performance.
Use the keys when you display lists or tables, this makes the react dose update much faster.
Make sure you ship the production build for the production
Code splitting is the technique of diving the code into separate files, and load those files when necessary for that module or section.
The single-page application reloads index.html
in DOM first and then loads the content as the user navigates through the pages or gets any data from the backend API in the same index.html
.
When you reload the page by hitting the reload buttion in the browser, the entire application reloads and we well lose the state of the application. How can you preserve the app state?
We use the borwser local storage
to perserve the state of the application whenever we reload the app. We keep the entire state of the application and whenever these is a page reload or refresh, we load the state from the browser local storage
.
We use redux-thunk
to make the API call, since reducers are pure functions, there should not be any side effect such as an API call, we have to mack an API call from action creators. the action dispatch an action putting the data from the API in the playload of the action, reducers recevie the data as we discussed in the redux cycle above and the rest of process is the same as well.
redux-thunk
is a middleware,once it is included, every dispatch pass through the redux-thunk
if it is a function and it just waits until the function process and returns a response if it is an object and it just processes normally.
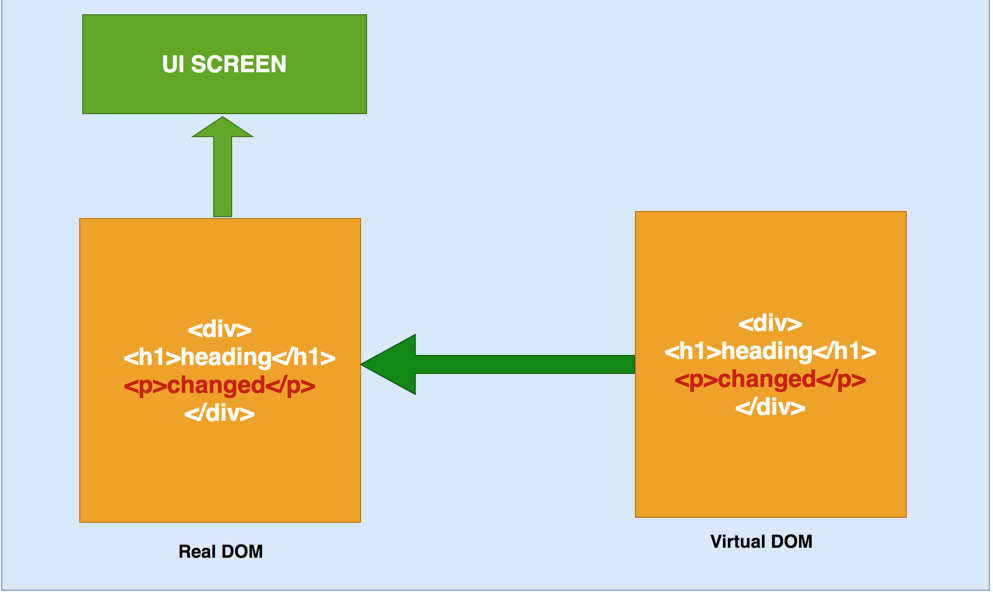
React is one of the most popular javascript libraries and it's going to be more popular in 2019 and beyond. React is released in 2013 and it gained a lot of popularity over the years. It's a declarative, component-based and efficient javascript library for building user interfaces.