grbl / grbl

An open source, embedded, high performance g-code-parser and CNC milling controller written in optimized C that will run on a straight Arduino
https://github.com/gnea/grbl/wiki
Other
5.62k stars 3.09k forks source link

Probing - Wiring Setup.and usage. #464

Closed Protoneer closed 10 years ago

Protoneer commented 10 years ago

I had a quick look at the Wiki page but there were very little details about the probing feature in V0.9.

My questions are around: x How does the wiring work? x What kind of probes can be used? x General overview of the probing process...

Thanks.

gerritv commented 10 years ago

Form the Readme in Edge: The G38.2 straight probe and G43.1/49 tool offset g-code commands are now supported. A simple probe switch must be connected to the Uno analog pin 5 (normally-open to ground). Grbl will report the probe position back to the user when the probing cycle detects a pin state change. (https://github.com/grbl/grbl/blob/edge/README.md). Whatever probe you design should be able to handle some over travel, the Z movement likely won't stop immediately. Some sort of spring arrangement would do.

So the probe is anything that will take pin A5 to ground when it touches your object. The probe position is relative to machine 0. A typical porbe command might be G38.2 X20 Y15 Z-100 (in mm mode). You should set a slow feed rate , e.g. F20 (20mm/min). The G38 will move to X and Y, then Z axis will lower to -100 until the probe makes contact with your object, at which time movement stops. Grbl will report the machine position of the probe touch. E.g.

g38.2 x5y6z-100 [PRB:0.030,0.040,-0.645](this is what comes back from Grbl when the probe switches to ground) A typical cycle might look like: N01 set feedrate N02 G0 X(pos1) Y(pos2) N03 G38.2 Z-100 N04 G0 Z0 (retract probe) change to new pos1 and pos2 Repeat from N02

If using Mach3 or LinuxCNC, then this would work directly: http://www.scorchworks.com/Gcoderipper/gcoderipper.html. Grbl doesn't do variables (yet/never?) so you would need to write some sort of preprocessor to handle the operation based on the gcode that GcodeRipper outputs. But it can be done. Just run gcode ripper on one of your gcode files and look at its output, you will see the sequence of operations.

gerritv commented 10 years ago

Including the feedrate in the same block as probe command will work as well, the resulting code is shorter G0 F1000 X20 Y30 Z0 (position probe at high speed) G38.2 F10 Z-100 (moves probe toward table at 10mm/sec)

chamnit commented 10 years ago

@Protoneer : Yep. @gerritv is right. Grbl just detects a pin change on the probe pin, so any kind of device could work on it. I left it up to the user to determine what that is. A few examples that I know of are a tool length offset touch-off pad in the Carbide 3d Nomad 883 machine, a DIY touch-probe could work on this, and quick auto-leveling using John Lauer's Chilipeppr. I think he has a few videos on quick ways to do this when setting up to mill a PCB.

LaserEngraver commented 7 years ago

Thank you very much for your answers. Unfortunatelly, Pin5 is connected to one pin of the A4988 Stepper Motor Drivers :-( So I have to choose an other one, but it´s hard to say, which one is free on my Eleks Maker Board.

jahnj0584 commented 7 years ago

Probe goes to A5,not 5

On Oct 6, 2017 11:52 AM, "LaserEngraver" notifications@github.com wrote:

Thank you very much for your answers. Unfortunatelly, Pin5 is connected to one pin of the A4988 Stepper Motor Drivers :-( So I have to choose an other one, but it´s hard to say, which one is free on my Eleks Maker Board.

— You are receiving this because you are subscribed to this thread. Reply to this email directly, view it on GitHub https://github.com/grbl/grbl/issues/464#issuecomment-334777903, or mute the thread https://github.com/notifications/unsubscribe-auth/AQlzDNG_KLQKiohflvPDQ78Z_-EcJJajks5spj7AgaJpZM4CV18k .

LaserEngraver commented 7 years ago

ooopppppssss thank you :-)

LaserEngraver commented 7 years ago

O.K. probe sequence is working with: N10 G38.2 Z-120 F500 N20 G10 L20 P1 Z0 N30 G91 G0 Z3

But...... if an end-Switch will be touched, the axis stops at once and retracts in the other direction. If now the PROBE-Sequence is running and the Switch will be touched, the axis Need some mm to stop (like a ramp). This is not so good, because a milling tool would be pressed into the part. What Need to be changed in the grbl-file that in case of probing the axis will stop at once when the Switch is "activated"?

thx

DEF7 commented 6 years ago

I've been using the probe pin successfully (after the addition of a capacitor to eliminate false positives) for a long while now, but need to probe off unconductive materials - so I built a 3D touch probe of the always-on type. I know I need to invert the pin, but I'm unsure about this 'pull-down resistor' stuff. Does this mean that there will be a resistor in parallel to the probe itself, effectively shorting the probe pin to ground while the probe already is? When the probe stylus makes contact and breaks the circuit, then only the resistor will be grounding the probe pin? So, at no point is the pin actually floating high (due to the internal pull-up resistor)?

LaserEngraver commented 6 years ago

Hi, I can´t answer your question about the capacitor, because I don´t use any. But I think you need to insert it in paralell to the switch. Why you need to invert the pin, because of an nc-used switch?

Now my process looks like following: I inserted a microswitch into a case. It´s a normally open one with a long pcs of metal (to have a long "spring"-way after 1st contact).

Now I have to add this switch on top of the material (if material thickness is increased, the switch is on a higher position). Then I run the probe-sequence with fast z-movement. After switch has been activated, the z-axis will lift up 10mm and move then down again, but now with really low speed, to stop directly after the switch is 2nd activated. Then z will be lifted up 0,5 mm again and stop. The new 0-point will be stored into the arduino to keep it if you need more parts with similar thickness.

The code looks like: N10 G38.3 Z-140 F500 N20 G91 G0 Z10 N30 G10 L20 P1 Z0

N10 G38.3 Z-140 F50 N20 G91 G0 Z0.5 N30 G10 L20 P1 Z0

Hope this helps you.

DEF7 commented 6 years ago

No, that doesn't help me. I've already been using the A5 pin to detect when the cutter contacts a conductive surface for years. This doesn't help with wood/plastic, which requires that I carefully adhere and flatten out foil onto the surface - something that is a big waste of my time, especially when I can make a probe and use that instead. Grbl supports inverting the pin specifically for these types of probes, but I'm unclear as to the pulldown resistor aspect. I'm not here to ask whether or not I need a touch probe, that wasn't my question. That boat has sailed, I already spent all my free time in the last week designing and making the probe, now I just need to know exactly what wiring it up entails.

DEF7 commented 6 years ago

I made a probe that's just like these:

https://hackaday.com/2011/06/09/diy-cnc-touch-probe/ http://gtocs.blogspot.com/2012/04/garys-diy-cnc-touch-probe.html https://www.thingiverse.com/thing:721620

and from forum posts I've dug up on the web people have been using them just fine with Grbl, but the threat of 'frying the arduino' as stated on the Github page if a pulldown resistor is not used makes me nervous. It also doesn't make sense because when using the probe pin while not inverted also fry the electronics when contact is made and GND is directly hooked up to the probe pin via cutter + worksurface?

I'm wondering if the resistor is even necessary.

thawkins commented 6 years ago

just buy a small piece of copper clad blank printed circuit board, and solder a wire to one corner. that then becomes a flat conductive surface to lay ontop of the work while probing. alternativly i small piece of metall sheet with one corner bent up, and a hole drilled thought it would allow attachment of a wire with a nut and bolt. it does not matter what it is so long as the thickness is known.

109JB commented 6 years ago

just buy a small piece of copper clad blank printed circuit board, and solder a wire to one corner. that then becomes a flat conductive surface to lay ontop of the work while probing.

That works great for setting tool length, but not so much for things such as detecting a hole center, probing an edge, mapping a contoured surface, etc. For things like that an actual probe works well.

Also, for tool setting, a non-pliable surface can result in chipping of tools particularly if the probing speeds are too fast, or if the tool is carbide. Keep the probe speeds low enough and it should be fine for HSS tools.

DEF7 commented 6 years ago

just buy a small piece of copper clad blank printed circuit board, and solder a wire to one corner. that then becomes a flat conductive surface to lay ontop of the work while probing. alternativly i small piece of metall sheet with one corner bent up, and a hole drilled thought it would allow attachment of a wire with a nut and bolt. it does not matter what it is so long as the thickness is known.

My goal is to map the top surface of a workpiece for a V-carving, which is very sensitive to an irregular surface because it can totally ruin the end result if not planed out or compensated for, and because I work with various pieces of degraded wood (for aesthetic) the goal is to not plane the top surface perfectly flat. Yes, if your one and only goal is to figure out just where the tool is relative to the top surface of the workpiece then a simple little contact piece sitting on there with a known thickness is just fine. My purposes are a bit more involved than that though.

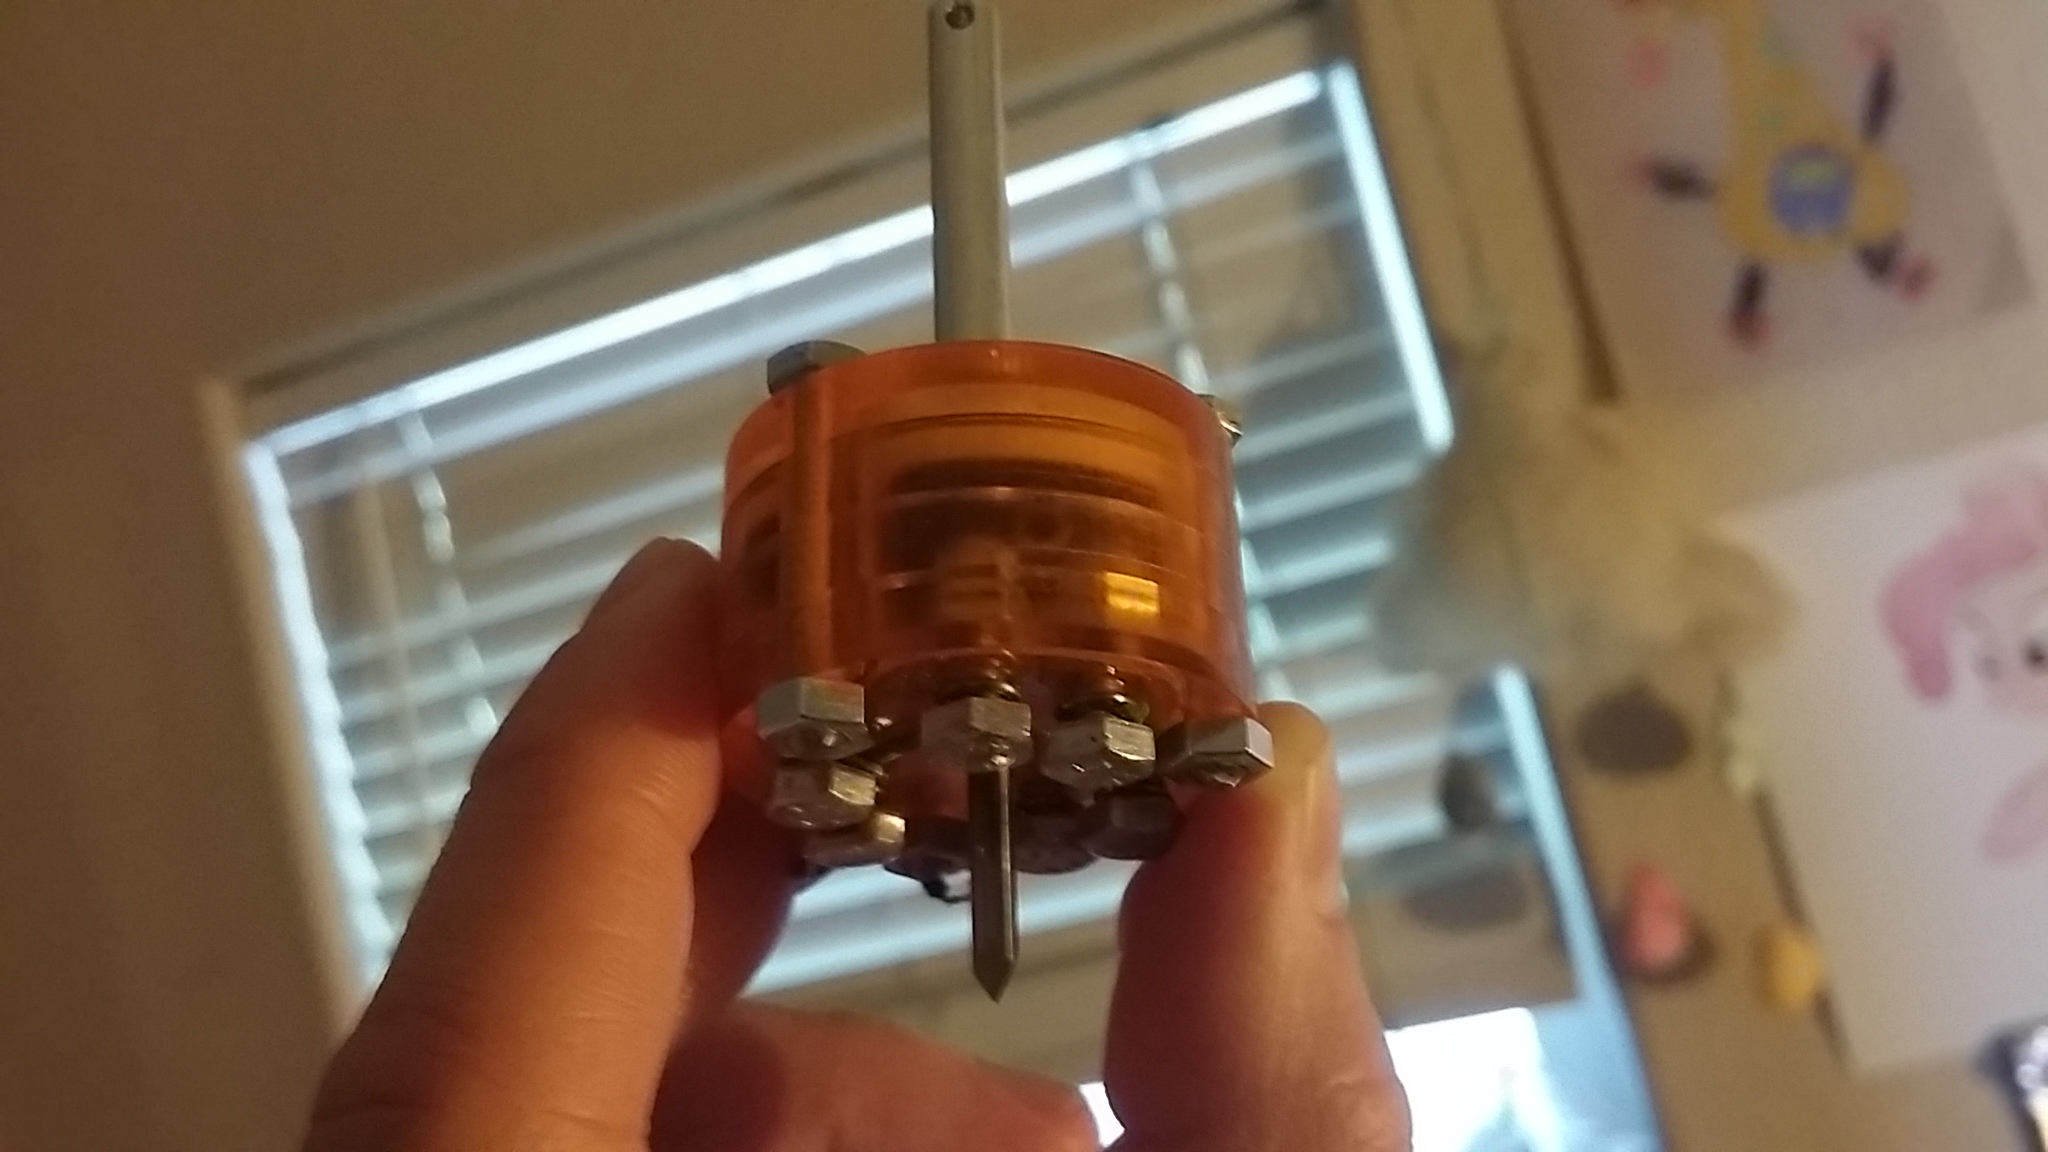
I've been having no problems whatsoever with my custom-made 'always-on' probe:

image

image

image

image

Originally I planned to just buy one off Ebay/Amazon, but all of them were way too long. My machine only has a few inches of travel so I needed something with a super low profile, and since apparently I'm the only person on the planet who needs a low-profile touch probe I had to design and fabricate one myself from scratch. I learned to use and drew it up in DesignSpark Mechanical - literally the first 3D CAD program I've ever used. Exported the various relevant features as DXF files and CAM'd them using VisualCAM. I then cut all the pieces out of various sheets of acrylic I had lying around from other projects, picked up some nuts and bolts at the local hardware store and was off to the races.

It took some adjusting to ensure that the contacts were all level (by twisting the bolts that are screwed through the bottom into the cap-nuts inside that function as contacts against the stylus carriage's contacts) but since I got that dialed it has been working great over the last year without any problems.

The real trick was wiring up to the galvanized bolts with a junky soldering iron and no flux! ;)

BernardG commented 5 years ago

I know this thread is already old, but I have a GCode / GRBL question. In GRBL, you can inverse ($6=1) the probe pin signal. But in GCode, you can also use G38.4 instead of G38.2. So, if I have an "always on" probe like @DEF7 show, can I use it with G38.4 and $6=0 ? being a little confused, here.

cri-s commented 5 years ago

This are two different thing. First from electrical points. $6=0 means that if the pin touch GND the probe trigger. Instead $6=1 means that there is a external pulldown or it is push/pull driven and high level trigger the probe. And from probing point: G38.2 - probe toward workpiece, stop on contact, signal error if failure G38.4 - probe away from workpiece, stop on loss of contact, signal error if failure

As example it is normal to probe G38.2 at higher speed, and then at lower speed use G38.4 in order to find the point with high precision. and then retract again at higher speed.

Further some CNC have a 3 pos toggle switch with probe disconnected, connected and inverted. This allows to use as example touch probes to sense height and length probes or 3d touch probes that require continuity of signal to work.

Others use 3 signal jack with gnd/5V/signal interface where the 5V have two 100ohm resistors 1/4W in parallel and protection diodes in order that it supports 12/24V and gnd shorts and active circuits inside touch probes or height sensors for inverting the signal and signalizing the state.

As attachement a possible solution for having passive touch plate and passive touch probe connected at the same time.

Chris

BernardG commented 5 years ago

Thank you for your great answer, @cri-s , much clearer for me know. Just one thing: I don't see your attachement?

thawkins commented 5 years ago

For v-cut engraving, i use a F.E.T, which is a floating engraving tool, it spring loads the engaving tool tip so it will follow the contors of the work surface. You can get them from cncaid.com

On Wed, 28 Aug 2019, 15:48 Bernard Grosperrin, notifications@github.com wrote:

Thank you for your great answer, @cri-s https://github.com/cri-s , much clearer for me know. Just one thing: I don't see your attachement?

— You are receiving this because you commented. Reply to this email directly, view it on GitHub https://github.com/grbl/grbl/issues/464?email_source=notifications&email_token=AAADRSOD2XAM6QW5JZLXAIDQGYUURA5CNFSM4ASXL4SKYY3PNVWWK3TUL52HS4DFVREXG43VMVBW63LNMVXHJKTDN5WW2ZLOORPWSZGOD5KGVDI#issuecomment-525625997, or mute the thread https://github.com/notifications/unsubscribe-auth/AAADRSI6Z34NF4YAQWBL7QLQGYUURANCNFSM4ASXL4SA .

cri-s commented 5 years ago

The attached image is here, https://imge.to/i/vvOuVf , it is just one example. The digitizer input need to be shorted when not used and not connected. Jack connectors have a NC pin that implement that automatically. Low current led could be added inside the digitizer in order to show there ready state.

2019-08-28 11:56 GMT+02:00, Tim Hawkins notifications@github.com:

For v-cut engraving, i use a F.E.T, which is a floating engraving tool, it

spring loads the engaving tool tip so it will follow the contors of the

work surface. You can get them from cncaid.com

On Wed, 28 Aug 2019, 15:48 Bernard Grosperrin, notifications@github.com

wrote:

Thank you for your great answer, @cri-s https://github.com/cri-s , much

clearer for me know. Just one thing: I don't see your attachement?

You are receiving this because you commented.

Reply to this email directly, view it on GitHub

https://github.com/grbl/grbl/issues/464?email_source=notifications&email_token=AAADRSOD2XAM6QW5JZLXAIDQGYUURA5CNFSM4ASXL4SKYY3PNVWWK3TUL52HS4DFVREXG43VMVBW63LNMVXHJKTDN5WW2ZLOORPWSZGOD5KGVDI#issuecomment-525625997,

or mute the thread

https://github.com/notifications/unsubscribe-auth/AAADRSI6Z34NF4YAQWBL7QLQGYUURANCNFSM4ASXL4SA

.

--

You are receiving this because you were mentioned.

Reply to this email directly or view it on GitHub:

https://github.com/grbl/grbl/issues/464#issuecomment-525672442

BernardG commented 5 years ago

Ha, yes, thank you. Looks like a good idea. I'll think about that.