harveyslash / Deep-Image-Analogy-PyTorch

Visual Attribute Transfer through Deep Image Analogy in PyTorch!
MIT License
112 stars 25 forks source link

quality of the generated images #2

Open gxlcliqi opened 6 years ago

gxlcliqi commented 6 years ago

Wonderful job, I have been look for a python implementation of this project and glad to see this. but looks like the generated images are not as good as the examples in the original paper, is there any plan to improve it?

harveyslash commented 6 years ago

I am currently still looking up the issues on why this might be.

These are the some things that are different from the implementation of the paper:

If you have any suggestions, feel free to discuss them

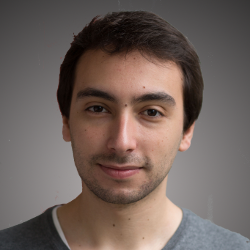
Having said that, this is an image that I just generated. I used more epochs for the optimiser at the last 2 blocks.

unknown I think its slightly better than the example in the readme.

gxlcliqi commented 6 years ago

notice there is difference about the deconv step between your implementation and the original code, not sure the impact but just raise a question about the deconv https://github.com/msracver/Deep-Image-Analogy/issues/30

gxlcliqi commented 6 years ago

here is another finding, there is a function avg_vote() used in 2 places in the official code while not appear in the pytorch code, I think it can make the image looks more smoothly, do you think so?

  1. avg_vote next layer's data after reconstruct them with the upsample nnf
  2. avg_vote the target of deconv before the deconv is started
harveyslash commented 6 years ago

I think avg vote is done only after the last reconstruction. That I have done in the method called reconstruct avg, which you can find in patchmatchorig.py

gxlcliqi commented 6 years ago

yes I can find reconstruct_avg(), but actually there is another method named avg_vote(), besides the method reconstruct_avg()

harveyslash commented 6 years ago

Can you tell me where that is?

gxlcliqi commented 6 years ago

Ok, It is invoked in line 520, 526, 566, 573 of this link: https://github.com/msracver/Deep-Image-Analogy/blob/linux/deep_image_analogy/source/DeepAnalogy.cu the method itself is declared in line 416 of this link: https://github.com/msracver/Deep-Image-Analogy/blob/linux/deep_image_analogy/source/GeneralizedPatchMatch.cu

harveyslash commented 6 years ago

very well found detail! thanks a lot! I compared the code between avg_vote and reconstruct_average ,and it looks like they are doing the exact same thing at a logical level.

So I will just reuse my reconstruct_avg() , and call it after the NNFs are computed.

gxlcliqi commented 6 years ago

you are welcome! and it is also called before deconv happens

harveyslash commented 6 years ago

I tried avg reconstruction for the last 2 blocks (with patch size of 2) , and these are the results: unknown-2 unknown-1

The image is sharper now , in my opinion

harveyslash commented 6 years ago

I am currently implementing patchmath for GPU using pyCuda. This will increase speeds dramatically. Can you tell me where they are using the sigmoid function for the blending (i cant seem to find the code )

gxlcliqi commented 6 years ago

I review the official code just now and it seems NO sigmoid function when blending. It seems the author just normalize |FA L−1(x)|2 to [0, 1], and compare it with 0.05. I guess it is used as a simplified version of the sigmoid function in that case.

And I am expecting your GPU version of patchmatch

harveyslash commented 6 years ago

gpu patchmatch using pycuda is more or less working. https://github.com/harveyslash/PatchMatch

gxlcliqi commented 6 years ago

another finding which is likely relate to the quality issue is that, the official code contains one more layer besides conv5_1 to conv1_1, that is the input data layer , the feature match process (including deconv, blend, norm, patchmatch) is also applied to the input data layer to get the final nnf.

so I guess there should be a "Process Block 0" in your implementation to solve the quality issue.

harveyslash commented 6 years ago

I had tried to do that , but the quality just becomes worse

gxlcliqi commented 6 years ago

for the GPU version of patchmatch, I use it in this project of deep image analogy, and it runs out of index when generate the image, do you know what is the problem?

the error is as below:

File "/home/li/Deep-Image_Analogy/src/../src/PatchMatch/PatchMatchCuda.py", line 131, in reconstruct_avg lookups[ay, ax] = img[y, x] IndexError: index 493921239056 is out of bounds for axis 0 with size 224

I print and check, just find the nnf is filled with big number where processing block 4:

[ 8589934614 8589934615] [ 8589934616 24] [ 26 27]]

[[ 0 3] [ 5 8589934596] [ 8589934597 8589934598] ..., [12884901910 8589934614] [ 8589934615 8589934616] [ 8589934617 4294967296]]

..., [[ 0 26] [ 0 26] [ 2 24] ..., [ 20 26] [ 22 26] [ 22 26]]

harveyslash commented 6 years ago

In reconstruction, you have to provide the dimension of the new resolution.

gxlcliqi commented 6 years ago

the following line of code is added before sending the nnf to the patchmatch method, to fix the out of index issue listed above, acutually the patchmatch method itself is correct, but the args passed to it must be explictly ensure to be np.int32 in the python layer, thus to keep the correct memory layout in the cuda layer:

    self.nnf = self.nnf.astype(np.int32)
harveyslash commented 6 years ago

I believe I had done it. Maybe I did not push

gxlcliqi commented 6 years ago

Thansk @harveyslash , with the gpu, the total time is decrease from 130s+ to 90s+ with my computer

harveyslash commented 6 years ago

Did your quality improve? I noticed that the quality is best till the 2nd last conv block. Then it worsens

gxlcliqi commented 6 years ago

not yet improved. I have also tried adding a block 0, but the result is the same as yours I may try to compare the quality layer by layer with the official result tomorrow.

albertpumarola commented 6 years ago

Any updates?

qhanson commented 6 years ago

Will you update it later?