 marcelloinfoweb
commented
2 years ago
marcelloinfoweb
commented
2 years ago The same problem.
Windows 11
Open kaa5trup opened 2 years ago
marcelloinfoweb
commented
2 years ago The same problem.
Windows 11
 thor836
commented
2 years ago
thor836
commented
2 years ago The same problem
Version: 7.6.5 Output folder: C:\Program Files\Intel\HAXM Extract: checktool.exe... 100% Execute: C:\Program Files\Intel\HAXM\checktool.exe --verbose CPU vendor GenuineIntel Intel64 supported Yes VMX supported - No VMX enabled - No EPT supported - No NX supported Yes NX enabled Yes Hyper-V disabled - No OS version Windows 10.0.19042 OS architecture x86_64 Guest unoccupied * Yes. 0 guest(s) The system requirements are not satisfied.
Laptop: Lenovo Yoga 7 Series CPU: Intel(R) Core(TM) i7-1065G7 CPU @ 1.30GHz, 1498 Mhz, 4 Core(s), 8 Logical Processor(s) RAM: 16.0 GB
 christianfees
commented
1 year ago
christianfees
commented
1 year ago This most be a bad joke. My new Lenovo notebook with i7 cannot install HAXM. My new PC with i5-12400 cannot install HAXM. Tried everything. Always say VMX supported NO and Enabled NO. It is ACTIVE in BIOS though.
CPU vendor GenuineIntel Intel64 supported Yes VMX supported - No VMX enabled - No EPT supported - No NX supported Yes NX enabled Yes Hyper-V disabled - No OS version Windows 10.0.22000 OS architecture x86_64 Guest unoccupied * Yes. 0 guest(s)
 lauglam
commented
1 year ago
lauglam
commented
1 year ago Same problem, does anyone know how to solve it?
 wcwang
commented
1 year ago
wcwang
commented
1 year ago Thanks for your feedback. Could you run below command to disable Hyper-V in an elevated Command Prompt and then restart Windows?
bcdedit /set hypervisorlaunchtype off
 kaa5trup
commented
1 year ago
kaa5trup
commented
1 year ago Thanks for your feedback. Could you run below command to disable Hyper-V in an elevated Command Prompt and then restart Windows?
bcdedit /set hypervisorlaunchtype off
Still says "System requirements not met".
 Grantwinhq
commented
1 year ago
Grantwinhq
commented
1 year ago Thanks for your feedback. Could you run below command to disable Hyper-V in an elevated Command Prompt and then restart Windows?
bcdedit /set hypervisorlaunchtype off
Still says "System requirements not met".
If you are using a HP PC press esc on startup press the f10 key for BIOS setup click on system configuration tab. Select Virtual Realization Technology and then press the Enter key Save. your system will reboot automatically. Try install the HAXM file again and you are good to go.
On other PCs
Acer
Most commonly: F2 or Delete.
On older computers: F1 or the key combination CTRL+ALT+ESC.
Turn ON the System.
Press F2 key at startup BIOS Setup.
Press the right arrow key to System Configuration tab, Select Virtualization Technology and then press the Enterkey.
Select Enabled and press the Enter key.
Press the F10 key and select Yes and press the Enter key to save changes and Reboot into Windows.
Asus
Most commonly: F2.
Alternatively: Delete or Insert key, and less commonly F10.
Turn ON the System.
Press F2 key at startup BIOS Setup.
Press the right arrow key to Advanced tab, Select Virtualization Technology and then press the Enter key.
Select Enabled and press the Enter key.
Press the F10 key and select Yes and press the Enter key to save changes and Reboot into Windows.
DELL
Newer models: F2 key whilst Dell logo is on screen.
Alternatively: F1, Delete, F12, or F3.
Older models: CTRL+ALT+ENTER or Delete or Fn+ESC or Fn+F1.
Turn ON the System.
Press F2 key at startup BIOS Setup.
Press the right arrow key to Advanced tab, Select Virtualization and then press the Enter key.
Select Enabled and press the Enter key.
Press the F10 key and select Yes and press the Enter key to save changes and Reboot into Windows.
Lenovo
Most commonly: F1 or F2
Older hardware: the key combination CTRL+ALT+F3 or CTRL+ALT+INS or Fn+F1.
If you have a ThinkPad, consult this Lenovo resource: how to access the BIOS on a ThinkPad. Enabling VT-x in ThinkPad (Tablets/Convertibles/Notebooks):
Power ON the system.
Press Enter or Tap the touch screen during Lenovo startup screen.
Press or Tap F1to enter into BIOS Setup.
Navigate to Security tab, then press Enter on Virtualization.
Select Intel(R) Virtualization Technology, Press Enter, choose Enable and press Enter.
Press F10.
Press Enter on YES to save the settings and boot into Windows.
Enabling VT-x in ThinkCentre (Desktops):
Power ON the system.
Press Enter during Lenovo startup screen.
Press F1key to enter into BIOS Setup.
Navigate to the Advanced tab and press Enter on CPU Setup.
SelectIntel(R) Virtualization Technology, Press Enter, choose Enable and press Enter.
Press F10.
Press Enter on YES to save the settings and boot into Windows.
Sony
Sony VAIO: F2 or F3
Alternatively: F1
If your VAIO has an ASSIST key, try to press and hold it while you power on the laptop. This also works if your Sony VAIO came with Windows 8.
With the computer turned completely off, press and hold the Assist button until the black VAIO screen appears.

NOTE: The location of the Assist button will be different depending on the computer model. Refer to the operating instructions supplied with the computer for the exact location of the Assist button on your model.
At the VAIOCare | Rescue Mode screen, press the Down Arrow key until the Start BIOS setup [F2] option is highlighted, and then press the Enter key.
In the [BIOS Name] Setup Utility screen, press the right-arrow key until the Advanced tab is selected.
On the Advanced tab, press the down-arrow key until Intel(R) Virtualization Technology is selected and then press the Enter key.
Use the arrow keys to select Enabled, and then press the Enter key.
Press the right-arrow key until the Exit tab is selected.
Press the down-arrow key until Exit Setup is selected and then press the Enter key.
In the Save screen, verify Yes is selected and then press the Enter key.
Toshiba
Most commonly: F2 key.
Alternatively: F1 and ESC.
Toshiba Equium: F12
Turn ON the System.
Press F2 key at startup BIOS Setup.
Press the right arrow key to Advanced tab, Select Virtualization Technology and then press the Enter key.
Select Enabled and press the Enter key.
Press the F10 key and select Yes and press the Enter key to save changes and Reboot into Windows.Describe the Bug
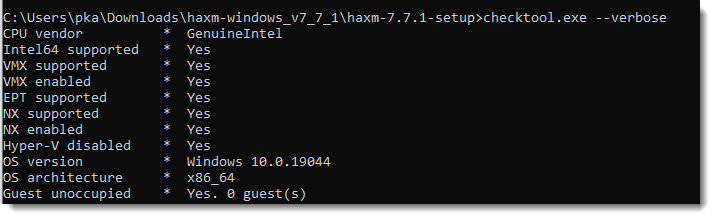
Summary: Cannot install HAXM, getting "The system requirements are not satisfied", when running checktool.exe --verbose, it seems all prerequisites are met.
CPU vendor GenuineIntel Intel64 supported Yes VMX supported Yes VMX enabled Yes EPT supported Yes NX supported Yes NX enabled Yes Hyper-V disabled Yes OS version Windows 10.0.19044 OS architecture x86_64 Guest unoccupied * Yes. 0 guest(s)
Host Environment
* HAXM version: 7.7.1

* Host OS version: 21H2 19044.1645

* Host OS architecture: x86_64

* Host CPU model: Intel(R) Core(TM) i7-8550U CPU @ 1.80GHz   1.99 GHz

* Host RAM size: 8 GB

* Host computer model: Lenovo Thinkpad X1
SOLVED check my last comment. I hope it helps
kaa5trup
commented
1 year ago Hi
This changes nothing:

BR, Palle
Den 24-06-2022 kl. 10:27 skrev Grantwinhq:
    Thanks for your feedback. Could you run below command to
    disable Hyper-V in an elevated *Command Prompt* and then
    restart Windows?

        bcdedit /set hypervisorlaunchtype off

Still says "System requirements not met".
If you are using a HP PC press esc on startup press the f10 key for BIOS setup click on system configuration tab. Select Virtual Realization Technology and then press the Enter key Save. your system will reboot automatically. Try install the HAXM file again and you are good to go.
On other PCs
Acer
Most commonly: F2 or Delete.
On older computers: F1 or the key combination CTRL+ALT+ESC.
|Turn ON the System. Press F2 key at startup BIOS Setup. Press the right arrow key to System Configuration tab, Select Virtualization Technology and then press the Enterkey. Select Enabled and press the Enter key. Press the F10 key and select Yes and press the Enter key to save changes and Reboot into Windows. |
Asus
Most commonly: F2.
Alternatively: Delete or Insert key, and less commonly F10.
|Turn ON the System. Press F2 key at startup BIOS Setup. Press the right arrow key to Advanced tab, Select Virtualization Technology and then press the Enter key. Select Enabled and press the Enter key. Press the F10 key and select Yes and press the Enter key to save changes and Reboot into Windows. |
DELL
Newer models: F2 key whilst Dell logo is on screen.
Alternatively: F1, Delete, F12, or F3.
Older models: CTRL+ALT+ENTER or Delete or Fn+ESC or Fn+F1.
|Turn ON the System. Press F2 key at startup BIOS Setup. Press the right arrow key to Advanced tab, Select Virtualization and then press the Enter key. Select Enabled and press the Enter key. Press the F10 key and select Yes and press the Enter key to save changes and Reboot into Windows. |
Lenovo
Most commonly: F1 or F2
Older hardware: the key combination CTRL+ALT+F3 or CTRL+ALT+INS or Fn+F1.
If you have a ThinkPad, consult this Lenovo resource: how to access the BIOS on a ThinkPad http://support.lenovo.com/en_US/detail.page?LegacyDocID=YAST-3JWKJX. Enabling VT-x in ThinkPad (Tablets/Convertibles/Notebooks):
|Power ON the system. Press Enter or Tap the touch screen during Lenovo startup screen. Press or Tap F1to enter into BIOS Setup. Navigate to Security tab, then press Enter on Virtualization. Select Intel(R) Virtualization Technology, Press Enter, choose Enable and press Enter. Press F10. Press Enter on YES to save the settings and boot into Windows. |
Enabling VT-x in ThinkCentre (Desktops):
|Power ON the system. Press Enter during Lenovo startup screen. Press F1key to enter into BIOS Setup. Navigate to the Advanced tab and press Enter on CPU Setup. SelectIntel(R) Virtualization Technology, Press Enter, choose Enable and press Enter. Press F10. Press Enter on YES to save the settings and boot into Windows. |
Sony
Sony VAIO: F2 or F3
Alternatively: F1
If your VAIO has an ASSIST key, try to press and hold it while you power on the laptop. This also works if your Sony VAIO came with Windows 8.
|With the computer turned completely off, press and hold the Assist button until the black VAIO screen appears. NOTE: The location of the Assist button will be different depending on the computer model. Refer to the operating instructions supplied with the computer for the exact location of the Assist button on your model. At the VAIOCare | Rescue Mode screen, press the Down Arrow key until the Start BIOS setup [F2] option is highlighted, and then press the Enter key. In the [BIOS Name] Setup Utility screen, press the right-arrow key until the Advanced tab is selected. On the Advanced tab, press the down-arrow key until Intel(R) Virtualization Technology is selected and then press the Enter key. Use the arrow keys to select Enabled, and then press the Enter key. Press the right-arrow key until the Exit tab is selected. Press the down-arrow key until Exit Setup is selected and then press the Enter key. In the Save screen, verify Yes is selected and then press the Enter key. |
Toshiba
Most commonly: F2 key.
Alternatively: F1 and ESC.
Toshiba Equium: F12
|Turn ON the System. Press F2 key at startup BIOS Setup. Press the right arrow key to Advanced tab, Select Virtualization Technology and then press the Enter key. Select Enabled and press the Enter key. Press the F10 key and select Yes and press the Enter key to save changes and Reboot into Windows. |
— Reply to this email directly, view it on GitHub https://github.com/intel/haxm/issues/450#issuecomment-1165332847, or unsubscribe https://github.com/notifications/unsubscribe-auth/AY5YOJNXOU6ATRHTI436YN3VQVWOXANCNFSM5UR5YMMA. You are receiving this because you authored the thread.Message ID: @.***>
Grantwinhq
commented
1 year ago Hi This changes nothing:
DID YOU DO ANY OF THIS?
If you are using a HP PC press esc on startup press the f10 key for BIOS setup click on system configuration tab. Select Virtual Realization Technology and then press the Enter key Save. your system will reboot automatically. Try install the HAXM file again and you are good to go.
Describe the Bug
Summary: Cannot install HAXM, getting "The system requirements are not satisfied", when running checktool.exe --verbose, it seems all prerequisites are met.
CPU vendor GenuineIntel Intel64 supported Yes VMX supported Yes VMX enabled Yes EPT supported Yes NX supported Yes NX enabled Yes Hyper-V disabled Yes OS version Windows 10.0.19044 OS architecture x86_64 Guest unoccupied * Yes. 0 guest(s)
Host Environment