 jackjindtnt
commented
7 years ago
jackjindtnt
commented
7 years ago Converting Between Column Letters and Numbers
To convert from letters to numbers, call the openpyxl.cell.column_index_from_string() function. To convert from numbers to letters, call the openpyxl.cell.get_column_letter() function. Enter the following into the interactive shell:
import openpyxl from openpyxl.cell import get_column_letter, column_index_from_string get_column_letter(1) 'A' get_column_letter(2) 'B' get_column_letter(27) 'AA' get_column_letter(900) 'AHP' wb = openpyxl.load_workbook('example.xlsx') sheet = wb.get_sheet_by_name('Sheet1') get_column_letter(sheet.max_column) 'C' column_index_from_string('A') 1 column_index_from_string('AA') 27 After you import these two functions from the openpyxl.cell module, you can call get_column_letter() and pass it an integer like 27 to figure out what the letter name of the 27th column is. The function column_index_string() does the reverse: You pass it the letter name of a column, and it tells you what number that column is. You don’t need to have a workbook loaded to use these functions. If you want, you can load a workbook, get a Worksheet object, and call a Worksheet object method like max_column to get an integer. Then, you can pass that integer to get_column_letter().
Getting Rows and Columns from the Sheets
You can slice Worksheet objects to get all the Cell objects in a row, column, or rectangular area of the spreadsheet. Then you can loop over all the cells in the slice. Enter the following into the interactive shell:
import openpyxl wb = openpyxl.load_workbook('example.xlsx') sheet = wb.get_sheet_by_name('Sheet1') tuple(sheet['A1':'C3']) ((
, | , | ), ( | , | , | ), ( | , | , | )) ❶ >>> for rowOfCellObjects in sheet['A1':'C3']: ❷ for cellObj in rowOfCellObjects: print(cellObj.coordinate, cellObj.value) print('--- END OF ROW ---') A1 2015-04-05 13:34:02 B1 Apples C1 73 --- END OF ROW --- A2 2015-04-05 03:41:23 B2 Cherries C2 85 --- END OF ROW --- A3 2015-04-06 12:46:51 B3 Pears C3 14 --- END OF ROW --- Here, we specify that we want the Cell objects in the rectangular area from A1 to C3, and we get a Generator object containing the Cell objects in that area. To help us visualize this Generator object, we can use tuple() on it to display its Cell objects in a tuple. |
This tuple contains three tuples: one for each row, from the top of the desired area to the bottom. Each of these three inner tuples contains the Cell objects in one row of our desired area, from the leftmost cell to the right. So overall, our slice of the sheet contains all the Cell objects in the area from A1 to C3, starting from the top-left cell and ending with the bottom-right cell.
To print the values of each cell in the area, we use two for loops. The outer for loop goes over each row in the slice ❶. Then, for each row, the nested for loop goes through each cell in that row ❷.
To access the values of cells in a particular row or column, you can also use a Worksheet object’s rows and columns attribute. Enter the following into the interactive shell:
import openpyxl wb = openpyxl.load_workbook('example.xlsx') sheet = wb.active sheet.columns[1] (
, | , | , | , | , | , | ) for cellObj in sheet.columns[1]: print(cellObj.value) |
Apples Cherries Pears Oranges Apples Bananas Strawberries Using the rows attribute on a Worksheet object will give you a tuple of tuples. Each of these inner tuples represents a row, and contains the Cell objects in that row. The columns attribute also gives you a tuple of tuples, with each of the inner tuples containing the Cell objects in a particular column. For example.xlsx, since there are 7 rows and 3 columns, rows gives us a tuple of 7 tuples (each containing 3 Cell objects), and columns gives us a tuple of 3 tuples (each containing 7 Cell objects).
To access one particular tuple, you can refer to it by its index in the larger tuple. For example, to get the tuple that represents column B, you use sheet.columns[1]. To get the tuple containing the Cell objects in column A, you’d use sheet.columns[0]. Once you have a tuple representing one row or column, you can loop through its Cell objects and print their values.

Reading Excel Documents
The examples in this chapter will use a spreadsheet named example.xlsx stored in the root folder. You can either create the spreadsheet yourself or download it from http://nostarch.com/automatestuff/. Figure 12-1 shows the tabs for the three default sheets named Sheet1, Sheet2, and Sheet3 that Excel automatically provides for new workbooks. (The number of default sheets created may vary between operating systems and spreadsheet programs.) Figure 12-1. The tabs for a workbook’s sheets are in the lower-left corner of Excel.
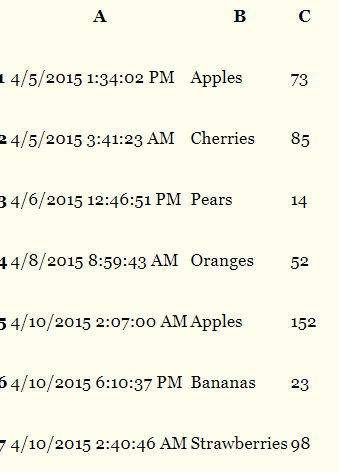
Sheet 1 in the example file should look like Table 12-1. (If you didn’t download example.xlsx from the website, you should enter this data into the sheet yourself.)
Table 12-1. The example.xlsx Spreadsheet
Figure 12-1. The tabs for a workbook’s sheets are in the lower-left corner of Excel.
Sheet 1 in the example file should look like Table 12-1. (If you didn’t download example.xlsx from the website, you should enter this data into the sheet yourself.)
Table 12-1. The example.xlsx Spreadsheet
Opening Excel Documents with OpenPyXL
Once you’ve imported the openpyxl module, you’ll be able to use the openpyxl.load_workbook() function. Enter the following into the interactive shell:
Remember that example.xlsx needs to be in the current working directory in order for you to work with it. You can find out what the current working directory is by importing os and using os.getcwd(), and you can change the current working directory using os.chdir().
Getting Sheets from the Workbook
You can get a list of all the sheet names in the workbook by calling the get_sheet_names() method. Enter the following into the interactive shell:
Each sheet is represented by a Worksheet object, which you can obtain by passing the sheet name string to the get_sheet_by_name() workbook method. Finally, you can read the active member variable of a Workbook object to get the workbook’s active sheet. The active sheet is the sheet that’s on top when the workbook is opened in Excel. Once you have the Worksheet object, you can get its name from the title attribute.
Getting Cells from the Sheets
Once you have a Worksheet object, you can access a Cell object by its name. Enter the following into the interactive shell:
The Cell object has a value attribute that contains, unsurprisingly, the value stored in that cell. Cell objects also have row, column, and coordinate attributes that provide location information for the cell.
Here, accessing the value attribute of our Cell object for cell B1 gives us the string 'Apples'. The row attribute gives us the integer 1, the column attribute gives us 'B', and the coordinate attribute gives us 'B1'.
OpenPyXL will automatically interpret the dates in column A and return them as datetime values rather than strings. The datetime data type is explained further in Chapter 16.
Specifying a column by letter can be tricky to program, especially because after column Z, the columns start by using two letters: AA, AB, AC, and so on. As an alternative, you can also get a cell using the sheet’s cell() method and passing integers for its row and column keyword arguments. The first row or column integer is 1, not 0. Continue the interactive shell example by entering the following:
1 Apples 3 Pears 5 Apples 7 Strawberries As you can see, using the sheet’s cell() method and passing it row=1 and column=2 gets you a Cell object for cell B1, just like specifying sheet['B1'] did. Then, using the cell() method and its keyword arguments, you can write a for loop to print the values of a series of cells.
Say you want to go down column B and print the value in every cell with an odd row number. By passing 2 for the range() function’s “step” parameter, you can get cells from every second row (in this case, all the odd-numbered rows). The for loop’s i variable is passed for the row keyword argument to the cell() method, while 2 is always passed for the column keyword argument. Note that the integer 2, not the string 'B', is passed.
You can determine the size of the sheet with the Worksheet object’s max_row and max_column member variables. Enter the following into the interactive shell: