kelchm / cgg1-thermometer-firmware

Reverse engineering and developing a custom firmware for the Qingping CGG1 bluetooth thermometer
GNU General Public License v3.0
5 stars 0 forks source link

Capture signals between MCU and display controller #3

Open kelchm opened 3 years ago

kelchm commented 3 years ago

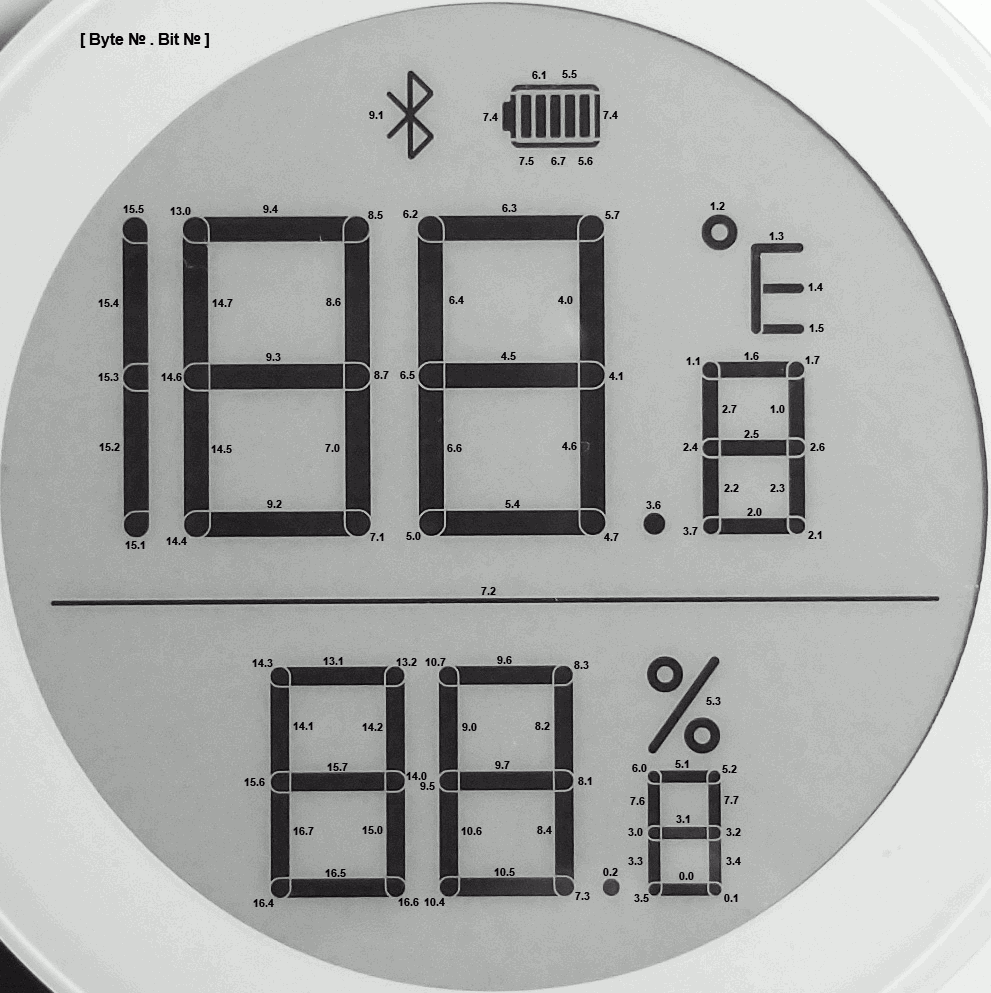
Given that the CGG1 is using an unknown display controller, we need to capture and try to reverse engineer the communication between the MCU and the display controller. As a first step, it will also be necessary to map out the test points on the reverse of the PCB.

Relevant Links

kelchm commented 3 years ago

Display FCP Pinout (WIP)

Note: numbered from left-to-right with the PCB inverted. The first pin is marked on the PCB itself with a vertical white line.

FPC Pin MCU Pin Purpose Test Point Notes
Pin 1 10 [PO.08] TP5
Pin 2 37 [P0.25] TP1
Pin 3 9 [P0.07] TP6
Pin 4 27 [P0.22] TP2
Pin 5 39 [P0.27] TP21
Pin 6 38 [P0.26] TP22
Pin 7 VDD TP20
Pin 8 Ground GND
Pin 9 VDH (?) Measured max of ~10V
Pin 10 VDL (?) Measured max of ~5V
kelchm commented 3 years ago

I'm still getting up to speed with how to use a logic analyzer, but here is a raw initial capture in for ~10 seconds after power on for the six relevant test points (TP5, TP1, TP6, TP2, TP21, TP22).

~cgg1-10s-after-power-on.sal.zip~

EDIT: This is the same capture as the file above, but has been updated to add an SPI analyzer. cgg1-10s-after-power-on-fixed.sal.zip

pvvx commented 3 years ago

EDIT: This is the same capture as the file above, but has been updated to add an SPI analyzer.

CMD  DATA

0x04 POWER_ON

0x00 0x0F PANEL_SETTING
0x01 0x32 0x32 POWER_SETTING 
0x03 0x00 POWER_OFF_SEQUENCE_SETTING
0x30 0x03 PLL_CONTROL
0x20 0x47 0x47 0x01 0x87 0x87 0x01 0x47 0x47 0x01 0x87 0x87 0x01 0x81 0x81 0x01 LUT_FOR_VCOM // T_LUTV_init
0x23 0x87 0x87 0x01 0x87 0x87 0x01 0x47 0x47 0x01 0x47 0x47 0x01 0x81 0x81 0x01 LUT_CMD_0x23 // T_LUT_KK_init
0x26 0x47 0x47 0x01 0x47 0x47 0x01 0x87 0x87 0x01 0x87 0x87 0x01 0x81 0x81 0x01 LUT_CMD_0x26 // T_LUT_KW_init

0x18 0xF9 0x20 0xB5 0xAB 0x3C 0x00 0x00 0x40 0x05 0x0C 0x0F 0xFF 0xFF 0xF8 0xF2 0x3E 0x8F 0xFF DATA_START_TRANSMISSION_1

0x12 DISPLAY_REFRESH

0x04 POWER_ON

0x00 0x0F PANEL_SETTING
0x01 0x32 0x32 POWER_SETTING
0x03 0x00 POWER_OFF_SEQUENCE_SETTING
0x30 0x07 PLL_CONTROL
0x15 0x00 0x87 0x01 PARTIAL_DISPLAY_REFRESH
0x03 0x06 POWER_OFF_SEQUENCE_SETTING
0x20 0x47 0x47 0x01 0x87 0x87 0x01 0x47 0x47 0x01 0x87 0x87 0x01 0x81 0x81 0x01 // T_LUTV_init
0x23 0x47 0x47 0x01 0x87 0x87 0x01 0x47 0x47 0x01 0x87 0x87 0x01 0x81 0x81 0x01 // T_LUTV_init
0x26 0x47 0x47 0x01 0x87 0x87 0x01 0x47 0x47 0x01 0x87 0x87 0x01 0x81 0x81 0x01 // T_LUTV_init
0x24 0x87 0x87 0x01 0x87 0x87 0x01 0x87 0x87 0x01 0x87 0x87 0x01 0x81 0x81 0x01 // T_LUT_KK_update
0x25 0x47 0x47 0x01 0x47 0x47 0x01 0x47 0x47 0x01 0x47 0x47 0x01 0x81 0x81 0x01 // T_LUT_KW_update

0x18 0xF9 0x20 0xB5 0xAB 0x3C 0x00 0x00 0x40 0x05 0x0C 0x0F 0xFF 0xFF 0xF8 0xF2 0x3E 0x8F 0xFF DATA_START_TRANSMISSION_1

0x12 DISPLAY_REFRESH

0x02 0x03 POWER_OFF

0x04 POWER_ON

0x00 0x0F PANEL_SETTING
0x01 0x32 0x32 POWER_SETTING 
0x03 0x00 POWER_OFF_SEQUENCE_SETTING
0x30 0x07 PLL_CONTROL
0x15 0x00 0x87 0x01 PARTIAL_DISPLAY_REFRESH
0x03 0x06 POWER_OFF_SEQUENCE_SETTING
0x20 0x47 0x47 0x01 0x87 0x87 0x01 0x47 0x47 0x01 0x87 0x87 0x01 0x81 0x81 0x01 // T_LUTV_init
0x23 0x47 0x47 0x01 0x87 0x87 0x01 0x47 0x47 0x01 0x87 0x87 0x01 0x81 0x81 0x01 // T_LUTV_init 
0x26 0x47 0x47 0x01 0x87 0x87 0x01 0x47 0x47 0x01 0x87 0x87 0x01 0x81 0x81 0x01 // T_LUTV_init 
0x24 0x87 0x87 0x01 0x87 0x87 0x01 0x87 0x87 0x01 0x87 0x87 0x01 0x81 0x81 0x01 // T_LUT_KK_update
0x25 0x47 0x47 0x01 0x47 0x47 0x01 0x47 0x47 0x01 0x47 0x47 0x01 0x81 0x81 0x01 // T_LUT_KW_update

0x18 0xF8 0x20 0x00 0x00 0x1C 0x00 0x40 0x80 0x41 0xA1 0x7F 0xFF 0xFF 0xF8 0x02 0x3E 0x8F 0xFF DATA_START_TRANSMISSION_1 

0x12 DISPLAY_REFRESH

0x02 0x03 POWER_OFF
pvvx commented 3 years ago

I didn't solder to the EPD connector pins. To CGG1-"M" made a driver based on your scan-capture and previous knowledge. Could you scan-capture for longer? Interested in the EPD update-refresh cycle.

Having changed the GPIO in source the MHO-C401, I added js function (in TelinkMiFlasher.html) a bit output for segments diagnostics:

var lcdb = new Uint8Array(19);
var lcdb_stage = 0;
var lcdb_cnt = 0;
function lcd_tst_segmets() {
    if(lcdb_stage == 0xff) return;
    switch(lcdb_stage) {
        case 0:
            lcdb.fill(0);
            lcdb_stage++;
            break;
        case 1:
            lcdb.fill(0xff);
            lcdb_cnt = 0;
            lcdb_stage++;
            break;
        case 2:
            lcdb.fill(0);
            lcdb[lcdb_cnt + 1] = 0xff;
            lcdb_cnt++;
            if(lcdb_cnt > 18) {
                lcdb_cnt = 1;
                lcdb_stage++;
            }
            break;
        case 3:
            lcdb.fill(lcdb_cnt);
            lcdb_cnt *= 2;
            if(lcdb_cnt > 0xff) {
                lcdb_cnt = 0;
                lcdb_stage = 0;
            }
            break;
        default:
            lcdb_stage = 0;
    }
    lcdb[0] = 0x60;
    addClog("Stage: "+lcdb_stage+"Send cmd (60): Set LCD data");
    settingsCharacteristics.writeValue(lcdb).then(_ => {addClog('Send data ok'); setTimeout(lcd_tst_segmets, 5000);});
}

Filmed the work on a video camera and did https://pvvx.github.io/CGG1/img/EPD_segments.gif

For further optimization, I would like to refine the EPD refresh cycle code.

kelchm commented 3 years ago

I didn't solder to the EPD connector pins.

To CGG1-"M" made a driver based on your scan-capture and previous knowledge.

Could you scan-capture for longer?

Interested in the EPD update-refresh cycle.

Sure! I'll post another capture later this week.

pvvx commented 3 years ago

@kelchm Thanks for attention. I have already read everything I need in the logic analyzer: https://github.com/pvvx/pvvx.github.io/tree/master/CGG1/SaleaeLogic