 mario-mitchell
commented
3 years ago
mario-mitchell
commented
3 years ago [ { "faceId": "a9aada17-baf7-48de-8997-e6bd6127fb77", "faceRectangle": { "top": 367, "left": 235, "width": 413, "height": 413 }, "faceAttributes": { "emotion": { "anger": 0.0, "contempt": 0.0, "disgust": 0.0, "fear": 0.0, "happiness": 1.0, "neutral": 0.0, "sadness": 0.0, "surprise": 0.0 } } } ]
 ghost
ghost [Open up a terminal in VSCode](https://code.visualstudio.com/docs/editor/integrated-terminal) inside your function's directory, type `npm install parse-multipart`, and press enter.
> :bulb: Forgot how to navigate a terminal? [Check this out.](https://computers.tutsplus.com/tutorials/navigating-the-terminal-a-gentle-introduction--mac-3855)
**Note:** the text outputted by the console does not mean there was an error! The npm package has successfully been installed.
[Open up a terminal in VSCode](https://code.visualstudio.com/docs/editor/integrated-terminal) inside your function's directory, type `npm install parse-multipart`, and press enter.
> :bulb: Forgot how to navigate a terminal? [Check this out.](https://computers.tutsplus.com/tutorials/navigating-the-terminal-a-gentle-introduction--mac-3855)
**Note:** the text outputted by the console does not mean there was an error! The npm package has successfully been installed.

Week 2 Step 1 ⬤◯◯◯◯◯◯◯ | 🕐 Estimated completion: 5-20 minutes
Getting Emotional ~ With the Face API
✅ Task:
Create a request in Postman to send an image of a person to the Azure Face API to return the subject's emotions
API_ENDPOINTANDSUBSCRIPTION_KEY🚧 Test your Work
You should get the following expected output if you have configured your Face API correcty, as well as sent the request with the correct parameters and body.
:white_check_mark: Expected Output
```json { "result": [ { "faceId": "d25465d6-0c38-4417-8466-cabdd908e756", "faceRectangle": { "top": 313, "left": 210, "width": 594, "height": 594 }, "faceAttributes": { "emotion": { "anger": 0, "contempt": 0, "disgust": 0, "fear": 0, "happiness": 1, "neutral": 0, "sadness": 0, "surprise": 0 } } } ] } ```1. The Face API
The Face API will accept the image and return information about the face, specifically emotions. Watch this video on Microsoft Cognitive Services for an in-depth explanation: http://www.youtube.com/watch?v=2aA8OEZ1wk8
❓ How do I create and access the Face API?
1. Log into your Azure portal 2. Navigate to **Create a Resource**, the **AI + Machine Learning** tab on the left, and finally select **Face** and fill out the necessary information 3. Record and save the API endpoint and [subscription key](https://docs.microsoft.com/en-us/azure/api-management/api-management-subscriptions) 4. Place the API endpoint and subscrition key in the GitHub repository secrets: `API_ENDPOINT` AND `SUBSCRIPTION_KEY` * These keys will be used in the Azure function to give access to this API❓ Where can I find the Face API keys?
1. Navigate to the home page on the Micrsoft Azure portal (https://portal.azure.com/#home)2. Using Postman to Send a Request
Now, we can test if our API is working using Postman. Make sure to pay close attention to the documentation and the API Reference
Request URL
Request URL is used when a web client makes a request to a server for a resource. Notice that the request url listed in the API reference is this:
https://{endpoint}/face/v1.0/detect[?returnFaceId]\[&returnFaceLandmarks]\[&returnFaceAttributes]\[&recognitionModel]\[&returnRecognitionModel][&detectionModel]Parameters
Parameters are typically used in requests to APIs to specify settings or customize what YOU want to receive.
❓ What are the parameters for the request?
The Request URL has the following parameters in [ ]: * [?returnFaceId] * [&returnFaceLandmarks] * [&returnFaceAttributes] * [&recognitionModel] * [&returnRecognitionModel] * [&detectionModel] Important things to note: - All of the bracketed sections represent possible request parameters - Read through **Request Parameters** section carefully - How can we specify that we want to get the emotion data? - All of the parameters are **optional** - We can delete the parameters we don't need in our request - Your **request URL** only requres one parameter, with a specific value - Between `detect` and your parameter, add `?` - *If you had more than one parameter,* you would need to place `&` between each (but not between `detect` and your first parameter) - Since we only have one parameter, no `&` are needed :bulb: [**All of this is located in the documentation! Find this section to read more:**](https://westus.dev.cognitive.microsoft.com/docs/services/563879b61984550e40cbbe8d/operations/563879b61984550f30395236) 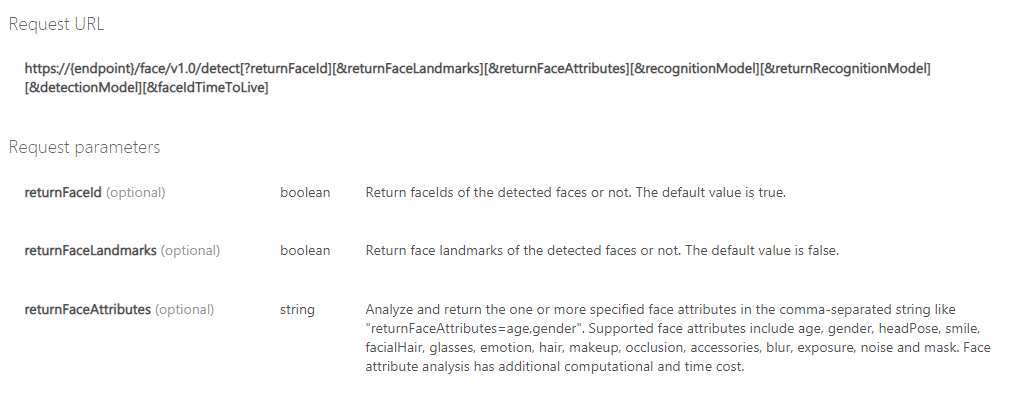Request Headers
 tell the receiving end of the request what type of data is in the body.
❓ How do I specify Request Headers?
- Go back to the Face API documentation [here](https://westus.dev.cognitive.microsoft.com/docs/services/563879b61984550e40cbbe8d/operations/563879b61984550f30395236), and find the **Request headers** section. - The `Content-Type` header should be set to`application/octet-stream`. This specifies a binary file. - The `Ocp-Apim-Subscription-Key` header should be set to one of your two keys from your Face API resource. - Request headers are **not** part of the request URL. They are specified in the Postman headers tab:Request Body
The body of a POST request contains the data you are sending.
❓ How do I send the image in the body of the POST request?
To send a post request, click on the dropdown and select `POST`. This means that we are going to send data to the server. Prior to this, we have been getting data from the server with a `GET` request.