 leoxiaobin
commented
6 years ago
leoxiaobin
commented
6 years ago Please follow our validation code.
Open zyoohv opened 6 years ago
leoxiaobin
commented
6 years ago Please follow our validation code.
 ahwaleed
commented
6 years ago
ahwaleed
commented
6 years ago Hi @zyoohv,
I think you are not loading the weights of the models.
model.load_state_dict(torch.load(config.TEST.MODEL_FILE))
However, I am still not able to get correctly predict my own image. Were you able to figure it out? The validation uses the function get_final_preds but I am not sure what to give as center and scale.
Hi @leoxiaobin Can you please elaborate the use of center and scale arguments? Do we need to tag our images with these in order to use your trained model?
 zyoohv
commented
5 years ago
zyoohv
commented
5 years ago @ahwaleed Thank you very much, now I can use it to predict my own image.
But unfortunately, I meet the same problem with you. I can not get correctly result on most of my images. I think it mainly because the model has overfit to the special dataset, so you'd better train your own model.
good luck.
 ybpaopao
commented
5 years ago
ybpaopao
commented
5 years ago @zyoohv Hi, I also want to predict my own images using the pre-trained model. However, the results are not satisfactory. I'm afraid I have to train my own model but not use the pre-trained model. BTW, have you figured out the use of center and scale? I did not use these two terms and I wonder wheter they are necessary to improve the results.
ybpaopao
commented
5 years ago @ahwaleed Hi, do you figure out how to predict own images with satisfactory performance? I wonder whether we can use the pre-trained models on my own images.
 QichaoXu
commented
5 years ago
QichaoXu
commented
5 years ago @ybpaopao I tested the pre-trained model with my own image, the result is good in my case. This is how I run it with center and scale arguments:
def _box2cs(box, image_width, image_height):
    x, y, w, h = box[:4]
    return _xywh2cs(x, y, w, h, image_width, image_height)

def _xywh2cs(x, y, w, h, image_width, image_height):
    center = np.zeros((2), dtype=np.float32)
    center[0] = x + w * 0.5
    center[1] = y + h * 0.5

    aspect_ratio = image_width * 1.0 / image_height
    pixel_std = 200

    if w > aspect_ratio * h:
        h = w * 1.0 / aspect_ratio
    elif w < aspect_ratio * h:
        w = h * aspect_ratio
    scale = np.array(
        [w * 1.0 / pixel_std, h * 1.0 / pixel_std],
        dtype=np.float32)
    if center[0] != -1:
        scale = scale * 1.25

    return center, scale

## Load an image
image_file = 'image_00001.jpg'
data_numpy = cv2.imread(image_file, cv2.IMREAD_COLOR | cv2.IMREAD_IGNORE_ORIENTATION)
if data_numpy is None:
    logger.error('=> fail to read {}'.format(image_file))
    raise ValueError('Fail to read {}'.format(image_file))

# object detection box
box = [450, 160, 350, 560]
c, s = _box2cs(box, data_numpy.shape[0], data_numpy.shape[1])
r = 0

trans = get_affine_transform(c, s, r, config.MODEL.IMAGE_SIZE)
input = cv2.warpAffine(
    data_numpy,
    trans,
    (int(config.MODEL.IMAGE_SIZE[0]), int(config.MODEL.IMAGE_SIZE[1])),
    flags=cv2.INTER_LINEAR)

# vis transformed image
cv2.imshow('image', input)
cv2.waitKey(0)

transform = transforms.Compose([
    transforms.ToTensor(),
    transforms.Normalize(mean=[0.485, 0.456, 0.406],
                        std=[0.229, 0.224, 0.225]),
    ])
input = transform(input).unsqueeze(0)

# switch to evaluate mode
model.eval()

with torch.no_grad():
    # compute output heatmap
    output = model(input)

    # compute coordinate
    preds, maxvals = get_final_preds(
        config, output.clone().cpu().numpy(), np.asarray([c]), np.asarray([s]))

    # plot
    image = data_numpy.copy()
    for mat in preds[0]:
        x, y = int(mat[0]), int(mat[1])
        cv2.circle(image, (x, y), 2, (255, 0, 0), 2)

    # vis result
    cv2.imshow('res', image)
    cv2.waitKey(0)
williamrodz
commented
5 years ago
williamrodz
commented
5 years ago @ybpaopao I tested the pre-trained model with my own image, the result is good in my case. This is how I run it with center and scale arguments:
def _box2cs(box, image_width, image_height):
    x, y, w, h = box[:4]
    return _xywh2cs(x, y, w, h, image_width, image_height)

def _xywh2cs(x, y, w, h, image_width, image_height):
    center = np.zeros((2), dtype=np.float32)
    center[0] = x + w * 0.5
    center[1] = y + h * 0.5

    aspect_ratio = image_width * 1.0 / image_height
    pixel_std = 200

    if w > aspect_ratio * h:
        h = w * 1.0 / aspect_ratio
    elif w < aspect_ratio * h:
        w = h * aspect_ratio
    scale = np.array(
        [w * 1.0 / pixel_std, h * 1.0 / pixel_std],
        dtype=np.float32)
    if center[0] != -1:
        scale = scale * 1.25

    return center, scale

## Load an image
image_file = 'image_00001.jpg'
data_numpy = cv2.imread(image_file, cv2.IMREAD_COLOR | cv2.IMREAD_IGNORE_ORIENTATION)
if data_numpy is None:
    logger.error('=> fail to read {}'.format(image_file))
    raise ValueError('Fail to read {}'.format(image_file))

# object detection box
box = [450, 160, 350, 560]
c, s = _box2cs(box, data_numpy.shape[0], data_numpy.shape[1])
r = 0

trans = get_affine_transform(c, s, r, config.MODEL.IMAGE_SIZE)
input = cv2.warpAffine(
    data_numpy,
    trans,
    (int(config.MODEL.IMAGE_SIZE[0]), int(config.MODEL.IMAGE_SIZE[1])),
    flags=cv2.INTER_LINEAR)

# vis transformed image
cv2.imshow('image', input)
cv2.waitKey(0)

transform = transforms.Compose([
    transforms.ToTensor(),
    transforms.Normalize(mean=[0.485, 0.456, 0.406],
                        std=[0.229, 0.224, 0.225]),
    ])
input = transform(input).unsqueeze(0)

# switch to evaluate mode
model.eval()

with torch.no_grad():
    # compute output heatmap
    output = model(input)

    # compute coordinate
    preds, maxvals = get_final_preds(
        config, output.clone().cpu().numpy(), np.asarray([c]), np.asarray([s]))

    # plot
    image = data_numpy.copy()
    for mat in preds[0]:
        x, y = int(mat[0]), int(mat[1])
        cv2.circle(image, (x, y), 2, (255, 0, 0), 2)

    # vis result
    cv2.imshow('res', image)
    cv2.waitKey(0)
Hi Qichao! Could you share your full code for testing the pretrained model with one single image? I'd really appreciate that. I ran what you have in this last block and get see some import statement errors.
Thank you!
 jiaxue-ai
commented
5 years ago
jiaxue-ai
commented
5 years ago Hi @williamrodz, I filled the left code, but the result is not good for the mpii images
from __future__ import absolute_import
from __future__ import division
from __future__ import print_function

import argparse
import os
import pprint

import torch
import torch.nn.parallel
import torch.backends.cudnn as cudnn
import torch.optim
import torch.utils.data
import torch.utils.data.distributed
import torchvision.transforms as transforms
import matplotlib.pyplot as plt
import _init_paths
from core.config import config
from core.config import update_config
from core.config import update_dir
from core.inference import get_final_preds
from core.loss import JointsMSELoss
from core.function import validate
from utils.utils import create_logger
from utils.transforms import *
import cv2
import dataset
import models
import numpy as np

def parse_args():
    parser = argparse.ArgumentParser(description='Train keypoints network')
    # general
    parser.add_argument('--cfg',
                        help='experiment configure file name',
                        required=True,
                        type=str)

    args, rest = parser.parse_known_args()
    # update config
    update_config(args.cfg)

    # training
    parser.add_argument('--frequent',
                        help='frequency of logging',
                        default=config.PRINT_FREQ,
                        type=int)
    parser.add_argument('--gpus',
                        help='gpus',
                        type=str)
    parser.add_argument('--workers',
                        help='num of dataloader workers',
                        type=int)
    parser.add_argument('--model-file',
                        help='model state file',
                        type=str)
    parser.add_argument('--use-detect-bbox',
                        help='use detect bbox',
                        action='store_true')
    parser.add_argument('--flip-test',
                        help='use flip test',
                        action='store_true')
    parser.add_argument('--post-process',
                        help='use post process',
                        action='store_true')
    parser.add_argument('--shift-heatmap',
                        help='shift heatmap',
                        action='store_true')
    parser.add_argument('--coco-bbox-file',
                        help='coco detection bbox file',
                        type=str)

    args = parser.parse_args()

    return args

def reset_config(config, args):
    if args.gpus:
        config.GPUS = args.gpus
    if args.workers:
        config.WORKERS = args.workers
    if args.use_detect_bbox:
        config.TEST.USE_GT_BBOX = not args.use_detect_bbox
    if args.flip_test:
        config.TEST.FLIP_TEST = args.flip_test
    if args.post_process:
        config.TEST.POST_PROCESS = args.post_process
    if args.shift_heatmap:
        config.TEST.SHIFT_HEATMAP = args.shift_heatmap
    if args.model_file:
        config.TEST.MODEL_FILE = args.model_file
    if args.coco_bbox_file:
        config.TEST.COCO_BBOX_FILE = args.coco_bbox_file

def _box2cs(box, image_width, image_height):
    x, y, w, h = box[:4]
    return _xywh2cs(x, y, w, h, image_width, image_height)

def _xywh2cs(x, y, w, h, image_width, image_height):
    center = np.zeros((2), dtype=np.float32)
    center[0] = x + w * 0.5
    center[1] = y + h * 0.5

    aspect_ratio = image_width * 1.0 / image_height
    pixel_std = 200

    if w > aspect_ratio * h:
        h = w * 1.0 / aspect_ratio
    elif w < aspect_ratio * h:
        w = h * aspect_ratio
    scale = np.array(
        [w * 1.0 / pixel_std, h * 1.0 / pixel_std],
        dtype=np.float32)
    if center[0] != -1:
        scale = scale * 1.25

    return center, scale

def main():
    args = parse_args()
    reset_config(config, args)

    logger, final_output_dir, tb_log_dir = create_logger(
        config, args.cfg, 'valid')

    logger.info(pprint.pformat(args))
    logger.info(pprint.pformat(config))

    # cudnn related setting
    cudnn.benchmark = config.CUDNN.BENCHMARK
    torch.backends.cudnn.deterministic = config.CUDNN.DETERMINISTIC
    torch.backends.cudnn.enabled = config.CUDNN.ENABLED

    model = eval('models.'+config.MODEL.NAME+'.get_pose_net')(
        config, is_train=False
    )

    if config.TEST.MODEL_FILE:
        logger.info('=> loading model from {}'.format(config.TEST.MODEL_FILE))
        model.load_state_dict(torch.load(config.TEST.MODEL_FILE))
    else:
        model_state_file = os.path.join(final_output_dir,
                                        'final_state.pth.tar')
        logger.info('=> loading model from {}'.format(model_state_file))
        model.load_state_dict(torch.load(model_state_file))

    gpus = [int(i) for i in config.GPUS.split(',')]
    model = torch.nn.DataParallel(model, device_ids=gpus).cuda()

    # define loss function (criterion) and optimizer
    criterion = JointsMSELoss(
        use_target_weight=config.LOSS.USE_TARGET_WEIGHT
    ).cuda()

    ## Load an image
    image_file = '/home/jia/Downloads/github/human-pose-estimation.pytorch/data/mpii/images/060601383.jpg'
    data_numpy = cv2.imread(image_file, cv2.IMREAD_COLOR | cv2.IMREAD_IGNORE_ORIENTATION)
    # data_numpy = cv2.resize(data_numpy, (512, 512))
    if data_numpy is None:
        logger.error('=> fail to read {}'.format(image_file))
        raise ValueError('Fail to read {}'.format(image_file))

    # object detection box
    box = [450, 160, 350, 560]
    c, s = _box2cs(box, data_numpy.shape[0], data_numpy.shape[1])
    r = 0

    trans = get_affine_transform(c, s, r, config.MODEL.IMAGE_SIZE)
    input = cv2.warpAffine(
        data_numpy,
        trans,
        (int(config.MODEL.IMAGE_SIZE[0]), int(config.MODEL.IMAGE_SIZE[1])),
        flags=cv2.INTER_LINEAR)

    # vis transformed image
    cv2.imshow('image', input)
    cv2.waitKey(3000)

    transform = transforms.Compose([
        transforms.ToTensor(),
        transforms.Normalize(mean=[0.485, 0.456, 0.406],
                            std=[0.229, 0.224, 0.225]),
        ])
    input = transform(input).unsqueeze(0)

    # switch to evaluate mode
    model.eval()
    with torch.no_grad():
        # compute output heatmap
        output = model(input)
        # compute coordinate
        preds, maxvals = get_final_preds(
            config, output.clone().cpu().numpy(), np.asarray([c]), np.asarray([s]))
        # plot
        image = data_numpy.copy()
        for mat in preds[0]:
            x, y = int(mat[0]), int(mat[1])
            cv2.circle(image, (x, y), 2, (255, 0, 0), 2)

        # vis result
        cv2.imshow('res', image)
        cv2.waitKey(10000)

if __name__ == '__main__':
    main()
the command to run it is create a .py file in pose_estimation folder and use command
python pose_estimation/demo.py --cfg experiments/mpii/resnet50/256x256_d256x3_adam_lr1e-3.yaml --flip-test --model-file models/pytorch/pose_mpii/pose_resnet_50_256x256.pth.tar
 cs-heibao
commented
5 years ago
cs-heibao
commented
5 years ago @jiaxue1993 Hi, I want to confirm something to you: 1) box = [450, 160, 350, 560] is the example person box in your image(the image also contains more than one people); 2) the function _box2cs and _xywh2cs are both defined by you? extract the image part according to the box from the raw image, and then do some transform to get the final input? thanks!
jiaxue-ai
commented
5 years ago @junjieAI I just filled up the missed part of Qichao, please read the whole discussion. Actually I find the result is not good. So I just followed the author's implementation, use faster rCNN to detect person from images, then follow their validation code for testing.
cs-heibao
commented
5 years ago @jiaxue1993 I get it, thanks
cs-heibao
commented
5 years ago @KaiserLew I've tried use get_max_preds instead of get_final_preds, but also can not get the right result. are there some tricks ? And I use the following script, the image_file is just a person image:
image_file = './1.jpg'
data_numpy = cv2.imread(image_file, cv2.IMREAD_COLOR | cv2.IMREAD_IGNORE_ORIENTATION)
# data_numpy = cv2.resize(data_numpy, (512, 512))
if data_numpy is None:
    logger.error('=> fail to read {}'.format(image_file))
    raise ValueError('Fail to read {}'.format(image_file))

# # object detection box
# box = [450, 160, 350, 560]
# c, s = _box2cs(box, data_numpy.shape[0], data_numpy.shape[1])
# r = 0
#
# trans = get_affine_transform(c, s, r, config.MODEL.IMAGE_SIZE)
# input = cv2.warpAffine(
#     data_numpy,
#     trans,
#     (int(config.MODEL.IMAGE_SIZE[0]), int(config.MODEL.IMAGE_SIZE[1])),
#     flags=cv2.INTER_LINEAR)
input = cv2.resize(data_numpy,(int(config.MODEL.IMAGE_SIZE[0]), int(config.MODEL.IMAGE_SIZE[1])),interpolation=cv2.INTER_LINEAR)
input1 = input.copy()
# vis transformed image
cv2.imshow('image', input)
cv2.waitKey()
cv2.destroyAllWindows()

transform = transforms.Compose([
    transforms.ToTensor(),
    transforms.Normalize(mean=[0.485, 0.456, 0.406],
                         std=[0.229, 0.224, 0.225]),
])
input = transform(input).unsqueeze(0)

# switch to evaluate mode
model.eval()
with torch.no_grad():
    # compute output heatmap
    output = model(input)
    # # compute coordinate
    # preds, maxvals = get_final_preds(
    #     config, output.clone().cpu().numpy(), np.asarray([c]), np.asarray([s]))

    # compute coordinate
    preds, maxvals = get_max_preds(output.clone().cpu().numpy())
    # plot
    # image = data_numpy.copy()
    image = input1
    for mat in preds[0]:
        x, y = int(mat[0]), int(mat[1])
        cv2.circle(image, (x, y), 2, (255, 0, 0), 2)

    # vis result
    cv2.imshow('res', image)
    cv2.waitKey(10000)
    cv2.destroyAllWindows()
Godatplay
commented
5 years ago
Godatplay
commented
5 years ago @jiaxue1993
So I just followed the author's implementation, use faster rCNN to detect person from images, then follow their validation code for testing.
Can you elaborate on this? When you say "follow their validation code" do you mean you use the valid.py script as-is by creating your own person detection JSON and then create a dummy annotations file? Or have you modified the codebase in some meaningful way? For example, are you still using a config file and having the DATASET set to coco?
cs-heibao
commented
5 years ago @Godatplay actually, if you use 'get_final_preds' function, you should prepare the object box to get the parameter 'c' and 's'. So for test, you can give a raw image and the corresponding object boxes(list or other format is ok), and then use forloop you can get all object's keypoint.
Godatplay
commented
5 years ago Thanks for your reply. It seems like there is more to it to get results comparable to the original test, though. @jiaxue1993 and @leoxiaobin both mentioned using the validation code (sorry, I mis-tagged)
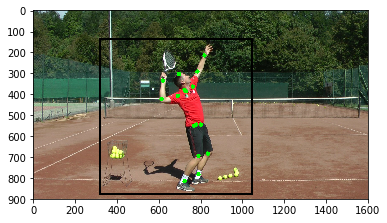
 shehel
commented
5 years ago
shehel
commented
5 years ago I obtain this with resnet50 and @jiaxue1993's snippet. Model maybe sensitive to localization, so make sure to use either detection models like rcnn or provide the bounding box manually. In my case, the black box shows the one I did manually.
 DragonAndSky
commented
5 years ago
DragonAndSky
commented
5 years ago @QichaoXu It is useful ,thanks, some low confidence points should be filtered out
 VD2410
commented
5 years ago
VD2410
commented
5 years ago Hi @junjieAI @QichaoXu @shehel or anyone who has tried this and got satisfied results Can you send How did you got a good result with the pretrained models. I am some how not able to get a good result. Also I am getting errors for imports while running the code given by @junjieAI. My mail id is vishalbatavia88@yahoo.com
VD2410
commented
5 years ago @jiaxue1993 When I try to run the code you filled it gives me key error
self.stage2_cfg = cfg['MODEL']['EXTRA']['STAGE2'] KeyError: 'STAGE2'.
Do you have any idea how to solve it
jiaxue-ai
commented
5 years ago I didn't work on this for a while, just briefly looked through the code, I guess that might because model loading error? Just recommend you go through the authors tutorial first before working on your own images.
VD2410
commented
5 years ago Hello @jiaxue1993 ,
Thank you for the reply
I have mailed you the thing which I tried, I you have sometime and can have a look at it then it would be a great help.
Thank You
VD2410
commented
5 years ago Thank You @jiaxue1993 I got a good output for my data.
 rafikg
commented
5 years ago
rafikg
commented
5 years ago @zyoohv could you elaborate the use of pixel_std and this instruction in _xywh2cs function
if center[0] != -1:
   scale = scale * 1.25
ridasalam
commented
5 years ago
ridasalam
commented
5 years ago @jiaxue1993 i think that:
c, s = _box2cs(box, data_numpy.shape[0], data_numpy.shape[1])should be
c, s = _box2cs(box, data_numpy.shape[1], data_numpy.shape[0]) OlivierX
commented
5 years ago
OlivierX
commented
5 years ago box = [450, 160, 350, 560] what does this line of code mean?
 YaoChungLiang
commented
4 years ago
YaoChungLiang
commented
4 years ago @jiaxue1993 Thanks for the code. But I'm wondering is the affine transform necessary?
 BadMachine
commented
4 years ago
BadMachine
commented
4 years ago Code for visualizing is available in my fork https://github.com/BadMachine/human-pose-estimation.pytorch
 finnickniu
commented
4 years ago
finnickniu
commented
4 years ago Faster-rcnn, Key points detection is available now. Besides, I added the function of social distance detection as well. https://github.com/finnickniu/Pytorch_keypoint_Socialdistance
 AndriiHura
commented
3 years ago
AndriiHura
commented
3 years ago I guess this implementation is suitable for single person pose estimation only, at least it works fine for me this way.
I used @jiaxue1993 code, and all I did is uncommented
# data_numpy = cv2.resize(data_numpy, (512, 512)),
and changed box code to
box = [0, 0, 512, 512]
and now it works fine when there is only one person in the picture, but when there are a lot of people it either works for only fine 1 person, and doesn't notice all the rest, or it splits its predicted point all over people, and it becomes mess :)
And to perform multiperson pose estimation it is necessary to add som object detection algo for boxes generation.
 tucachmo2202
commented
3 years ago
tucachmo2202
commented
3 years ago @AndriiHura Definitely, it needs an human detection first!
tucachmo2202
commented
3 years ago @jiaxue1993, I find that your codes lack of something like nms? Because, I try validate in COCO dataset via your inference code, the result is worse than using code validation code of this repo.
 KKK114514
commented
3 years ago
KKK114514
commented
3 years ago @BadMachine, could you show how to define width and height when visualizating?
python pose_estimation\demo_picture.py --img pose_estimation\test\hugh_laurie.jpg --model .\models\onnx\pose_resnet_152_384x288.onnx --type ONNX --width 656 --height 384
I read your code carefully, and implement with following code. But I still get the wrong result. Could you help me?
LoadNet.pdf