 mulder82
commented
3 months ago
mulder82
commented
3 months ago @dreamer1976
Hi, please open tasmota console type Rule1 hit enter and paste the console output here.
Closed dreamer1976 closed 3 months ago
mulder82
commented
3 months ago @dreamer1976
Hi, please open tasmota console type Rule1 hit enter and paste the console output here.
 dreamer1976
commented
3 months ago
dreamer1976
commented
3 months ago 16:35:20.608 CMD: Rule1 16:35:20.614 RSL: RESULT = {"Rule1":{"State":"OFF","Once":"OFF","StopOnError":"OFF","Length":0,"Free":511,"Rules":""}}
mulder82
commented
3 months ago Rule was not added correctly. Open tasmota console and paste following comand then hit enter:
Rule1 ON System#Init DO serialsend5 64696d3d313030ffffff ENDON ON Wifi#Connected DO serialsend5 706167652036ffffff54312e7478743d2257494649204f4b22ffffff50312e7069633d3237ffffff ENDON ON Wifi#Disconnected DO serialsend5 706167652036ffffff54312e7478743d2257494649204f46464c494e4522ffffff50312e7069633d3531ffffff ENDON ON Mqtt#Connected DO serialsend5 706167652036ffffff54312e7478743d224d515454204f4b22ffffff50312e7069633d3236ffffff ENDON ON Mqtt#Disconnected DO serialsend5 706167652036ffffff54312e7478743d224d515454204f46464c494e4522ffffff50312e7069633d3434ffffff ENDONafter that if you type rule1 the result should be:
{"Rule1":{"State":"ON","Once":"OFF","StopOnError":"OFF","Length":562,"Free":338,"Rules":"ON System#Init DO serialsend5 64696d3d313030ffffff ENDON ON Wifi#Connected DO serialsend5 706167652036ffffff54312e7478743d2257494649204f4b22ffffff50312e7069633d3237ffffff ENDON ON Wifi#Disconnected DO serialsend5 706167652036ffffff54312e7478743d2257494649204f46464c494e4522ffffff50312e7069633d3531ffffff ENDON ON Mqtt#Connected DO serialsend5 706167652036ffffff54312e7478743d224d515454204f4b22ffffff50312e7069633d3236ffffff ENDON ON Mqtt#Disconnected DO serialsend5 706167652036ffffff54312e7478743d224d515454204f46464c494e4522ffffff50312e7069633d3434ffffff ENDON"}}Now i get this when i touch the screen. 17:47:04.750 MQT: tele/TNDtttttttttttttttttttttttttttttttttttttttttttttttttttt/RESULT = {"SerialReceived":"00000000000000000000000000000000000000000000000000000000"} in the console and
cmnd TND POWER TNDtttttttttttttttttttttttttttttttttttttttttttttttttttt POWER
in my MQTT exploror but still the logo with TNDisplay in my touch screen
dreamer1976
commented
3 months ago 17:54:40.033 CMD: Rule1 1 17:54:40.038 RUL: Rule1 ON System#Init DO serialsend5 64696d3d313030ffffff ENDON ON Wifi#Connected DO serialsend5 706167652036ffffff54312e7478743d2257494649204f4b22ffffff50312e7069633d3237ffffff ENDON ON Wifi#Disconnected DO serialsend5 706167652036ffffff54312e7478743d2257494649204f46464c494e4522ffffff50312e7069633d3531ffffff ENDON ON Mqtt#Connected DO serialsend5 706167652036ffffff54312e7478743d224d515454204f4b22ffffff50312e7069633d3236ffffff ENDON ON Mqtt#Disconnected DO serialsend5 17:54:40.040 RUL: Rule1 +706167652036ffffff54312e7478743d224d515454204f46464c494e4522ffffff50312e7069633d3434ffffff ENDON 17:54:40.045 MQT: stat/TNDtttttttttttttttttttttttttttttttttttttttttttttttttttt/RESULT = {"Rule1":{"State":"ON","Once":"OFF","StopOnError":"OFF","Length":562,"Free":338,"Rules":"ON System#Init DO serialsend5 64696d3d313030ffffff ENDON ON Wifi#Connected DO serialsend5 706167652036ffffff54312e7478743d2257494649204f4b22ffffff50312e7069633d3237ffffff ENDON ON Wifi#Disconnected DO serialsend5 706167652036ffffff54312e7478743d2257494649204f46464c494e4522ffffff50312e7069633d3531ffffff ENDON ON Mqtt#Connected DO serialsend5 706167652036ffffff54312e7478743d224d515454204f4b22ffffff50312e7069633d3236ffffff ENDON ON Mqtt#Disconnected DO serialsend5 706167652036ffffff54312e7478743d224d515454204f46464c494e4522ffffff50312e7069633d3434ffffff ENDON"}}
mulder82
commented
3 months ago ok, next step check serial port settings, type Baudrate in the console and hit enter, what result?
dreamer1976
commented
3 months ago {"Baudrate":115200}
mulder82
commented
3 months ago Change it to 9600, execute following command:
Baudrate 9600after that try execute command:
serialsend5 706167652033ffffff If the page on the display changes then the settings are correct. Restart tasmota and you should see "WiFi OK", "MQTT OK".
dreamer1976
commented
3 months ago 18:09:33.241 MQT: stat/TND/RESULT = {"Baudrate":9600} 18:10:27.739 CMD: serialsend5 706167652033ffffff 18:10:27.745 MQT: stat/TND/RESULT = {"SerialSend":"Done"}
When i touch 18:10:38.557 MQT: tele/TND/RESULT = {"SerialReceived":"70735F636C69636BFFFFFF"} 18:10:47.552 MQT: tele/TND/RESULT = {"SerialReceived":"70735F636C69636BFFFFFF"} But no change on the display
mulder82
commented
3 months ago Touch events looks good, after restart display show informations about wifi and mqtt?
dreamer1976
commented
3 months ago 00:00:00.001 HDW: ESP8266EX 00:00:00.050 CFG: Loaded from flash at F7, Count 37 00:00:00.055 SER: Set to 8N1 9600 bit/s 00:00:00.056 QPC: Count 1 00:00:00.065 Project tasmota - Tasmota Version 14.1.0(release-display)-2_7_6(2024-06-03T11:53:04) 00:00:00.127 RUL: SYSTEM#INIT performs 'serialsend5 64696d3d313030ffffff' 00:00:00.131 RSL: RESULT = {"SerialSend":"Done"} 00:00:01.001 WIF: Connecting to AP1 MHI Channel 1 BSSId 10:27:F5:1B:54:B2 in mode 11n as TND-2707... 00:00:01.762 RSL: RESULT = {"SerialReceived":"FE000000FFFFFF88FFFFFF"} 00:00:02.510 WIF: Connected 00:00:02.576 RUL: WIFI#CONNECTED performs 'serialsend5 706167652036ffffff54312e7478743d2257494649204f4b22ffffff50312e7069633d3237ffffff' 00:00:02.579 RSL: RESULT = {"SerialSend":"Done"} 00:00:02.762 HTP: Web server active on TND-2707 with IP address 192.168.4.88 18:16:58.458 MQT: Attempting connection... 18:16:58.515 MQT: Connected 18:16:58.518 MQT: tele/TND/LWT = Online (retained) 18:16:58.520 MQT: cmnd/TND/POWER = 18:16:58.530 MQT: tele/TND/INFO1 = {"Info1":{"Module":"TNDisplay","Version":"14.1.0(release-display)","FallbackTopic":"cmnd/DVES_5D8A93_fb/","GroupTopic":"cmnd/tasmotas/"}} 18:16:58.539 MQT: tele/TND/INFO2 = {"Info2":{"WebServerMode":"Admin","Hostname":"TND-2707","IPAddress":"192.168.4.88"}} 18:16:58.548 MQT: tele/TND/INFO3 = {"Info3":{"RestartReason":"Power On","BootCount":20}} 18:16:58.621 RUL: MQTT#CONNECTED performs 'serialsend5 706167652036ffffff54312e7478743d224d515454204f4b22ffffff50312e7069633d3236ffffff' 18:16:58.627 MQT: stat/TND/RESULT = {"SerialSend":"Done"} 18:17:00.327 QPC: Reset 18:17:02.295 MQT: tele/TND/STATE = {"Time":"2024-07-02T18:17:02","Uptime":"0T00:00:09","UptimeSec":9,"Heap":28,"SleepMode":"Dynamic","Sleep":50,"LoadAvg":19,"MqttCount":1,"Wifi":{"AP":1,"SSId":"MHI","BSSId":"10:27:F5:1B:54:B2","Channel":1,"Mode":"11n","RSSI":82,"Signal":-59,"LinkCount":1,"Downtime":"0T00:00:04"}}
dreamer1976
commented
3 months ago No wifi or MQTT still the same
mulder82
commented
3 months ago TX pin from ESP is correctly connected to the RX pin on display?
dreamer1976
commented
3 months ago 18:25:55.145 MQT: tele/TND/RESULT = {"SerialReceived":"70735F636C69636BFFFFFF"} 18:25:56.086 MQT: tele/TND/RESULT = {"SerialReceived":"70735F636C69636BFFFFFF"} 18:25:57.054 MQT: tele/TND/RESULT = {"SerialReceived":"70735F636C69636BFFFFFF"} 18:25:59.194 MQT: tele/TND/RESULT = {"SerialReceived":"70735F636C69636BFFFFFF"} 18:26:00.305 MQT: tele/TND/RESULT = {"SerialReceived":"70735F636C69636BFFFFFF"} 18:26:01.378 MQT: tele/TND/RESULT = {"SerialReceived":"70735F636C69636BFFFFFF"} 18:26:02.643 MQT: tele/TND/RESULT = {"SerialReceived":"70735F636C69636BFFFFFF"} 18:26:04.817 MQT: tele/TND/RESULT = {"SerialReceived":"70735F636C69636BFFFFFF"}
Wherever I touch the screen it gives this output. it cannot be that the flashing of the screen was not done correctly. because I get the same output everywhere.
dreamer1976
commented
3 months ago TX i think its ok
mulder82
commented
3 months ago 8:26:04.817 MQT: tele/TND/RESULT = {"SerialReceived":"70735F636C69636BFFFFFF"}This output is correct, on the status page there is one large button for the entire screen. Clicking it should send just such a message.
Port speed settings are also ok, data received from the display is ok, the problem is only with sending data to the display... try check serial settings by sending this command:
SerialConfigresult should be 8N1
dreamer1976
commented
3 months ago 18:40:48.925 MQT: stat/TND/RESULT = {"SerialConfig":"8N1"}
mulder82
commented
3 months ago And still after sending the command:
serialsend5 706167652033ffffffthe screen does not respond?
dreamer1976
commented
3 months ago 18:44:48.302 CMD: serialsend5 706167652033ffffff 18:44:48.308 MQT: stat/TND/RESULT = {"SerialSend":"Done"} and the screens keeps still with logo and TNDisplay in the schreen
mulder82
commented
3 months ago Can you post some photos of pins connections? Software looks good, lets check hardware...
mulder82
commented
3 months ago And one more check, what is output of command:
SerialDelimiter?
dreamer1976
commented
3 months ago dreamer1976
commented
3 months ago dreamer1976
commented
3 months ago 19:12:19.732 MQT: stat/TND/RESULT = {"SerialDelimiter":255}
mulder82
commented
3 months ago Connections look good, try change delimiter to 254, command:
SerialDelimiter 254any changes after restart?
dreamer1976
commented
3 months ago No changes
mulder82
commented
3 months ago
Your module and template settings looking like this?
dreamer1976
commented
3 months ago Yes i think so Only by my is the name tasmota. And i have tasmota 14.1.0 instead of 13.4.0
mulder82
commented
3 months ago We have probably checked all possible settings step by step and you have everything configured correctly, the communication from the display works, the problem is still with sending data to the screen and I have no idea what could be wrong anymore.... do you have the possibility to connect nextion via ttl adapter to PC? There is a debug option in NextionEditor, maybe this way you could check if the problem is only in Tasmota or maybe on the side of the display.. wires?
Some people also reported problems with correctly uploading the project to nextion via SD card, I uploaded the project via nextion editor and ttl adapter, maybe try this option?
dreamer1976
commented
3 months ago okay I have a TTL module. I'm going to try this. thank you so much for your project and time. If I get any further I will let you know.
mulder82
commented
3 months ago You can also hook up the ttl adapter to esp and see exactly what Tasmota is sending through the serial port. When decoding/encoding the hex strings i recommend this tools:
https://codebeautify.org/hex-string-converter https://codebeautify.org/string-hex-converter
Good luck!
dreamer1976
commented
3 months ago I orders another One. Just a different type because i ordered in the netherlands. Now i get this message. Can i adjust this?
mulder82
commented
3 months ago So the old display was broken?
You can change the display model here:
dreamer1976
commented
3 months ago yes i think is is broken, got no response to the RX. I have now WiFi OK mqtt OK and imported the nodered. What else do I have to change to get it working?
mulder82
commented
3 months ago In nodered, make sure you have properly configured the MQTT connection (MQTT configuration node) and in all MQTT-IN and MQTT-OUT nodes are correctly set MQTT topics (according to what you entered in Tasmota).
dreamer1976
commented
3 months ago where do I find the MQTT configuration node? I have some experience with nodered, but not much
mulder82
commented
3 months ago In the upper right corner the gear icon:
And then double click on:
Set your MQTT server IP and port:
If you have enabled Mosquitto Username and Password Authentication then enter it here:
After that make sure you have enabled TNDisplay flow:
Then click on deploy and you should see demo app on the nextion screen.
If the demo app doesn't show up, make sure you set a topic and full topic in Tamota like that:
And finally if you want to use other topics in tasmota change the configuration of these nodes:
dreamer1976
commented
3 months ago Next step. I get a connection and also the buttons on the screen. I tried it this afternoon in the office and when I heard a switch I also went to the switches. At home I have the same buttons, but when I press buttons I stay in the menu screen and do not go to switches. I do get the output below in nodered.
FYI I want to use this later for domoticz
8-7-2024 21:55:33node: fe1719b2.b214f8 TNDisplay/tele/RESULT : msg.payload : string[43] "{"SerialReceived":"70315F636C69636BFFFFFF"}"
mulder82
commented
3 months ago When returned value from display is a string, the returned data is 0X70+ASCII code+0xff 0xff 0xff so 70315F636C69636BFFFFFF is a 1_click and it looks good, you make any changes in demo flow?
You can also enable debug for display, click here and deploy flow:
As for controlling Domoticz from TNDisplay it can of course be done, TNDisplay can control anything you can do in Node-Red.
dreamer1976
commented
3 months ago It's the same display, same WiFi(SID), just a different MQTT IP. I'll take a look at this tonight. Is it true that the only difference I see when debugging in nodered the PIC changes. Furthermore, I see no difference when I press the on or off switch.
{"RawData":"70315F636C69636B","ReturnCode":"70","RawValue":"315F636C69636B","DataType":"String","Value":"1_click"} {"RawData":"70315F636C69636B","ReturnCode":"70","RawValue":"315F636C69636B","DataType":"String","Value":"1_click"}
ref_stop;PH.pic=15;TH.txt="Switches";P1.pic=49;T1.txt="Switch1";P2.pic=48;T2.txt="Switch2";P3.pic=48;T3.txt="Switch3";P4.pic=48;T4.txt="Switch4";ref_star ref_stop;PH.pic=15;TH.txt="Switches";P1.pic=48;T1.txt="Switch1";P2.pic=48;T2.txt="Switch2";P3.pic=48;T3.txt="Switch3";P4.pic=48;T4.txt="Switch4";ref_star
mulder82
commented
3 months ago It seems to me that you must have accidentally changed something in the demo flow. Based on the information provided the communication with the display is already working both ways, so the demo should function correctly.
In my case DemoApp looks like this:
dreamer1976
commented
3 months ago that works the same for me. I now realize it's a demo. so when touching a button i get the same output in the console and mqtt i am right. son no matter what butten the same output.
mulder82
commented
3 months ago Great, so we finally got everything up and running. Now you just need to experiment with the demo application to understand how it works and then rework it for your project.
It will be nice if you share the final version of your project. Greetings!
dreamer1976
commented
3 months ago If I understand correctly you made the demo for the screen and logos. and not yet the input for home assistant. is that right? I can now send code when pressing a button. I think I should mainly look at nextion editor if I'm right. If I have something working I will definitely share it. I may have some questions later. There is still a difference between my office and home, but I don't dare to change anything here at the moment. among other things, all my air conditioners and shutters run on my mqtt/nodered at home. In any case, thanks for the project and the support so far
dreamer1976
commented
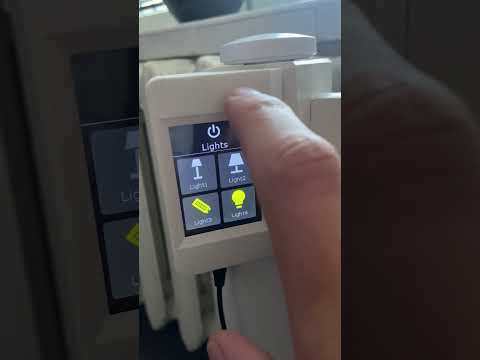
3 months ago Let's get back to my previous post. I see that you have a YouTube video that shows you switching your lighting. do you have an example of this? the code?
mulder82
commented
3 months ago The purpose of the DemoApp is to show how the communication between NodeRed and the display works. In this sample flow you have shown how to control the display and how to respond to touch events sent by the display. On this basis, you can already create any Nextion<->NodeRed integration.
As for HomeAssistant, I use this set of nodes for NodeRed<->HA communication: node-red-contrib-home-assistant-websocket
e.g. there is a "CallService" node, with which you can drive any device from HomeAssistant, so just connect the output of the "OnClick" node to the input of the "CallService" node and touching a button on the screen will drive some device. Try experimenting with this.
As for the demo of homeassistant integration, there is not really how to do it, because everyone has different devices and entity names and zones.... and creating a demo that would, for example, change the state of all available switches could make a mess.
This is what the nodes connections look like in my lights control flow:
mulder82
commented
3 months ago I will close this issue as a solved problem, if you still have any questions go ahead and create a new discussion thread or another issue.
I think I have done all the steps. it also says update success and then take out the SD card and restart it. only when I start it I don't see any WiFi ok <-> MQTT ok. I only see TNDisplay and the logo. Can you help me on where I should look?