pomelovico / keep

A learning notebook
7 stars 0 forks source link

@antd-desgin 组件库构建学习 #29

Open pomelovico opened 4 years ago

pomelovico commented 4 years ago

antd-tools

antd-tools 是antd组件库打包使用的工具,集成了编译,发布等操作,实现了按需加载的打包方式,接下来一一说明

gulp工作流

antd-tools采用gulp进行打包,入口文件在lib/gulpfile.js,所有的命令都在gulpfile中注册

antd-tools run compile

编译组件库,同时并行编译了两种代码,分别到es目录和lib目录,其区别是,es目录是支持ES module规范的代码(import),而lib目录下的代码是支持commonJS规范的代码(require)

// 编译到es module规范的代码
gulp.task('compile-with-es', done => {
  // 注意传入的参数
  compile(false).on('finish', done);
});
// 编译到commonJS规范的代码
gulp.task('compile-with-lib', done => {
  compile().on('finish', done);
});
// 编译结束后的操作,从项目的`.antd-tools.config.js`进行读取
gulp.task('compile-finalize', done => {
  // Additional process of compile finalize
  const { compile: { finalize } = {} } = getConfig();
  if (finalize) {
    finalize();
  }
  done();
});

// 并行执行连个编译任务
gulp.task(
  'compile',
  gulp.series(gulp.parallel('compile-with-es', 'compile-with-lib'), 'compile-finalize')
);

重点是这个compile函数:

// modules 表示是否转换es6 modules
function compile(modules) {
  // 清空输出目录
  rimraf.sync(modules !== false ? libDir : esDir);
// 先处理样式文件
  const less = gulp
    .src(['components/**/*.less'])
    .pipe(
      through2.obj(function (file, encoding, next) {
        this.push(file.clone());
        if (
          file.path.match(/(\/|\\)style(\/|\\)index\.less$/) ||
          file.path.match(/(\/|\\)style(\/|\\)v2-compatible-reset\.less$/)
        ) {
          // 组件style目录下的样式入口文件
          transformLess(file.path)
           // ...
        } else {
          next();
        }
      })
    )
    .pipe(gulp.dest(modules === false ? esDir : libDir));
  // 静态文件
  const assets = gulp
    .src(['components/**/*.@(png|svg)'])
    .pipe(gulp.dest(modules === false ? esDir : libDir));
  let error = 0;
  // 将要打包处理的目录
  const source = [
    'components/**/*.tsx',
    'components/**/*.ts',
    'typings/**/*.d.ts',
    '!components/**/__tests__/**',
  ];
  // allow jsx file in components/xxx/
  if (tsConfig.allowJs) {
    source.unshift('components/**/*.jsx');
  }
  // gulp-typescript 使用tsconfig.json的配置编译
  const tsResult = gulp.src(source).pipe(
    ts(tsConfig, {
      // ...
    })
  );

  function check() {
   // ...
  }

  tsResult.on('finish', check);
  tsResult.on('end', check);
  // 编译后的js文件,再经由babel处理
  const tsFilesStream = babelify(tsResult.js, modules);
  // 得到的声明文件
  const tsd = tsResult.dts.pipe(gulp.dest(modules === false ? esDir : libDir));
  return merge2([less, tsFilesStream, tsd, assets]);
}

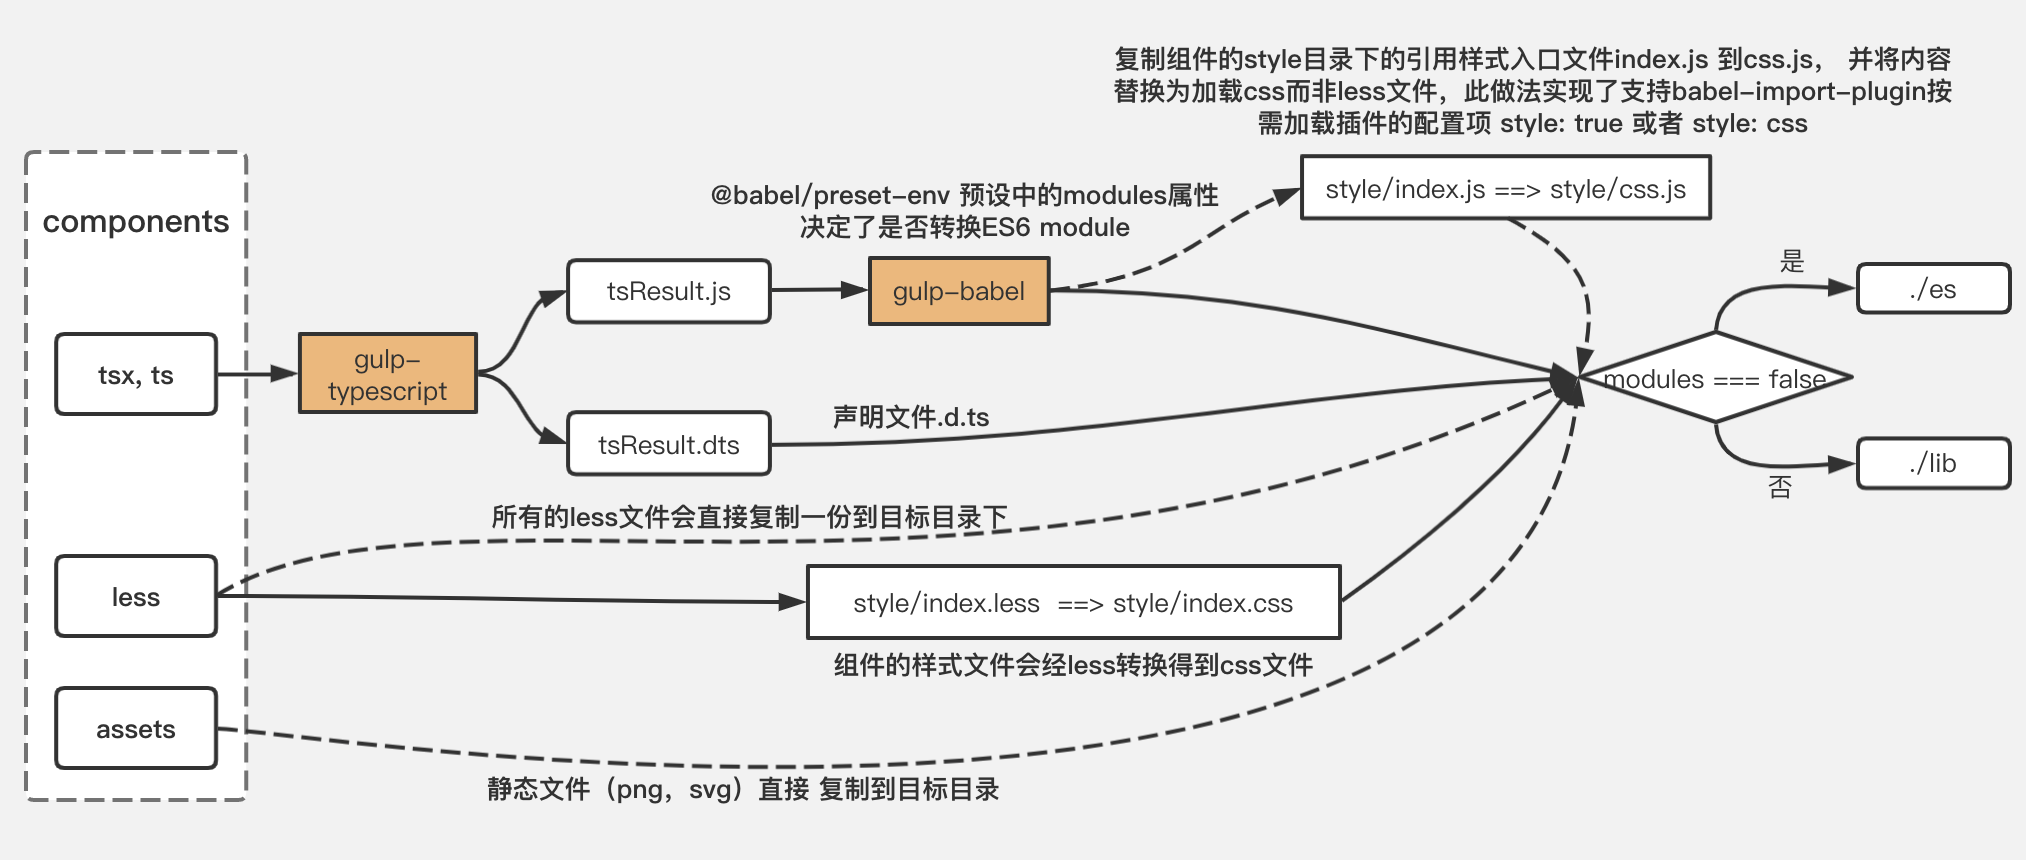
编译过程示意图如下: image

antd的编译过程中,tsc只编译到了ES6的程度,剩下的由babel进行了处理。

注:

相关库

pomelovico commented 4 years ago

Yarn workspace

官方介绍:https://classic.yarnpkg.com/zh-Hans/docs/workspaces/

总的来说,它就是一个比npm link更好的方式去管理多包开发的方式,npm link使得我们可以不用发布就可以在其他项目里使用本地的一个包,但是这会影响到全局的npm 系统,而yarn的workspace将这个影响降低到一个工作目录下。

举个:chestnut:

我们在进行react项目开发时,可能会使用antd组件库,但由于UI规范,我们需要对antd组件库进行二次改动(俗称魔改:smiling_imp:),所以做法是fork 一份antd官方代码到本地,与我们的项目代码放到一起,目录结构大致如下:

- packages
  - business      // 业务代码
  - ant-desgin    // 组件库代码
- package.json

然后在根目录下的package.json文件中声明启用yarn workspace功能:

"private": true,
"workspaces": {
    "packages": [ 
      "packages/*"
    ],
  },

重点来了:,然后再执行yarn install的时候,yarn就会在node_modules目录下生成一个@own/component的软连接指向packages/components了,而不会从npm网络仓库寻找这个包:

/node_modules/@own/component  ->  /packages/components

这样一来,我们成功的在一个工作目录下维护了两个包,这两个包的代码也可以放在同一个git仓库中,方便管理,相比link的方式,从项目角度来说更加内聚。当我们对组件库进行了修改后,只需要重新编译一次,即可在业务代码中使用了

nohoist

启用了workspace之后,yarn会把每个包的依赖尽量提升到根级node_modules目录下存放,如果需要避免yarn将 依赖安装到root下,可以使用nohoist字段声明依赖