Open rogerxu opened 8 years ago
Linux 守护进程的启动方法 - 阮一峰的网络日志 (ruanyifeng.com)
前后台进程、孤儿进程和daemon类进程的父子关系 - Systemd系列文章 (junmajinlong.com)
$ nohup node server.js &
SIGHUP
信号发到这个进程。nohup.out
。Linux PID 1 和 Systemd | 酷 壳 - CoolShell
systemd.service (www.freedesktop.org)
Systemd 入门教程:命令篇 - 阮一峰的网络日志 (ruanyifeng.com)
Systemd 入门教程:实战篇 - 阮一峰的网络日志 (ruanyifeng.com)
Node 应用的 Systemd 启动 - 阮一峰的网络日志 (ruanyifeng.com)
systemd.index 中文手册 [金步国] (jinbuguo.com)
How To Use Systemctl to Manage Systemd Services and Units | DigitalOcean
systemd时代的服务管理 - Systemd系列文章 (junmajinlong.com)
$ sudo systemctl enable httpd
$ sudo systemctl start httpd
$ systemctl status httpd
$ sudo systemctl stop httpd
$ sudo systemctl kill httpd
$ systemctl cat httpd
[Unit]
Description=OpenSSH server daemon
Documentation=man:sshd(8) man:sshd_config(5)
After=network.target sshd-keygen.service
Wants=sshd-keygen.service
[Service]
EnvironmentFile=/etc/sysconfig/sshd
ExecStart=/usr/sbin/sshd -D $OPTIONS
ExecReload=/bin/kill -HUP $MAINPID
Type=simple
KillMode=process
Restart=on-failure
RestartSec=42s
[Install]
WantedBy=multi-user.target
[Unit]
After
Before
- 只涉及启动顺序,不涉及依赖关系Wants
- 弱依赖关系Requires
- 强依赖关系Service
ExecStart
Type
simple
exec
forking
oneshot
[Install
WantedBy
- 服务所在的Target$ sudo systemctl daemon-reload
$ sudo systemctl restart httpd
systemd时代的/etc/fstab | 骏马金龙 (junmajinlong.com)
noauto,x-systemd.automount,x-systemd.mount-timeout=30,_netdev
How to Install Software Via the Command Line in Various Linux Distros - Make Tech Easier
yum
For CentOS
$ yum clean all
$ yum list installed
$ yum list git
$ yum search git
$ yum install git
$ yum check-update
$ yum update
$ yum update git
$ yum list updates
$ yum grouplist
$ yum groupinfo "Development tools"
$ yum groupinstall "Development tools"
$ yum erase git
apt
For Debian / Ubuntu
Linux中apt与apt-get命令的区别与解释 - 系统极客
Using apt Commands in Linux (Complete Guide) - It's FOSS (itsfoss.com)
$ apt search git
$ apt show git
$ apt list --installed
$ apt list --upgradable
$ sudo apt update
$ sudo apt upgrade
$ sudo apt full-upgrade
$ sudo apt install git
$ sudo apt remove git
$ sudo apt purge git
$ sudo apt autoremove
Ubuntu Manpage: apt.conf - Configuration file for APT
/etc/apt/apt.conf.d/
How to Set the Proxy for APT on Ubuntu 18.04 - Serverlab
$ sudo touch /etc/apt/apt.conf.d/proxy.conf
$ sudo vim /etc/apt/apt.conf.d/proxy.conf
/etc/apt/apt.conf.d/proxy.conf
Acquire::http::Proxy "http://localhost:8080";
$ python --version
Python 2.6.6
Easy Install is a python module (easy_install
) bundled with setuptools
that lets you automatically download, build, install, and manage Python packages.
$ yum install python-setuptools
$ easy_install pip
$ pip --version
pip 9.0.1 from /usr/lib/python2.6/site-packages (python 2.6)
$ pip list -o
$ pip install --upgrade pip
$ yum install swig
$ yum install m2crypto
$ uname -v
$ cat /etc/lsb-release
DISTRIB_ID=Ubuntu
DISTRIB_RELEASE=18.04
DISTRIB_CODENAME=bionic
DISTRIB_DESCRIPTION="Ubuntu 18.04.2 LTS"
Ubuntu
$ sudo do-release-upgrade
适用于 Linux 的 Windows 子系统概述 | Microsoft Docs
💡 在 Windows 上用 WSL 开发的操作体验指北 - 少数派
WSL 配置指北:打造 Windows 最强命令行 - Blessing Studio
Windows Subsystem for Linux 環境配置 (最新 1709 版) – Hungys.blog() – Medium
在 Windows 10 上安装 WSL | Microsoft Docs
wsl --set-default-version 2
$ wsl -l -v
NAME STATE VERSION
* Ubuntu Running 2
Manage Linux Distributions | Microsoft Docs
Create and modify the new WSL configuration file:
/etc/wsl.conf
# Now make it look like this and save the file when you're done:
[automount]
root = /
options = "metadata,umask=22,fmask=11"
We need to set root = /
because this will make your drives mounted at /c
instead of /mnt/c
.
The options = "metadata"
line is not necessary but it will fix folder and file permissions on WSL mounts so everything isn’t 777
all the time within the WSL mounts.
Once you make those changes, sign out and sign back in to Windows to ensure the changes take effect. You’ll need to do a full blown sign out / sign in.
第9章 使用ssh服务管理远程主机 | 《Linux就该这么学》 (linuxprobe.com)
How to Configure SSH on Ubuntu Server (itsfoss.com)
SSH server configuration
/etc/ssh/sshd_config
Include /etc/ssh/sshd_config.d/*.conf
Port 10022
HostKey /etc/ssh/ssh_host_ed25519_key
# Authentication:
#PermitRootLogin prohibit-password
#PubkeyAuthentication yes
#PasswordAuthentication yes
X11Forwarding yes
$ chmod 700 ~/.ssh
$ chmod 600 ~/.ssh/id_*
$ chmod 644 ~/.ssh/id_*.pub
SSH server configuration
/etc/ssh/sshd_config
Client pub keys
$HOME/.ssh/authorized_keys
Known server pub keys
$HOME/.ssh/known_hosts
Generating a new SSH key and adding it to the ssh-agent - GitHub Help
How to use ssh-keygen to generate a new SSH key | SSH.COM
Upgrade Your SSH Key to Ed25519 – risan – Medium
Ed25519
$ ssh-keygen -t ed25519 -C "$(whoami)@$(hostname)-$(date -I)"
$HOME/.ssh/id_ed25519
$HOME/.ssh/id_ed25519.pub
Linux
$ ssh-copy-id -i ~/.ssh/id_ed25519 -p 10022 user@host
usr/bin/ssh-copy-id: INFO: Source of key(s) to be installed: "/home/user/.ssh/id_ed25519.pub"
Windows
$ type $env:USERPROFILE\.ssh\id_ed25519.pub | ssh -p 10022 user@host "cat >> .ssh/authorized_keys"
Start the ssh-agent in the background.
$ eval "$(ssh-agent -s)"
> Agent pid 59566
Add your SSH private key to the ssh-agent
$ ssh-add ~/.ssh/id_ed25519
$ sudo service ssh restart
$ ssh -p 10022 user@host
SSH 端口转发 - SSH 教程 - 网道 (wangdoc.com)
SSH原理与运用(二):远程操作与端口转发 - 阮一峰的网络日志 (ruanyifeng.com)
An Illustrated Guide to SSH Tunnels (solitum.net)
ssh-client $ ssh -D 1080 -p 10022 user@ssh-server -N
ssh-client:1080 -> ssh-tunnel:10022 -> ssh-server -> any:any
ssh-client $ ssh -L 1080:target:80 -p 10022 user@ssh-server -N
ssh-client:1080 -> ssh-tunnel:10022 -> ssh-server -> target:80
ssh-client $ ssh -R 1080:target:80 -p 10022 user@ssh-server -N
ssh-server:1080 -> ssh-tunnel:10022 -> ssh-client -> target:80
ssh-client $ ssh -Y -p 10022 user@ssh-server "export DISPLAY=ssh-client:0.0"
ssh-server $ xclock &
x-window-client on ssh-server -> DISPLAY=ssh-client:0.0 -> ssh-tunnel:10022 -> x-window-server on ssh-client
$ scp path/to/local_file username@remote_host:path/to/remote_file
DNS 原理入门 - 阮一峰的网络日志 (ruanyifeng.com)
DNS 查询原理详解 - 阮一峰的网络日志 (ruanyifeng.com)
A warm welcome to DNS (powerdns.org)
10.7. Domain Name Servers (DNS) (debian-handbook.info)
dig
DiG GUI - DiG Web Interface, DiG Online, DiG Command
$ dig +short google.com
142.251.42.238
$ dig +noall +answer google.com
google.com. 300 IN A 142.251.42.238
$ dig @1.1.1.1 +short +tcp google.com
$ dig @208.67.222.222 -p 5353 +short +tcp google.com
Nameserver
$ dig ns +short ppy-moble.0098dns02in.work
$ dig @h.root-servers.net ppy-moble.0098dns02in.work
$ dig @a.nic.work ppy-moble.0098dns02in.work
$ dig @vip7.alidns.com ppy-moble.0098dns02in.work
Reverse query
$ dig +noall +answer -x 8.8.8.8
8.8.8.8.in-addr.arpa. 547 IN PTR dns.google.
$ ping rogerxu-host.local
Debian 11 无法解决 .local 名称 (ddeevv.com)
$ resolvectl status
Global
Protocols: -LLMNR +mDNS -DNSOverTLS DNSSEC=no/unsupported
resolv.conf mode: foreign
Current DNS Server: 192.168.1.1
DNS Servers: 192.168.1.1
DNS Domain: a300
Link 2 (eth0)
Current Scopes: DNS
Protocols: +DefaultRoute +LLMNR -mDNS -DNSOverTLS DNSSEC=no/unsupported
DNS Servers: 192.168.1.1 fe80::1%22073
$ sudo apt install avahi-daemon
$ sudo systemctl status avahi-daemon
/etc/systemd/resolved.conf
# This file is part of systemd.
#
# systemd is free software; you can redistribute it and/or modify it under the
# terms of the GNU Lesser General Public License as published by the Free
# Software Foundation; either version 2.1 of the License, or (at your option)
# any later version.
#
# Entries in this file show the compile time defaults. Local configuration
# should be created by either modifying this file, or by creating "drop-ins" in
# the resolved.conf.d/ subdirectory. The latter is generally recommended.
# Defaults can be restored by simply deleting this file and all drop-ins.
#
# Use 'systemd-analyze cat-config systemd/resolved.conf' to display the full config.
#
# See resolved.conf(5) for details.
[Resolve]
# Some examples of DNS servers which may be used for DNS= and FallbackDNS=:
# Cloudflare: 1.1.1.1#cloudflare-dns.com 1.0.0.1#cloudflare-dns.com 2606:4700:4700::1111#cloudflare-dns.com 2606:4700:4700::1001#cloudflare-dns.com
# Google: 8.8.8.8#dns.google 8.8.4.4#dns.google 2001:4860:4860::8888#dns.google 2001:4860:4860::8844#dns.google
# Quad9: 9.9.9.9#dns.quad9.net 149.112.112.112#dns.quad9.net 2620:fe::fe#dns.quad9.net 2620:fe::9#dns.quad9.net
#DNS=
#FallbackDNS=
#Domains=
#DNSSEC=no
#DNSOverTLS=no
MulticastDNS=yes
#LLMNR=no
#Cache=no-negative
#CacheFromLocalhost=no
#DNSStubListener=yes
#DNSStubListenerExtra=
#ReadEtcHosts=yes
#ResolveUnicastSingleLabel=no
Enable service
$ sudo systemctl enable systemd-resolved
$ sudo systemctl start systemd-resolved
systemd.network 中文手册 [金步国] (jinbuguo.com)
/etc/systemd/network/10-ethernet-mdns.network
[Match]
Name=en*
[Network]
DHCP=yes
MulticastDNS=yes
IPv6AcceptRA=yes
Enable service
$ sudo systemctl enable systemd-networkd
$ sudo systemctl start systemd-networkd
Ubuntu Manpage: update-ca-certificates - update /etc/ssl/certs and ca-certificates.crt
Copy CA certs to /usr/local/share/ca-certificates
$ sudo mkdir /usr/local/share/ca-certificates/extra
$ sudo cp root_ca.crt /usr/local/share/ca-certificates/extra/
Update /etc/ssl/certs
and ca-certificates.crt
$ sudo update-ca-certificates --fresh
/etc/profile
~/.bash_profile
~/.bash_login
~/.profile
info命令_Linux info 命令用法详解:Linux下info格式的帮助指令 (linuxde.net)
brew install pinfo
pinfo date
Linux man pages online (man7.org)
man-pages(7) - Linux manual page (man7.org)
libc
functions)./dev
which allow to access to devices through the kernel.mount(8)
, many of which only root can execute.man
man(1) - Linux manual page (man7.org)
Display intro(1)
$ man intro
Display intro(7)
$ man 7 intro
Equivalent to whatis
. Display a short description from the manual page, if available.
$ man -f intro
$ whatis intro
Equivalent to apropos
. Search for keywords.
$ man -k intro
$ apropos intro
Print the location(s) of the files that would be formatted or displayed.
$ man -w intro
$ man --path intro
Linux Directory Structure Explained for Beginners (linuxhandbook.com)
/
|- /bin
|- /boot
|- /dev - Devices
|- /etc - Configuration
|- /home
|- /lib
|- /lib64
|- /media - Mount point for removable media
|- /mnt - Mount
|- /opt - Optional software
|- /root
|- /run
|- /sbin - System Binary
|- /srv - Service data
|- /tmp
|- /usr - Unix Software Resource
|- /var - Variable
[permission] [links] [owner] [group] [size] [date] [name]
$ ls -l .
drwxrwxr-x 2 parallels parallels 4.0K Jul 18 01:10 temp
rsync
really is a fast and extraordinarily versatile file copying tool. It's known for synchronizing between machines but is equally useful locally.
$ rsync -avvP src dest
$ rm -rf some_dir
rsync
also is among the fastest ways to delete large numbers of files.
$ mkdir empty && rsync -a --delete-before empty/ some_dir && rmdir some_dir
rsync 用法教程 - 阮一峰的网络日志 (ruanyifeng.com)
第2章 rsync(一):基本命令和用法 - 骏马金龙 - 博客园 (cnblogs.com)
【整理】rsync复制时可以用–info=progress2显示整体的进度以及参数的含义 – 在路上 (crifan.com)
$ rsync --info=help
Use OPT or OPT1 for level 1 output, OPT2 for level 2, etc.; OPT0 silences.
BACKUP Mention files backed up
COPY Mention files copied locally on the receiving side
DEL Mention deletions on the receiving side
FLIST Mention file-list receiving/sending (levels 1-2)
MISC Mention miscellaneous information (levels 1-2)
MOUNT Mention mounts that were found or skipped
NAME Mention 1) updated file/dir names, 2) unchanged names
PROGRESS Mention 1) per-file progress or 2) total transfer progress
REMOVE Mention files removed on the sending side
SKIP Mention files that are skipped due to options used
STATS Mention statistics at end of run (levels 1-3)
SYMSAFE Mention symlinks that are unsafe
ALL Set all --info options (e.g. all4)
NONE Silence all --info options (same as all0)
HELP Output this help message
Options added for each increase in verbose level:
1) COPY,DEL,FLIST,MISC,NAME,STATS,SYMSAFE
2) BACKUP,MISC2,MOUNT,NAME2,REMOVE,SKIP
$ rsync -avv src dest
$ rsync -avvP src dest
$ rsync -avv --partial --progress src dest
$ rsync -a --partial --info=progress2 src dest
$ rsync -a --partial --info=all2 src dest
An intro to finding things in Linux (madebygps.com)
locate
uses a database that is usually updated once a day.
$ locate keyword
whereis
locates a binary.
$ whereis binary
which
locates a binary in the PATH
variable.
$ which binary
find
$ find directory options expression
$ find /home/username -type f -name foo.*
grep
rg
useradd
$ useradd -g users joe
adduser
- interactive command
$ sudo adduser joe
passwd
$ passwd joe
usermod
userdel
$ id
$ id joe
$ w
$ who
$ last -5
su
and sudo
Switch to another user
$ su - username
Add user to sudo
user group
$ usermod -a -G sudo username
TBD
Redirections (Bash Reference Manual) (gnu.org)
An intro to redirection in Linux (madebygps.com)
Input Output & Error Redirection in Linux [Beginner's Guide]
stdin
) is the source of input data. By default, stdin
is any text entered from the keyboard. It’s stream ID is 0.stdout
) is the outcome of command. By default, it is displayed on the screen. It’s stream ID is 1.stderr
) is the error message (if any) produced by the commands. By default, stderr
is also displayed on the screen. It’s stream ID is 2.Read line from "file.txt" to FD 0.
$ read line < file.txt
Append to "file.txt"
$ echo hello >> file.txt
Duplicate file descriptors. Make FD 2 write to where FD 1 is writing.
The redirection of stderr
must always occur after redirecting stdout
.
The traditional method - using the 2>&1
notation.
$ ls -l a b > myfile.txt 2>&1
Recent versions of bash provide a second, more streamlined method for performing this combined redirection - using the &>
notation.
$ ls -l a b &> myfile.txt
$ ls -l a b &>> myfile.txt
Disposing FD 2 to the file /dev/null
.
$ ls -l /bin/usr 2> /dev/null
Close FD x
x>&-, x<&-
exec 3>&1 >mylog; echo moo; exec 1>&3 3>&-
Move file descriptors.
[x]>&y-, [x]<&y-
Replace FD x
with FD y
.
exec 3>&1- >mylog; echo moo; exec >&3-
tee
Tee Command in Linux Explained with Examples (linuxhandbook.com)
The tee
command reads from the standard input and writes to both standard output and files.
ls -l | tee list1.txt list2.txt
awk
awk -F fs 'prog' file
$ awk -F ':' '{ print $1 }' /etc/passwd
root
daemon
bin
sed
Replace all digits with "?"
$ sed 's/[0-9]/?/g' example.txt
the number is ???-????-????
ps
List every process in full format.
$ ps -ef
top
$ top
kill
kill PID
killall
- kill processes by name
killall procname
command &
nohup
No Hang Up, conntinue running in the background after log our from the shell.
nohup command &
nano – Text editor (nano-editor.org)
scopatz/nanorc: Improved Nano Syntax Highlighting Files (github.com)
git clone https://github.com/scopatz/nanorc.git ~/.nano/
.nanorc
include "~/.nano/conf.nanorc"
include "~/.nano/git.nanorc"
include "~/.nano/html.nanorc"
include "~/.nano/java.nanorc"
include "~/.nano/javascript.nanorc"
include "~/.nano/json.nanorc"
include "~/.nano/sh.nanorc"
include "~/.nano/ts.nanorc"
include "~/.nano/vi.nanorc"
include "~/.nano/xml.nanorc"
include "~/.nano/yaml.nanorc"
include "~/.nano/zsh.nanorc"
/etc/crontab
m h dom mon dow user command
Edit user crontab file
crontab -e
Display user crontab file
crontab -l
Remove the current crontab
crontab -r
$ ls -l install.sh
-rwxrwxrwx 1 user group 24298 04-02 00:23 install.sh
Change file owner and group
$ chown owner:group file
Change file mode
$ chmod u+x file
$ chmod -R g+w dir
SUID
$ ls -l /bin/passwd
-rwsr-xr-x 1 root root 59976 6月 18 03:35 /bin/passwd
SGID
在某个目录中创建的文件自动继承该目录的用户组
$ chmod -R g+s shared
$ ls -l shared
drwxrwsr-x 2 root sambashare 4.0K 11月 23 19:40 shared
SBIT
Sticky Bit, 可确保用户只能删除自己的文件,而不能删除其他用户的文件。
当目录被设置 SBIT 特殊权限位后,文件的其他用户权限部分的 x 执行权限就会被替换成 t 或者 T—原本有 x 执行权限则会写成 t,原本没有 x 执行权限则会被写成 T。
$ ls -ald /tmp
drwxrwxrwt 19 root root 4096 11月 23 18:36 /tmp
chattr
$ chattr +a file.log
lsattr
$ lsattr file.log
-----a---------- file.log
setfacl
$ setfacl -R -m u:username:rwx /root
getfacl
$ getfacl /root
getfacl: Removing leading '/' from absolute path names
# file: root
# owner: root
# group: root
user::r-x
user:username:rwx
group::r-x
mask::rwx
other::---
ip
$ ip a
$ ip r
Samba - Community Help Wiki (ubuntu.com)
Samba/SambaServerGuide - Community Help Wiki (ubuntu.com)
11.5. Setting Up Windows Shares with Samba (debian-handbook.info)
Samba/SambaServerGuide - Community Help Wiki (ubuntu.com)
$ sudo apt install samba
Allow guest account as nobody
$ sudo mkdir -p /srv/samba/share
$ sudo chown -R nobody:nogroup /srv/samba/share/
Create user share
$ sudo adduser share
Add user to sambashare
group
$ sudo usermod -a -G sambashare share
Create a directory with sambashare
group
$ sudo mkdir -p /var/www/downloads
$ sudo chown -R nas:sambashare /var/www/downloads/
$ sudo chmod -R 2775 /var/www/downloads/
Configuration
/etc/samba/smb.conf
[global]
; workgroup = WORKGROUP
server string = %h server (Samba, Ubuntu)
server role = standalone server
; security = user
; guest account = nobody
map to guest = Bad User
[share]
comment = File Share
path = /srv/samba/share
browseable = Yes
guest ok = Yes
read only = No
create mask = 0644
directory mask = 0775
[downloads]
path = /var/www/downloads
browseable = Yes
read only = Yes
guest ok = Yes
create mask = 0664
directory mask = 0775
Check samba configuration
$ testparm
Restart service
$ sudo systemctl restart smbd.service
Samba/SambaClientGuide - Community Help Wiki (ubuntu.com)
How to Mount SMB Shares on Ubuntu? (linuxhint.com)
Mount a Samba Share on Ubuntu & Debian – TecAdmin
$ sudo apt install cifs-utils
Mount
$ sudo mount -t cifs -o username=share,password=share,uid=nas,gid=nas,rw //smb-server/share /srv/samba/share
Show disk information
$ df -hT
Show directory usage
$ du -h -s .config/
$ sudo apt install smartmontools
Show identity information
$ sudo smartctl -i /dev/sda
Show all SMART information
$ sudo smartctl -a /dev/sda
$ blkid /dev/sda2
$ e2label /dev/sda2 BACKUP
$ fdisk -l /dev/sda
$ sudo gdisk /dev/sda
$ sudo parted /dev/sda
(parted) print free
(parted) resizepart 2 100%
(parted) quit
$ sudo resize2fs -p /dev/sda2
8 Best Desktop Environments For Linux in 2020 (itsfoss.com)
$ echo $XDG_CURRENT_DESKTOP
XFCE
The Best Lean Linux Desktop Environment: LXDE vs. Xfce vs. MATE (makeuseof.com)
Clementine
mpv
NFSv4Howto - Community Help Wiki (ubuntu.com)
第12章 使用Samba或NFS实现文件共享 | 《Linux就该这么学》 (linuxprobe.com)
ls -l /lib/modules/$(uname -r)/kernel/fs
$ lsmod | nfs
11.4. NFS File Server (debian-handbook.info)
$ sudo apt install nfs-kernel-server
Configuration
/etc/nfs.conf
exports(5): NFS server export table - Linux man page (die.net)
/etc/exports
/srv/nfs/share 192.168.1.0/24(rw,async,no_subtree_check)
Read-only filesystems are more suitable to enable _subtreecheck on.
Apply the new config
$ sudo exportfs -a
Restart the service
$ sudo systemctl restart nfs-server
$ sudo apt install nfs-common
Mount
$ sudo mount nfs-server:/srv/nfs/share /mnt/nfs
/etc/fstab
nfs-server:/srv/nfs/share /mnt/nfs nfs4 _netdev,auto,rsize=8192,wsize=8192,timeo=14,intr 0 0
$ resolvectl status
Global
Protocols: -LLMNR +mDNS -DNSOverTLS DNSSEC=no/unsupported
resolv.conf mode: foreign
Current DNS Server: 192.168.1.1
DNS Servers: 192.168.1.1
DNS Domain: a300
Link 2 (eth0)
Current Scopes: DNS
Protocols: +DefaultRoute +LLMNR -mDNS -DNSOverTLS DNSSEC=no/unsupported
DNS Servers: 192.168.1.1 fe80::1%22073
/etc/systemd/resolved.conf
# This file is part of systemd.
#
# systemd is free software; you can redistribute it and/or modify it under the
# terms of the GNU Lesser General Public License as published by the Free
# Software Foundation; either version 2.1 of the License, or (at your option)
# any later version.
#
# Entries in this file show the compile time defaults. Local configuration
# should be created by either modifying this file, or by creating "drop-ins" in
# the resolved.conf.d/ subdirectory. The latter is generally recommended.
# Defaults can be restored by simply deleting this file and all drop-ins.
#
# Use 'systemd-analyze cat-config systemd/resolved.conf' to display the full config.
#
# See resolved.conf(5) for details.
[Resolve]
# Some examples of DNS servers which may be used for DNS= and FallbackDNS=:
# Cloudflare: 1.1.1.1#cloudflare-dns.com 1.0.0.1#cloudflare-dns.com 2606:4700:4700::1111#cloudflare-dns.com 2606:4700:4700::1001#cloudflare-dns.com
# Google: 8.8.8.8#dns.google 8.8.4.4#dns.google 2001:4860:4860::8888#dns.google 2001:4860:4860::8844#dns.google
# Quad9: 9.9.9.9#dns.quad9.net 149.112.112.112#dns.quad9.net 2620:fe::fe#dns.quad9.net 2620:fe::9#dns.quad9.net
#DNS=
#FallbackDNS=
#Domains=
#DNSSEC=no
#DNSOverTLS=no
MulticastDNS=yes
#LLMNR=no
#Cache=no-negative
#CacheFromLocalhost=no
#DNSStubListener=yes
#DNSStubListenerExtra=
#ReadEtcHosts=yes
#ResolveUnicastSingleLabel=no
Enable service
$ sudo systemctl enable systemd-resolved
$ sudo systemctl start systemd-resolved
systemd.network 中文手册 [金步国] (jinbuguo.com)
/etc/systemd/network/10-ethernet-mdns.network
[Match]
Name=en*
[Network]
DHCP=yes
MulticastDNS=yes
IPv6AcceptRA=yes
Enable service
$ sudo systemctl enable systemd-networkd
$ sudo systemctl start systemd-networkd
$ sudo apt install avahi-daemon
$ sudo systemctl status avahi-daemon
Systemd 入门教程:命令篇 - 阮一峰的网络日志 (ruanyifeng.com)
Systemd 入门教程:实战篇 - 阮一峰的网络日志 (ruanyifeng.com)
Node 应用的 Systemd 启动 - 阮一峰的网络日志 (ruanyifeng.com)
systemd by example - the systemd playground
How To Use Systemctl to Manage Systemd Services and Units | DigitalOcean
$ sudo systemctl suspend
# Hibernate and suspend the system
$ sudo systemctl hybrid-sleep
# Suspend the system and hibernate it after the delay specified in systemd-sleep.conf
$ sudo systemctl suspend-then-hibernate
$ udo systemctl hibernate
$ sudo systemctl reboot
# Shut down and halt the system
$ sudo systemctl halt
$ sudo systemctl poweroff
List units
$ systemctl list-units
$ systemctl list-units --all
$ systemctl list-units --all --state=inactive
$ systemctl list-units --failed
$ systemctl list-units --type=service
Unit status
$ systemctl status
$ systemctl status ssh.service
$ systemctl is-active ssh.service
$ systemctl is-failed ssh.service
$ systemctl is-enabled ssh.service
Unit management
$ sudo systemctl start ssh.service
$ sudo systemctl stop ssh.service
$ sudo systemctl restart ssh.service
$ sudo systemctl kill ssh.service
# reload modified configuration for the unit
$ sudo systemctl reload ssh.service
# reload all modified configuration
$ sudo systemctl daemon-reload
# display unit file
$ systemctl cat ssh.service
# display properties for the unit
$ systemctl show ssh.service
List dependencies
$ systemctl list-dependencies --all ssh.service
List unit files
$ systemctl list-unit-files
$ systemctl list-unit-files --type=service
Enable/disable unit
$ sudo systemctl enable ssh.service
$ sudo systemctl disable ssh.service
/etc/systemd/system/
$ systemctl cat ssh
# /lib/systemd/system/ssh.service
[Unit]
Description=OpenBSD Secure Shell server
Documentation=man:sshd(8) man:sshd_config(5)
After=network.target auditd.service
ConditionPathExists=!/etc/ssh/sshd_not_to_be_run
[Service]
EnvironmentFile=-/etc/default/ssh
ExecStartPre=/usr/sbin/sshd -t
ExecStart=/usr/sbin/sshd -D $SSHD_OPTS
ExecReload=/usr/sbin/sshd -t
ExecReload=/bin/kill -HUP $MAINPID
KillMode=process
Restart=on-failure
RestartPreventExitStatus=255
Type=notify
RuntimeDirectory=sshd
RuntimeDirectoryMode=0755
[Install]
Targets are special unit files that describe a system state or synchronization point. Targets do not do much themselves, but are instead used to group other units together.
Default target
$ systemctl get-default
multi-user.target
$ sudo systemctl set-default graphical.target
List available targets
$ systemctl list-unit-files --type=target
List active targets
$ systemctl list-units --type=target
Systemd 定时器教程 - 阮一峰的网络日志 (ruanyifeng.com)
task.timer
[Unit]
Description=Runs every hour
[Timer]
OnUnitActiveSec=1h
Unit=task.service
[Install]
WantedBy=multi-user.target
$ systemd-analyze
Startup finished in 4.928s (kernel) + 16.575s (userspace) = 21.503s
graphical.target reached after 16.070s in userspace
$ systemd-analyze blame
54.981s apt-daily-upgrade.service
8.252s snap.lxd.activate.service
6.933s snapd.service
4.214s docker.service
2.185s systemd-networkd-wait-online.service
$ systemd-analyze critical-chain
$ systemd-analyze critical-chain docker.service
$ hostnamectl
Static hostname: ubuntu-server
Icon name: computer-vm
Chassis: vm
Machine ID: c60e19bcaedd42dfa7204801efbae687
Boot ID: d975336836f84acba805d511fcdeb510
Virtualization: kvm
Operating System: Ubuntu 22.04 LTS
Kernel: Linux 5.15.0-30-generic
Architecture: x86-64
Hardware Vendor: QEMU
Hardware Model: Standard PC _Q35 + ICH9, 2009_
Set hostname
$ sudo hostnamectl set-hostname ubuntu
$ timedatectl
Local time: Wed 2022-05-25 18:16:13 CST
Universal time: Wed 2022-05-25 10:16:13 UTC
RTC time: Wed 2022-05-25 10:16:13
Time zone: Asia/Shanghai (CST, +0800)
System clock synchronized: yes
NTP service: active
RTC in local TZ: no
List timezones
$ timedatectl list-timezones
Set timezone
$ sudo timedatectl set-timezone Asia/Shanghai
List sessions
$ loginctl
SESSION UID USER SEAT TTY
23 1000 nas seat0 tty1
25 1000 nas pts/0
2 sessions listed.
List users
$ loginctl list-users
UID USER
1000 nas
1 users listed.
$ journalctl
# kernel
$ journalctl -k
# this boot
$ journalctl -b
# last boot
$ journalctl -b -1
# last 10 lines
$ journalctl -n
# last 20 lines
$ journalctl -n 20
# end
$ journalctl -e
# follow
$ journalctl -f
# process
$ journalctl _PID=1
# user
$ journalctl _UID=1000 --since today
# unit
$ journalctl -f -u ssh.service
# piority
$ journalctl -p err
# log disk usage
$ journalctl --disk-usage
Archived and active journals take up 80.0M in the file system.
$ swapon
NAME TYPE SIZE USED PRIO
/dev/sda7 partition 20G 44.3M -2
Create a partition as type linuxswap (8200)
/dev/sda3
Format and enable swap
$ sudo mkswap /dev/sda3
$ sudo swapon /dev/sda3
/etc/fstab
/dev/sda3 none swap defaults 0 0
$ lsblk -f
Create a swap file /swapfile
$ sudo dd if=/dev/zero of=/swapfile bs=1M count=512 status=progress
Set permission
$ sudo chmod 600 /swapfile
Format and enable
$ sudo mkswap /swapfile
$ sudo swapon /swapfile
Auto mount
/etc/fstab
/swapfile swap swap defaults,noatime 0 0
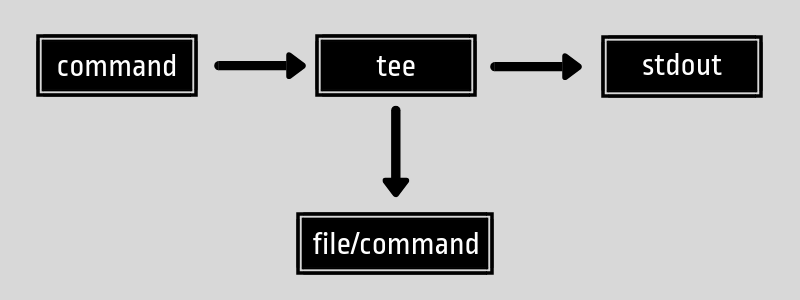
Introduction To Linux Commands — Smashing Magazine
linux - madebygps