rwaldron / johnny-five

JavaScript Robotics and IoT programming framework, developed at Bocoup.
http://johnny-five.io
Other
13.26k stars 1.76k forks source link

Wrong data if multiple sensors are used at once #623

Closed ritz078 closed 7 years ago

ritz078 commented 9 years ago

Hi,

I am using a proximity sensor and temperature sensor connected to a arduino uno. When only one is connected they work fine and even when both are connected and proximity sensor has nothing in between, the sensors work fine but the moment there is something between the proximity sensor, there are abrupt changes in the temperature sensor. below is my code ;

var board=new five.Board();
var controller = process.argv[2] || "GP2Y0A02YK0F" ;
board.on("ready", function() {
    var temperature = new five.Temperature({
      controller: "LM35",
      pin: "A4"
    });

    temperature.on("change", function(err, data) {
      io.emit('temperature',data.celsius);
      console.log(data.celsius+' C')
    });

    var proximity = new five.IR.Proximity({
      controller: controller,
      pin: "A0"
    });

    proximity.on("change", function() {
      io.emit('proximity',this.inches);
      console.log("inches: ", this.inches);
    });
  });
rwaldron commented 9 years ago
    var proximity = new five.IR.Proximity({
      controller: controller,
      pin: "A0"
    });

There is no controller specified :) (edit: I missed the line at the top)

What model is your IR proximity sensor? For example, if it's GP2Y0A21YK, then you'll want to initialize it like this:

    var proximity = new five.IR.Proximity({
      controller: "GP2Y0A21YK",
      pin: "A0"
    });

edit:

Is your sensor model GP2Y0A02YK0F? Or is it another?

ritz078 commented 9 years ago

it is another sensor model but separately its working fine.

Resseguie commented 9 years ago

Note that there was discussion about this on gitter for anyone that wants to see background chatter: https://gitter.im/rwaldron/johnny-five?at=54e31b1051b516c761d7999a (and following)

Thought from @ajfisher is that it's an ADC issue and having time to stabilize caps between reads? (He can chime in with more details)

rwaldron commented 9 years ago

I can't reproduce this.

Using:

(I have every available Sharp IR here, so please tell me which)

ajfisher commented 9 years ago

Make sure you're using two entirely analog sensors rather than an I2C one. I'm not sure which was @ritz078 was using but I don't believe it was the Sharp one.

ajfisher commented 9 years ago

As follow up - I don't have access to either of these sensors where I am, however using the Sensor object x2 with simple potentiometers in order to replicate two analog inputs being read at high speed, I can't replicate this.

I would suggest @ritz078 tries a test case of using the Sensor object for both components rather than Temperature and Proximity in order to ensure that the data is coming through and is stable. Something like this should work:

 var five = require("johnny-five");                                              

var board=new five.Board();                                                     
board.on("ready", function() {                                                  
   var temperature = new five.Sensor({                                         
     pin: "A0",                                                                
     freq: 50,                                                                 
   });                                                                         

   temperature.on("data", function(err, data) {                                
     console.log("A0: " + this.value)                                          
   });                                                                         

   var proximity = new five.Sensor({                                           
     pin: "A1",                                                                
     freq: 50,                                                                                                                                    
   });                                                                         

   proximity.on("data", function() {                                           
     console.log("A1: ", this.value);                                          
   });                                                                         
 }); 

This would most closely replicate the arduino sketch we played around with that was found to be working.

ritz078 commented 9 years ago

Its a H505 photoelectric sensor. Now i am using MPU 6050 instead of LM35 but still there are abrupt changes in the MPU readings while the H505 readings are always correct when both are used simultaneously and the abrupt change only happens when the readings of H505 are changed. Do you think its an issue with H505 ?

rwaldron commented 9 years ago

Its a H505 photoelectric sensor. Do you think its an issue with H505 ?

Seems likely. Where can I order this from? Are any of these what I'm looking for:

Just to be clear, Johnny-Five doesn't know what that is (yet). Here are the supported analog IR proximity sensors: https://github.com/rwaldron/johnny-five/wiki/IR.Proximity . In the meantime, using the Sensor class will be fine (while we figure out what's wrong).

ritz078 commented 9 years ago

Yes those links for H505 are correct. I tried with the sensor class but the problem was still there.

ajfisher commented 9 years ago

If that's the case then maybe the H505 requires some sort of stabilisation before the read?

On Thu Feb 19 2015 at 5:37:12 PM Ritesh Kumar notifications@github.com wrote:

Yes those links for H505 are correct. I tried with the sensor class but the problem was still there.

— Reply to this email directly or view it on GitHub https://github.com/rwaldron/johnny-five/issues/623#issuecomment-75005491 .

ritz078 commented 9 years ago

No, I don't think so because in that case there would have been fluctuations in H505's data and not LM35 but here H505's data is totally correct.

rwaldron commented 9 years ago

@ritz078 ok, thanks. The next step is that I need to acquire one of these if I'm to be any help to you. I appreciate your patience so far :) I've just ordered the first one on Amazon and will receive it tomorrow. Once it arrives, I will be able to help you more effectively :D

ritz078 commented 9 years ago

Thanks @ajfisher and @rwaldron for all the help :)

rwaldron commented 9 years ago

@ritz078 I received the sensors, can you post a picture of your wiring?

ritz078 commented 9 years ago

image Here's the image :)

rwaldron commented 9 years ago

Ok, this is very helpful, but I just learned that I don't have the right component. I got just the sensor :\ Can you link me to the exact component shown in this picture? Thanks!! (and also: thanks for your patience!!)

ritz078 commented 9 years ago

I have one extra . If you want I can send it to you.

rwaldron commented 9 years ago

No, that won't be necessary—just send me the link :)

rsrt commented 9 years ago

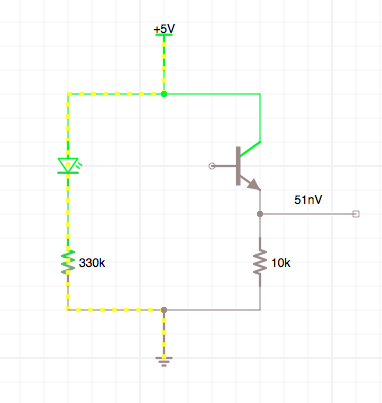
@ritz078 and I am working on the same project. It's a custom made sensor so I can't find the link.You can use the same sensor H505 which you have. In that sensor you only have diode and phototransistor. Here is the circuit diagram. github

Connect a 331 resistor chip (330 ohm) in series with diode pins ( on the top of sensor you can see diode symbol) and 103 resistor chip (10 Kohm) in series with phototransistor (same as given in circuit diagram). links are here http://www.aliexpress.com/store/product/1206-330E-5-Surface-printing-331-Chip-Resistor/903701_585435200.html

https://www.dipmicro.com/store/R4Y100

I hope this will work :)

rwaldron commented 9 years ago

That's extremely helpful, thanks!!

rwaldron commented 9 years ago

Using the above circuit, I made a simulation with iCircuit:

Then I assembled it:

Along with an Led and a Thermistor:

And used this code:

var five = require("johnny-five");
var board = new five.Board();

board.on("ready", function() {
  var led = new five.Led(8);
  var temp = new five.Temperature({
    controller: "GROVE",
    pin: "A2"
  });
  var sensor = new five.Sensor("A0");

  sensor.on("change", function() {
    if (this.value < 25) {
      led.on();
      console.log("Slot interrupted @ %d", Date.now());
      console.log("Temperature: %d°C", Math.round(temp.celsius));
    } else {
      led.off();
    }
  });
});

Here's a video demo: https://www.youtube.com/watch?v=7BHT7QUWMuY

And here's a sample of console output:

$ node eg/hy505.js
1424902063749 Device(s) /dev/cu.usbmodem1421
1424902063761 Connected /dev/cu.usbmodem1421
1424902067993 Repl Initialized
>> Slot interrupted @ 1424902069419
Temperature: 24°C
Slot interrupted @ 1424902069873
Temperature: 24°C
Slot interrupted @ 1424902074362
Temperature: 24°C
Slot interrupted @ 1424902075577
Temperature: 24°C
Slot interrupted @ 1424902075605
...

Based on this, I think you might need to take another look at the HY505 hardware in your circuit—keep us posted!

wardialer commented 9 years ago

If i use my LM35 Temperature with this code, the sensor works fine:

var five = require("johnny-five");
var board = new five.Board();
board.on("ready", function() {
  var temp = new five.Temperature({
    pin: "A0",
    controller: "LM35"
  });

//  var sensor = new five.Sensor("A5");

  temp.on("change", function() {
    console.log("Temp: %d", this.celsius);
  });
});

But, when i simply uncomment row 9:

var sensor = new five.Sensor("A5");

my temperature sensor starts printing wrong values, changing from ~24°C to ~50°C in seconds. The circuit remains the same. To the A5 pin is attached a terrain humidity sensor, both sensors works fine alone (i.e. attached to my arduino but undeclared on code) but when i put them together temperature sensor goes crazy. How can this happen?

rwaldron commented 9 years ago

@wardialer I need more information, because I can't reproduce this issue—however I'm using a TMP36, not an LM35. I just ordered an LM35.

ajfisher commented 9 years ago

It might be because the voltage is wavering on the LM35 if you're reading it directly. Make sure you've got the 2k series resistor in place in your circuit.

On Wed, Aug 5, 2015, 09:05 Rick Waldron notifications@github.com wrote:

@wardialer https://github.com/wardialer I need more information, because I can't reproduce this issue—however I'm using a TMP36, not an LM35. I just ordered an LM35.

  • What board are you using?
  • What, if anything, is attached to A5?

— Reply to this email directly or view it on GitHub https://github.com/rwaldron/johnny-five/issues/623#issuecomment-127790558 .

wardialer commented 9 years ago

@rwaldron I'm using an Arduino Uno. If nothing is attached to A5, all works fine. @ajfisher I'll try later (i'm at work right now), but it seems strange to me, because the circuit works fine if i don't initialize the sensor in my code... Thats why i thought it was a software problem

rwaldron commented 9 years ago

If nothing is attached to A5, all works fine.

With or without the var sensor = new five.Sensor("A5"); line?

...

We might have to go deeper and attempt to reproduce with an arduino C sketch, because Johnny-Five doesn't do anything but "deliver" the data it receives over the wire.

wardialer commented 9 years ago

With and without the line.

update: i re-wired my circuit, connecting a resistor following @ajfisher tip, and now results are far better: reading jitter is now +/- 2°C. Thanks.

rwaldron commented 9 years ago

So what thing is connected to A5 when the values erratically change?

wardialer commented 9 years ago

It was a homemade terrain-humidity sensor like this: schema-collegamento-sensore-umidita-arduino pdf

and a photoresistor. Here you have the complete circuit (here the sensor is attached to A4 as a test...) _mg_9377 1

rwaldron commented 9 years ago

is that what the yellow and red wires lead to?

wardialer commented 9 years ago

yes, sorry for bad picture

rwaldron commented 9 years ago

The picture is just fine, thank you for taking the time to produce it for the big report. I just wanted to make sure I understand the relationship between the two images :)

Now I have another question, that I should've asked before and I apologize for not doing so: which wire in the photo goes to which connection in the diagram?

Orange -> 5V ? Red -> A0?

wardialer commented 9 years ago

Red wires are connected to 5v for both images.The blue cable in the schema is the orange one in the picture and is attached to A5 instead of A0.

reconbot commented 7 years ago

I'm going to close this issue due to it's age, but if you'd like to continue with it feel free to comment and we'll reopen. I hope you got it working!

franciscohanna92 commented 7 years ago

Hi. I would like this thread to be reopen since I couldn't find a solution to a similar problem I'm experimenting.

Right now I have two photoresitor modules attached to A0 and A1. Whenever the value in one photoresitor changes, it affects the other. From reading, I've come to the conclusion that it is a ADC problem, since the ADC needs time between readings so that a current reading doesn't affect further readings in analog inputs. In a pure arduino sketch, this is solved by placing a delay between readings or by reading the same input twice with delay between this readings. So, a way to solve this in J5 would be adding this delay. I couldn't acomplished this using 'freq' option in Sensor Class (I don't thinks this option it's meant to acomplished this). Any ideas on this?

Here is my code

` var five = require("johnny-five");

var board = new five.Board();

board.on("ready", function() {
console.log("Arduino connected");

var sensorA = new five.Sensor({pin: "A0"});
var sensorB = new five.Sensor({pin: "A1"});

sensorA.on("data", function(){
    console.log("A val:" + this.value);
});

sensorB.on("data", function(){
    console.log("B val:" + this.value);
});

}); `

rwaldron commented 7 years ago

From reading, I've come to the conclusion that it is a ADC problem, since the ADC needs time between readings so that a current reading doesn't affect further readings in analog inputs

@soundanalogous any thoughts on this?

soundanalogous commented 7 years ago

Strange how this issue has never come up in all the years Firmata has been around. Anyway, a delay after this line would fix it. However, deciding the duration of that delay is not so simple because Firmata can run on several different microcontroller architectures and this delay likely differs to some extent per architecture. I wouldn't want to set the delay to be the longest required delay for a particular architecture to be applied to all architectures.

soundanalogous commented 7 years ago

Interesting... the Arduino analogRead function actually blocks until the conversion is finished so a delay should not be necessary.

@FranciscoHanna, I have a few questions for you:

  1. What board are you using?
  2. How do you have the photoresistors wired to the board?
  3. Can you try adding a short delay just after this line: https://github.com/firmata/arduino/blob/master/examples/StandardFirmata/StandardFirmata.ino#L800 and see if that makes a difference.
franciscohanna92 commented 7 years ago

@soundanalogous Let me answer those questions:

  1. I'm using an Arduino Uno. It's probably a chinesse replica because here in Argentina is not easy to find the originals.
  2. I'm using this photoresistor module so the wiring is pretty staright forward.
  3. I'll try this on weekend and I'll come back and post the results.
webondevices commented 7 years ago

I have a similar issue when using an LDR and a LM35 circuit simultaneously. One connected to A0 the other to A1.

They work perfectly individually but as soon as I try using both of them my temperature readings starts fluctuating from 15 to 50 celsius when it should be 20 degrees.

Also wanted to mention that, from my research, this seems like an issue with the ADC. Basically it needs some time to "cool down" between two measurements and on Arduino C examples they solve this by either adding a short delay (10 ms) between measurements OR by performing two analogReads() of the same sensor after each other and only using the second one.

webondevices commented 7 years ago

So I tried modifying the StandardFirmata sketch by performing a dummy analogRead() before the actual Firmata read that is being sent through serial and it has solved my problem!

dummyRead = analogRead(analogPin);
Firmata.sendAnalog(analogPin, analogRead(analogPin));