Open shuvigoss opened 4 years ago
创建一个叫config_index.dart
文件
并初始化一个ConfigIndexPage
import 'package:flutter/material.dart';
class ConfigIndexPage extends StatelessWidget {
@override
Widget build(BuildContext context) {
return Scaffold(
appBar: AppBar(
title: Text('服务列表'),
),
body: Center(
child: Text('服务列表'),
),
);
}
}
在welcome.dart内创建一个函数
void gotoConfigIndex(BuildContext context) {
Navigator.push(
context, MaterialPageRoute(builder: (context) => ConfigIndexPage()));
}
将CountDownBtn
的callbakc
函数调用该方法
大致效果如下
这个跳转有2个问题
针对这2个问题,修改一下gotoConfigIndex
Navigator.pushReplacement(
context,
PageRouteBuilder(
pageBuilder: (
context,
animation,
secondaryAnimation,
) =>
ConfigIndexPage(),
transitionsBuilder: (context, Animation<double> animation,
secondaryAnimation, Widget child) =>
FadeTransition(opacity: animation, child: child)),
);
看看效果是不是很不错,至于Navigator的文档,可以参考 https://flutterchina.club/cookbook/navigation/navigation-basics/ https://juejin.im/post/5c3ed794f265da616b10f14e
知道了解push
与 pushReplacement
的区别
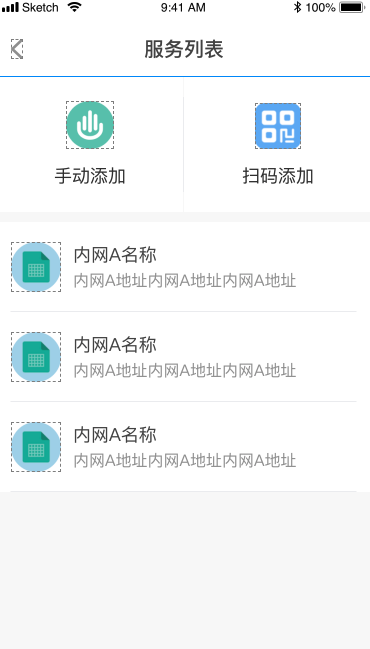
接下来设置全局的样式,可以观察到这个图片这些widget都需要统一设置而不是每个页面都手动设置。
https://juejin.im/post/5d751714f265da03ad14765c https://book.flutterchina.club/chapter7/theme.html
class MyApp extends StatelessWidget {
// This widget is the root of your application.
@override
Widget build(BuildContext context) {
return MaterialApp(
title: '协同签名',
home: WelcomePage(),
theme: ThemeData(
primaryColor: Colors.white,
scaffoldBackgroundColor: Color.fromRGBO(248, 248, 248, 1)),
);
}
}
接下来做这个组件
import 'package:flutter/material.dart';
class ImageBtn extends StatelessWidget {
String image;
String title;
Function callback;
ImageBtn(this.image, this.title, this.callback);
@override
Widget build(BuildContext context) {
return InkWell(
onTap: () => callback(),
child: Container(
width: 72,
height: 88,
child: Column(
children: <Widget>[
Container(
margin: EdgeInsets.only(bottom: 14),
child: Image.asset(image),
),
Text(
title,
style:
TextStyle(fontSize: 18, color: Color.fromRGBO(51, 51, 51, 1)),
)
],
),
),
);
}
}
最终,通过在config_index.dart
中设置上部布局。
import 'package:coss_demo/pages/widgets/image_btn.dart';
import 'package:flutter/material.dart';
class ConfigIndexPage extends StatelessWidget {
@override
Widget build(BuildContext context) {
return Scaffold(
appBar: AppBar(
title: Text('服务列表'),
),
body: Container(
child: Column(
children: <Widget>[buildTop()],
),
));
}
Container buildTop() {
return Container(
color: Colors.white,
height: 135,
child: Row(
mainAxisAlignment: MainAxisAlignment.spaceEvenly,
children: <Widget>[
Container(
child: ImageBtn('images/shoudongluru.png', '手动录入', () {
print('shoudongluru');
}),
),
Container(
width: 0.5,
color: Colors.grey,
),
Container(
child: ImageBtn('images/saomatianjia.png', '扫码添加', () {
print('shoudongluru');
}),
)
],
),
);
}
}
接下来,实现一个带分割线的ListView
import 'package:coss_demo/pages/widgets/image_btn.dart';
import 'package:flutter/material.dart';
import 'models/config_item.dart';
final List<ConfigItem> list = [
ConfigItem('测试1', 'http://127.0.0.1'),
ConfigItem('测试2', 'http://127.0.0.2')
];
class ConfigIndexPage extends StatelessWidget {
@override
Widget build(BuildContext context) {
return Scaffold(
appBar: AppBar(
title: Text('服务列表'),
),
body: Container(
child: Column(
children: <Widget>[buildTop(), buildConfigList()],
),
));
}
Expanded buildConfigList() {
return Expanded(
child: Container(
margin: EdgeInsets.only(top: 10),
color: Colors.white,
child: ListView.separated(
itemBuilder: (context, index) {
return ListTile(
leading: Image.asset('images/fuwuliebiao.png'),
title: Text(list[index].name),
subtitle: Text(list[index].url),
);
},
separatorBuilder: (context, index) {
return Container(
margin: EdgeInsets.only(left: 18, right: 18),
height: 1,
color: Colors.grey,
);
},
itemCount: list.length),
),
);
}
Container buildTop() {
return Container(
color: Colors.white,
height: 135,
child: Row(
mainAxisAlignment: MainAxisAlignment.spaceEvenly,
children: <Widget>[
Container(
child: ImageBtn('images/shoudongluru.png', '手动录入', () {
print('shoudongluru');
}),
),
Container(
width: 0.5,
color: Colors.grey,
),
Container(
child: ImageBtn('images/saomatianjia.png', '扫码添加', () {
print('shoudongluru');
}),
)
],
),
);
}
}
本节课讲一下路由以及组件封装