 solomonxie
commented
6 years ago
solomonxie
commented
6 years ago Open solomonxie opened 6 years ago
solomonxie
commented
6 years ago solomonxie
commented
5 years ago 最近学习Machine Learning发现好多人都用docker,之前一直听说但是感觉和自己无关。但是现在发现原来docker是个这么方便的东西,可以跨平台(不分什么版本的linux,甚至mac和windows也行)运行。所以这里开一篇来记录学习感受。
参考:Docker 完全指南 参考: Gitbook - Docker — 从入门到实践
不提那些难懂的术语,大白话就是: 一个Docker就是一个Linux的Live CD系统,跟USB系统一样,有完整的系统文件目录和程序。
我们可以在这个与外界隔离的便携系统里随便读写操作,只是每次进入它时候,都会恢复最开始的样子,像什么事都没发生一样。 我们可以像定制Live CD或WinPE一样,定制这个小系统里面默认装什么软件。一旦定制好了,就是不可更改的,非常稳定。
一开始发现很乱很难理解,觉得所有人都把它说的太复杂了。直到后来发现,其实它的运行逻辑很简单。
实际上,可以把Docker看成是给电脑安装Linux系统时的Live CD,或者是给Windows用USB安装系统时的WinPE。这样会方便理解一点。
回想下自己在给PC或是虚拟机上安装Linux系统时,都会有个Live CD选项。也是就是你可以什么都不安装,直接进入系统,所有的工具都能用,所有的软件都能安装,所有的配置也可以改。只不过你重启过后,一切修改的地方都恢复原样了。
每篇攻略都会提到这三个基本概念:
镜像 Image
相当于一个系统光盘的ISO镜像文件,是只读的。你可以直接进入image中各种操作没有障碍,感觉就像进入_Live CD_系统了。只是所有操作都会在退出时消失,下次进image时候还是初始的样子。容器 Container
就像给"ISO文件"加了一层可读写的外衣,所有的变动都会保存在Container里,而image还是image,不会变。就像你可以随便换衣服,但是身体不会变。仓库 Repo
一般指的Dockerhub,就是一个像Github的网站,只不过不是收集代码,而是收集各种image镜像。你可以随意上传下载各大厂商或个人制作的镜像。Docker分CE和EE两个版本,一个社区公开免费,一个商业付费。
参考官方安装步骤:Get Docker CE for Ubuntu
准备工作:
#安装SSL相关,让apt通过HTTPS下载:
sudo apt-get install apt-transport-https ca-certificates curl software-properties-common
# 添加docker的GPG key
curl -fsSL https://download.docker.com/linux/ubuntu/gpg | sudo apt-key add -
#检查key是否相符(9DC8 5822 9FC7 DD38 854A  E2D8 8D81 803C 0EBF CD88)
sudo apt-key fingerprint 0EBFCD88

#添加docker的apt下载源
sudo add-apt-repository  "deb [arch=amd64] https://download.docker.com/linux/ubuntu $(lsb_release -cs) stable"

#更新源
sudo apt-get update
安装docker:
$ sudo apt-get install docker-ce卸载Docker:
$ sudo apt-get remove docker docker-engine docker.io直接下载app:

树莓派是基于ARM架构的,和PC不同。所以即使树莓派上能做一些docker镜像,也不能在别的PC上运行。反过来别的PC上的docker镜像,也不能在树莓派上运行。 如果需要找树莓派专用的镜像,那就在
Dockerhub上搜索ARM或Rpi相关就能找到了。 有一个叫Hypriot的仓库制作了非常多树莓派专用docker,可以参考下。
树莓派安装Docker,最难的在于正确的选择源和添加GPG-key,才能找到版本适合的docker并下载。这个过程是非常繁琐且很难有统一方案的。 另外:官方的一键安装版本已经失效了。必须手动操作。

从Image镜像创建一个Container容器:
# 新建一个Container容器(如果本地有image则直接从它创建,如果没有则从网上下载)
# 进入docke的shell -t,即进入虚拟的一个系统,有自己的/root文件系统结构

$ docker run -it <repo>:<tag> <CMD>

#如:
$ docker run -it jekyll/jekyll:latest bash

# 为container指定名称(而不是只用ID来引用)
$ docker run -it --name <NAME> <image-ID>
查看已有的:
# 查看已有的images
$ docker images

# 查看已创建的containers
$ docker container ls -a
运行一个已有的Container:
# 先启动container
$ docker container <ID> start

# 运行(挂载)container,挂载后自动进入容器里的shell
$ docker attach <ID>

# 或者一句话完成(--attach)
$ docker start -a<ID>
删除已有的:
# 删除image
$ docker rm <Image-ID>

# 删除container
$ docker rm <Container-ID>为了每次执行docker不需要总是输入sudo,我们需要为docker创建一个用户组,并授予权限才行:
# 创建docker用户组
sudo groupadd docker

# 把当前用户加入到docker用户组
sudo gpasswd -a $USER docker

# 更新当前用户组变动(就不用退出并重新登录了)
newgrp docker我们肯定不会满足于docker只访问自己的小世界里的文件系统(什么数据都没有),所以有必要让它能访问外界Host主机上的一些文件夹。比如我有一个docker是作为下载机用的,那么我肯定得让它把下载好的东西存到我的主机上,要不然就白下载了。
挂载文件夹是在docker运行镜像的命令里就指定的(利用-v参数):
$ docker run -it -v <HOST-PATH>:<DOCKER-PATH> ubuntu64 /bin/bash

#或者作为只读挂载 (:ro)
$ docker run -it -v <HOST-PATH>:<DOCKER-PATH>:ro ubuntu64 /bin/bash
注意,挂载的双方都必须是绝对路径。
如果Docker里运行的是Web服务比如Nginx,里面有一个网站,那你必须得把”虚拟机“里的端口映射到外部才能正常看到网页。
映射是在运行docker命令时指定的,比如把里面的80端口映射到外面的8888端口,命令如下:
$ docker run --name webserver -d -p 80:8888 nginx然后你在主机上的浏览器访问http://localhost:8888,就可以看到nginx里的网页了。

直接在镜像上改动的内容,会在退出时全部消失。但是我们经常需要把这些变动保存下来。
Docker保存这些变动的机制就是——生成另一个只读镜像。(-_-!)
虽然正常看来,这不太好吧。但实际上,这很好! Docker镜像实际上是非常小的,所以生成另一个镜像也没有多费事。而且这种机制保证了每个镜像的不可随便修改的性质,这一点就极大的避免了混乱。
Docker保存更改有两种方式:
docker commit:就像git commit一样,把每次改动作为一个commit提交,可以追溯历史Dockerfile:这是从头build构建一个镜像的配置文件,把你想改动的地方(如安装一个程序)写成一句bash命令,加到Dockerfile这个文件里,它就会按照你的要求执行所有的命令,然后生成一个新的镜像。Commit可以追溯历史,但是变动了哪些地方是对外界黑箱的。 Dockerfile确实明明白白写清楚有哪些改变。
所以一般情况下,正式构建一个镜像,都是用Dockerfile的。
docker commit命令,可以将容器的存储层保存下来成为镜像。换句话说,就是在原有镜像的基础上,再叠加上容器的存储层,并构成新的镜像。以后我们运行这个新镜像的时候,就会拥有原有容器最后的文件变化。
慎用docker commit:
由于命令的执行,还有很多文件被改动或添加了。这还仅仅是最简单的操作,如果是安装软件包、编译构建,那会有大量的无关内容被添加进来,如果不小心清理,将会导致镜像极为臃肿。 此外,使用 docker commit 意味着所有对镜像的操作都是黑箱操作,生成的镜像也被称为黑箱镜像,换句话说,就是除了制作镜像的人知道执行过什么命令、怎么生成的镜像,别人根本无从得知。而且,即使是这个制作镜像的人,过一段时间后也无法记清具体在操作的。虽然 docker diff 或许可以告诉得到一些线索,但是远远不到可以确保生成一致镜像的地步。这种黑箱镜像的维护工作是非常痛苦的。 而且,回顾之前提及的镜像所使用的分层存储的概念,除当前层外,之前的每一层都是不会发生改变的,换句话说,任何修改的结果仅仅是在当前层进行标记、添加、修改,而不会改动上一层。如果使用 docker commit 制作镜像,以及后期修改的话,每一次修改都会让镜像更加臃肿一次,所删除的上一层的东西并不会丢失,会一直如影随形的跟着这个镜像,即使根本无法访问到。这会让镜像更加臃肿。
solomonxie
commented
5 years ago 因为树莓派是ARM架构的,所以Docker的安装和使用也都有不同。需要讲的内容比较多,这里单挑出来。
树莓派是基于ARM架构的,和PC不同。所以即使树莓派上能做一些docker镜像,也不能在别的PC上运行。反过来别的PC上的docker镜像,也不能在树莓派上运行。
如果需要找树莓派专用的镜像,那就在Dockerhub上搜索ARM或Rpi相关就能找到了。
有一个叫Hypriot的仓库制作了非常多树莓派专用docker,可以参考下。
树莓派参考:Get Docker CE for Debian 参考:My home server powered by Pi and Docker
树莓派安装Docker,最难的在于正确的选择源和添加GPG-key,才能找到版本适合的docker并下载。这个过程是非常繁琐且很难有统一方案的。
注意:官方的一键安装脚本很多人说不再支持了。但是目前位置,其实还是能支持的。
参考:The easy way to set up Docker on a Raspberry Pi
开始执行之前,先说明:我之前很多次都不成功,找了很多相关解决方案都不行。直到。。。
直到我先sudo apt-get update并且最最最重要的是sudo apt-get upgrade,之后才行。
其实在upgrade时候就能看到,更新了很多系统依赖包,这也就解决了之前docker安装不成功的一切毛病了。
upgrade完成后,就开始正式安装了:
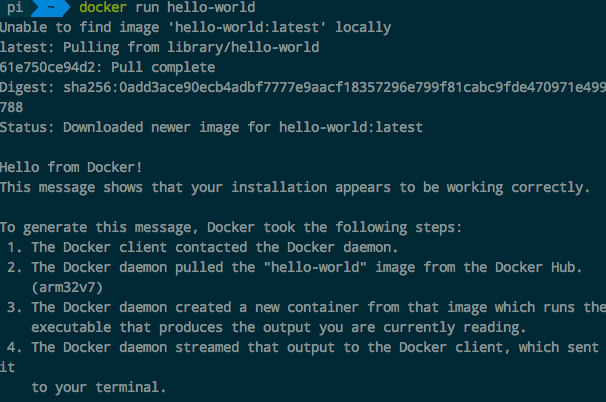
需要用到一个shell脚本,get.docker.com,整个网站就这一个脚本。下载并执行:
$ curl -fsSL get.docker.com -o get-docker.sh && sh get-docker.sh完成后,会显示:
然后运行hello world试试:
$ sudo docker run hello-world然后显示:
准备工作:
#安装SSL相关,让apt通过HTTPS下载:
sudo apt-get install apt-transport-https ca-certificates curl gnupg2 software-properties-common

# 添加docker的GPG key
curl -fsSL https://download.docker.com/linux/debian/gpg | sudo apt-key add -
#检查key是否相符(9DC8 5822 9FC7 DD38 854A E2D8 8D81 803C 0EBF CD88)
sudo apt-key fingerprint 0EBFCD88

#添加docker的apt下载源
sudo echo "\ndeb-src [arch=amd64] https://download.docker.com/linux/debian wheezy stable\n" >> /etc/apt/sources.list

#更新源
sudo apt-get update
安装docker:
$ sudo apt-get install docker-ce为了每次执行docker不需要总是输入sudo,我们需要为docker创建一个用户组,并授予权限才行:
# 创建docker用户组
sudo groupadd docker

# 把当前用户加入到docker用户组
sudo gpasswd -a $USER docker

# 更新当前用户组变动(就不用退出并重新登录了)
newgrp docker可以通过把docker compose当作一个docker的container下载并运行:
docker run \
    -v /var/run/docker.sock:/var/run/docker.sock \
    -v "$PWD:/rootfs/$PWD" \
    -w="/rootfs/$PWD" \
    docker/compose:1.13.0 up

# 设置alias快捷键(`~/.zshrc`或`~/.bash_profile`)
alias docker-compose="'"'docker run \
    -v /var/run/docker.sock:/var/run/docker.sock \
    -v "$PWD:/rootfs/$PWD" \
    -w="/rootfs/$PWD" \
docker/compose:1.13.0'"'"Python: No module name lsb_release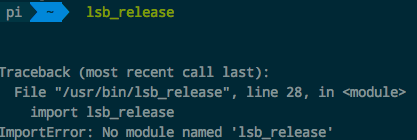
先检查本机是否已经安装了lsb_release,或者重新安装一遍:
$ sudo apt-get install lsb-release如果还是这个问题,那么就检查Python版本。如果是python3,那么很可能是版本不够,因为lsb_release需要最少python3.5。 解决这个问题,就把默认python设置回python2就好了。就是个ln建立快捷方式都事:
# 备份(python具体的位置根据自己情况定)
$ sudo mv /usr/bin/python /usr/bin/python_bak

# 更换
$ sudo ln -s /usr/bin/python2.7 /usr/bin/python然后再试一下$ lsb_release -cs看看有没有显示jessie
无法添加源 add-apt-repository 报错找不到相关源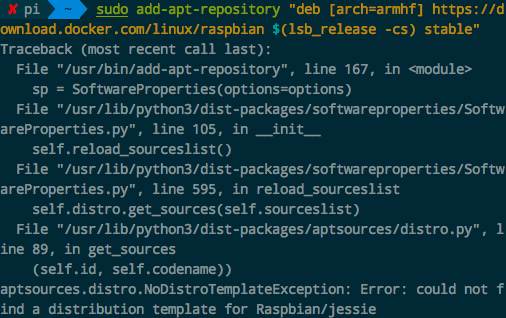
solomonxie
commented
5 years ago # 显示当前所有运行的docker
$ docker ps -a
# 显示所有docker对主机系统的占用
$ docker stats# 查看现有容器
$ docker container ls -a
# 容器重命名
$ docker container rename <Name1> <Name2>
# 删除容器
$ docker container rm <ID or Name>
# 运行已有容器 (start + attach)
$ docker start <Name>
$ docker attach <Name>
# 运行已有容器 (start --attach) ====不建议,因为经常出问题,如卡住=====
$ docker start -a <Name>
# 进入已经运行的容器 或 执行命令
$ docker exec -it <Name> <CMD>
# 导出容器为镜像(于docker import相对应,只导出当前状态)
$ docker export -o <Filename.tar> <Container-ID>
# 导出容器为镜像(与docker save相对应,导出所有历史版本)# 显示所有镜像
$ docker images
# 删除镜像
$ docker image rm <Name or ID>
# 或
$ docker rmi <Name or ID>
# 从镜像生成容器
$ docker run -it <Image Name>
# 下载镜像
$ docker pull <Image Source>
# 导入本地镜像 (导入docker save出来的镜像)
$ docker load -i <Filename>
# 导入本地镜像(导入docker export 出来的镜像)
$ docker import <Filename>
# 为无名镜像创建tag标签
$ docker tag <Name or ID> <Name>:<Tag>显示错误:
open /var/lib/docker/tmp/docker-import- ... /json: no such file or directory一般要记住:
docker save保存出来的镜像,要用docker load -o <path>导入docker export保存出来的镜像,要用docker import <path>导入还有,导出镜像时,可以用.tar格式。
solomonxie
commented
5 years ago Docker很多镜像动不动就1G或几百M,官方经常掉线。所以只能换国内源。
国内的镜像源有
https://registry.docker-cn.comhttp://hub-mirror.c.163.comhttp://docker.mirrors.ustc.edu.cnhttp://<你的ID>.mirror.aliyuncs.com注意registry-mirrors千万不要用https,而是用http,否则会显示No certs for egitstry.docker.com,
insecure-registries不要任何http头,否则无法通过。
通用的方法就是编辑/etc/docker/daemon.json:
{
  "registry-mirrors" : [
    "http://ovfftd6p.mirror.aliyuncs.com",
    "http://registry.docker-cn.com",
    "http://docker.mirrors.ustc.edu.cn",
    "http://hub-mirror.c.163.com"
  ],
  "insecure-registries" : [
    "registry.docker-cn.com",
    "docker.mirrors.ustc.edu.cn"
  ],
  "debug" : true,
  "experimental" : true
}
然后重启docker的daemon即可。

阿里源需要用自己的账号登录阿里云后台获得只有自己有的源地址,如下:

solomonxie
commented
5 years ago Docker为容器声明一个Volume数据存储,有三种方法,达到一样的效果:
Volume: HostPath:ContainerPath-v HostPath:ContainerPath-volumes-from AnotherContainer创建某容器并读取数据容器:
$ docker run -d --volumes-from dbdata --name db1 postgres使用数据容器的两个注意点:
如果把Host上文件夹映射到Container里,极有可能涉及权限问题,比如Container里所有者是
root,但是Host里面这个文件夹的所有者是guest,那么就极有可能容器里的app无法正常读写这个文件夹。
所以,必须里外的所有者、权限是一样的。
最好是从容器里面定义文件夹的权限,而不是从外部。 如chown -R www-data:wwwdata .
solomonxie
commented
5 years ago 用了两三天才把Docker在Windows上搞定。 首先:必须要Windows10最新版(2018以上)才行。最好不要用网上Ghost版本的镜像,因为即使是最新编的镜像也是用的老版本win10,更新时间还是花了我12小时以上还没更新完。索性直接到官网下载正式安装版。
适用于Linux的子系统 (Windows Subsystem For Linux)和Hpyer-V和Hypervisor三项参考:Get started with Docker for Windows 参考:Logs and troubleshooting
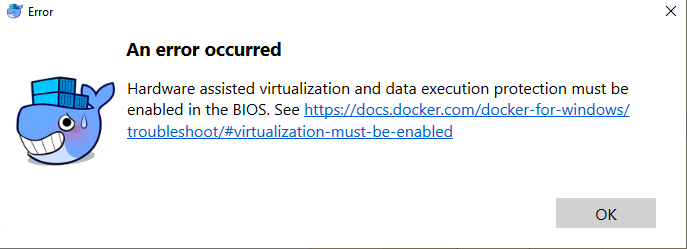
用管理员权限打开Powershell,输入命令:
# 开启Hyper-V
dism.exe /Online /Enable-Feature:Microsoft-Hyper-V /All
bcdedit /set hypervisorlaunchtype auto
重启。
如果还没用,就到控制面板WIndows功能里,取消HypyerV等,重启。然后再选中,然后再重新安装,再重启。
如果再再没用,那就是时候考虑放弃了(电脑太老了可能),然后使用Virtualbox方案——安装Docker toolbox。
solomonxie
commented
5 years ago 必须要在本地的镜像名称规范化后才能提交,否则会被denied.
规范的镜像名称应该是:<用户名>/<镜像名>:<Tag>,比如solomonxie/webdav-rpi:jessie
如果创建时候没有规范,还可以用docker tag命令改:
$ docker tag <原镜像名> <用户名>/<新镜像名>:<Tag>完成后,就可以准备登录提交了:
# 进入互动,输入用户密码后即可登录
$ docker login

# 提交镜像
$ docker push <用户名>/<镜像名>:<Tag>
然后就等待它慢慢上传就好了:

最后还可以在自己的hub.docker.io空间中查看这个镜像,然后填写相关的说明。

solomonxie
commented
5 years ago solomonxie
commented
5 years ago DevOps是个近些年的新词,它是一个职位,而不是一个的技术。
可以直接从字面上理解:把实现功能写代码的Developer开发人员和运维部署应用的Operations运维人员和在一起的职位。
DevOps is the NEW Dev.
也就是说,既然Ops部署上线一类的完成了自动化,Dev开发者就可以独自承担一个完整的上线流程了。这样的话好处在于,Dev了解自己刚刚写的代码也了解自己管理的功能模块,所以参与整个上线流程会非常顺手,出了问题也能很快找到问题源头。
要说DevOps,就不能不提把他推上高位的源头:微服务 Microservices。
微服务,或SOA,或PaaS,简而言之就是把原本的Monolithic单体化应用(百万代码量)拆分成成百上千的细分小功能应用。 用Git语言理解,就是把一个大Repo拆分成很多个小Repo。 用编程语言理解,就相当于函数式编程理念:把一个1000行代码的fucntion拆分成几十个专注单一功能的小function。
这样的细分虽然利用构建健壮可扩展性的应用,但相对的维护这些细粒模块的管理成本就上来了。 原本手动在命令行里敲命令来部署维护一个大应用,是没问题的。 但是让你手敲命令去部署几百个应用?开玩笑!
这就催生了DevOps,让重复的东西自动化,让电脑自己部署。
以往的Dev,只要负责写代码就好了。剩下的QA、部署、上线、监控全都有别人来管。 但现在变身DevOps就不同了,需要负责一整个链条。具体如下:
Coding – 代码开发,代码审核, Git版本管理,Git分支Merge管理Building – CI持续集成Testing – 保证所有测试通过Packaging – artifact repository, application pre-deployment stagingReleasing – 部署上线Configuring – 架构配置,Infrastructure as Code管理Monitoring – 应用性能监控,终端用户体验三大步骤:
如果懂Git,所谓的CI就非常容易理解了。
用Git的语言来说,所谓的集成就是把feature分支merge到master分支上。一旦完成merge,就算完成集成。也就是把你新开发的一个小功能或小改动,集成到整个应用上。
要完成这个集成,就要运行一系列的测试,比如单元测试、功能测试、性能测试等。
一旦所有测试通过,就算集成完成。如果哪个测试失败了,那么就要再回去继续改代码。
在每次push的时候自动触发这一系列的测试并返回结果,这就叫持续集成。
每次改完代码,提交commits,然后push到remote远程主机,就会触发这个CI测试。只要测试完成,就意味着可以集成了,用git的语言说,就是可以merge到master分支了。 一旦merge到master分支,就意味着完成了集成。
_"交付"_是要交付什么呢? 简单理解,就是交付一个Docker镜像。
交付给谁呢? 交付给Ops运维人员。这样他就能直接拿着镜像在各种主机、集群环境上部署了。
部署什么呢? 就是自动检查新的Docker镜像,有了新的镜像后自动部署到主机、集群上,完成自动上线Release。


solomonxie
commented
5 years ago Swagger专门用来生成API,以内部API为主。
Swagger几大件:
Refer to: What Is the Difference Between Swagger and OpenAPI?
The easiest way to understand the difference is:
OpenAPI = SpecificationSwagger = Tools for implementing the specification"The OpenAPI is the official name of the specification. The development of the specification is fostered by the OpenAPI Initiative, which involves more the 30 organizations from different areas of the tech world — including Microsoft, Google, IBM, and CapitalOne. Smartbear Software, which is the company that leads the development of the Swagger tools, is also a member of the OpenAPI Initiative, helping lead the evolution of the specification."
Swagger is the name associated with some of the most well-known, and widely used tools for implementing the OpenAPI specification. The Swagger toolset includes a mix of open source, free, and commercial tools, which can be used at different stages of the API lifecycle.
These tools include:
Swagger Editor: Swagger Editor lets you edit OpenAPI specifications in YAML inside your browser and to preview documentation in real time.*Swagger UI: Swagger UI is a collection of HTML, Javascript, and CSS assets that dynamically generate beautiful documentation from an OAS-compliant API.*Swagger Codegen: Allows generation of API client libraries (SDK generation), server stubs and documentation is automatically given an OpenAPI Spec.Swagger Parser: Standalone library for parsing OpenAPI definitions from JavaSwagger Core: Java-related libraries for creating, consuming, and working with OpenAPI definitions*Swagger Inspector (free): API testing tool that lets you validate your APIs & generate OpenAPI definitions from an existing APISwaggerHub (free & commercial): API design and documentation, built for teams working with OpenAPI.solomonxie
commented
5 years ago It's all about TESTING, and applied in the scenario of DAILY MULTIPLE MERGES TO MASTER BRANCH.
Refer to: Continuous Integration - What's the point? - Continuous Integration P1 - Fun Fun Function
CI sounds like a buzz word, a magic word, which in my opinion it's just to confuse the beginners.
In an essense, a CI is just a server program that helps you to run your test scripts automatically when you do git push.
What does "integration" mean?
It simple means git merge from a feature-branch to a master-branch.
What does "continuous" mean?
It's just saying after you developed a new thing to the application, the code can be git mergeed WITHOUT WAITING for the Ops guy to manually check stuff before he merge the code. It means to say, without the "blocker", without the waiting, the development process then become "continuous".
Start from the beginning, as the team's branching strategy, what we do is to develop all feature or fix at a feature branch out of the master branch.
When the development is finished, we run the unit tests and functional tests at the feature branch by a simple command like pytest /path/to/project/tests to make sure all tests are passed.
Then seems it's ready to be merged to master branch.
What does it mean by merge to master? It means that the code is ready to RELEASE to the public, to show to the customers, which is critical and can be risky. We want it to be as less risky as possible.
Before diving deeper, I'd like to show the common development process on a new feature:
git checkout -b new-feature-01git commitpytest /path/to/project/unit-testpytest /path/to/project/functional-testgit push origin new-feature-01doing a CICI tests are passed or not.Test Environment computer, which has some test dataset in the database or the production database (read-only).real production server on "real data"production serverIn the pro-language, we call it a hook when something will be automatically triggered.
At Github, it's called a webhook on a repo which will trigger some scripts or programs when you do some change to the repo, like git push.
solomonxie
commented
5 years ago Refer to: Podman official page Refer to: Podman介绍 Refer to Youtube: Replacing Docker With Podman
开始前,你需要知道的一切:
$ dnf install podman -y
$ alias docker=podman能够快速增强理解的说法是,
Podman是Docker-compose的替代品。
也就是说,podman用来管理多个相关联的Docker容器,达到比docker-compose更好更合理的配合。
solomonxie
commented
5 years ago 单主机当然没有使用Docker的必要性。
一般企业级应用,必然要涉及多主机,即Cluster集群的部署。 而这种分布式架构,目前几乎必然会用到Docker。
Docker在集群部署上,有以下三种流行的方式:
docker-swarm + docker-machine + docker-composeMesos + Marathon + ZookeeperKubernetes,简称K8s"Kubernetes"在希腊语中代表舵手,或是飞行员。这也就是为什么在其源码中会出现飞行员手册式编程这种东西。Kubernetes是2014年由几位Google工程师创建的开源产品,是真正的新生代,年头很短但势力强劲。它的开发深受Google内部著名的Borg大规模集群容器管理系统的影响,直接将它的思路用Go重新实现。也就是说它不是真正的新产物而是有深厚技术和历史基础的,是站在巨人的肩膀上的,所以才能一出事就被市场这么广泛的接受。
一句话说明:Kubernetes就是一个集群,把多个主机当成一个主机来用。
在Kubernetes中,能够管理的最小单元就不再是Container容器了,而是一个叫Pod的单元,它是一个"逻辑组件"。K8s是在这个pod内运行容器。
一个Pod内,有多个containers,而这些containers之间可以进行通信,且共享多种资源,如:
但是Pod内的各个容器之间的user等命名空间还是相互隔离的。
solomonxie
commented
5 years ago IaC是一种策略,是DevOps的一种工作策略:即把所有架构性部署操作都变为代码或配置文件,在Git Repo中进行版本管理,然后上线部署、监控等都是根据这些配置文件自动执行的,无需手动敲命令行的命令。
这个过程中,最重要的就是用
Git版本控制来管理部署。
所以整个部署过程,不但可以保存历史变动,还能免去记忆一大堆命令,还能自动执行,同时还对其他所有成员透明。每个参与项目的人都能知道整个部署过程是什么。
我们可以用IaC来做什么呢?
结合当前Infrastructure流行架构的技术,我们可以把这种"部署即代码"的策略应用在:
solomonxie
commented
5 years ago $ docker images
REPOSITORY TAG IMAGE ID CREATED SIZE
<none> <none> 5b021d7fb1c2 10 minutes ago 453MB
<none> <none> b6fd958aee66 13 minutes ago 453MB
<none> <none> 066450d8f9f6 14 minutes ago 545MB
<none> <none> 6e3e8c5dc3ce 17 minutes ago 453MB
<none> <none> 2d7ab2f16ba8 20 minutes ago 545MB很多这种创建不成功的镜像很占地方,所以一口气删除它们:
$ docker images --filter "dangling=true" -q |xargs docker rmi$ docker images --format "{{.ID}}:{{.Repository}}"
77af4d6b9913: <none>
b6fa739cedf5: committ
78a85c484f71: <none>
30557a29d5ab: docker
5ed6274db6ce: <none>
746b819f315e: postgres
746b819f315e: postgres
746b819f315e: postgres
$ docker images --format "{{.ID}}: {{.Repository}}" | grep "none" |cut -d ':' -f 1
77af4d6b9913: <none>
78a85c484f71: <none>
5ed6274db6ce: <none>Official: https://www.portainer.io/
一切只需要:
$ docker volume create portainer_data
$ docker run -d -p 9000:9000 -v /var/run/docker.sock:/var/run/docker.sock -v portainer_data:/data portainer/portainer
solomonxie
commented
5 years ago https://serverfault.com/questions/683605/docker-container-time-timezone-will-not-reflect-changes
solomonxie
commented
5 years ago If your services or containers attempt to use more memory than the system has available, you may experience an Out Of Memory Exception (OOME) and a container, or the Docker daemon, might be killed by the kernel OOM killer. To prevent this from happening, ensure that your application runs on hosts with adequate memory and see Understand the risks of running out of memory.
solomonxie
commented
4 years ago $ docker ps -a -q
4ff5324e9636
5f0cec9b5c71
e108bbf3ea22
a6a1d6306844
232642460fd7
b997d5016284
222a30c93694
31182cc11926
781e09ada5c7
9bffdfbb670e
43f6ba685883
02ab7c20e01d
35ee1033272c
0aa64438a0f8
909279a8c656$ docker stop $(docker ps -a -q)
$ docker rm $(docker ps -a -q)$ docker system prune
WARNING! This will remove:
- all stopped containers
- all networks not used by at least one container
- all dangling images
- all dangling build cache
Are you sure you want to continue? [y/N] y
Deleted Networks:
aa-bulk-grabber_default
aa-qa-bulk-e2e-test_default
aa_default
Deleted Images:
untagged: solomonxie/aa_ace_contest_201909@sha256:ac735b326b5303ad7cafcd54347e9eb1086e0935c9e85487d500c4350c80b114
deleted: sha256:56a191d08494a0b2b572345e5fce1ab966b32382ce13b345bbd35bda805cd9df
deleted: sha256:800a9f4654309621ac2bea04fff503ab5436ac505012d7f5f1bb9f6040459cc1
deleted: sha256:fb703a91d488d585a80ab6c9d358514a741b413a174fd6f9be28af3d896ccde7
deleted: sha256:638fa5563f49fe6f7ea1a0893fc89538cfffe359004ea1e595d8f1ea2f498d55
deleted: sha256:6c1ab126920007acc6ae7485a671d8be33b50c5961ed8cd9e33733e0da6e110c
deleted: sha256:c1938c54758090a0ada2d043c5fbac91aa45291aa7b0eb9fa8fd56b4256a6e65Mac:
$ brew install ansible现在有一个最简单的Dockerfile
FROM alpine
MAINTAINER Solomon Xie <solomonxiewise@gmail.com>

COPY entry.sh /

CMD ["/bin/sh", "/entry.sh"]
然后entry脚本是这样的:
#entry.sh
echo OK.
现在想要这个docker在后台常驻(-d),然后我随时可以登陆进container:
$ docker build . example
$ docker run -d example
但是每次run之后,container执行完entry脚本立马就停止了。
原因在于, -d 是detached mode,有一个大大前提:
必须有一个foreground前台任务执行,才能把container“挂住”,可以是一个server,也可以是一个死循环,比如:
# Correct
tail -f /dev/null

# Correct
FLASK_APP=myapp flask run

# Correct (Cron daemon)
/usr/sbin/crond -fd 0

# Wrong
echo OK
flask run &
脚本的最后一个命令,一定要挂住,不能到"完成",也不能转后台运行。
solomonxie
commented
3 years ago 随着近期Docker可能会由于国界问题被禁用,我们开始寻找靠谱的替代方案。目前最可靠、迁移成本最低的就是新起之秀 Podman。
# MacOS (Catalina)
$ brew cask install podmanSolution:
System Preferences > Security & Privacy > General -> Allow
Solution: ?

涉及领域: