제1-1장: 변수, 배열, 반복문
# 자바의 데이터 타입
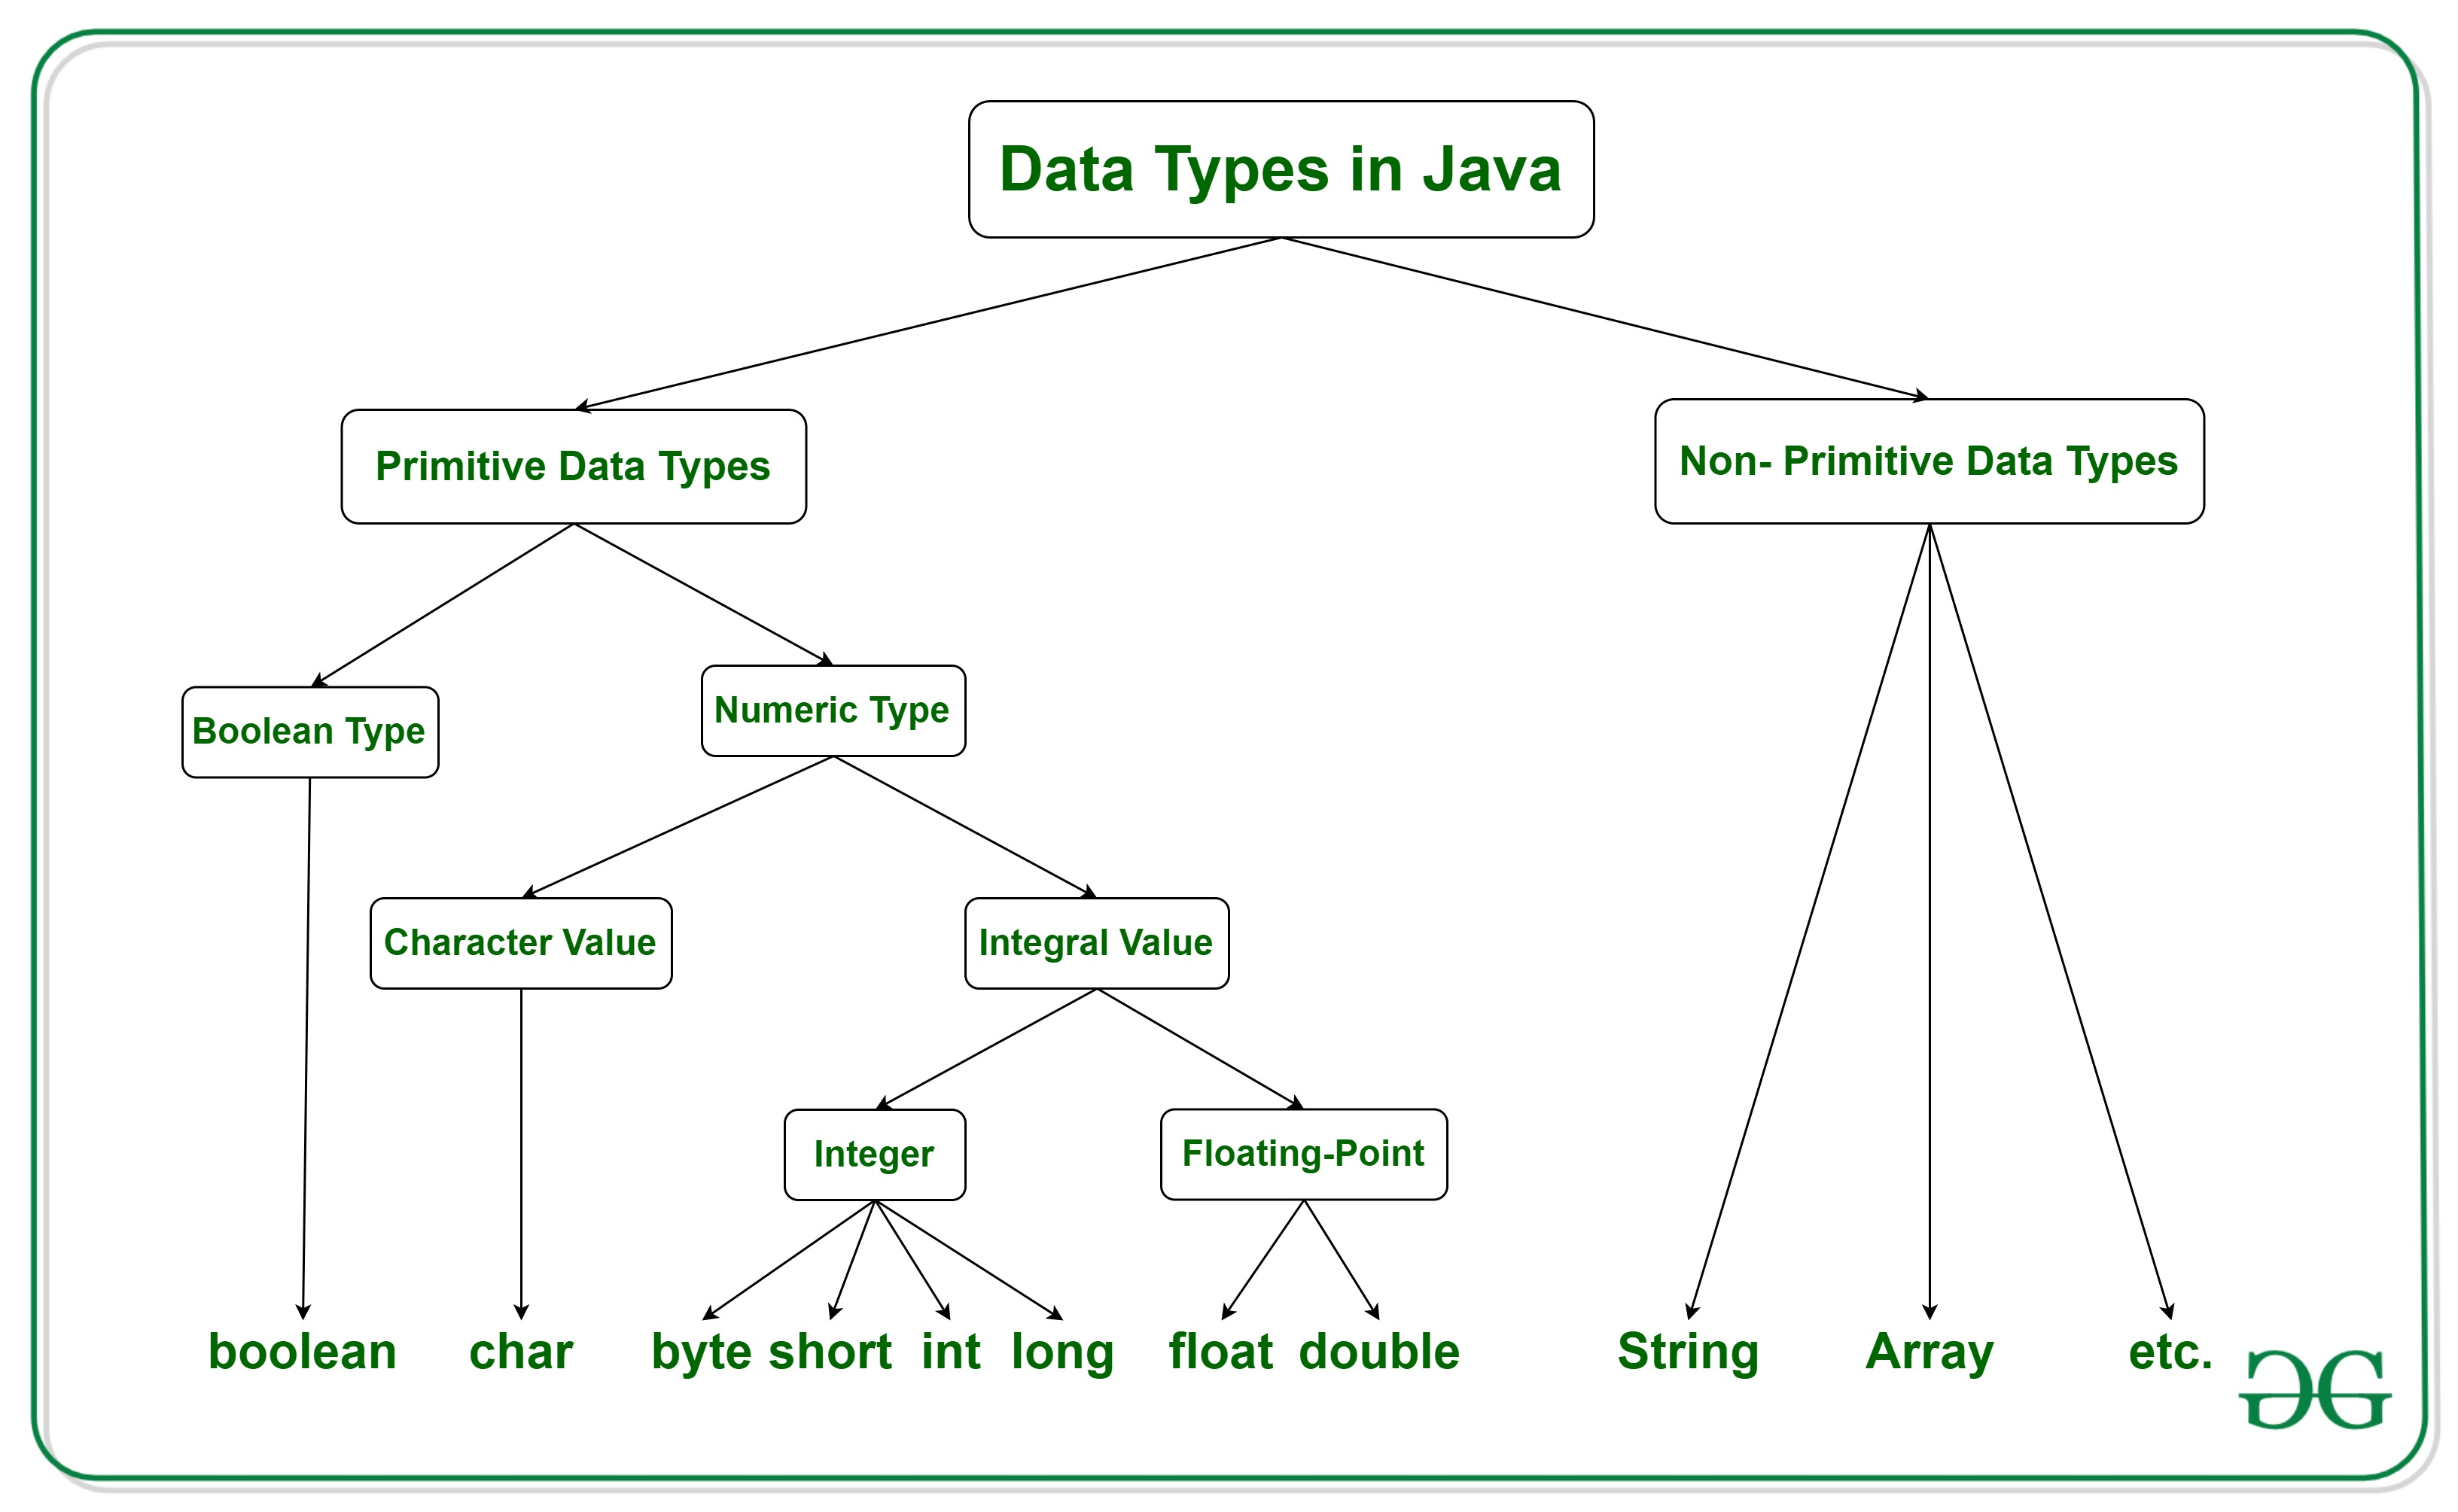
## Primitive Type
* 사용하기 전에 선언 (Declared)
* OS에 따라 자료형의 길이가 변하지 않습니다.
* 비객체 타입 -> null 값을 가질 수 없습니다.
* `==`로 타입의 동일성을 검사할 수 있음
## Non-Primitive Type (Reference Type)
* **참조형** : java.lang.Object를 상속 받음 (클래스형Class Type, 인터페이스형Interface Type, 배열형Array Type)
* java.lang 패키지는 자바에서 가장 기본적인 동작을 수행하는 클래스들의 집합
-> java.lang 패키지의 클래스들은 import 문을 사용하지 않아도 클래스 이름만으로 바로 사용 가능
* Class Type 中 String Type
* 참조형에 속하지만 기본적인 사용은 기본형처럼 사용
* 불변하는immutable 객체
* String 객체간의 비교는 .equals() 메소드를 사용
* **래퍼 클래스(Wrapper class)**
* 기본 타입의 데이터 -> 객체로 취급해야 하는 경우 (ex. 메소드의 인수로 객체 타입만이 요구되면, 기본 타입의 데이터를 그대로 사용할 수는 없음, 기본 타입의 데이터를 먼저 객체로 변환한 후 작업을 수행)
* 8개의 기본 타입에 해당하는 데이터를 객체로 포장해 주는 클래스: 래퍼 클래스(Wrapper class)
* 래퍼 클래스는 각각의 타입에 해당하는 데이터를 인수로 전달받아, 해당 값을 가지는 객체로 만들어 줍니다.
* java.lang 패키지에 포함되어 제공됨
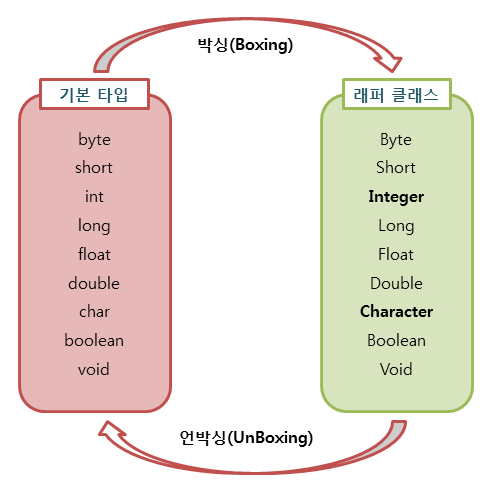
* 래퍼 클래스도 객체이므로 동등 연산자(==)를 사용하게 되면, 두 인스턴스의 값을 비교하는 것이 아니라 두 인스턴스의 주소값을 비교
-> 그러므로 인스턴스에 저장된 값의 동등 여부를 정확히 판단하려면 equals() 메소드를 사용
* 래퍼 클래스로 감싸고 있는 기본 타입 값은 외부에서 변경 X -> 변경하려면? 새로운 포장 객체 만들기
* boxing, unboxing
제1-2장: 메서드 호출과 프로그램의 기능적 분할
***Call by Value, 값에 의한 호출***
- 현재 swap 메서드를 만들면 작동이 안된다? 왜?
```java
package Section2;
import java.util.Arrays;
import java.util.Scanner;
public class Code16 {
public static void main(String[] args) {
Scanner kb = new Scanner(System.in);
int n = kb.nextInt();
int[] data = new int[n];
for (int i = 0; i < n; i++) {
data[i] = kb.nextInt();
}
kb.close();
bubbleSort(data);
System.out.println(Arrays.toString(data));
}
public static void bubbleSort(int[] data) {
for (int i = data.length - 1; i > 0; i--) {
for (int j = 0; j < i; j++) {
if (data[j] > data[j + 1]) {
swap(data[j], data[j + 1]);
}
}
}
}
**private static void swap(int a, int b) {
int tmp = a;
a = b;
b = tmp;
}**
}
```
- 값에 의한 호출
- 프리미티브 타입의 매개변수는 호출된 메서드에서 값을 변경하더라도 호출한 쪽에 영향을 주지 못한다. 이것은 “값에 의한 호출”이기 때문이다.
- Actual Paremeter와 Formal Parameter는 별개의 변수라는 것
- 다만 호출이 실행되는 순간 Acutal의 값이 Formal에 **복사되는 것**
- 즉, a와 b의 값이 swap된 것이고 data[j], data[j + 1]은 변경이 없다!
- C와 java에는 값에 의한 호출 뿐이다
- **그런데 왜 bubblesort()도 main()에서 매개변수로 전달 받은걸 순서를 바꾼건데 왜 여기선 되고 swap() 메서드 만들었을 때는 안되는 걸까?**
- **배열의 값**은 호출된 메서드에서 변경하면 호출한 쪽에서도 변경된다.
- Primitive type이 아닌 타입들은 변경이 가능한 것
제1-3장: 문자열 다루기
# 문자열 다루기
### 예제: 인덱스 메이커
- 입력으로 하나의 텍스트 파일을 읽는다 (sample.txt).
- 텍스트 파일에 등장하는 모든 단어들의 목록을 만들고, 각 단어가 텍스트 파일에 등장하는 횟수를 센다. 단, 단어 개수는 100,000개 이하라고 가정한다.
- 사용자가 요청하면 단어 목록을 하나의 파일로 저장한다.
- 사용자가 단어를 검색하면 그 단어가 텍스트 파일에 몇 번 등장하는지 출력한다.
```java
package Section2;
import java.io.*;
import java.util.Scanner;
public class Code22 {
//단어 목록
static String[] words = new String[100000];
//각 단어 등장 횟수
static int[] count = new int[100000];
//저장된 단어 개수
static int n;
public static void main(String[] args) {
Scanner kb = new Scanner(System.in);
while (true) {
System.out.println("$ ");
String command = kb.next();
if (command.equals("read")) {
String fileName = kb.next();
makeIndex(fileName);
} else if (command.equals("find")) {
String keyword = kb.next();
int index = findWord(keyword);
if (index != -1)
System.out.println("The word " + keyword + " appears " + count[index] + " times.");
else System.out.println("The word " + keyword + " doesn't appear.");
} else if (command.equals("saveas")) {
String fileName = kb.next();
saveAs(fileName);
} else if (command.equals("exit"))
break;
}
kb.close();
}
private static void saveAs(String fileName) {
try {
//파일 출력
PrintWriter outFile = new PrintWriter(new FileWriter(fileName));
for (int i = 0; i < n; i++) {
outFile.println(words[i] + " " + count[i]);
}
outFile.close();
} catch (IOException e) {
System.out.println("Save failed.");
}
}
private static void makeIndex(String fileName) {
try {
Scanner theFile = new Scanner(new File(fileName));
while (theFile.hasNext()) {
String word = theFile.next();
addWord(word);
}
theFile.close();
} catch (FileNotFoundException e) {
System.out.println("File doesn't exist!");
}
}
private static void addWord(String word) {
//못 찾으면 -1 반환
int index = findWord(word);
if (index > -1) {
count[index]++;
} else {
words[n] = word;
count[n] = 1;
n++;
}
}
private static int findWord(String keyWord) {
for (int i = 0; i < n; i++)
if (words[i].equals(keyWord))
return i;
return -1;
}
}
```
### String 클래스 기본 메서드
- 문자열 동일성 검사 - `boolean equals(String)` : primitive(숫자, 문자 하나)만 `==` 된다
- 문자열 사전식 순서 - `int compareTo(String)`
- The result is a **negative integer** if this String object lexicographically precedes the argument string. The result is a **positive integer** if this String object lexicographically follows the argument string. The result is zero if the strings are equal; compareTo returns 0 exactly when the equals(Object) method would return true.
- 문자열 길이 - `int length()`
- 특정 위치의 문자 - `char charAt(int)`
- 지정한 문자의 위치 검색 - `int indexOf(char)`
- 지정된 범위의 부분 문자열 - `String substring(int, int)`
---
- trim 하고 lowercase 저장
```java
package Section2;
import java.io.*;
import java.util.Scanner;
public class Code22 {
//단어 목록
static String[] words = new String[100000];
//각 단어 등장 횟수
static int[] count = new int[100000];
//저장된 단어 개수
static int n;
public static void main(String[] args) {
Scanner kb = new Scanner(System.in);
while (true) {
System.out.println("$ ");
String command = kb.next();
if (command.equals("read")) {
String fileName = kb.next();
makeIndex(fileName);
} else if (command.equals("find")) {
String keyword = kb.next();
int index = findWord(keyword);
if (index != -1)
System.out.println("The word " + keyword + " appears " + count[index] + " times.");
else System.out.println("The word " + keyword + " doesn't appear.");
} else if (command.equals("saveas")) {
String fileName = kb.next();
saveAs(fileName);
} else if (command.equals("exit"))
break;
}
kb.close();
}
**private static String trimming(String str) {
if (str == null || str.length() <= 0)
return null;
int i = 0, j = str.length() - 1;
while (i < str.length() && !Character.isLetter(str.charAt(i)))
i++;
while (j >= 0 && !Character.isLetter(str.charAt(j)))
j--;
if (i <= j)
return str.substring(i, j + 1);
else
return null;
}**
private static void saveAs(String fileName) {
try {
//파일 출력
PrintWriter outFile = new PrintWriter(new FileWriter(fileName));
for (int i = 0; i < n; i++) {
outFile.println(words[i] + " " + count[i]);
}
outFile.close();
} catch (IOException e) {
System.out.println("Save failed.");
}
}
private static void makeIndex(String fileName) {
try {
Scanner theFile = new Scanner(new File(fileName));
while (theFile.hasNext()) {
String word = theFile.next();
**String trimmed = trimming(word);
if (trimmed != null)
String lower = trimmed.toLowerCase();
addWord(lower);**
}
theFile.close();
} catch (FileNotFoundException e) {
System.out.println("File doesn't exist!");
}
}
private static void addWord(String word) {
//못 찾으면 -1 반환
int index = findWord(word);
if (index > -1) {
count[index]++;
} else {
words[n] = word;
count[n] = 1;
n++;
}
}
private static int findWord(String keyWord) {
for (int i = 0; i < n; i++)
if (words[i].equals(keyWord))
return i;
return -1;
}
}
```
- 정렬하려면? 2가지 방법
1. 모두 읽고 인덱스 만든 후에 한 번에 정렬하기
2. 단어를 읽는 순간에 정렬하기
*2. 방법으로 하면~*
- 뒤에서부터 검사해야함 왜? 앞에서부터 검사하면 넣을 자리 찾고 뒤에꺼도 하나씩 뒤로 옮겨야 하니까!
```java
private static void addWord(String word) {
//못 찾으면 -1 반환
int index = findWord(word);
if (index > -1) {
count[index]++;
} else {
int i = n - 1;
for (; i >= 0 && words[i].compareToIgnoreCase(word) > 0; i--) { //이미 소문자로 바꿔서 그냥 compareTo()해도 된다!
words[i + 1] = words[i];
count[i + 1] = count[i];
}
words[i + 1] = word;
count[i + 1] = 1;
n++;
}
}
```
제2-1장: 클래스, 객체, 참조변수
# 클래스, 객체, 참조변수
## 클래스
- 하나의 타입
- Java가 미리 정해놓은 타입이 아니라 사용자가 정의한 새로운 타입 ⇒ `사용자 정의 타입`
### Primitive type과 Class: 차이점
- `int count = 0`
- primitive type은 변수가 만들어지면서 변수 안에 값이 저장됨
- `Person1 first = new Person1();`
- 클래스는 변수가 만들어지고, 객체는 그 다음에 new로 따로 만들어야 한다.
- 변수에는 그 객체의 주소(참조)를 저장한다.
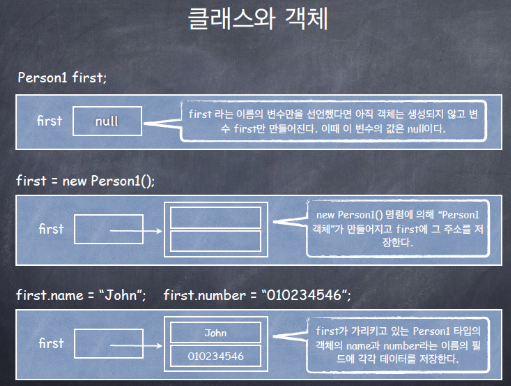
- 모든 primitive type의 변수는 보통 변수이다. → 변수 자체에 값이 저장된다.
- primitive type이 아닌 모든 변수는 참조 변수이다. → 실제 데이터가 저장될 "객체"는 new 명령으로 따로 만들어야 하고, 참조 변수에는 그 객체의 주소를 저장한다.
- `Person1 [] members = new Person1[8]`
- 배열은 Primitive타입이 아니다. Primitive타입의 배열이라고 하더라도 배열의 각 원소가 Primitive 타입인 것이지 배열 자체가 Primitive타입인 것은 아니다. 따라서 배열의 이름 members는 참조 변수이다.
- 배열의 각 칸은 Person1 타입이다. 그런데 Person1은 프리미티브타입이 아니다. 따라서 배열의 각 칸도 참조 변수이다.
```java
package Section3;
public class Code01_2 {
public static void main(String[] args) {
Person1 first = new Person1();
first.name = "John";
first.number = "0511233456";
Person1 second = first;
second.name = "Tom";
System.out.println(first.name + ", " + first.number);
//배열의 각 칸이 Person1 타입인 상황
Person1 [] members = new Person1[100];
members[0] = first;
//first와 second는 같은 객체를 참조
members[1] = second;
// members[1].name = "John";
// members[1].number = "01020222022";
members[2] = new Person1(); //만약 이렇게 객체를 생성, 참조하지 않으면 NPE 난다
members[2].name = "John";
members[2].number = "01020222022";
System.out.println(members[0].name + ", " + members[0].number);
System.out.println(members[1].name + ", " + members[1].number);
System.out.println(members[2].name + ", " + members[2].number);
}
}
```
---
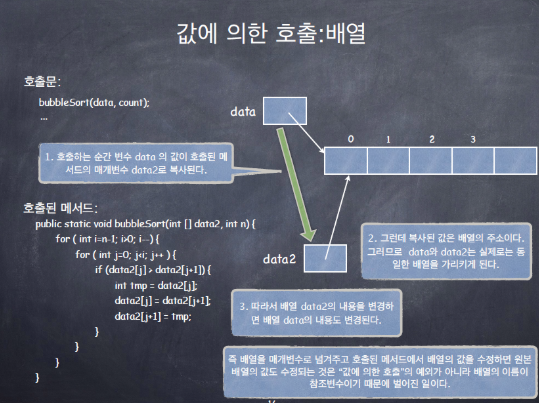
- data2 배열을 매개변수로 받고 그 배열의 원소의 순서를 바꿨는데 그게 data에도 반영되는 이유는 두 변수가 동일한 배열을 참조하고 있기 때문!
- 호출될 때의 data 변수의 값이 data2에 복사되는데 그 복사된 값이 동일한 배열의 주소라는 것
---
- 클래스는 타입, 설계도 같은 것
- 실체는 참조변수나 객체
- 참조변수는 실제 값을 저장하는 것이 아님, 생성한 객체의 고유한 이름이 없으니 그걸 접근하기 위한 객체의 주소를 저장한다.
제2-2장: 메서드와 생성자
# 메서드와 생성자
- 관련있는 데이터들 한 단위로
- 관련 깊은 메서드도
- 응집도 높이고 결합도 낮추기
- 클래스는 설계도일뿐, 실체가 아님 → 설계도 하나로 여러 개의 집을 지을 수 있음
- 실행하는 것: 클래스가 아니라 각각의 객체 안에 있는 메서드
- 각각의 객체 안에 메서드 존재
## 생성자
- 클래스 안에 그 클래스와 동일한 이름을 가지며 return 타입이 없는 특별한 메서드
- 생성자는 new 명령으로 객체가 생성될 때 자동으로 실행된다. 주 목적은 객체의 데이터 필드의 값을 초기화
- 매개변수를 반드시 받아야 하는 것은 아님
제2-3장: static 그리고 public
# static 그리고 visibility
- 클래스의 데이터 필드에 데이터를 저장할 수는 없고, 클래스의 멤버 메서드를 실행할 수도 없다. 왜냐하면 실체가 아니므로!
- new 명령으로 해당 클래스 타입의 **객체를 만든 후, 그 객체에 데이터를 저장하고, 그 객체의 멤버 메서드를 실행하는 것**이다.
- 여기에는 하나의 예외가 존재하는데 그것이 static 멤버이다.
- **static 멤버**는 **클래스 안에 실재로 존재하며 객체에는 존재하지 않는다.**
- 왜 main 메서드는 반드시 static?
- static이 아니면 어디서 이 클래스를 객체로 만들어서 실행할 것인가!
- 시작점이어야 하기 때문
- 왜 static 메서드에서 같은 클래스의 non-static 멤버를 엑세스 할 수 없는가?
```java
package section3;
public class Test {
static int s = 0;
int t = 0;
public static void print1() {
System.out.println("s: " + s);
// System.out.println("t: " + t);
}
public void print2() {
System.out.println("s: " + s);
System.out.println("t: " + t);
}
public static void main(String[] args) {
s = 100;
// t = 100;
print1();
// print2();
//객체를 생성해야만!
Test test1 = new Test();
test1.t = 100;
test1.print2();
}
}
```
---
- 다른 클래스에 속한 static 멤버는 어떻게 엑세스하는가?
```java
package section3;
public class Test {
public static int s = 0;
public int t = 0;
public static void print1() {
System.out.println("s: " + s);
}
public void print2() {
System.out.println("t: " + t);
}
}
```
```java
package section3;
public class TestTest {
public static void main(String[] args) {
Test test1 = new Test();
test1.t = 10;
test1.s = 100;
test1.print2(); //10
test1.print1(); //100
Test test2 = new Test();
test2.print1(); //100
test2.print2(); //0
}
}
```
```java
package section3;
public class TestTest {
public static void main(String[] args) {
Test test1 = new Test();
test1.t = 10;
**Test.s = 100;**
test1.print2(); //10
Test.print1(); //100
Test test2 = new Test();
**Test.print1(); //100**
test2.print2(); //0
}
}
```

- static 멤버는 이미 그 클래스에 속해 있으니 한 번 바꾸면 유지된다.
---
- static 메서드/필드의 용도는?
- main 메서드
- 상수 혹은 클래스 당 하나만 유지하고 있으면 되는 값(혹은 객체)
- `Math.PI`, `System.out`
- 순수하게 기능만으로 정의되는 메서드 ex. 수학 함수들
- `Math.abs(k)` , `Math.sqrt(n)`, `Math.min(a, b)`
## 접근 제어: public, private, default, protected
- public: 클래스 외부에서 접근이 가능하다.
- private: 클래스 내부에서만 접근이 가능하다.
- default: 동일 패키지에 있는 다른 클래스에서 접근 가능하다.
- protected: 동일 패키지의 다른 클래스와 다른 패키지의 하위클래스에서도 접근 가능하다.
## 데이터 캡슐화
- 모든 데이터 멤버를 private으로 만들고 필요한 경우에 **public한 get/set 메서드를 제공**한다.
- 이렇게 하면 객체가 제공해주는 메서드를 통하지 않고서는 객체 내부의 데이터에 접근할 수가 없다.
- 의도하지 않은 변경을 막기 위해서!
- 이것을 data encapsulation 혹은 information hiding이라고 부른다.
제3-3장: 클래스 Object와 Wrapper 클래스
# class Object와 Wrapper class
## class Object

- 모든 클래스의 super class
- Java의 모든 클래스는 내가 만들어 주지 않아도 이미 `equals`와 `toString` 메서드를 가지고 있음
### toString()
- 만약 toString 메서드를 따로 만들어주지 않은 클래스의 객체에 대해서 toString() 메서드를 호출하면 다음과 같은 String이 반환된다.
- 예: PhoneBook@ef08879 (클래스 이름@객체의 hash code)
### equals(Object)
- Object 클래스의 equals 메서드의 매개변수는 Object 타입
- `public boolean equals (Object other) { ... }`
- 매개변수로 제공된 객체와 자기 자신의 동일성을 검사
- 이 메서드를 의도대로 사용하려면? → `@Override`
```java
package object;
public class ObjectPractice {
public int a = 10;
public double x = 3.22;
public static void main(String[] args) {
ObjectPractice test1 = new ObjectPractice();
ObjectPractice test2 = new ObjectPractice();
System.out.println(test1.toString());
if (test2.equals(test1))
System.out.println("yes");
else
System.out.println("no");
}
}
// no
```
- `@Override` 를 하지는 않았지만 결과를 yes 나오게끔 하기
- 매개변수의 타입이 다르면 다른 메서드로 분리해서 생각
```java
package object;
public class ObjectPractice {
public int a = 10;
public double x = 3.22;
public boolean equals(**ObjectPractice other**) {
return a == other.a && x == other.x;
}
public static void main(String[] args) {
ObjectPractice test1 = new ObjectPractice();
ObjectPractice test2 = new ObjectPractice();
System.out.println(test1.toString());
if (test2.equals(test1))
System.out.println("yes");
else
System.out.println("no");
}
}
//yes
```
- 진짜 `@Override` 하기 위해서 매개변수 타입을 Object로 해주면 → 오류가 난다!

- ObjectPractice 클래스는 Object의 subclass
- 매개 변수 전달과정에서 Polymorphism(다형성)이 발생
- Object 타입의 변수는 모든 클래스의 타입을 참조할 수 있다
- 그런데 other는 Object 타입의 변수니까 → a라는 필드와 x라는 필드가 없음
⇒ type casting(형변환) 필요
- `@Override`
```java
package object;
public class ObjectPractice {
public int a = 10;
public double x = 3.22;
@Override
public boolean equals(Object o) {
if (this == o) return true;
if (o == null || getClass() != o.getClass()) return false;
//형변환 후 필드까지 동일하면 true로!
// 근데 이거는 내가 직접 변경해서 동일한 객체의 정의를 새로 할 수 있음
ObjectPractice that = (ObjectPractice) o;
return a == that.a &&
Double.compare(that.x, x) == 0;
}
public static void main(String[] args) {
ObjectPractice test1 = new ObjectPractice();
ObjectPractice test2 = new ObjectPractice();
System.out.println(test1.toString());
if (test2.equals(test1))
System.out.println("yes");
else
System.out.println("no");
}
}
```
### Class
- 모든 클래스는 하나의 Class 객체를 가진다.
- 이 객체는 각각의 클래스에 대해서 유일(unique)하다.
- 메서드 **`getClass()`**는 Object 클래스가 제공하는 메서드이며, 이 유일한 Class 객체 반환한다.
- 앞 페이지의 예에서 만약 this.getClass()==obj.getClass() 가 true라면 우리는 비교 대상인 두 객체 (this와 obj)가 동일한 클래스의 객체임을 알 수 있다.
## Wrapper Class
- Java에서 **primitive type 데이터와 non-primitive type 데이터**, 즉 객체는 근본적으로 *다르게* 처리된다.
- 가령 **Object 타입의 배열**에는 다형성의 원리에 의해서 **모든 종류의 객체**를 저장할 수 있다. 하지만, int, double, char 등의 **primitive type 데이터는 저장할 수 없다. 객체가 아니므로…**
- 때때로 primitive type 데이터를 객체로 만들어야 할 경우가 있다. 이럴 때 Integer, Double, Character 등의 **wrapper class를 이용**한다.
- 기본 타입의 데이터를 하나의 객체로 포장해주는 클래스:
- Integer, Double, Character, Boolean 등
```java
int a = 20;
Integer age = new Integer(a);
int b = age.intValue(); // b becomes 20
```
- 데이터 타입 간의 변환 기능을 제공
- `Integer.parseInt`
```java
String str = "1234";
int d = Integer.paresInt(str); //d becomes 1234
```
```java
Object [] array = new Object[100];
int a = 20;
Integer age = new Integer(a); //wrapping
array[0] = age;
int b = age.intValue(); //unwrapping
```
### Autoboxing과 unboxing
```java
Object [] array = new Object[100];
int a = 20;
Integer age = new Integer(a); //wrapping
array[0] = age; //이렇게 wrapping 해야 할 것 같지만
array[1] = a; //이렇게 안 해도 괜찮다? -> Autoboxing 덕분에!
```
- Java 컴파일러가 자동으로 이것을 Integer 객체로 변환 ⇒ Autoboxing
```java
Object [] array = new Object[100];
int a = 20;
Integer age = new Integer(a); //wrapping
array[0] = age;
int b = (Integer)array[0]; //문법적으로 말도 안되지만 Autounboxing 덕분에 가능!
```
제3-5장: Generic 프로그래밍과 Generics
# Generic 프로그래밍과 Generics
- 데이터 형식에 의존하지 않고, 하나의 값이 여러 다른 데이터 타입들을 가질 수 있는 기술에 중점을 두어 재사용성*(types-to-be-specified-later)*을 높일 수 있는 프로그래밍 방식
- Generic한 변수/자료구조
- `Event ev;` ⇒ OneDayEvent 타입의 변수보다 Event 타입의 변수가 더 generic 하다!
- `Event [] events = new Event [capacity];`
- `Object obj;` ⇒ 가장 Generic하다...!
- Generic한 알고리즘 (method)
- `Arrays.sort( shapes, 0, n );`
- Generic 클래스
- `Generics`
### Generics
- T라는 가상의 타입에 의해서 parpameterized된 클래스
- T는 type parameter
- 객체를 생성하는 시점에 가상의 타입 T를 실재하는 타입으로 지정
```java
package genericPractice;
public class Box {
private T t;
public void set(T t) {
this.t = t;
}
public T get() {
return t;
}
}
```
```java
package genericPractice;
import SchedulerApp.Event;
import SchedulerApp.OneDayEvent;
public class Main {
public static void main(String[] args) {
**Box integerBox = new Box();**
integerBox.set(new Integer(10));
**Box eventBox = new Box();**
eventBox.set(new OneDayEvent("dinner","2020-09-10"));
}
}
```
```java
package genericPractice;
public class Pair {
private K key;
private V value;
public void set(K key, V value) {
this.key = key;
this.value = value;
}
public K getKey() {
return key;
}
public V getValue() {
return value;
}
}
```
```java
Pair p1 = new Pair();
p1.set("Even", 9);
Pair p2 = new Pair();
p2.set("Even", "bla");
```
- 2개 이상의 type parameter도 가능하다!
---
### class Object vs. Generics
```java
public class Box {
private **Object** t;
public void set(Object t) {
this.t = t;
}
public Object get() {
return t;
}
}
```
```java
package genericPractice;
public class Main {
public static void main(String[] args) {
**Box box = new Box();**
box.set(new Integer(10));
**Integer a = (Integer)box.get();**
}
}
```
- box.get()의 리턴 타입이 Object ⇒ type casting이 필수
```java
package genericPractice;
public class Box {
private T t;
public void set(T t) {
this.t = t;
}
public T get() {
return t;
}
}
```
```java
package genericPractice;
public class Main {
public static void main(String[] args) {
**Box integerBox = new Box();**
integerBox.set(new Integer(10));
}
}
```
- 매번 형변환을 해줘야 하는 것은 좋은 프로그램이라고 할 수 없음!
제4-1장: 연결리스트의 개념과 기본연산
# 연결 리스트의 개념과 기본 연산
## 리스트(list)
- 기본적인 연산: 삽입(insert), 삭제(remove), 검색(search) 등 리스트를 구현하는 대표적인 두 가지 방법: 배열, 연결리스트
## 배열의 단점
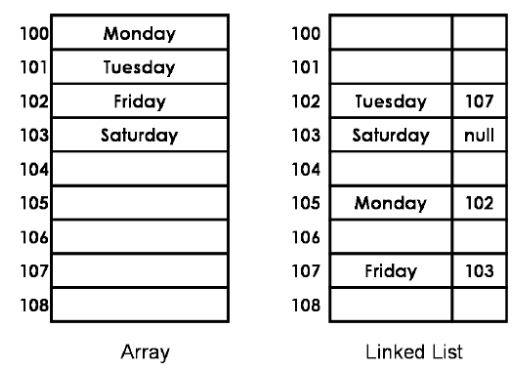
- 크기가 고정 - **reallocation이 필요**
- 리스트의 중간에 원소를 삽입하거나 삭제할 경우 다수의 데이터를 옮겨야
## 연결리스트
- 다른 데이터의 이동없이 중간에 삽입이나 삭제가 가능하며, 길이의 제한이 없음 but, 랜덤 엑세스가 불가능
## 노드
- 각각의 노드는 “데이터 필드”와 하나 혹은 그 이상의 “링크 필드”로 구성
- 링크 필드는 다음 노드를 참조
- 첫 번째 노드의 주소는 따로 저장해야
- MyNode
- MyLinkedList
- 첫 번째 노드

- 노드 클래스
```java
package linkedListPractice;
public class Node {
public T data;
public Node next;
public Node(T data) {
this.data = data;
next = null;
}
}
```
- 연결리스트 표현
```java
package linkedListPractice;
public class MySingleLinkedList {
public Node head;
public int size;
public MySingleLinkedList() {
head = null;
size = 0;
}
public void addFirst(T item) {
Node newNode = new Node(item); //T: type parameter -> T 타입의 객체를 생성하는 것: 가능
// 아래는 모두 불가능
// Node arr = new Node[100];
// T t = new T();
// T[] array = new T[100];
}
public void add(int index, T item) {
}
public void remove(int index) {
}
public T get(int index) {
return null;
}
public int indexOf(T item) {
return -1;
}
public static void main(String[] args) {
MySingleLinkedList list = new MySingleLinkedList<>();
list.add(0, "Saturday");
list.add(1, "Friday");
list.add(0, "Monday");
list.add(2, "Tuesday");
String str = list.get(2);
list.remove(2);
int pos = list.indexOf("Friday");
}
}
```
---
- `addFirst(T item)`
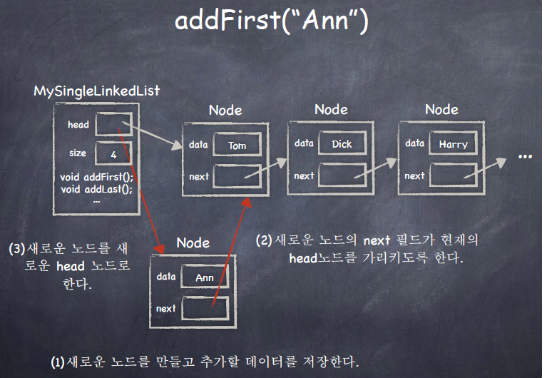
- (2) 이 먼저 되어야 그 담에 오는 Tom 노드의 주소를 잃지 않을 수 있다
- 연결 리스트를 다루는 프로그램에서 가장 주의할 점은 내가 작성한 코드가 일반적인 경우만이 아니라 특수한 혹은 극단적인 경우에도 문제 없이 작동하는지 철저히 확인하는 것이다. 이 경우에는 **기존의 연결 리스트의 크기가 0인 경우, 즉 head가 null인 경우에도 문제가 없는지** 확인해야 한다. 문제가 없는가?
```java
public void addFirst(T item) {
Node newNode = new Node(item); //T: type parameter -> T 타입의 객체를 생성하는 것: 가능
// 아래는 모두 불가능
// Node arr = new Node[100];
// T t = new T();
// T[] array = new T[100];
newNode.next = head; //(2)새 노드의 next 필드 -> 현재의 head 가르키도록
head = newNode; //(3)head를 새 노드로
size++;
}
```
- `addAfter(Node before, T item)`
```java
public void addAfter(Node before, T item) {
Node temp = new Node<>(item);
temp.next = before.next;
before.next = temp;
size++;
}
```
- 단순연결리스트에 새로운 노드를 삽입할 때 삽입할 위치의 바로 앞 노드의 주소가 필요하다. 즉 어떤 노드의 뒤에 삽입하는 것은 간단하지만, 반대로 **어떤 노드의 앞에 삽입하는 것은 간단하지 않다.**
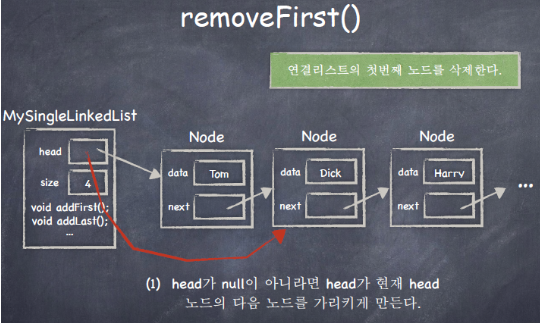
- `removeFirst()`
```java
public T removeFirst() {
if (head == null)
return null;
else {
T temp = head.data;
head = head.next;
size--;
return temp;
}
}
```
- `removeAfter(Node before)`
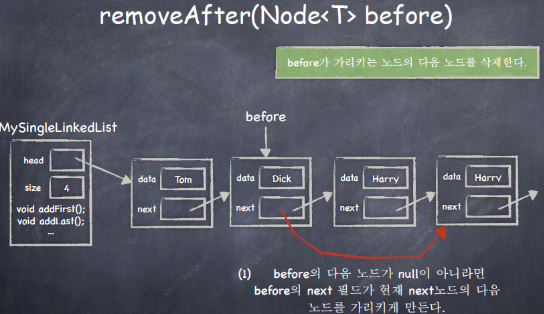
- 단순연결리스트에 어떤 노드를 삭제할 때는 삭제할 노드의 바로 앞 노드의 주소가 필요하다. 삭제할 노드의 주소만으로는 삭제할 수 없다.
```java
public T removeAfter(Node before) {
if (before.next == null)
return null;
else {
T temp = before.next.data;
before.next = before.next.next;
size--;
return temp;
}
}
```
- `indexOf(T item)`
```java
public int indexOf(T item) {
Node p = head;
int index = 0;
while (p != null) {
if (p.data.equals(item))
return index;
p = p.next;
index++;
}
return -1;
}
```
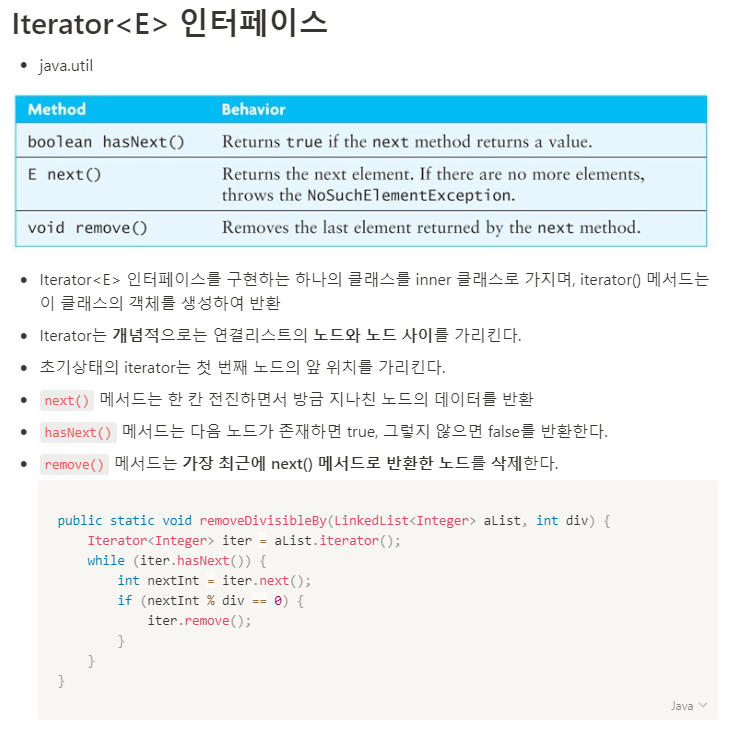
- 연결리스트의 노드들을 처음부터 순서대로 방문하는 것을 순회(traverse)한다고 말한다. indexOf 메서드는 **입력된 데이터 item과 동일한 데이터를 저장한 노드를 찾아서 그 노드번호(index)를 반환**한다. 그것을 위해서 연결리스트를 순회한다.
- `getNode(int index)`
```java
public Node getNode(int index) {
if (index < 0 || index >= size)
return null;
Node p = head;
for (int i = 0; i < index; i++)
p = p.next;
return p;
}
```
- 연결리스트의 **index번째 노드의 주소를 반환**한다.
- `get(int index)`
```java
public T get(int index) {
if (index < 0 || index >= size)
return null;
return getNode(index).data;
}
```
- **index번째 노드에 저장된 데이터**를 반환한다.
- 중복 줄이기
- `void add(int indedx, T item)`
```java
public void addFirst(T item) {
Node newNode = new Node(item); //T: type parameter -> T 타입의 객체를 생성하는 것: 가능
// 아래는 모두 불가능
// Node arr = new Node[100];
// T t = new T();
// T[] array = new T[100];
newNode.next = head; //(2)새 노드의 next 필드 -> 현재의 head 가르키도록
head = newNode; //(3)head를 새 노드로
size++;
}
public void addAfter(Node before, T item) {
Node temp = new Node<>(item);
temp.next = before.next;
before.next = temp;
}
**public void add(int index, T item) {
if (index < 0 || index > size) //index - 1 해야하니까 등호 빼기
return;
else if (index == 0)
addFirst(item);
else {
Node q = getNode(index - 1);
addAfter(q, item);
}
}**
```
- `T remove(int index)` , `T remove(T item)`
- index번째 노드를 삭제하고, 그 노드에 저장된 데이터를 반환
- item에 해당하는 노드를 삭제하고, 그 노드에 저장된 데이터를 반환
- 항상 직전 노드도 참조해 가면서! 접근하기
```java
public T removeFirst() {
if (head == null)
return null;
else {
T temp = head.data;
head = head.next;
size--;
return temp;
}
}
public T removeAfter(Node before) {
if (before.next == null)
return null;
else {
T temp = before.next.data;
before.next = before.next.next;
size--;
return temp;
}
}
**public T remove(int index) { //매개변수 index인 경우
if (index < 0 || index >= size) {
return null;
}
if (index == 0)
return removeFirst();
Node prev = getNode(index - 1);
return removeAfter(prev);
}
public T remove(T item) { //매개변수 item인 경우
Node p = head;
Node q = null;
while (p != null && !p.data.equals(item)) {
q = p; //직전노드가 항상 쫓아가도록
p = p.next; //이전 노드의 주소를 알아야 함...!
}
if (p == null)
return null;
if (q == null)
return removeFirst();
else
return removeAfter(q);
}**
```
제4-3장: 연결리스트와 Iterator
# 객체지향 프로그래밍
- Information Hiding
- Data Encapsulation
- Abstract Data Type
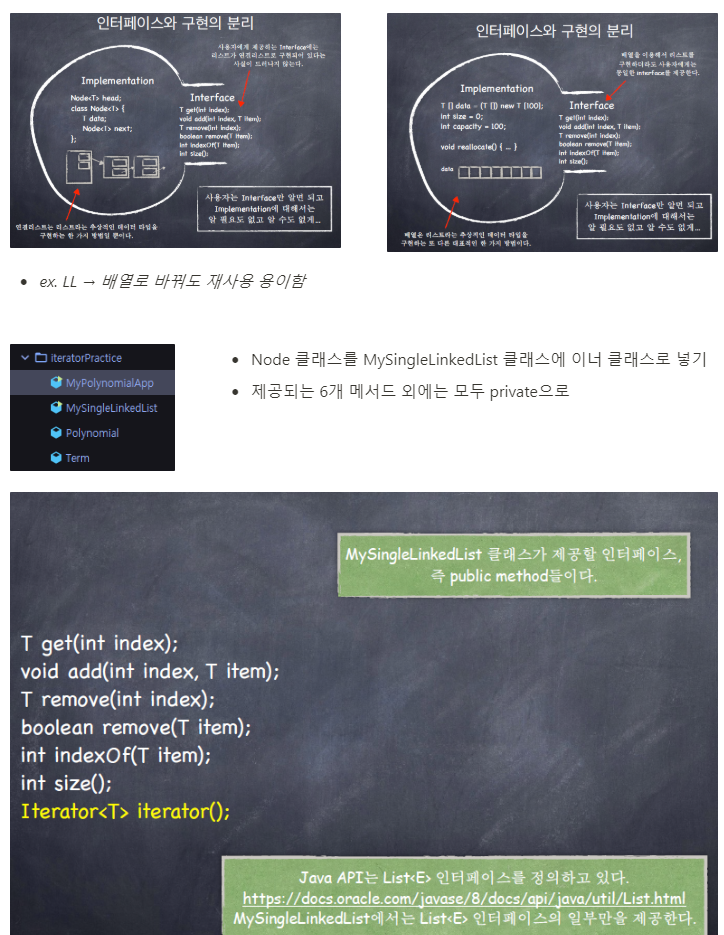
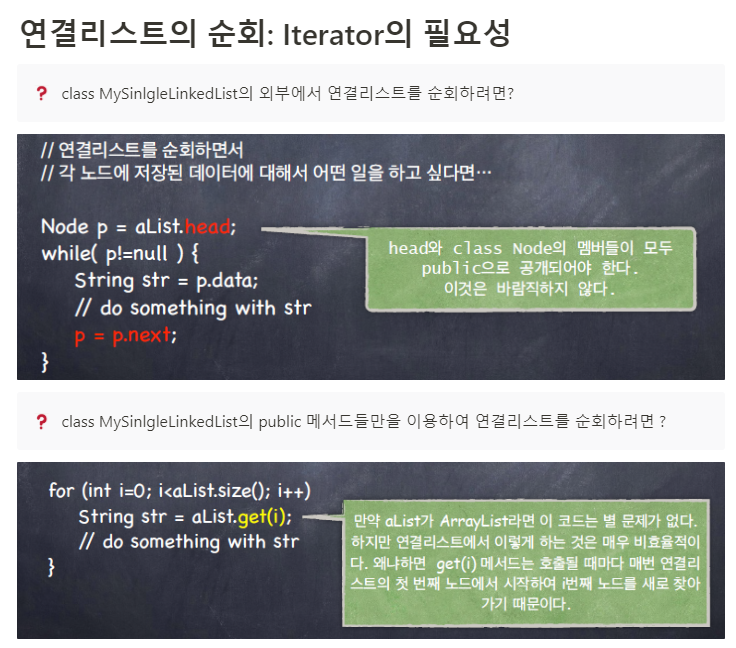
## 인터페이스(Interface)와 구현(implementation)의 분리
- *tv를 보기 위해 tv리모컨(인터페이스) 리모컨이 어떻게 만들어져 있는지 알아야 할 필요는 없음*
- 연결 리스트는 “리스트”라는 추상적인 데이터 타입을 구현하는 한 가지 방법일 뿐이다. 가령 배열 혹은 ArrayList는 또 다른 구현 방법의 예이다.
- 사용자는 리스트에 데이터를 삽입, 삭제, 검색할 수 있으면 된다. 그것의 구현에 대해서 세부적으로 알 필요는 없다.
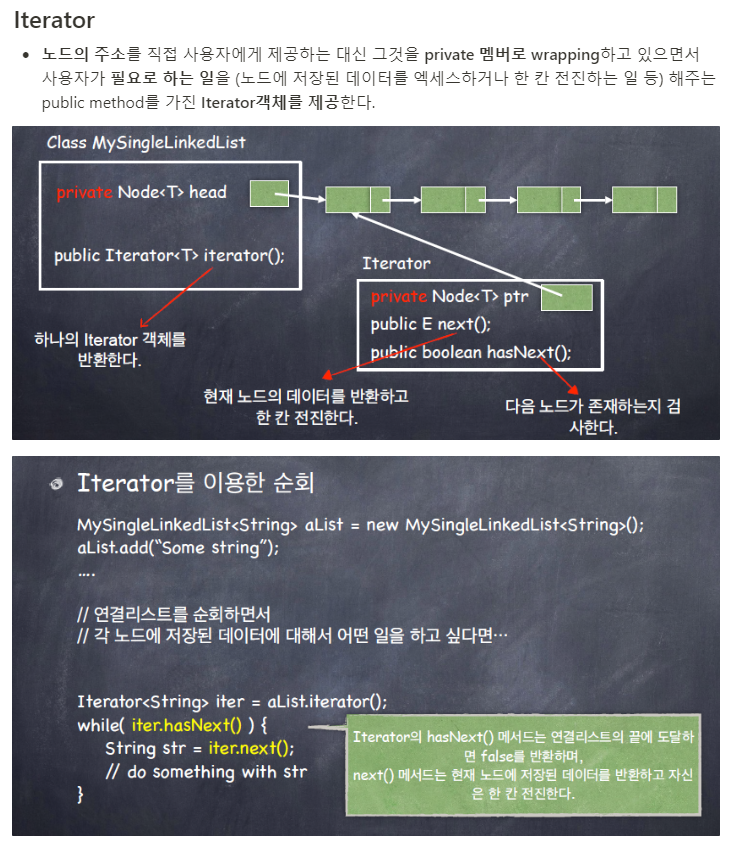
- 사용자가 필요로 하는 이런 기능들을 public method들로 제공한다.
- 이 public method들은 가능한 한 내부 구현과 독립적이어야 한다.
- 인터페이스와 구현을 분리하면 코드의 모듈성(modularity)가 증가하며, 코드의 유지/보수, 코드의 재사용이 용이해진다.
인프런 강의 - Java로 배우는 자료구조
강의 내용