 sungsoo
commented
2 years ago
sungsoo
commented
2 years ago Provisioning Kubeflow on macOS with MicroK8s
- Article Source: Provisioning Kubeflow on macOS with MicroK8s
- Alternative installs (MacOS/Windows 10/Multipass)
Simple steps for getting Kubeflow off the ground on your Mac (hint: it’s not ‘helm install…’)
MicroK8s
MicroK8s is a fully-compliant mini Kubernetes implementation. Thanks to its tiny footprint, it is perfectly suited for local installation. We’ll install it with brew:
➜ brew install ubuntu/microk8s/microk8sOnce it’s installed on your machine, we can provision a local cluster this way:
➜ microk8s install --cpu 2 --mem 8The additional --cpu and --mem parameters increase the CPU count and memory allocation, which will be helpful later on when we start experimenting with Kubeflow. If everything goes well, you should see this output:
Launched: microk8s-vm
2020-10-26T00:29:20-07:00 INFO Waiting for automatic snapd restart...
microk8s v1.19.0 from Canonical✓ installed
Under the hood, Microk8s is provisioned on multipass — a VM orchestrator, which abstracts your operating system, which is especially useful on non-Linux based machines. You can confirm that the VM has been provisioned with the requested via the multipass CLI:
➜  multipass info --all
Name:           microk8s-vm
State:          Running
IPv4:           192.168.64.2
Release:        Ubuntu 18.04.5 LTS
Image hash:     9fdd8fa3091b (Ubuntu 18.04 LTS)
Load:           1.59 1.18 0.60
Disk usage:     2.1G out of 48.3G
Memory usage:   811.9M out of 7.8G
Configuring kubectl for microk8s
Since microk8s is a fully-compliant Kubernetes implementation, we can use kubectl to interact with it, with a little configuration. First, let’s check if kubectl is installed on your machine:
➜ which kubectl
/usr/local/bin/kubectl
Great, kubectlis there. If it’s not, a quick brew install kubectl will get you there. Next, let’s configure it for microk8s. Here again, there are two options — there either is an existing configuration, in which case we will be adding microk8s to it, or it’s a ‘clean’ kubectl installation. Run kubectl config get-contexts to see which one it is. If you don’t see any entries in the output, it means it’s a fresh installation and you’ll want to run this to set your kubectl up:
➜ microk8s config > ~/.kube/configIn case there were entries already in place, you’ll need to merge microk8s configuration into your kubectl configuration. You can do this either manually, or with yq like this (make a backup of ~/.kube/config before editing it):
➜ microk8s config | yq m -i -a append ~/.kube/config -This will add the microk8s configuration in and the only remaining tasks will be to set the current context to the microk8s cluster:
➜ kubectl config use-context microk8sYou can confirm a successful configuration like this:
➜ kubectl cluster-info
Kubernetes master is running at https://192.168.64.2:16443/
CoreDNS is running at https://192.168.64.2:16443/api/v1/namespaces/kube-system/services/kube-dns:dns/proxy
Metrics-server is running at https://192.168.64.2:16443/api/v1/namespaces/kube-system/services/https:metrics-server:/proxy
You’re all set with Microk8s!
Installing Kubeflow
Having installed MicroK8s, we can now proceed to provision Kubelflow. The extra parameters we’re passing bypass the minimum 14GB of memory validation and select a lite version of Kubeflow, which is more suitable for a local installation.
➜ microk8s enable kubeflow:ignore_min_mem=true,bundle=lite
Enabling dns...
Enabling storage...
Enabling dashboard...
Enabling ingress...
Enabling metallb:10.64.140.43-10.64.140.49...
Waiting for DNS and storage plugins to finish setting up
...
...
This process will take a while, so go grab some coffee :) Finally, you will see this output:
Congratulations, Kubeflow is now available.
The dashboard is available at [http://XX.XX.XXX.XX.xip.io](http://10.64.140.43.xip.io/)
    Username: admin
    Password: XXXXXXXXXXXXXXX
To see these values again, run:
    microk8s juju config dex-auth static-username
    microk8s juju config dex-auth static-password
Keep the IP, username, and password accessible for later.
There’s one last thing we need to do in order to allow access to the Kubeflow UI over that external IP— tunnel external traffic into the Kubeflow UI service. First, we’ll need to start a port forwarding ssh session to the microk8s node. To do this, we’ll need to find out the IP address of this node and set up key-based access to it. Let’s start with the IP address
➜ multipass list
Name                    State             IPv4             Image
microk8s-vm             Running           192.168.64.2     Ubuntu 18.04 LTS
Great! IP address is 192.168.64.2. Let’s now tackle the key access. First, get a hold of your public key:
➜ cat ~/.ssh/id_rsa.pub | pbcopypbcopy puts the contents of the key in your clipboard — you’ll need it in a second! Now, use multipass to open a shell into the VM and add the contents of the key at the end of the authorized_key file:
➜ multipass shell microk8s-vm
Welcome to Ubuntu 18.04.5 LTS (GNU/Linux 4.15.0-121-generic x86_64)
Last login: Mon Oct 26 20:37:35 2020 from 192.168.64.1
ubuntu@microk8s-vm:~$ vi ~/.ssh/authorized_keys
Now we can open a port forwarding session:
➜ ssh -D9999 ubuntu@192.168.64.2
The authenticity of host '192.168.64.2 (192.168.64.2)' can't be established.
ECDSA key fingerprint is SHA256:lRysM9GCTgz25z2vKKE2IDVJALLIkvaTXqhHwkxpyFE.
Are you sure you want to continue connecting (yes/no/[fingerprint])? yes
Warning: Permanently added '192.168.64.2' (ECDSA) to the list of known hosts.
Welcome to Ubuntu 18.04.5 LTS (GNU/Linux 4.15.0-121-generic x86_64)
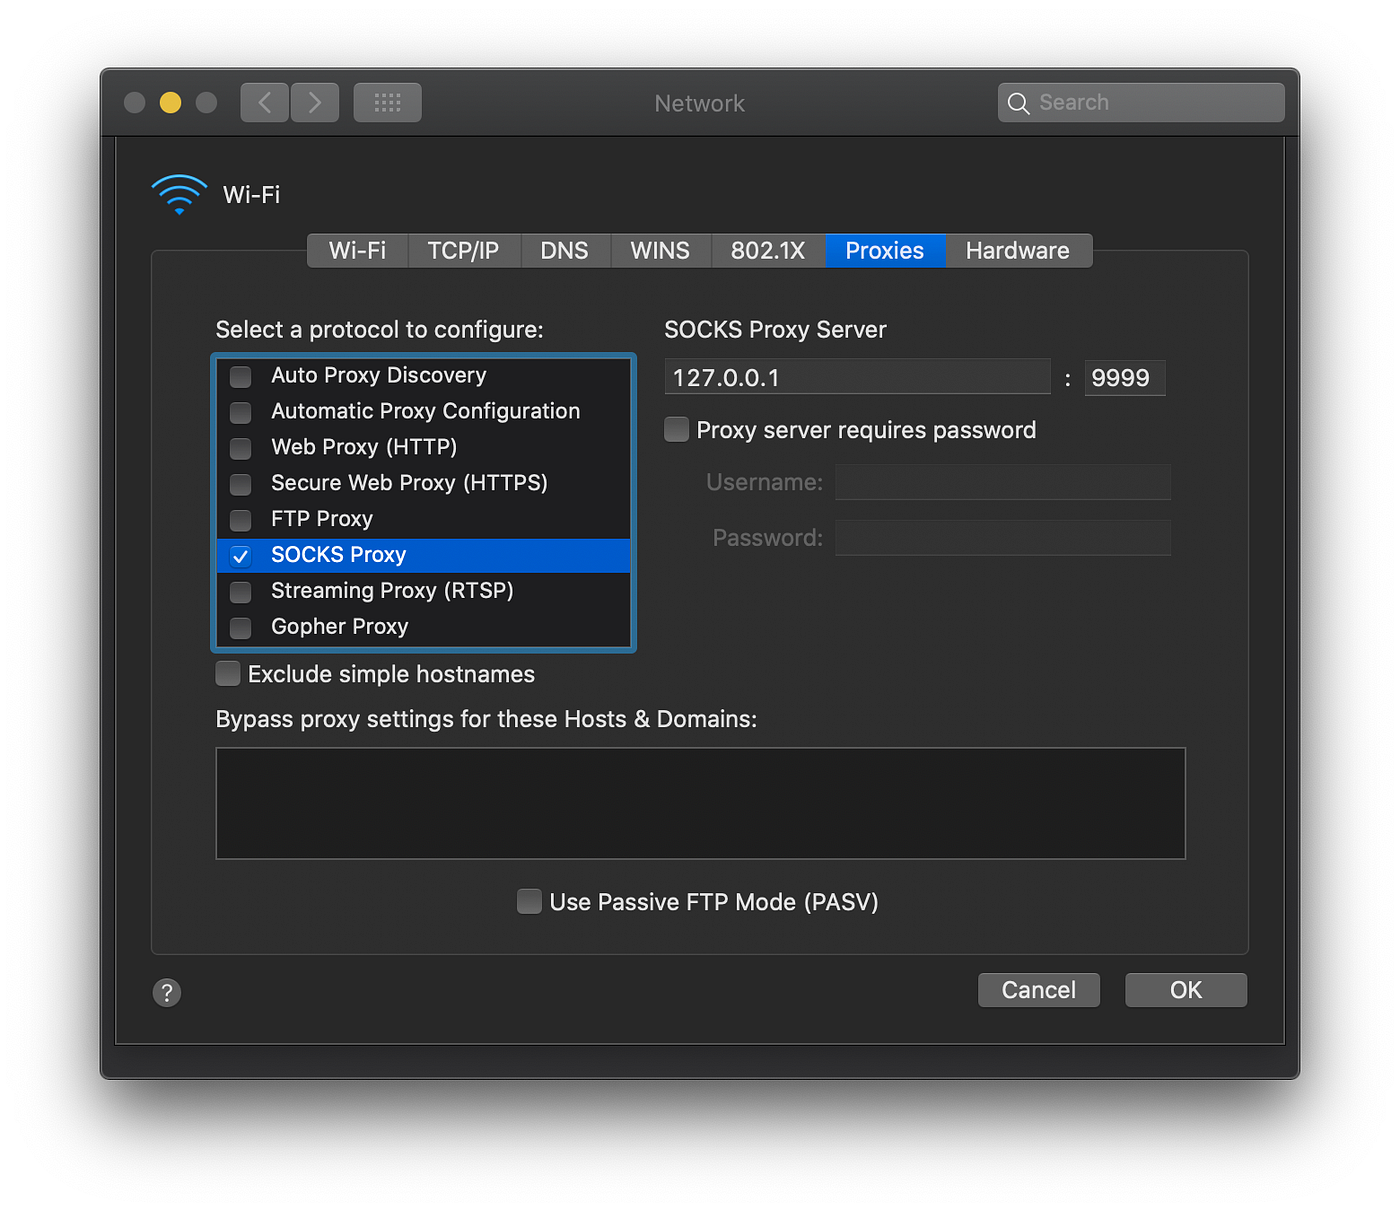
Last login: Mon Oct 26 20:47:33 2020 from 192.168.64.1The final step to do is to enable the SOCKS proxy in your macOS settings. It should look like this:
You can now point your browser at the URL and credentials from the earlier step.
Congratulations! You’re all set!
Install Kubeflow in 10 Steps on MacOS
Kubeflow is a great tool to implement and deploy Machine Learning pipelines on a Kubernetes cluster. It supports a lot of cloud platforms, but developers might want to experiment with it before deploying the pipeline to the cloud.
However, installation can be quite tricky. In this article, I will share with you the easiest and the most elegant way I personally find to install Kubeflow on MacOS. So without further ado, let’s start!
The best way I personally found to run Kubeflow on a local cluster is via Multipass and Microk8s. In essence, we are creating a lightweight Kubernetes cluster via Microk8s in a virtual Ubuntu instance created using Multipass.
First of all, you might ask: why not install Microk8s directly on the MacBook?
Well, while this is certainly feasible, a lot of tutorials and resources are targeted to Ubuntu. Some commands don’t work on MacOS and you might have a hard time getting around them. Also, it creates an extra layer of encapsulation, so if things get out of hand, you can just remove the instance and start over again.
Nevertheless, if you feel like installing Microk8s directly, then just go straight to step 4.
Hardware requirements:
The recommended requirements are at least 14GB RAM and 50GB disk space. If you don’t have that much RAM, you could still try the following steps with the last step being slightly different. However, it is possible that the installation gets stuck due to insufficient memory.
Step 1: Install Multipass
Step 2: Launch an instance
Step 3: Go into the shell of the instance
Step 4: Install Microk8s
Step 5: Join the “microk8s” group
This step is very important, since it will allow you to use commands that require admin privilege. DO NOT run all commands using sudo. This might cause permission problems later on.
MicroK8s will start up as soon as it is installed. It is a completely functional Kubernetes, running with the least amount of overhead possible. However, for our purposes we will need a Kubernetes with a few more features. A lot of extra services are available as MicroK8s “add-ons” - code which is shipped with the snap and can be turned on and off when it is needed. We can now enable some of these features to get a Kubernetes where we can usefully install Kubeflow. We will add a DNS service, so the applications can find each other, storage, an ingress controller so we can access Kubeflow components and the MetalLB load balancer application. These can all be enabled simply at the same time:
Step 5: Check if the installation was successful
It can take some minutes for MicroK8s to install and set up these additional features. Before we do anything else, we should check that the add-ons have been enabled successfully and that MicroK8s is ready for action. We can do this by requesting the status, and supplying the
--wait-readyoption, which tells microk8s to finish whatever processes it is working on before returning:Step 6: Settings for accessing the dashboard
For local Kubeflow deployments, such as in a workstation, you can simply access the link found in the previous step, appending nip.io, for example:
http://10.64.140.43.nip.io.However, for remote deployments, or running on a virtual machine, creating a SOCKS proxy is required to access the dashboard. This can be done as follows:
Logout from the current session with the exit command
Let’s start with the IP address
Great! IP address is 192.168.64.3. Let’s now tackle the key access. First, get a hold of your public key:
pbcopy puts the contents of the key in your clipboard — you’ll need it in a second! Now, use multipass to open a shell into the VM and add the contents of the key at the end of the authorized_key file:
Step 7: Exit shell and re-enter for the step 6 to take effect
The final step to do is to enable the SOCKS proxy in your macOS settings. It should look like this:
Step 8: Install Juju
As with MicroK8s, Juju is installed from a snap package:
As Juju already has a built-in knowledge of MicroK8s and how it works, there is no additional set up or configuration needed. All we need to do is run the command to deploy a Juju controller to the Kubernetes we set up with MicroK8s:
The controller is Juju’s agent, running on Kubernetes, which can be used to deploy and control the components of Kubeflow.
The controller can work with different models, which map to namespaces in Kubernetes. It is recommended to set up a specific model for Kubeflow:
Step 9: Deploying Kubeflow
The full Kubeflow bundle will require a lot of resources (at least 4 cpus, 14GB orf free RAM and 60GB of disk space), so unless you know that’s what you want and have the resources to match, we recommend starting with the ‘kubeflow-lite’ bundle.
You can deploy full Kubeflow or Kubeflow lite bundle what you want.
Full Kubeflow bundle
Kubeflow-lite bundle
Juju will now fetch the applications and begin deploying them to the MicroK8s Kubernetes. This process can take several minutes. You can track the progress by running:
This will show a list of the applications and their current status. Don’t be surprised if a few show up error messages to begin with - a lot of the components rely on the operation of others, so it can take some time before everything is ready and talking to one another.
Step 10: Configuration
For authentication and allowing access to the dashboard service, some components will need to be configured with the URL to be allowed. This depends on the underlying network provider, but for the known case of running on a local MicroK8s, we also know what the URL will be. It can be configured with Juju using the following commands:
To enable simple authentication, and set a username and password for your Kubeflow deployment, run the following commands:
Accessing the Dashboard
The URL for the Kubeflow dashboard is the same as the one determined earlier for the configuration steps - in the case of a default MicroK8s install, it’s:
http://10.64.140.43.nip.ioFrom a browser on your local machine, this can be reached just by copying and pasting the URL. You should then see the dex login screen, where you should enter the username( it does say email address, but whatever string you entered to configure it will work fine) and your password from the configuration step.
You can now point your browser at the URL(e.g., http://10.64.140.43.nip.io/ ) and credentials from the earlier step.
Congratulations! You’re all set!
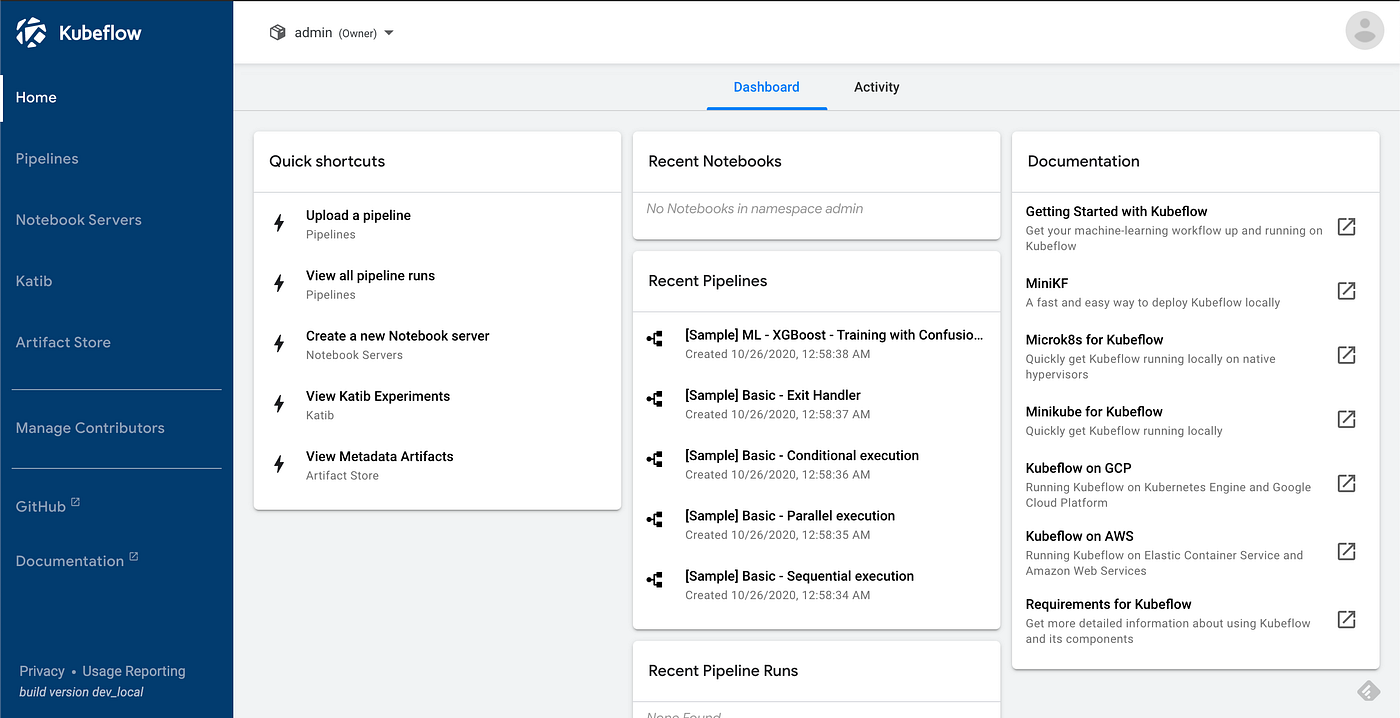
You should now see the Kubeflow “Welcome” page
That’s it! If the installation has been successful, you will see the following message: “Congratulations, Kubeflow is now available.”
References