 sungsoo
commented
2 years ago
sungsoo
commented
2 years ago Run your first InferenceService
KFServing InferenceService 배포와 예측
KFServing - Deep dive
서버리스란?
서버리스(serverless)란 개발자가 서버를 관리할 필요 없이 애플리케이션을 빌드하고 실행할 수 있도록 하는 클라우드 네이티브 개발 모델입니다.
Python SDK for building, training, and deploying ML models
Overview of Kubeflow Fairing
Kubeflow Fairing is a Python package that streamlines the process of building, training, and deploying machine learning (ML) models in a hybrid cloud environment. By using Kubeflow Fairing and adding a few lines of code, you can run your ML training job locally or in the cloud, directly from Python code or a Jupyter notebook. After your training job is complete, you can use Kubeflow Fairing to deploy your trained model as a prediction endpoint.
Use Kubeflow Fairing SDK
To install the SDK:
pip install kubeflow-fairingTo quick start, you can run the E2E MNIST sample.
Documentation
To learn how Kubeflow Fairing streamlines the process of training and deploying ML models in the cloud, read the Kubeflow Fairing documentation.
To learn the Kubeflow Fairing SDK API, read the HTML documentation.


 The Grafana Service
 The Prometheus Service
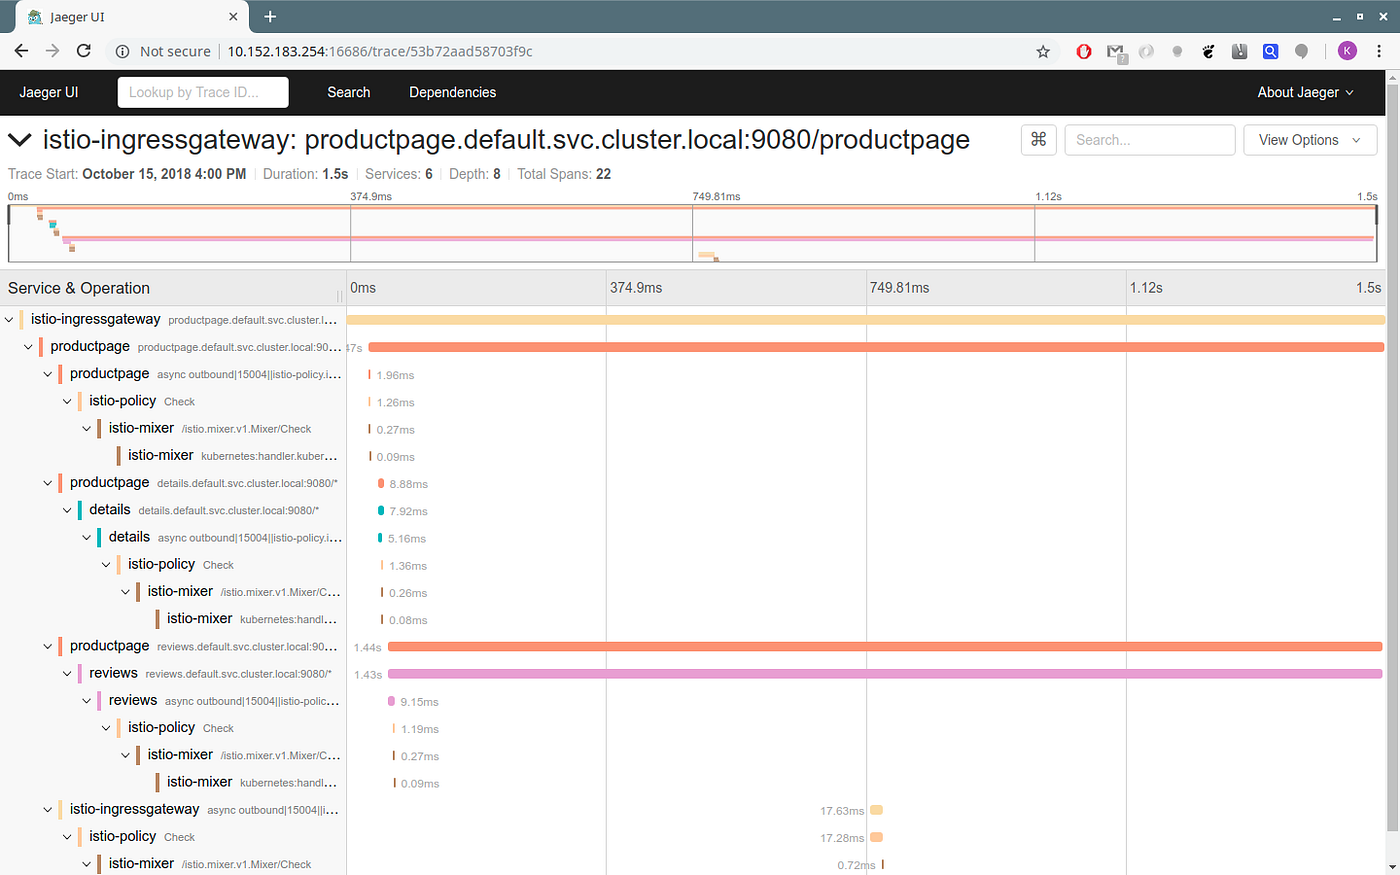 The Jaeger Service
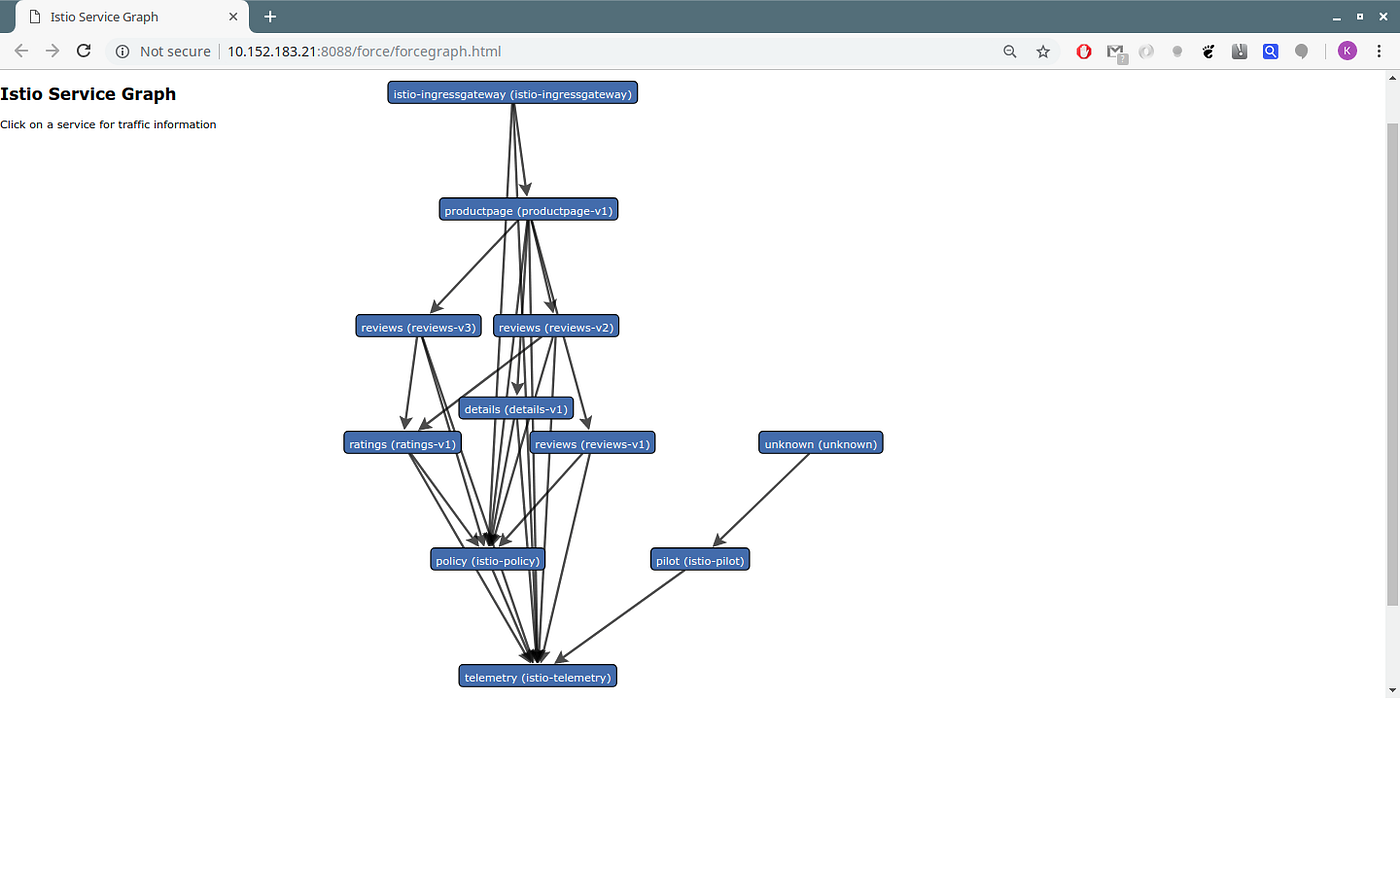 The ServiceGraph
 yurkoff-mv
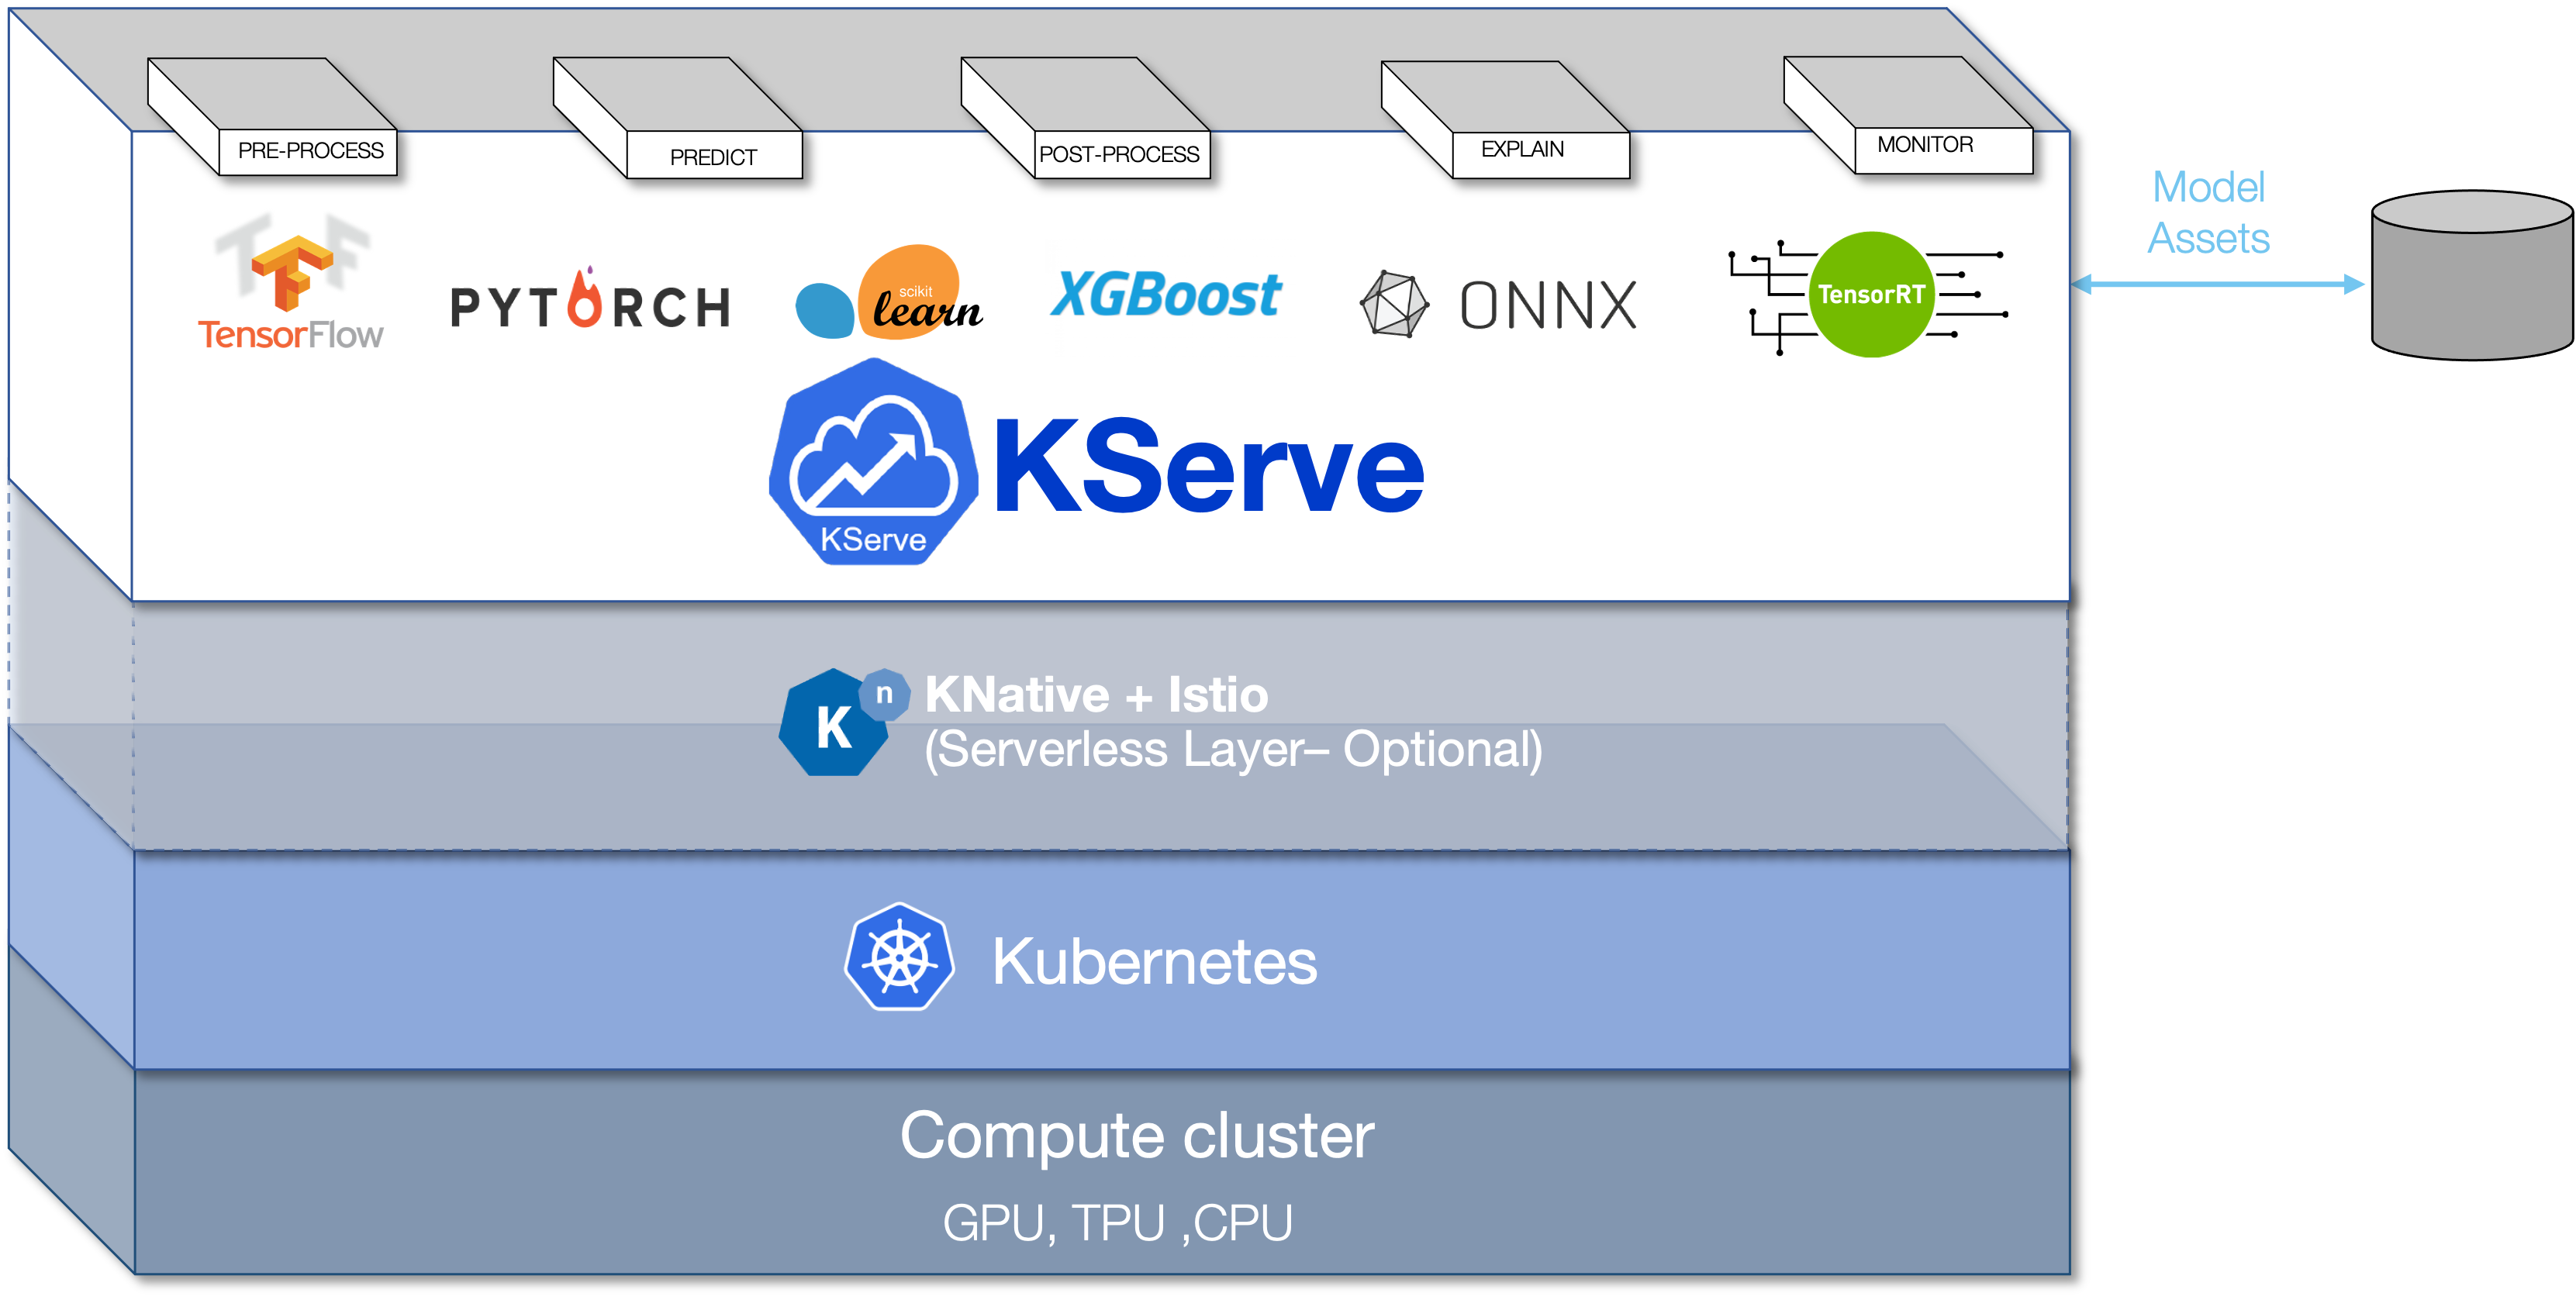
KServer Inference
Article Source: First InferenceService
First InferenceService
Run your first InferenceService
In this tutorial, you will deploy a ScikitLearn InferenceService.
This inference service loads a simple iris ML model, send a list of attributes and print the prediction for the class of iris plant."
Since your model is being deployed as an InferenceService, not a raw Kubernetes Service, you just need to provide the trained model and it gets some super powers out of the box 🚀.
1. Create test InferenceService
Once you've created your YAML file (named something like "sklearn.yaml"):
You can verify the deployment of this inference service as follows.
2. Check InferenceService status.
If your DNS contains example.com please consult your admin for configuring DNS or using custom domain.
3. Determine the ingress IP and ports
Execute the following command to determine if your kubernetes cluster is running in an environment that supports external load balancers
or @microk8s with kubeflow
Load Balancer
If the EXTERNAL-IP value is set, your environment has an external load balancer that you can use for the ingress gateway.
or @microk8s with kubeflow
Node Port
If the EXTERNAL-IP value is none (or perpetually pending), your environment does not provide an external load balancer for the ingress gateway. In this case, you can access the gateway using the service’s node port.
Port Forward
Alternatively you can do Port Forward for testing purpose
4. Curl the InferenceService
First prepare your inference input request
Once you've created your json test input file (named something like "iris-input.json"):
Real DNS
If you have configured the DNS, you can directly curl the InferenceService with the URL obtained from the status print. e.g
이 부분에서 오류가 생긴다. DNS 문제인 듯...
살펴보자!
Magic DNS
If you don't want to go through the trouble to get a real domain, you can instead use "magic" dns xip.io. The key is to get the external IP for your cluster.
Look for the EXTERNAL-IP column's value(in this case 35.237.217.209)
Next step is to setting up the custom domain:
Now in your editor, change example.com to {{external-ip}}.xip.io (make sure to replace {{external-ip}} with the IP you found earlier).
With the change applied you can now directly curl the URL
From Ingress gateway with HOST Header
If you do not have DNS, you can still curl with the ingress gateway external IP using the HOST Header.
From local cluster gateway
If you are calling from in cluster you can curl with the internal url with host {{InferenceServiceName}}.{{namespace}}
6. Run Performance Test
Expected Outpout