 synbe
commented
6 years ago
synbe
commented
6 years ago Open synbe opened 6 years ago
synbe
commented
6 years ago synbe
commented
6 years ago 2014年12月28日 22:44:01
aria2下载工具特点:
1、支持http/https/ftp/bt协议 2、支持metalink3.0,metalink是一种可以将不同协议下载的同一文件集合到一起以达到最大下载稳定性和速度的东东。个人感觉这个似乎比迅雷支持不同网址下载同一文件似乎更高级些 3、支持分段下载和续传 4、支持通过http代理的ftp下载 5、可以作为守候进程运行
注:aria有gtk界面,但aria2只有命令行版本。 arch下安装: pacman -S aria2
典型用法: aria2c http://AAA.BBB.CCC/file.zip 普通下载 aria2c -s 2http://AAA.BBB.CCC/file.zip 开2个线程下载 aria2c http://AAA.BBB.CCC/file.zipftp://DDD.EEE.FFF/GGG/file.zip 从不同的地址下载同一文件 aria2c http://AAA.BBB.CCC/file.zipftp://DDD.EEE.FFF/GGG/file.zip 支持不同的协议下载同一文件 aria2c -otest.torrent http://AAA.BBB.CCC/file.torrent 下载BT种子 aria2c –max-upload-limit 40K -Tfile.torrent 设定BT最大上传速度 aria2chttp://AAA.BBB.CCC/file.metalink 从metalink下载文件
注:https下载依赖于安装gnutls或openssl
bt下载依赖于安装gnutls+libgcrypt或openssl
metalink下载依赖于安装libxml2
官方地址:http://aria2.sourceforge.net/
命令行下多线程下载工具:axel (prozilla下载工具因安全问题不推荐使用)
图形界面下载工具:d4x wxdownload
synbe
commented
6 years ago 下载最新的 Kodi 中文插件库安装文件,目前有两个中文插件库可以选择,分别是「Chinese Add-ons Repository - repository.xbmc-addons-chinese.zip」和「HDPFans 中文插件库 - repository.hdpfans.xbmc-addons-chinese.zip」。不同的库里面提供了不同的插件,推荐大家把这两个库都装上吧,日后想安装什么插件也方便一些。
注意文件下载回去后不要解压,如果是安装到手机/平板或电视盒上的 Kodi,请把文件拷贝到该设备中。
启动 Kodi,进入 “系统->插件”,这次要点击「从 ZIP 文件安装」,然后选择刚才下载的 zip 文件,待 Kodi 更新完毕,对应的插件库即安装完成。
再次进入 “系统->插件->从库安装”,此时便会在库列表中看到多出新安装的库了,如下图,多出的Chinese Add-ons 和 HDPfans 中文插件库就是我刚安装上去的。(最下面那个 Kodi Add-on repository 是 Kodi 官方自带的英文插件库)。
synbe
commented
6 years ago 默认情况下,新安装好的 Kodi 启动后是英文版的界面。但事实上,Kodi 包含多国语言 (包含简繁体中文版),我们可以设置改回简体中文界面。不过,很多人都遇到修改 Kodi 的语言为中文之后整个界面显示乱码的问题,正确的设置方法如下:
启动 Kodi,进入 System -> Settings -> Appearance -> Skin,将其中的 Fonts 修改成 Arial Based (这是必须的,也是第一步首先要做的步骤,否则就会显示乱码)
然后再进入 System -> Settings -> International -> Language,选择 Chinese (Simple) 确定
进入 系统->设置->视频->字幕 “首选字幕语言” 以及“下载字幕语言”均选择 Chinese (Simple)
synbe
commented
6 years ago Kodi 可以添加本机的文件夹,也可以将局域网中其他电脑 / NAS 中的共享文件夹添加进来。也就是说,你可以非常方便地在客厅的 Kodi 中播放寝室电脑里或 NAS 中下载好的电影视频!加上 Kodi 支持各种平台,因此,你可以选用「安卓机顶盒」、「树莓派」、「Mac Mini」、笔记本或组装一台小型 Windows 电脑 (HTPC 迷你主机) 放在客厅用来做专用播放机。
添加视频源的方法如下:依次点击 视频 -> 文件 -> 添加视频... -> 浏览,可以看到你可以添加本机硬盘的目录,也能添加 SMB (Windows共享) 和 NFS (Mac 或 Linux 使用的共享协议) 的网络路径,在“添加网络位置...”选项里还能添加 HTTP、FTP、WebDAV 等网络路径。
synbe
commented
6 years ago synbe
commented
6 years ago 没有显示器,而新在树莓派上安装的OSMC又得配置,就按照linux中使用xrdp配置远程桌面,但是远程能够登陆成功,死活无法进桌面。 后来搜了一圈,还是谷歌上搜到解决方法: 参见: https : //github.com/patrikolausson/dispmanx_vnc
On OSMC, prepare using the following
sudo apt-get install build-essential rbp-userland-dev-osmc libvncserver-dev libconfig++-dev
sudo ./dispmanx_vncserver
贴出来,让同样使用树莓派的朋友少走弯路
synbe
commented
6 years ago dispmanx_vnc参考:
在Raspberry pi上安装vnc服务器
想拿树莓派3b+做个电视盒子,但是手头没有现成HDMI显示器,想到既然是linux系统那么安装个VNC吧,就install tightvncserver 结果不行,显示灰屏~然后去网上找资料,发现并未有相关文章,我就跑到OSMC官方论坛里搜索了一下,结果还真找到了,所以,我就整理下,发在此处。
一、使用SSH连接:
将刷好OSMC系统的TF卡插入树莓派后,系统将会进行初始化,这个时间大概需要五分钟以上,所以可以用ping命令监控系统是否已正常启动,SSH默认是开启的,所以只要系统正常启动就可以使用SSH连接了,默认用户名:osmc,密码:osmc。
二、安装依赖包:
sudo apt-get install build-essential rbp-userland-dev-osmc libvncserver-dev libconfig++-dev unzip
三、下载dispmanx_vnc安装包,然后进行编译
cd /home/osmc
sudo wget https://github.com/patrikolausson/dispmanx_vnc/archive/master.zip
unzip master.zip -d  /home/osmc/
rm master.zip
cd dispmanx_vnc-master
make
三、要将vnc服务器添加为服务,创建一个基本的配置文件(密码,fps等),并将服务器复制到/ bin文件夹以便于执行
sudo cp dispmanx_vncserver /usr/bin
sudo chmod +x /usr/bin/dispmanx_vncserver
sudo cp dispmanx_vncserver.conf.sample /etc/dispmanx_vncserver.conf
sudo vi /etc/dispmanx_vncserver.conf
我这里用的是VI编辑器,你也可以用nano,然后将下面的代码粘贴到编辑器里
relative = false;
port = 0;
screen = 0;
unsafe = false;
fullscreen = true;
multi-threaded = true;
password = "mypassword";
frame-rate = 23;
downscale = false;
localhost = false;
vnc-params = "";
按ESC键,然后输入:wq保存所做的更改并退出vi。
注意:
port:设置端口号
fullscreen:全屏设置,就我的经验来说就算设置成true,分辨率还是很小
multi-threaded:多线程设置
password:密码设置,这个一定要改成自己的,别忘了
frame-rate:刷新率
四、创建服务文件,以便能够在启动时“自动加载”服务
sudo vi /etc/systemd/system/dispmanx_vncserver.service
将下面的代码粘贴到编辑器里:
[Unit]
Description=VNC Server
After=network-online.target mediacenter.service
Requires=mediacenter.service

[Service]
Restart=on-failure
RestartSec=30
Nice=15
User=root
Group=root
Type=simple
ExecStartPre=/sbin/modprobe evdev
ExecStart=/usr/bin/dispmanx_vncserver
KillMode=process

[Install]
WantedBy=multi-user.target
按ESC键,然后输入:wq保存所做的更改并退出vi。
五、启动服务并加载,当然也可以重新启动树莓派
sudo systemctl start dispmanx_vncserver.service
sudo systemctl enable dispmanx_vncserver.service
sudo systemctl daemon-reload
在VNC客户端输入树莓派的IP然后再输入第三步中设置的密码后,就可以愉快的玩耍了~
synbe
commented
6 years ago 安装:
sudo apt-get install openssh-server启动:
sudo service ssh start停止:
sudo service ssh stop查询服务启动状态:
sudo ps -e | grep ssh或者
sudo service ssh status配置开机启动:
sudo sysv-rc-conf把四项都选上。
修改默认端口:
sudo vim /etc/ssh/sshd_config找到Port 22,然后改成相应的端口。建议先保留22端口的。后面连接成功了之后再删除22端口,保险起见。
重启服务
sudo service ssh restart查看状态
netstat -an | grep "LISTEN "用端口进行连接
ssh username@ip -p 50022连接成功之后记得把22端口去除。
注意:如果开通了ufw防火墙的要加入规则,默认端口为22。在Ubuntu下防火墙建议使用ufw进行管理,主要是方便操作。
synbe
commented
6 years ago 假如你想和你的朋友聊聊,有很多的软件和信息服务可以供你使用。但是,如果你没有这么奢侈的配置,比如你在计算机实验室,所有的对外的连接都是被限制的,你怎样和整天坐在隔壁房间的朋友沟通那?不要郁闷了,netcat提供了这样一种方法,你只需要创建一个Chat服务器,一个预先确定好的端口,这样子他就可以联系到你了。
Server
$nc -l 1567netcat 命令在1567端口启动了一个tcp 服务器,所有的标准输出和输入会输出到该端口。输出和输入都在此shell中展示。
Client
$nc 172.31.100.7 1567不管你在机器B上键入什么都会出现在机器A上。
大部分时间中,我们都在试图通过网络或者其他工具传输文件。有很多种方法,比如FTP,SCP,SMB等等,但是当你只是需要临时或者一次传输文件,真的值得浪费时间来安装配置一个软件到你的机器上嘛。假设,你想要传一个文件file.txt 从A 到B。A或者B都可以作为服务器或者客户端,以下,让A作为服务器,B为客户端。
Server
$nc -l 1567 < file.txtClient
$nc -n 172.31.100.7 1567 > file.txt这里我们创建了一个服务器在A上并且重定向netcat的输入为文件file.txt,那么当任何成功连接到该端口,netcat会发送file的文件内容。
在客户端我们重定向输出到file.txt,当B连接到A,A发送文件内容,B保存文件内容到file.txt.
没有必要创建文件源作为Server,我们也可以相反的方法使用。像下面的我们发送文件从B到A,但是服务器创建在A上,这次我们仅需要重定向netcat的输出并且重定向B的输入文件。
B作为Server
Server
$nc -l 1567 > file.txtClient
nc 172.31.100.23 1567 < file.txt1 SSH连接
SSH连接比Telnet远程桌面连接使用更为安全,已经成为行业标准。使用SSH连接树莓派,可以对树莓派进行远程控制与编程开发,在没有桌面环境的条件下使用SSH连接是非常合适的选择。
第2节和第3节中SSH服务相关的命令同样适用于Debian和Ubuntu系统。
2 树莓派SSH服务安装、检测、启动与配置
(1)SSH服务安装
sudo apt-get install openssh-server(2)检查树莓派SSH服务是否开启
ps -e | grep sshssh-agent为客户端,sshd为服务器端服务,只有ssh-agent没有sshd表明SSH服务还没有开启。
(3)SSH服务开启
sudo /etc/init.d/ssh start(4)SSH服务配置
openssh-server配置文件为“/etc/ssh/sshd_config”,可以配置SSH服务的各项参数,如端口配置,默认端口为22,可以配置为其他端口,配置后重启生效。
3 树莓派SSH服务开机自动启动
在终端命令行中启动SSH服务后,如果系统重启或关机后启动,SSH服务默认是关闭的,依然需要手动启动,为了方便可以设置SSH服务开机自动启动,打开/etc/rc.local文件,在语句exit 0之前加入:
/etc/init.d/ssh start4 SSH连接客户端软件
Windows平台SSH连接客户端软件可以使用Xshell,家庭和学校版本是免费使用的,简单易用。
synbe
commented
6 years ago 问题描述:将全新的树莓派系统烧录,开机然后用SSH远程连接,结果SSH连接提示“connection refused”,导致连接树莓派失败。
问题原因:出现错误的原因是自 2016-11-25 官方发布的 Raspbian 系统镜像,系统默认禁用了 SSH 服务。
之前我用的是NOOBS_v2_0_0.zip,现在用了NOOBS_v2_4_0.zip,该版本下ssh默认是不能直接连的。
找了一下,官方说:
As of the November 2016 release, Raspbian has the SSH server disabled by default.
报错信息如下:
ssh: connect to host 192.168.21.150 port 22: Connection refused
官方的解决方案是:
SSH disabled by default; can be enabled by creating a file with name "ssh" in boot partition
如果有显示器,开机后,在树莓派配置中将SSH开启即可。
sudo service ssh start
sudo service ssh sttus
但在没有显示器,首次开机需要用SSH登陆的时候,就需要在系统烧录完毕后,进入到根目录,新建一个名为ssh的空白文件就行了。
完成后再将SD卡插回树莓派,就可以正常使用SSH了。
对于windows用户,在驱动器根目录下使用PowerShell输入以下指令即可。
new-item ssh -type file
新建文本改名为ssh也是一样的效果。
完成后再将SD卡插回树莓派,就可以正常使用SSH了。
synbe
commented
6 years ago 树莓派在安装系统之后都会有原始默认的用户名和密码,接下来我们可以自行修改树莓派的用户密码。
环境:
树莓派3 B型,树莓派系统:raspbian,默认的用户名:pi,默认密码:raspberry
修改用户密码:
sudo passwd pi                    #修改 Pi 密码
sudo passwd root                 #设置 root 密码
su root                                #切换到 root 用户
su pi                                    #切换到 pi 用户
通过以上操作,我们就可以修改用户密码以及进行用户的切换。
synbe
commented
6 years ago Whilst the Mozilla project does not provide downloads for Firefox or Thunderbird for the Raspberry Pi that does not mean you can’t install them! The trick is knowing what the unbranded Open Source versions of these applications are called, these versions are available in the repositories of most Linux distributions including Raspbian (Jessie).
The Firefox browser gets renamed Iceweasel and the Thunderbird mail client gets renamed Icedove, so once you know this installing them is quite straight forward. Obviously you need to be running either the MATE of XFCE desktop. Update Current Packages
Before downloading and installing anything we need to be running as root and it is a good idea to make sure that your system is up to date.
$ su
Password:
OR
$ sudo -i
Password:
# apt-get update;apt-get upgrade
# apt-get update;apt-get upgradeGet:1 http://mirrordirector.raspbian.org jessie InRelease [15.0 kB]
:
:
:
Fetched 9130 kB in 39s (234 kB/s)
Reading package lists... Done
Reading package lists... Done
Building dependency tree
Reading state information... Done
Calculating upgrade... Done
0 upgraded, 0 newly installed, 0 to remove and 0 not upgraded.
#
Installing Firefox
The current version of Iceweasel is 31.8 which corresponds to the last extended support release (ESR) of Firefox.
Note – Unfortunately since support for Adobe Flash depends on a browser plugin that requires an x86 processor it isn’t available on the Raspberry Pi.
To keep the number of installed packages to a minimum I’ve chosen not to install the recommended packages.
# apt-get install iceweasel --no-install-recommends
Reading package lists... Done
Building dependency tree
Reading state information... Done
The following extra packages will be installed:
  libevent-2.0-5
Suggested packages:
  fonts-stix otf-stix fonts-oflb-asana-math
  fonts-mathjax mozplugger libgnomeui-0
The following NEW packages will be installed:
  iceweasel libevent-2.0-5
0 upgraded, 2 newly installed, 0 to remove and 0 not upgraded.
Need to get 30.2 MB of archives.
After this operation, 69.3 MB of additional disk space will be used.
Do you want to continue? [Y/n]
  :
  :
  :
#
One installed you can start it from the application menu. It is going to seem a little slower than on a desktop PC, particularly when starting up, but given the small size and low power of the Raspberry Pi it works surprisingly well
synbe
commented
6 years ago 【安装】
apt-get install vsftpd
【配置】
1、配置文件路径:/etc/vsftpd.conf
2、配置用户可以写权限:write_enable=YES
3、配置uMask:local_umask=022(默认为077,该种方式不支持断点续传,修改为022)
4、禁止匿名用户登录:anonymous_enable=NO
5、限制用户访问配置以外的路径:chroot_local_user=YES(这个配置是限制全部用户的,也可以限制部分用户)
6、配置用户的Home目录:local_root=/application/search/test
7、为系统新分配一个账号:test/test
【重启服务】
service vsftpd restart
【Q&A】
1、Q:配置“chroot_local_user=YES”后,用户登录的时候会出现“500 OOPS: vsftpd: refusing to run with writable root”错误是什么原因?
A:这个是2.3.5-3版本新添加的一个规则,设定了chroot限制后,用户的根目录必须是只读的,将根目录设定权限为755即可。
2、Q、配置“chroot_local_user=YES”后,用户登录的时候会出现“500 OOPS: cannot change directory”错误是什么原因?
A、这个是因为用户的根目录设定的太严导致的,必须是755权限,user权限小于7的都会出现这个问题。
3、Q、按照上面说的,岂不是我不能配置一个可以写的,并且不允许用户访问根目录之外的设置了?
A、不是的,可以将根目录设置为755,然后在根目录下面新建一个目录,将该目录设置为777权限,这样用户就可以在这个新建目录下活动了。
synbe
commented
6 years ago vsftpd配置
树莓派使用vsftpd搭建ftp服务器 1.安装vsftpd
sudo apt-get install vsftpd
2.修改配置 /etc/vsftpd.conf
sudo vim /etc/vsftpd.conf
替换为以下内容
listen=YES anonymous_enable=NO local_enable=YES write_enable=YES local_umask=022 anon_upload_enable=NO anon_mkdir_write_enable=NO dirmessage_enable=YES use_localtime=YES xferlog_enable=YES connect_from_port_20=YES
xferlog_file=/var/log/vsftpd.log xferlog_std_format=YES idle_session_timeout=600 data_connection_timeout=120 async_abor_enable=YES ascii_upload_enable=YES ascii_download_enable=YES ftpd_banner=Welcome to blah FTP service.
userlist_enable=YES userlist_deny=NO chroot_local_user=YES chroot_list_enable=YES chroot_list_file=/etc/vsftpd.chroot_list
ls_recurse_enable=YES secure_chroot_dir=/var/ftp pam_service_name=vsftpd rsa_cert_file=/etc/ssl/private/vsftpd.pem
3.修改配置 /etc/vsftpd.user_list
sudo vim /etc/vsftpd.user_list
将允许访问的树莓派系统用户添加进来,这里添加了1个用户
pi
4.修改配置 /etc/vsftpd.chroot_list
chroot_list_enable=YES时,vsftpd.chroot_list中配置那些可以访问根目录的用户。我是管理员,所以这里会配置我用的帐号pi
pi
5.修改配置 /etc/ftpuser
此配置文件是安装时vsftpd自动生成的,存放帐户黑名单,这些帐户一般是比较敏感的帐户,禁止用来做ftp登录,比如root,这里都是默认的,我没改,如果发现有些帐户不能登录,要以查查这里。
sudo mkdir /var/ftp sudo chown ftp:ftp /var/ftp
sudo chmod 555 /var/ftp
8.连接
使用客户端连接即可,这里推荐使用xftp客户端,简单好用 推荐文章
[1] http://os.51cto.com/art/201008/222036.htm 讲的很全面,要是懒的看,就只看配置解释那里吧,然后拿我的配置改改就行
synbe
commented
6 years ago 安装Samba
sudo apt-get samba samba-common-bin
配置Samba
修改配置文件smb.conf
sudo vim /etc/samba/smb.conf
在文件最下面加上以下内容,这里设置/home/pi/Public为共享文件夹
[Public]
   comment = Public Storage  # 共享文件夹说明
   path = /home/pi/Public # 共享文件夹目录
   read only = no # 不只读
   create mask = 0777 # 创建文件的权限
   directory mask = 0777 # 创建文件夹的权限
   guest ok = yes # guest访问,无需密码
   browseable = yes # 可见
重启Samba服务
sudo samba restart
设置文件夹权限
在Samba配置文件设置过权限后,还需要在系统中将共享文件夹的权限设置为同配置文件中相同的权限,这样才能确保其他用户正常访问及修改文件夹内容
sudo chmod -R 777 /home/pi/Public/
配置完成后即可从局域网内其他电脑访问共享文件夹,Windows下访问目录为\IP\Folder,例如:
\192.168.1.55\Public
synbe
commented
6 years ago 在Linux下使用shell的时候,为方便起见,偶尔会用到一下数组。数组的申明方式是:
array=(element1 element2 element3 .... elementN) 也就是直接用圆括号包数组元素包起来,数组元素之间用空格隔开就行了。
数据的读取如下
#echo ${array[0]}
#echo ${array[index]}
数组的遍历用到一个取全部:
${array[@]} ,完整示例如下:
for data in ${array[@]}
do
    echo ${data}
done 对一个目录及其子目录所有文件添加权限 命令:
chmod 777 -R ./html 给予html目录下可读可写可操作权限。
或者
chmod -R u+x ./html NT_STATUS_ACCESS_DENIED listing *
在CENTOS上配了个SAMBA与WINDOW共享文件。
一访问共享目录就”NT_STATUS_ACCESS_DENIED listing *“ ,找了好久,发现是SELINUX阻挡了。
root@linux tmp]# smbclient //127.0.0.1/sambar -U sambar%sambar
Domain=[WORKGROUP] OS=[Unix] Server=[Samba 3.5.10-114.el6]
smb: \> ls
NT_STATUS_ACCESS_DENIED listing \*
 52265 blocks of size 1048576. 48406 blocks available
解决方法一:
关闭SELIUNX
[root@linux /]# getenforce   ;查看当前状态
Enforcing

[root@linux /]# setenforce 0;
SELINUX几种状态表示:
enforcing:强制模式,代表 SELinux 运行中,且已经正确的开始限制 domain/type 了; permissive:宽容模式:代表 SELinux 运行中,不过仅会有警告信息并不会实际限制 domain/type 的存取。这种模式可以运来作为 SELinux 的 debug 之用; disabled:关闭,SELinux 并没有实际运行。
解决方法二:
更改selinux的策略
chcon -t samba_share_t 共享目录(/var/www/html)
synbe
commented
6 years ago 刷openwrt系统的路由器的选购 发表于2015-02-01由rapistor 注:本文由明月永在原创,复制或者引用请注明出处.www.myopenwrt.org
玩openwrt一年以来,发了一些固件,在圈内知道的明月永在的朋友也多了起来。
于是经常有朋友要求我推荐路由一个合适的路由器。故写些心得和大家分享一下openwrt路由的选购经验。
能运行openwrt系统的路由,cpu主要有三四个公司,openwrt是一个开源系统,所用的软件,包括驱动都是开源的,官方是不会采用有版权的闭源驱动。
在这方面,比不上TT和DD,后两个在官方发布的固件或者源码里可以用闭源的驱动。一般来说闭源驱动的性能、兼容性和稳定性都会好于开源驱动,有时些一些芯片甚至没有开源驱动,导致无法使用。但闭源驱动的内核几乎千年不变,所以这两个版本一直还停留在2.6内核。
AR系列cpu相对来说是对openwrt支持最好的,新旧芯片都在openwrt系统运行良好 。cpu主要有ar7240 ar9331 ar9341 ar9342 ar9344 ar7161 等。大部分芯片自带无线部分,不必要使用单独的无线芯片。ar系列的cpu主要有TPLINK 美国的netgear、国内的水星、迅捷、巴法络等公司使用较多。ar7240使用的型号主要有tp740v1-v3 ,841和941的几个较旧的机型,9331主要是tp的740v4/v5 743v2,tp841v8使用ar9341,1041v2使用ar9342 ,tp3500/3600/4300/4310以及水星的4530使用ar9344 cpu,ar9344是现在的主流cpu,性能相当不错。网件的4300就是使用这个cpu,网件的3800使用ar7161。这类芯片性能一般,但对op兼容最好。Buffalo翻译为巴法络,或者巴法罗,也是AR芯片的使用者,这个是个高档品牌,一般可以直接刷,价格当然也是高高在上的。
BRCM系列的cpu使用的较少,主要有华硕、华为一些厂家,cpu有47xx 和53xx 63xx系列,好些机型使用openwrt系统会没有无线,因为op没有无线驱动。这系统的路由主要用来玩Tomato也就是我们常说TT系统。另DD-wrt,也就里常说的DD系统,对这类芯片也支持不错。这类芯片性比ar稍强,但只有部分型号能良好 的运行openwrt固件。
另台湾 的联发科,新推出有mtk系列的cpu,主要有mt7620n和mt7620a,前者为单核,后者为接口扩展版,性能相当的不错,对op的支持不是太好,但还能勉强接受。主要是无线 驱动比较差,无线能用,但不太稳定。在脱 机下载,usb传输上,的速度比较好。这类芯片也不是首选 。
还有一个realtk吧,也就是大家所说的螃蟹芯片,这类芯片openwrt支持极差,op的官方没有可支持的源码,只看到有部分商家使用这芯片,自己定制了op系统,据说基本没有什么功能的。这类芯片暂时不要碰为好,这类芯片有一个最大的特点,就是这种路由特别便宜。
综上所述,建议大家最好选购ar芯片的路由器。bcm和mtk的其次。另大家选购路由要看以下几个方面:
闪存和内存的大小,由于国内商家为了节省成本 ,加上原厂的固件较小,所以一般原厂的闪存和内存都很小。有的固件闪存才1-2M,内存仅16M。这是不可能运行openwrt系统的。openwrt系统的最低要求是4M闪存,32M内存。如果刷我编译的固件,因为内置了很多软件,至少 得8M闪存,32M内存运行不太理想,只是能运行而以。推荐用16M闪存和64M内存。因些,如果不进行改机,我们所说的硬改,原厂的在200M以下价格的路由基本上不能刷我的固件,AR系列的型号不用改机可直接刷的大概有下面些型号,水星mw4530,TP3500/3600/4300/4310,这些路由是8M闪存,二手的价格比较便宜,网件的3800 ,是16M闪存,网件的4300是128M nand,也就相当128M闪存,nand也是闪存的一种,其实就是大家U盘中所用的很多脚的存储芯片。这种很多脚,更换和修理 起来不方便 。一明坏了,业余修理基本不可能。就算换了nand,需要重写固件,可刷nand固件的编程器至少一千以上,不是普通人能玩得起的,而一般的8脚 闪存的编程器最小的才20多元。最近网件的3800用的人相当的多,但网件的路由基本是国外的二手,硬件参差不齐,经常有听说出各种奇怪的问题。所以大家自己权衡买 什么好。另外tp的其它的低端路由可以自己买 回来 修改,花十多远钱换个闪存和内存也可以用来刷openwrt系统,不过没有usb的机型,很多功能就没法用了。tp低端的带usb的型号主要是tP743v2 tp843,这两个如果有旧货可以改改,1041v2电路板上预留了usb位置,再买一个5v的电源模块,加装上usb接口,也是一个很不错的选择,此型号用9342cpu,比9331强不少。改装可以自己动手,找附近的会修理的朋友,也可以花点小钱找人帮忙 。如果是新手,强烈建议不会轻易换内存,已经有无数的正常路由被这样焊坏了。
发烧量,如果芯片发热厉害,会导致夏天过热死机。这也是要考虑的。
天线的类型,一般来说内置天线的路由是看起来好看,但信号的收发能力远低于外置天线的路由。还有无线芯片的带宽可能也需要考虑,很旧的那些是54M,再后一点的单天线是150M的,双天线一般是300M的,多天线一般会比单天线好一些。但也不是天线越多越好,现在有部分厂商,以此为噱头,加了许多天线,把路由弄得比蜘蛛的脚还多。
建议大家在购机前,先多了解下,对比下,看看别人的评测和刷机,说了一大堆,可能由于本人的知识有限,有些错误 ,请见谅。
synbe
commented
6 years ago feeefee
synbe
commented
6 years ago 2018中国国际智能产业博览会马云演讲 简介http://m.youku.com/video/idXMzc5NDAyODY0NA==.html?tpa=dW5pb25faWQ9MTAzNzQ5XzEwMDAwMV8wMV8wMQ&source=https%3A%2F%2Fsp3.baidu.com%2F84oIbT3kAMgDnd%2Ffrom%3D2001a%2Fbd_page_type%3D1%2Fssid%3D0%2Fuid%3D0%2Fpu%3Dusm%25400%252Csz%25401320_2003%252Cta%2540qbase_1_11.3_1_11.4%2Fbaiduid%3DB234CF20AA54BE30A3789B99EEF7D9CA%2Fw%3D010%2Ft%3Diphone%2Fl%3D1%2Ftc%3Fclk_info%3D%257B%2522srcid%2522%253A%25225026%2522%252C%2522oldsrcid%2522%253A%25224185%2522%252C%2522frsrcid%2522%253A%2522undefined%2522%252C%2522type%2522%253A%2522tab_video_click_url%2522%252C%2522xpath%2522%253A%2522div-div7-div-div-div-a-div-div2-p%2522%252C%2522atn%2522%253A%2522index%2522%252C%2522applid%2522%253A%252211700782025837134571%2522%252C%2522t%2522%253A1535094570698%257D%26module%3Dsf%26pd%3Dvideo%26tn%3Dvsearch%26q%3D%25E4%25B8%25AD%25E5%259B%25BD%25E5%259B%25BD%25E9%2599%2585%25E6%2599%25BA%25E8%2583%25BD%25E4%25BA%25A7%25E4%25B8%259A%25E5%258D%259A%25E8%25A7%2588%25E4%25BC%259A%26lid%3D9524575109094145809%26pu%3Dusm%25400%252Csz%25401320_2003%252Cta%2540qbase_1_11.3_1_11.4%26extra%3D%257B%257D%26ref%3Dwww_iphone%26isAtom%3D1%26is_baidu%3D0%26wd%3D%26eqid%3Da2618742544c4000100000065b7faf11%26w_qd%3DIlPT2AEptyoA_yk66Ascs47xFFhOm9Uor55NlfDUu49qVPQyZkdn-88ejgm%26tcplug%3D1%26sec%3D32215%26di%3Ddfb9c36a262d9af7%26bdenc%3D1%26nsrc%3DIlPT2AEptyoA_yixCFOxXnANedT62v3IGs4PNy6R2iv5nk_qva02EtAfEVXfNDrJB645wGOFjd6UdyGu0WBlldAPu_5Uxmcabnnwdfm_ewCAG_Ndag2lDgOHGnV6sqmg7RlOg2Z9E2EoB7-ie_37suc_rsXZ82os8sa1eGS6rPOAVY4y26mZnFrb_5kJD-HAGOzI-1Ozr89jG98uBuXACYOBnXRUEyMM7Brh8tZHL23Iqn6zK2bVDdRNZFX5QicM_afrSdjiwADSY-55jyIkTn-R-8yVhPSCJnVUTRy2eP5lIv0-NQn1JYDuOxpVetvOU3syGwLEqelvKWtm-5h9VSxzPeK9RoXnGZVIQOXiuqyhClhinlSJRr3fsD2sCvKv_McZ3x6vH8kHnG0cnNTOrYaqKrqMrAA0NAlqOSvnk6x4ynx3PlCe5EPX9FYGdDLQ37maN8KWFhST3zxNus0FMaWQ1R7D1WZ4mneiq9iluZD9VceJQPASwIxrx6EJ3VCBhLjbMjbzGt3_zxIQlwyDmvu8vzH9mIqWwYbQEO7p_ql8YklAqBF4Qky7eGy18U5uP1TBjzPo_XS5qJ1cpuv5i-1DxcQ11vYdDuiuQM2nxf8kwlgV_9J_t_PEXrAMR-zgm2doGK8xTJGtVozYQpgt5LgwUWC14mXX90LR_ZEmFGDzWH4w2NtqtDRsp85uX0uwPWm962VfJY7ggwI0XbKHw6lnQ2FKRoMDiprpJ8ra1PnU6OlEpHo_cblP3-me_gKIeDVgfsAP2-_rewenPQv-sTFhkieH-2gnABrJCVOIb7GVA41Usojh0TSyrZzFiLwUzZ5crh3qLHXElvl_IINMor4xXo7gQU8JD8c6ZrLxURotsYdBb7hEWo21KVwtIb77VfcFfIoHJSQQoRNlW-AYsuNRE8nP3k04OerQoncPepGWnQm4YnLxMSJ1ujh6L3dAqdCfGWKcL4CzkvgjdyOwMtU-pkqpR6cvZs7rhx4Jrz5w4waVh1qzol5hmesGpK20gncYYtNQSKlXPJWuhM3ZgQcj879pRKBH7aLwaKoYmLy5UOT4DARIIc1fQQYCmsG9Nbtm5JdAl1ehNTsSjZ-mlTPXUeMayPfDwWHMtM7yNrlfdS8ebZa7u2o2zjkY75innwRALosbP8C21_NOKFruJ605pjDCsysFwJoga1ADearqHNlt8ApWQN1tVok9jZ8XMNyH9ff9yWQBNaq790MLqTs6qRAQeUdeI672ZnlirCfAm3kMsP4s58YAzR0sph-W-HXbLDYDOUlzkH96gCIVL5aBW6fdI58EKWcvRelsM0NLBZEIE54zVEcsbL0PrsaTbgfv80rznmyfdmT0vefXBdqtsNXiU--k0zPlDrVHx_MN-ZF2a-t0TtLintA9j5a4rxJ3M06pmyc8cdde8ZUNRkhNIYYqFDXdwVYH_Rteg0YtPQVVeME_0FIkUzzqRD1PJo37bZu9z2DoQBi3O1FZsXe2FCcDb510hBaNZWO4So49gwnmstTfsmTuwA5VZggaefZtU1g7wlqgtPqes0OVOzgmWmVraW57XY-7LpcK_cIj3PGopmZ0-lC9RWn0o9aawzhcl9TpVbxMtpKBgo_OQiR5PVsIEmZ9crnl3dTIWQCaJof2zkdyuLqzsMwV8UkiJ9CkZ5arngs6SdAOg7QFFDCV7jm8Rf-9WnPVjadYnd6CKRTCN-LSk04gxqb-XjGPWxdZl7Q9ldexQfsUD0QBdbdzmBklby24TfBGY5Q2bhYZM96N-F1lGdp6xMq3wCA6UjxG73Ssk1qOYJsLbtGfI3C0tii4-DsgTwgLwBr-cZeIHrrxoqwgoUZdwPNrUfxDpqZCTQugJFaBtKtoDHjElaI7jzq-hPyX6gHTk4teJDepMEISQ2NIzMZGN_GCqAPZqvXoyUgCmrG51YPbvwgUNu-H__HTc0x6Cb2yd909etIi6Qy61Pn_1o_FJENkPa
synbe
commented
6 years ago 
A framework for easily creating beautiful presentations using HTML. Check out the live demo.
reveal.js comes with a broad range of features including nested slides, Markdown contents, PDF export, speaker notes and a JavaScript API. There's also a fully featured visual editor and platform for sharing reveal.js presentations at slides.com.
Presentations are written using HTML or Markdown but there's also an online editor for those of you who prefer a graphical interface. Give it a try at https://slides.com.
Here's a barebones example of a fully working reveal.js presentation:
<html>
    <head>
        <link rel="stylesheet" href="css/reveal.css">
        <link rel="stylesheet" href="css/theme/white.css">
    </head>
    <body>
        <div class="reveal">
            <div class="slides">
                <section>Slide 1</section>
                <section>Slide 2</section>
            </div>
        </div>
        <script src="js/reveal.js"></script>
        <script>
            Reveal.initialize();
        </script>
    </body>
</html>
The presentation markup hierarchy needs to be .reveal > .slides > section where the section represents one slide and can be repeated indefinitely. If you place multiple section elements inside of another section they will be shown as vertical slides. The first of the vertical slides is the "root" of the others (at the top), and will be included in the horizontal sequence. For example:
<div class="reveal">
    <div class="slides">
        <section>Single Horizontal Slide</section>
        <section>
            <section>Vertical Slide 1</section>
            <section>Vertical Slide 2</section>
        </section>
    </div>
</div>It's possible to write your slides using Markdown. To enable Markdown, add the data-markdown attribute to your <section> elements and wrap the contents in a <textarea data-template> like the example below. You'll also need to add the plugin/markdown/marked.js and plugin/markdown/markdown.js scripts (in that order) to your HTML file.
This is based on data-markdown from Paul Irish modified to use marked to support GitHub Flavored Markdown. Sensitive to indentation (avoid mixing tabs and spaces) and line breaks (avoid consecutive breaks).
<section data-markdown>
    <textarea data-template>
        ## Page title

        A paragraph with some text and a [link](http://hakim.se).
    </textarea>
</section>You can write your content as a separate file and have reveal.js load it at runtime. Note the separator arguments which determine how slides are delimited in the external file: the data-separator attribute defines a regular expression for horizontal slides (defaults to ^\r?\n---\r?\n$, a newline-bounded horizontal rule) and data-separator-vertical defines vertical slides (disabled by default). The data-separator-notes attribute is a regular expression for specifying the beginning of the current slide's speaker notes (defaults to notes?:, so it will match both "note:" and "notes:"). The data-charset attribute is optional and specifies which charset to use when loading the external file.
When used locally, this feature requires that reveal.js runs from a local web server. The following example customises all available options:
<section data-markdown="example.md"
         data-separator="^\n\n\n"
         data-separator-vertical="^\n\n"
         data-separator-notes="^Note:"
         data-charset="iso-8859-15">
    <!--
        Note that Windows uses `\r\n` instead of `\n` as its linefeed character.
        For a regex that supports all operating systems, use `\r?\n` instead of `\n`.
    -->
</section>Special syntax (through HTML comments) is available for adding attributes to Markdown elements. This is useful for fragments, amongst other things.
<section data-markdown>
    <script type="text/template">
        - Item 1 <!-- .element: class="fragment" data-fragment-index="2" -->
        - Item 2 <!-- .element: class="fragment" data-fragment-index="1" -->
    </script>
</section>Special syntax (through HTML comments) is available for adding attributes to the slide <section> elements generated by your Markdown.
<section data-markdown>
    <script type="text/template">
    <!-- .slide: data-background="#ff0000" -->
        Markdown content
    </script>
</section>We use marked to parse Markdown. To customise marked's rendering, you can pass in options when configuring Reveal:
Reveal.initialize({
    // Options which are passed into marked
    // See https://github.com/chjj/marked#options-1
    markdown: {
        smartypants: true
    }
});At the end of your page you need to initialize reveal by running the following code. Note that all configuration values are optional and will default to the values specified below.
Reveal.initialize({

    // Display presentation control arrows
    controls: true,

    // Help the user learn the controls by providing hints, for example by
    // bouncing the down arrow when they first encounter a vertical slide
    controlsTutorial: true,

    // Determines where controls appear, "edges" or "bottom-right"
    controlsLayout: 'bottom-right',

    // Visibility rule for backwards navigation arrows; "faded", "hidden"
    // or "visible"
    controlsBackArrows: 'faded',

    // Display a presentation progress bar
    progress: true,

    // Display the page number of the current slide
    slideNumber: false,

    // Push each slide change to the browser history
    history: false,

    // Enable keyboard shortcuts for navigation
    keyboard: true,

    // Enable the slide overview mode
    overview: true,

    // Vertical centering of slides
    center: true,

    // Enables touch navigation on devices with touch input
    touch: true,

    // Loop the presentation
    loop: false,

    // Change the presentation direction to be RTL
    rtl: false,

    // Randomizes the order of slides each time the presentation loads
    shuffle: false,

    // Turns fragments on and off globally
    fragments: true,

    // Flags whether to include the current fragment in the URL,
    // so that reloading brings you to the same fragment position
    fragmentInURL: false,

    // Flags if the presentation is running in an embedded mode,
    // i.e. contained within a limited portion of the screen
    embedded: false,

    // Flags if we should show a help overlay when the questionmark
    // key is pressed
    help: true,

    // Flags if speaker notes should be visible to all viewers
    showNotes: false,

    // Global override for autoplaying embedded media (video/audio/iframe)
    // - null: Media will only autoplay if data-autoplay is present
    // - true: All media will autoplay, regardless of individual setting
    // - false: No media will autoplay, regardless of individual setting
    autoPlayMedia: null,

    // Number of milliseconds between automatically proceeding to the
    // next slide, disabled when set to 0, this value can be overwritten
    // by using a data-autoslide attribute on your slides
    autoSlide: 0,

    // Stop auto-sliding after user input
    autoSlideStoppable: true,

    // Use this method for navigation when auto-sliding
    autoSlideMethod: Reveal.navigateNext,

    // Specify the average time in seconds that you think you will spend
    // presenting each slide. This is used to show a pacing timer in the
    // speaker view
    defaultTiming: 120,

    // Enable slide navigation via mouse wheel
    mouseWheel: false,

    // Hides the address bar on mobile devices
    hideAddressBar: true,

    // Opens links in an iframe preview overlay
    // Add `data-preview-link` and `data-preview-link="false"` to customise each link
    // individually
    previewLinks: false,

    // Transition style
    transition: 'slide', // none/fade/slide/convex/concave/zoom

    // Transition speed
    transitionSpeed: 'default', // default/fast/slow

    // Transition style for full page slide backgrounds
    backgroundTransition: 'fade', // none/fade/slide/convex/concave/zoom

    // Number of slides away from the current that are visible
    viewDistance: 3,

    // Parallax background image
    parallaxBackgroundImage: '', // e.g. "'https://s3.amazonaws.com/hakim-static/reveal-js/reveal-parallax-1.jpg'"

    // Parallax background size
    parallaxBackgroundSize: '', // CSS syntax, e.g. "2100px 900px"

    // Number of pixels to move the parallax background per slide
    // - Calculated automatically unless specified
    // - Set to 0 to disable movement along an axis
    parallaxBackgroundHorizontal: null,
    parallaxBackgroundVertical: null,

    // The display mode that will be used to show slides
    display: 'block'

});
The configuration can be updated after initialization using the configure method:
// Turn autoSlide off
Reveal.configure({ autoSlide: 0 });

// Start auto-sliding every 5s
Reveal.configure({ autoSlide: 5000 });All presentations have a normal size, that is, the resolution at which they are authored. The framework will automatically scale presentations uniformly based on this size to ensure that everything fits on any given display or viewport.
See below for a list of configuration options related to sizing, including default values:
Reveal.initialize({

    // ...

    // The "normal" size of the presentation, aspect ratio will be preserved
    // when the presentation is scaled to fit different resolutions. Can be
    // specified using percentage units.
    width: 960,
    height: 700,

    // Factor of the display size that should remain empty around the content
    margin: 0.1,

    // Bounds for smallest/largest possible scale to apply to content
    minScale: 0.2,
    maxScale: 1.5

});
If you wish to disable this behavior and do your own scaling (e.g. using media queries), try these settings:
Reveal.initialize({

    // ...

    width: "100%",
    height: "100%",
    margin: 0,
    minScale: 1,
    maxScale: 1
});Reveal.js doesn't rely on any third party scripts to work but a few optional libraries are included by default. These libraries are loaded as dependencies in the order they appear, for example:
Reveal.initialize({
    dependencies: [
        // Cross-browser shim that fully implements classList - https://github.com/eligrey/classList.js/
        { src: 'lib/js/classList.js', condition: function() { return !document.body.classList; } },

        // Interpret Markdown in <section> elements
        { src: 'plugin/markdown/marked.js', condition: function() { return !!document.querySelector( '[data-markdown]' ); } },
        { src: 'plugin/markdown/markdown.js', condition: function() { return !!document.querySelector( '[data-markdown]' ); } },

        // Syntax highlight for <code> elements
        { src: 'plugin/highlight/highlight.js', async: true, callback: function() { hljs.initHighlightingOnLoad(); } },

        // Zoom in and out with Alt+click
        { src: 'plugin/zoom-js/zoom.js', async: true },

        // Speaker notes
        { src: 'plugin/notes/notes.js', async: true },

        // MathJax
        { src: 'plugin/math/math.js', async: true }
    ]
});
You can add your own extensions using the same syntax. The following properties are available for each dependency object:
To load these dependencies, reveal.js requires head.js (a script loading library) to be loaded before reveal.js.
A ready event is fired when reveal.js has loaded all non-async dependencies and is ready to start navigating. To check if reveal.js is already 'ready' you can call Reveal.isReady().
Reveal.addEventListener( 'ready', function( event ) {
    // event.currentSlide, event.indexh, event.indexv
} );
Note that we also add a .ready class to the .reveal element so that you can hook into this with CSS.
Presentations can be configured to progress through slides automatically, without any user input. To enable this you will need to tell the framework how many milliseconds it should wait between slides:
// Slide every five seconds
Reveal.configure({
  autoSlide: 5000
});
When this is turned on a control element will appear that enables users to pause and resume auto-sliding. Alternatively, sliding can be paused or resumed by pressing »A« on the keyboard. Sliding is paused automatically as soon as the user starts navigating. You can disable these controls by specifying autoSlideStoppable: false in your reveal.js config.
You can also override the slide duration for individual slides and fragments by using the data-autoslide attribute:
<section data-autoslide="2000">
    <p>After 2 seconds the first fragment will be shown.</p>
    <p class="fragment" data-autoslide="10000">After 10 seconds the next fragment will be shown.</p>
    <p class="fragment">Now, the fragment is displayed for 2 seconds before the next slide is shown.</p>
</section>
To override the method used for navigation when auto-sliding, you can specify the autoSlideMethod setting. To only navigate along the top layer and ignore vertical slides, set this to Reveal.navigateRight.
Whenever the auto-slide mode is resumed or paused the autoslideresumed and autoslidepaused events are fired.
If you're unhappy with any of the default keyboard bindings you can override them using the keyboard config option:
Reveal.configure({
  keyboard: {
    13: 'next', // go to the next slide when the ENTER key is pressed
    27: function() {}, // do something custom when ESC is pressed
    32: null // don't do anything when SPACE is pressed (i.e. disable a reveal.js default binding)
  }
});You can swipe to navigate through a presentation on any touch-enabled device. Horizontal swipes change between horizontal slides, vertical swipes change between vertical slides. If you wish to disable this you can set the touch config option to false when initializing reveal.js.
If there's some part of your content that needs to remain accessible to touch events you'll need to highlight this by adding a data-prevent-swipe attribute to the element. One common example where this is useful is elements that need to be scrolled.
When working on presentation with a lot of media or iframe content it's important to load lazily. Lazy loading means that reveal.js will only load content for the few slides nearest to the current slide. The number of slides that are preloaded is determined by the viewDistance configuration option.
To enable lazy loading all you need to do is change your src attributes to data-src as shown below. This is supported for image, video, audio and iframe elements. Lazy loaded iframes will also unload when the containing slide is no longer visible.
<section>
  <img data-src="image.png">
  <iframe data-src="http://hakim.se"></iframe>
  <video>
    <source data-src="video.webm" type="video/webm" />
    <source data-src="video.mp4" type="video/mp4" />
  </video>
</section>The Reveal object exposes a JavaScript API for controlling navigation and reading state:
// Navigation
Reveal.slide( indexh, indexv, indexf );
Reveal.left();
Reveal.right();
Reveal.up();
Reveal.down();
Reveal.prev();
Reveal.next();
Reveal.prevFragment();
Reveal.nextFragment();

// Randomize the order of slides
Reveal.shuffle();

// Toggle presentation states, optionally pass true/false to force on/off
Reveal.toggleOverview();
Reveal.togglePause();
Reveal.toggleAutoSlide();

// Shows a help overlay with keyboard shortcuts, optionally pass true/false
// to force on/off
Reveal.toggleHelp();

// Change a config value at runtime
Reveal.configure({ controls: true });

// Returns the present configuration options
Reveal.getConfig();

// Fetch the current scale of the presentation
Reveal.getScale();

// Retrieves the previous and current slide elements
Reveal.getPreviousSlide();
Reveal.getCurrentSlide();

Reveal.getIndices();        // { h: 0, v: 0, f: 0 }
Reveal.getSlidePastCount();
Reveal.getProgress();       // (0 == first slide, 1 == last slide)
Reveal.getSlides();         // Array of all slides
Reveal.getTotalSlides();    // Total number of slides

// Returns the speaker notes for the current slide
Reveal.getSlideNotes();

// State checks
Reveal.isFirstSlide();
Reveal.isLastSlide();
Reveal.isOverview();
Reveal.isPaused();
Reveal.isAutoSliding();
Custom key bindings can be added and removed using the following Javascript API. Custom key bindings will override the default keyboard bindings, but will in turn be overridden by the user defined bindings in the keyboard config option.
Reveal.addKeyBinding( binding, callback );
Reveal.removeKeyBinding( keyCode );
For example
// The binding parameter provides the following properties
//      keyCode: the keycode for binding to the callback
//          key: the key label to show in the help overlay
//  description: the description of the action to show in the help overlay
Reveal.addKeyBinding( { keyCode: 84, key: 'T', description: 'Start timer' }, function() {
    // start timer
} )

// The binding parameter can also be a direct keycode without providing the help description
Reveal.addKeyBinding( 82, function() {
    // reset timer
} )
This allows plugins to add key bindings directly to Reveal so they can
A slidechanged event is fired each time the slide is changed (regardless of state). The event object holds the index values of the current slide as well as a reference to the previous and current slide HTML nodes.
Some libraries, like MathJax (see #226), get confused by the transforms and display states of slides. Often times, this can be fixed by calling their update or render function from this callback.
Reveal.addEventListener( 'slidechanged', function( event ) {
    // event.previousSlide, event.currentSlide, event.indexh, event.indexv
} );The presentation's current state can be fetched by using the getState method. A state object contains all of the information required to put the presentation back as it was when getState was first called. Sort of like a snapshot. It's a simple object that can easily be stringified and persisted or sent over the wire.
Reveal.slide( 1 );
// we're on slide 1

var state = Reveal.getState();

Reveal.slide( 3 );
// we're on slide 3

Reveal.setState( state );
// we're back on slide 1If you set data-state="somestate" on a slide <section>, "somestate" will be applied as a class on the document element when that slide is opened. This allows you to apply broad style changes to the page based on the active slide.
Furthermore you can also listen to these changes in state via JavaScript:
Reveal.addEventListener( 'somestate', function() {
    // TODO: Sprinkle magic
}, false );Slides are contained within a limited portion of the screen by default to allow them to fit any display and scale uniformly. You can apply full page backgrounds outside of the slide area by adding a data-background attribute to your <section> elements. Four different types of backgrounds are supported: color, image, video and iframe.
All CSS color formats are supported, including hex values, keywords, rgba() or hsl().
<section data-background-color="#ff0000">
    <h2>Color</h2>
</section>By default, background images are resized to cover the full page. Available options:
| Attribute | Default | Description |
|---|---|---|
| data-background-image | URL of the image to show. GIFs restart when the slide opens. | |
| data-background-size | cover | See background-size on MDN. |
| data-background-position | center | See background-position on MDN. |
| data-background-repeat | no-repeat | See background-repeat on MDN. |
| data-background-opacity | 1 | Opacity of the background image on a 0-1 scale. 0 is transparent and 1 is fully opaque. |
<section data-background-image="http://example.com/image.png">
    <h2>Image</h2>
</section>
<section data-background-image="http://example.com/image.png" data-background-size="100px" data-background-repeat="repeat">
    <h2>This background image will be sized to 100px and repeated</h2>
</section>Automatically plays a full size video behind the slide.
| Attribute | Default | Description |
|---|---|---|
| data-background-video | A single video source, or a comma separated list of video sources. | |
| data-background-video-loop | false | Flags if the video should play repeatedly. |
| data-background-video-muted | false | Flags if the audio should be muted. |
| data-background-size | cover | Use cover for full screen and some cropping or contain for letterboxing. |
| data-background-opacity | 1 | Opacity of the background video on a 0-1 scale. 0 is transparent and 1 is fully opaque. |
<section data-background-video="https://s3.amazonaws.com/static.slid.es/site/homepage/v1/homepage-video-editor.mp4,https://s3.amazonaws.com/static.slid.es/site/homepage/v1/homepage-video-editor.webm" data-background-video-loop data-background-video-muted>
    <h2>Video</h2>
</section>Embeds a web page as a slide background that covers 100% of the reveal.js width and height. The iframe is in the background layer, behind your slides, and as such it's not possible to interact with it by default. To make your background interactive, you can add the data-background-interactive attribute.
<section data-background-iframe="https://slides.com" data-background-interactive>
    <h2>Iframe</h2>
</section>Backgrounds transition using a fade animation by default. This can be changed to a linear sliding transition by passing backgroundTransition: 'slide' to the Reveal.initialize() call. Alternatively you can set data-background-transition on any section with a background to override that specific transition.
If you want to use a parallax scrolling background, set the first two properties below when initializing reveal.js (the other two are optional).
Reveal.initialize({

    // Parallax background image
    parallaxBackgroundImage: '', // e.g. "https://s3.amazonaws.com/hakim-static/reveal-js/reveal-parallax-1.jpg"

    // Parallax background size
    parallaxBackgroundSize: '', // CSS syntax, e.g. "2100px 900px" - currently only pixels are supported (don't use % or auto)

    // Number of pixels to move the parallax background per slide
    // - Calculated automatically unless specified
    // - Set to 0 to disable movement along an axis
    parallaxBackgroundHorizontal: 200,
    parallaxBackgroundVertical: 50

});
Make sure that the background size is much bigger than screen size to allow for some scrolling. View example.
The global presentation transition is set using the transition config value. You can override the global transition for a specific slide by using the data-transition attribute:
<section data-transition="zoom">
    <h2>This slide will override the presentation transition and zoom!</h2>
</section>

<section data-transition-speed="fast">
    <h2>Choose from three transition speeds: default, fast or slow!</h2>
</section>
You can also use different in and out transitions for the same slide:
<section data-transition="slide">
    The train goes on …
</section>
<section data-transition="slide">
    and on …
</section>
<section data-transition="slide-in fade-out">
    and stops.
</section>
<section data-transition="fade-in slide-out">
    (Passengers entering and leaving)
</section>
<section data-transition="slide">
    And it starts again.
</section>
You can choose from none, fade, slide, convex, concave and zoom.
It's easy to link between slides. The first example below targets the index of another slide whereas the second targets a slide with an ID attribute (<section id="some-slide">):
<a href="#/2/2">Link</a>
<a href="#/some-slide">Link</a>
You can also add relative navigation links, similar to the built in reveal.js controls, by appending one of the following classes on any element. Note that each element is automatically given an enabled class when it's a valid navigation route based on the current slide.
<a href="#" class="navigate-left">
<a href="#" class="navigate-right">
<a href="#" class="navigate-up">
<a href="#" class="navigate-down">
<a href="#" class="navigate-prev"> <!-- Previous vertical or horizontal slide -->
<a href="#" class="navigate-next"> <!-- Next vertical or horizontal slide -->
Fragments are used to highlight individual elements on a slide. Every element with the class fragment will be stepped through before moving on to the next slide. Here's an example: http://revealjs.com/#/fragments
The default fragment style is to start out invisible and fade in. This style can be changed by appending a different class to the fragment:
<section>
    <p class="fragment grow">grow</p>
    <p class="fragment shrink">shrink</p>
    <p class="fragment fade-out">fade-out</p>
    <p class="fragment fade-up">fade-up (also down, left and right!)</p>
    <p class="fragment fade-in-then-out">fades in, then out when we move to the next step</p>
    <p class="fragment fade-in-then-semi-out">fades in, then obfuscate when we move to the next step</p>
    <p class="fragment highlight-current-blue">blue only once</p>
    <p class="fragment highlight-red">highlight-red</p>
    <p class="fragment highlight-green">highlight-green</p>
    <p class="fragment highlight-blue">highlight-blue</p>
</section>
Multiple fragments can be applied to the same element sequentially by wrapping it, this will fade in the text on the first step and fade it back out on the second.
<section>
    <span class="fragment fade-in">
        <span class="fragment fade-out">I'll fade in, then out</span>
    </span>
</section>
The display order of fragments can be controlled using the data-fragment-index attribute.
<section>
    <p class="fragment" data-fragment-index="3">Appears last</p>
    <p class="fragment" data-fragment-index="1">Appears first</p>
    <p class="fragment" data-fragment-index="2">Appears second</p>
</section>When a slide fragment is either shown or hidden reveal.js will dispatch an event.
Some libraries, like MathJax (see #505), get confused by the initially hidden fragment elements. Often times this can be fixed by calling their update or render function from this callback.
Reveal.addEventListener( 'fragmentshown', function( event ) {
    // event.fragment = the fragment DOM element
} );
Reveal.addEventListener( 'fragmenthidden', function( event ) {
    // event.fragment = the fragment DOM element
} );By default, Reveal is configured with highlight.js for code syntax highlighting. To enable syntax highlighting, you'll have to load the highlight plugin (plugin/highlight/highlight.js) and a highlight.js CSS theme (Reveal comes packaged with the zenburn theme: lib/css/zenburn.css).
Reveal.initialize({
    // More info https://github.com/hakimel/reveal.js#dependencies
    dependencies: [
        { src: 'plugin/highlight/highlight.js', async: true, callback: function() { hljs.initHighlightingOnLoad(); } },
    ]
});
Below is an example with clojure code that will be syntax highlighted. When the data-trim attribute is present, surrounding whitespace is automatically removed. HTML will be escaped by default. To avoid this, for example if you are using <mark> to call out a line of code, add the data-noescape attribute to the <code> element.
<section>
    <pre><code data-trim data-noescape>
(def lazy-fib
  (concat
   [0 1]
   <mark>((fn rfib [a b]</mark>
        (lazy-cons (+ a b) (rfib b (+ a b)))) 0 1)))
    </code></pre>
</section>If you would like to display the page number of the current slide you can do so using the slideNumber and showSlideNumber configuration values.
// Shows the slide number using default formatting
Reveal.configure({ slideNumber: true });

// Slide number formatting can be configured using these variables:
//  "h.v":  horizontal . vertical slide number (default)
//  "h/v":  horizontal / vertical slide number
//    "c":  flattened slide number
//  "c/t":  flattened slide number / total slides
Reveal.configure({ slideNumber: 'c/t' });

// Control which views the slide number displays on using the "showSlideNumber" value:
//     "all": show on all views (default)
// "speaker": only show slide numbers on speaker notes view
//   "print": only show slide numbers when printing to PDF
Reveal.configure({ showSlideNumber: 'speaker' });Press »ESC« or »O« keys to toggle the overview mode on and off. While you're in this mode, you can still navigate between slides, as if you were at 1,000 feet above your presentation. The overview mode comes with a few API hooks:
Reveal.addEventListener( 'overviewshown', function( event ) { /* ... */ } );
Reveal.addEventListener( 'overviewhidden', function( event ) { /* ... */ } );

// Toggle the overview mode programmatically
Reveal.toggleOverview();Just press »F« on your keyboard to show your presentation in fullscreen mode. Press the »ESC« key to exit fullscreen mode.
Add data-autoplay to your media element if you want it to automatically start playing when the slide is shown:
<video data-autoplay src="http://clips.vorwaerts-gmbh.de/big_buck_bunny.mp4"></video>If you want to enable or disable autoplay globally, for all embedded media, you can use the autoPlayMedia configuration option. If you set this to true ALL media will autoplay regardless of individual data-autoplay attributes. If you initialize with autoPlayMedia: false NO media will autoplay.
Note that embedded HTML5 <video>/<audio> and YouTube/Vimeo iframes are automatically paused when you navigate away from a slide. This can be disabled by decorating your element with a data-ignore attribute.
reveal.js automatically pushes two post messages to embedded iframes. slide:start when the slide containing the iframe is made visible and slide:stop when it is hidden.
Sometimes it's desirable to have an element, like an image or video, stretch to consume as much space as possible within a given slide. This can be done by adding the .stretch class to an element as seen below:
<section>
    <h2>This video will use up the remaining space on the slide</h2>
    <video class="stretch" src="http://clips.vorwaerts-gmbh.de/big_buck_bunny.mp4"></video>
</section>
Limitations:
The framework has a built-in postMessage API that can be used when communicating with a presentation inside of another window. Here's an example showing how you'd make a reveal.js instance in the given window proceed to slide 2:
<window>.postMessage( JSON.stringify({ method: 'slide', args: [ 2 ] }), '*' );When reveal.js runs inside of an iframe it can optionally bubble all of its events to the parent. Bubbled events are stringified JSON with three fields: namespace, eventName and state. Here's how you subscribe to them from the parent window:
window.addEventListener( 'message', function( event ) {
    var data = JSON.parse( event.data );
    if( data.namespace === 'reveal' && data.eventName ==='slidechanged' ) {
        // Slide changed, see data.state for slide number
    }
} );
This cross-window messaging can be toggled on or off using configuration flags.
Reveal.initialize({
    // ...

    // Exposes the reveal.js API through window.postMessage
    postMessage: true,

    // Dispatches all reveal.js events to the parent window through postMessage
    postMessageEvents: false
});Presentations can be exported to PDF via a special print stylesheet. This feature requires that you use Google Chrome or Chromium and to be serving the presentation from a webserver. Here's an example of an exported presentation that's been uploaded to SlideShare: http://www.slideshare.net/hakimel/revealjs-300.
Fragments are printed on separate slides by default. Meaning if you have a slide with three fragment steps, it will generate three separate slides where the fragments appear incrementally.
If you prefer printing all fragments in their visible states on the same slide you can set the pdfSeparateFragments config option to false.
Export dimensions are inferred from the configured presentation size. Slides that are too tall to fit within a single page will expand onto multiple pages. You can limit how many pages a slide may expand onto using the pdfMaxPagesPerSlide config option, for example Reveal.configure({ pdfMaxPagesPerSlide: 1 }) ensures that no slide ever grows to more than one printed page.
To enable the PDF print capability in your presentation, the special print stylesheet at /css/print/pdf.css must be loaded. The default index.html file handles this for you when print-pdf is included in the query string. If you're using a different HTML template, you can add this to your HEAD:
<script>
    var link = document.createElement( 'link' );
    link.rel = 'stylesheet';
    link.type = 'text/css';
    link.href = window.location.search.match( /print-pdf/gi ) ? 'css/print/pdf.css' : 'css/print/paper.css';
    document.getElementsByTagName( 'head' )[0].appendChild( link );
</script>print-pdf included in the query string i.e. http://localhost:8000/?print-pdf. You can test this with revealjs.com?print-pdf.
showNotes=true to the query string: http://localhost:8000/?print-pdf&showNotes=true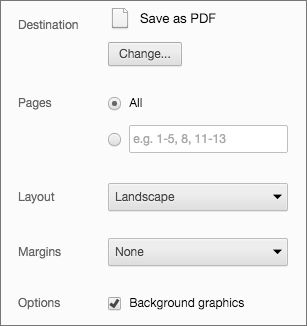
Alternatively you can use the decktape project.
The framework comes with a few different themes included:
Each theme is available as a separate stylesheet. To change theme you will need to replace black below with your desired theme name in index.html:
<link rel="stylesheet" href="css/theme/black.css" id="theme">If you want to add a theme of your own see the instructions here: /css/theme/README.md.
reveal.js comes with a speaker notes plugin which can be used to present per-slide notes in a separate browser window. The notes window also gives you a preview of the next upcoming slide so it may be helpful even if you haven't written any notes. Press the »S« key on your keyboard to open the notes window.
A speaker timer starts as soon as the speaker view is opened. You can reset it to 00:00:00 at any time by simply clicking/tapping on it.
Notes are defined by appending an <aside> element to a slide as seen below. You can add the data-markdown attribute to the aside element if you prefer writing notes using Markdown.
Alternatively you can add your notes in a data-notes attribute on the slide. Like <section data-notes="Something important"></section>.
When used locally, this feature requires that reveal.js runs from a local web server.
<section>
    <h2>Some Slide</h2>

    <aside class="notes">
        Oh hey, these are some notes. They'll be hidden in your presentation, but you can see them if you open the speaker notes window (hit »S« on your keyboard).
    </aside>
</section>
If you're using the external Markdown plugin, you can add notes with the help of a special delimiter:
<section data-markdown="example.md" data-separator="^\n\n\n" data-separator-vertical="^\n\n" data-separator-notes="^Note:"></section>

# Title
## Sub-title

Here is some content...

Note:
This will only display in the notes window.Notes are only visible to the speaker inside of the speaker view. If you wish to share your notes with others you can initialize reveal.js with the showNotes configuration value set to true. Notes will appear along the bottom of the presentations.
When showNotes is enabled notes are also included when you export to PDF. By default, notes are printed in a semi-transparent box on top of the slide. If you'd rather print them on a separate page after the slide, set showNotes: "separate-page".
The speaker notes window will also show:
The pacing timer can be enabled by configuring by the defaultTiming parameter in the Reveal configuration block, which specifies the number of seconds per slide. 120 can be a reasonable rule of thumb. Timings can also be given per slide <section> by setting the data-timing attribute. Both values are in numbers of seconds.
In some cases it can be desirable to run notes on a separate device from the one you're presenting on. The Node.js-based notes plugin lets you do this using the same note definitions as its client side counterpart. Include the required scripts by adding the following dependencies:
Reveal.initialize({
    // ...

    dependencies: [
        { src: 'socket.io/socket.io.js', async: true },
        { src: 'plugin/notes-server/client.js', async: true }
    ]
});
Then:
npm installnode plugin/notes-serverThe multiplex plugin allows your audience to view the slides of the presentation you are controlling on their own phone, tablet or laptop. As the master presentation navigates the slides, all client presentations will update in real time. See a demo at https://reveal-js-multiplex-ccjbegmaii.now.sh/.
The multiplex plugin needs the following 3 things to operate:
Served from a static file server accessible (preferably) only to the presenter. This need only be on your (the presenter's) computer. (It's safer to run the master presentation from your own computer, so if the venue's Internet goes down it doesn't stop the show.) An example would be to execute the following commands in the directory of your master presentation:
npm install node-staticstaticIf you want to use the speaker notes plugin with your master presentation then make sure you have the speaker notes plugin configured correctly along with the configuration shown below, then execute node plugin/notes-server in the directory of your master presentation. The configuration below will cause it to connect to the socket.io server as a master, as well as launch your speaker-notes/static-file server.
You can then access your master presentation at http://localhost:1947
Example configuration:
Reveal.initialize({
    // other options...

    multiplex: {
        // Example values. To generate your own, see the socket.io server instructions.
        secret: '13652805320794272084', // Obtained from the socket.io server. Gives this (the master) control of the presentation
        id: '1ea875674b17ca76', // Obtained from socket.io server
        url: 'https://reveal-js-multiplex-ccjbegmaii.now.sh' // Location of socket.io server
    },

    // Don't forget to add the dependencies
    dependencies: [
        { src: '//cdn.socket.io/socket.io-1.3.5.js', async: true },
        { src: 'plugin/multiplex/master.js', async: true },

        // and if you want speaker notes
        { src: 'plugin/notes-server/client.js', async: true }

        // other dependencies...
    ]
});Served from a publicly accessible static file server. Examples include: GitHub Pages, Amazon S3, Dreamhost, Akamai, etc. The more reliable, the better. Your audience can then access the client presentation via http://example.com/path/to/presentation/client/index.html, with the configuration below causing them to connect to the socket.io server as clients.
Example configuration:
Reveal.initialize({
    // other options...

    multiplex: {
        // Example values. To generate your own, see the socket.io server instructions.
        secret: null, // null so the clients do not have control of the master presentation
        id: '1ea875674b17ca76', // id, obtained from socket.io server
        url: 'https://reveal-js-multiplex-ccjbegmaii.now.sh' // Location of socket.io server
    },

    // Don't forget to add the dependencies
    dependencies: [
        { src: '//cdn.socket.io/socket.io-1.3.5.js', async: true },
        { src: 'plugin/multiplex/client.js', async: true }

        // other dependencies...
    ]
});Server that receives the slideChanged events from the master presentation and broadcasts them out to the connected client presentations. This needs to be publicly accessible. You can run your own socket.io server with the commands:
npm installnode plugin/multiplexOr you can use the socket.io server at https://reveal-js-multiplex-ccjbegmaii.now.sh/.
You'll need to generate a unique secret and token pair for your master and client presentations. To do so, visit http://example.com/token, where http://example.com is the location of your socket.io server. Or if you're going to use the socket.io server at https://reveal-js-multiplex-ccjbegmaii.now.sh/, visit https://reveal-js-multiplex-ccjbegmaii.now.sh/token.
You are very welcome to point your presentations at the Socket.io server running at https://reveal-js-multiplex-ccjbegmaii.now.sh/, but availability and stability are not guaranteed.
For anything mission critical I recommend you run your own server. The easiest way to do this is by installing now. With that installed, deploying your own Multiplex server is as easy running the following command from the reveal.js folder: now plugin/multiplex.
The socket.io server can play the role of static file server for your client presentation, as in the example at https://reveal-js-multiplex-ccjbegmaii.now.sh/. (Open https://reveal-js-multiplex-ccjbegmaii.now.sh/ in two browsers. Navigate through the slides on one, and the other will update to match.)
Example configuration:
Reveal.initialize({
    // other options...

    multiplex: {
        // Example values. To generate your own, see the socket.io server instructions.
        secret: null, // null so the clients do not have control of the master presentation
        id: '1ea875674b17ca76', // id, obtained from socket.io server
        url: 'example.com:80' // Location of your socket.io server
    },

    // Don't forget to add the dependencies
    dependencies: [
        { src: '//cdn.socket.io/socket.io-1.3.5.js', async: true },
        { src: 'plugin/multiplex/client.js', async: true }

        // other dependencies...
    ]
It can also play the role of static file server for your master presentation and client presentations at the same time (as long as you don't want to use speaker notes). (Open https://reveal-js-multiplex-ccjbegmaii.now.sh/ in two browsers. Navigate through the slides on one, and the other will update to match. Navigate through the slides on the second, and the first will update to match.) This is probably not desirable, because you don't want your audience to mess with your slides while you're presenting. ;)
Example configuration:
Reveal.initialize({
    // other options...

    multiplex: {
        // Example values. To generate your own, see the socket.io server instructions.
        secret: '13652805320794272084', // Obtained from the socket.io server. Gives this (the master) control of the presentation
        id: '1ea875674b17ca76', // Obtained from socket.io server
        url: 'example.com:80' // Location of your socket.io server
    },

    // Don't forget to add the dependencies
    dependencies: [
        { src: '//cdn.socket.io/socket.io-1.3.5.js', async: true },
        { src: 'plugin/multiplex/master.js', async: true },
        { src: 'plugin/multiplex/client.js', async: true }

        // other dependencies...
    ]
});If you want to display math equations in your presentation you can easily do so by including this plugin. The plugin is a very thin wrapper around the MathJax library. To use it you'll need to include it as a reveal.js dependency, find our more about dependencies here.
The plugin defaults to using LaTeX but that can be adjusted through the math configuration object. Note that MathJax is loaded from a remote server. If you want to use it offline you'll need to download a copy of the library and adjust the mathjax configuration value.
Below is an example of how the plugin can be configured. If you don't intend to change these values you do not need to include the math config object at all.
Reveal.initialize({
    // other options ...

    math: {
        mathjax: 'https://cdnjs.cloudflare.com/ajax/libs/mathjax/2.7.0/MathJax.js',
        config: 'TeX-AMS_HTML-full'  // See http://docs.mathjax.org/en/latest/config-files.html
    },

    dependencies: [
        { src: 'plugin/math/math.js', async: true }
    ]
});
Read MathJax's documentation if you need HTTPS delivery or serving of specific versions for stability.
The basic setup is for authoring presentations only. The full setup gives you access to all reveal.js features and plugins such as speaker notes as well as the development tasks needed to make changes to the source.
The core of reveal.js is very easy to install. You'll simply need to download a copy of this repository and open the index.html file directly in your browser.
Some reveal.js features, like external Markdown and speaker notes, require that presentations run from a local web server. The following instructions will set up such a server as well as all of the development tasks needed to make edits to the reveal.js source code.
Install Node.js (4.0.0 or later)
Clone the reveal.js repository
$ git clone https://github.com/hakimel/reveal.js.gitNavigate to the reveal.js folder
$ cd reveal.jsInstall dependencies
$ npm installServe the presentation and monitor source files for changes
$ npm startOpen http://localhost:8000 to view your presentation
You can change the port by using npm start -- --port=8001.
MIT licensed
Copyright (C) 2018 Hakim El Hattab, http://hakim.se
synbe
commented
6 years ago 如果一个未经签名的附加组件被禁用,您将不能继续使用它,并且附加组件管理器将显示信息: 未通过针对是否适用于 Firefox 的验证,现已被禁用。。如果它提供已签名的版本,您可以在 Firefox 中 移除此附加组件 ,然后通过 Mozilla 附加组件网站 重新安装它。
如果没有提供经过签名的版本,请联系附加组件的开发者或作者,询问他们是否能提供签名后的更新版附加组件。您也可以提醒他们给附加组件签名。 如何才能使用非签名的附加组件?(高级用户)
键值分为三种类型:整数型,键值为整数,例如5000、10000等;布尔型,键值为逻辑值,只有true和false两种;字符串型,键值一般为不属于以上两种的各种字符、字符串。
Firefox的延长支持版(ESR)、开发者版和Nightly版,将允许通过把偏好xpinstall.signatures.required改为false来屏蔽增强的扩展签名要求,该偏好可通过Firefox 配置编辑器(about:config 页)更改。 还有其它一些山寨版的 Firefox 也允许此项屏蔽。更多内容,参阅 MozillaWiki 文章 附加组件/扩展签名。
synbe
commented
6 years ago http://mozilla.com.cn/thread-59589-1-1.html
作者: MozillaOnline
适用:Firefox 26.0 - 28.0
系统:Linux, Mac, Windows
更新:2014-12-10 18:42:34
webRTChat预览图
webRTChat,提供同个局域网内用户间的文本聊天,语音/视频通话和文件传输。局域网内用户自动发现,无需注册账号即可使用,是您最方便轻巧的聊天工具。
synbe
commented
6 years ago https://blog.csdn.net/baddog_/article/details/80575178
安装完成pycharm
在打开pycharm的时候出现报错 Fail load JVM DLL xxxx xxx。解决方案
安装Microsoft Visual C++ 2010 Redistributable Package32 bit: http://www.microsoft.com/download/en/details.aspx?id=5555
64 bit: http://www.microsoft.com/download/en/details.aspx?id=14632
然后再运行即可
其他编译器出现这个问题也可以用这个方案解决比如 Android studio
synbe
commented
6 years ago python对xp支持的最后版本为3.4.4
https://www.python.org/ftp/python/3.4.4/python-3.4.4.msi
安装过程一直下一步即可。
在 Windows 设置环境变量
手动添加环境变量:鼠标右键我的电脑 -> 属性 -> 点击高级系统设置 -> 点击环境变量 -> 点击PATH -> 在最后面加上我们的Python安装路径 -> 点击确定。
找到系统环境变量的path 添加 C:\Python34; C:\Python34\Scripts; 即可。
下载 pip
到http://pypi.python.org/pypi/pip上下载pip-1.0.2.tar.gz
安装 pip
5.1 解压 pip-1.0.2.tar.gz
5.2 运行CMD,进入命令行
5.3 用CD命令进入 pip 解压目录(F:\ cd pip-1.0.2)
5.4 输入 "python setup.py install"
5.5 添加环境变量 path = C:\Python27\Scripts
进入CMD命令行,输入 "pip install package",package为安装包名称。
程序会自动下载相应的安装包,并进行安装。
synbe
commented
6 years ago 最近在编写Python脚本过程中遇到一个问题比较奇怪:Python脚本完全正常没问题,但执行总报错"AttributeError: 'module' object has no attribute 'xxx'"。这其实是.pyc文件存在问题。
问题定位:
查看import库的源文件,发现源文件存在且没有错误,同时存在源文件的.pyc文件
命名py脚本时,不要与python预留字,模块名等相同
删除该库的.pyc文件(因为py脚本每次运行时均会生成.pyc文件;在已经生成.pyc文件的情况下,若代码不更新,运行时依旧会走pyc,所以要删除.pyc文件),重新运行代码;或者找一个可以运行代码的环境,拷贝替换当前机器的.pyc文件即可
synbe
commented
6 years ago 
Installs and loads tmux plugins.
Tested and working on Linux, OSX, and Cygwin.
Requirements: tmux version 1.9 (or higher), git, bash.
Clone TPM:
$ git clone https://github.com/tmux-plugins/tpm ~/.tmux/plugins/tpmPut this at the bottom of .tmux.conf:
# List of plugins
set -g @plugin 'tmux-plugins/tpm'
set -g @plugin 'tmux-plugins/tmux-sensible'

# Other examples:
# set -g @plugin 'github_username/plugin_name'
# set -g @plugin 'git@github.com/user/plugin'
# set -g @plugin 'git@bitbucket.com/user/plugin'

# Initialize TMUX plugin manager (keep this line at the very bottom of tmux.conf)
run '~/.tmux/plugins/tpm/tpm'
Reload TMUX environment so TPM is sourced:
# type this in terminal if tmux is already running
$ tmux source ~/.tmux.conf
That's it!
~/.tmux.conf with set -g @plugin '...'prefix + I (capital I, as in Install) to fetch the plugin.You're good to go! The plugin was cloned to ~/.tmux/plugins/ dir and sourced.
prefix + alt + u (lowercase u as in uninstall) to remove the plugin.All the plugins are installed to ~/.tmux/plugins/ so alternatively you can
find plugin directory there and remove it.
prefix + I
prefix + U
prefix + alt + u
For more plugins, check here.
More advanced features and instructions, regular users probably do not need this:
Tests for this project run on Travis CI.
When run locally, vagrant is required. Run tests with:
# within project directory
$ ./run_testsYou might want to follow @brunosutic on twitter if you want to hear about new tmux plugins or feature updates.
synbe
commented
6 years ago Features:
Together these features enable uninterrupted tmux usage. No matter the computer or server restarts, if the machine is on, tmux will be there how you left it off the last time it was used.
Tested and working on Linux, OSX and Cygwin.
Tmux environment will be saved at the interval of 15 minutes. All the saving happens in the background without the impact to your workflow.
This action starts automatically when the plugin is installed.
Tmux is automatically started after the computer/server is turned on.
See the instructions how to enable this for your system.
Last saved environment is automatically restored when tmux is started.
Put set -g @continuum-restore 'on' in .tmux.conf to enable this.
Note: automatic restore happens exclusively on tmux server start. No other
action (e.g. sourcing .tmux.conf) triggers this.
tmux 1.9 or higher, bash,
tmux-resurrect plugin.
Please make sure you have tmux-resurrect installed.
Add plugin to the list of TPM plugins in .tmux.conf:
set -g @plugin 'tmux-plugins/tmux-resurrect'
set -g @plugin 'tmux-plugins/tmux-continuum'
Hit prefix + I to fetch the plugin and source it. The plugin will
automatically start "working" in the background, no action required.
Please make sure you have tmux-resurrect installed.
Clone the repo:
$ git clone https://github.com/tmux-plugins/tmux-continuum ~/clone/pathAdd this line to the bottom of .tmux.conf:
run-shell ~/clone/path/continuum.tmuxReload TMUX environment with: $ tmux source-file ~/.tmux.conf
The plugin will automatically start "working" in the background, no action required.
-L or -S flagsYou might want to follow @brunosutic on twitter if you want to hear about new tmux plugins or feature updates.
Both contributing and bug reports are welcome. Please check out contributing guidelines.
synbe
commented
6 years ago http://forum.ubuntu.org.cn/viewtopic.php?t=143221
参照他的xterm配置如下。
外观:重要点的就xterm-256color那行。
代码: 全选
!look and feel
xterm.termName: xterm-256color
xterm.geometry: 80x36
xterm*scrollBar: false
xterm*rightScrollBar: true
xterm*loginshell: true
xterm*cursorBlink: true
xterm*background:  black
xterm*foreground:  gray
xterm.borderLess: true
xterm.cursorBlink: true
xterm*colorUL: yellow
xterm*colorBD: white
修正Alt不能正常使用的问题。
代码: 全选
!fix alt key input
xterm*eightBitInput: false
xterm*altSendsEscape: true
拷贝屏幕内容,包含所有颜色控制符。可以用来做ASCIIART,也可以用脚本转成html放到网上,就好像鸟哥的主页里面的代码段一样。附件里面的perl脚本可以把拷屏输出转成html。
代码: 全选
!print color and bold/underline attributes
xterm*printAttributes: 2
xterm*printerCommand: cat > ~/xtermdump
快捷键定义:鼠标选择自动复制,ctrl-v粘贴,ctrl-p拷屏。
代码: 全选
!mouse selecting to copy, ctrl-v to paste
!Ctrl p to print screen content to file
XTerm*VT100.Translations: #override \
    Ctrl <KeyPress> V: insert-selection(CLIPBOARD,PRIMARY,CUT_BUFFER0) \n\
    <BtnUp>: select-end(CLIPBOARD,PRIMARY,CUT_BUFFER0) \n\
    Ctrl <KeyPress> P: print() \n
字体相关
代码: 全选
!font and locale
xterm*locale: true
xterm.utf8:     true
xterm*utf8Title: true
xterm*fontMenu*fontdefault*Label: Default
xterm*faceName: Monaco:antialias=True:pixelsize=15
!xterm*faceName: monofur:antialias=True:pixelsize=20
!xter*boldFont: DejaVu Sans Mono:style=Bold:pixelsize=15
xterm*faceNameDoublesize: wenquanyi bitmap song:pixelsize=16:antialias=True
xterm*xftAntialias: true
xterm*cjkWidth:false            !<-----谢谢xeoc指正

Tango配色方案

代码: 全选

!-- Tango color scheme
*xterm*color0: #2e3436
*xterm*color1: #cc0000
*xterm*color2: #4e9a06
*xterm*color3: #c4a000
*xterm*color4: #3465a4
*xterm*color5: #75507b
*xterm*color6: #0b939b
*xterm*color7: #d3d7cf
*xterm*color8: #555753
*xterm*color9: #ef2929
*xterm*color10: #8ae234
*xterm*color11: #fce94f
*xterm*color12: #729fcf
*xterm*color13: #ad7fa8
*xterm*color14: #00f5e9
*xterm*color15: #eeeeec
附上我的xterm和urxvt对比图。同样的字体,同样的窗口大小,同样的配色。
P.S.: 在此向在IRC中被我偷拍的无辜路人致以诚挚的谢意!
all:
!look and feel
xterm.termName: xterm-256color
xterm.geometry: 80x36
xterm*scrollBar: false
xterm*rightScrollBar: true
xterm*loginshell: true
xterm*cursorBlink: true
xterm*background:  black
xterm*foreground:  white
xterm.borderLess: true
xterm.cursorBlink: true
xterm*colorUL: yellow
xterm*colorBD: white

!fix alt key input
xterm*eightBitInput: false
xterm*altSendsEscape: true

!print color and bold/underline attributes
xterm*printAttributes: 2
xterm*printerCommand: cat > ~/xtermdump

!mouse selecting to copy, ctrl-v to paste
!Ctrl p to print screen content to file
XTerm*VT100.Translations: #override \
    Ctrl <KeyPress> V: insert-selection(CLIPBOARD,PRIMARY,CUT_BUFFER0) \n\
    <BtnUp>: select-end(CLIPBOARD,PRIMARY,CUT_BUFFER0) \n\
!    Ctrl <KeyPress> P: print() \n

!font and locale
xterm*locale: true
xterm.utf8:     true
xterm*utf8Title: true
xterm*fontMenu*fontdefault*Label: Default
xterm*faceName: Monaco:antialias=True:pixelsize=15
!xterm*faceName: monofur:antialias=True:pixelsize=20
!xter*boldFont: DejaVu Sans Mono:style=Bold:pixelsize=15
xterm*faceNameDoublesize: wenquanyi bitmap song:pixelsize=16:antialias=True
xterm*xftAntialias: true
xterm*cjkWidth:false

!-- Tango color scheme
*xterm*color0: #2e3436
*xterm*color1: #cc0000
*xterm*color2: #4e9a06
*xterm*color3: #c4a000
*xterm*color4: #3465a4
*xterm*color5: #75507b
*xterm*color6: #0b939b
*xterm*color7: #d3d7cf
*xterm*color8: #555753
*xterm*color9: #ef2929
*xterm*color10: #8ae234
*xterm*color11: #fce94f
*xterm*color12: #729fcf
*xterm*color13: #ad7fa8
*xterm*color14: #00f5e9
*xterm*color15: #eeeeec
axun 的配置(20180923):
!look and feel
xterm.termName: xterm-256color
xterm.geometry: 80x36
xterm*scrollBar: false
xterm*rightScrollBar: true
xterm*loginshell: true
xterm*cursorBlink: true
xterm*background:  black
xterm*foreground:  white
xterm.borderLess: true
xterm.cursorBlink: true
xterm*colorUL: yellow
xterm*colorBD: white

!fix alt key input
xterm*eightBitInput: false
xterm*altSendsEscape: true

!print color and bold/underline attributes
xterm*printAttributes: 2
xterm*printerCommand: cat > ~/xtermdump

!mouse selecting to copy, ctrl-v to paste
!Ctrl p to print screen content to file
XTerm*VT100.Translations: #override \
    Ctrl <KeyPress> V: insert-selection(CLIPBOARD,PRIMARY,CUT_BUFFER0) \n\
    <BtnUp>: select-end(CLIPBOARD,PRIMARY,CUT_BUFFER0) \n\
!    Ctrl <KeyPress> P: print() \n

!font and locale
!Xterm*locale:zh_CN.UTF-8
xterm*locale: true
xterm.utf8:     true
xterm*utf8Title: true
XTerm*selectToClipboard: true
xterm*fontMenu*fontdefault*Label: Default
xterm*faceName:DejaVu Sans Mono:antialias=True:pixelsize=14
xter*boldFont: DejaVu Sans Mono:style=Bold:pixelsize=15
xterm*faceNameDoublesize:WenQuanYi Micro Hei:antialias=True:pixelsize=14

xterm*xftAntialias: true
xterm*cjkWidth:false

!Tango color scheme
*xterm*color0: #2e3436
*xterm*color1: #cc0000
*xterm*color2: #4e9a06
*xterm*color3: #c4a000
*xterm*color4: #3465a4
*xterm*color5: #75507b
*xterm*color6: #0b939b
*xterm*color7: #d3d7cf
*xterm*color8: #555753
*xterm*color9: #ef2929
*xterm*color10: #8ae234
*xterm*color11: #fce94f
*xterm*color12: #729fcf
*xterm*color13: #ad7fa8
*xterm*color14: #00f5e9
*xterm*color15: #eeeeec
xterm终端的配置文件是: ~/.Xresources (如果没有,请手动建立:vi .Xresources) 保存上述内容后,然后执行命令: xrdb ~/.Xresources
synbe
commented
6 years ago file : ~/.tmux.conf
# https://synbe.bitbucket.io/synbox/index5.html?name=linux-study:tmux

#####################vim#####################
# $Id: vim-keys.conf,v 1.2 2010-09-18 09:36:15 nicm Exp $
#
# vim-keys.conf, v1.2 2010/09/12
#
# By Daniel Thau.  Public domain.
#
# This configuration file binds many vi- and vim-like bindings to the
# appropriate tmux key bindings.  Note that for many key bindings there is no
# tmux analogue.  This is intended for tmux 1.3, which handles pane selection
# differently from the previous versions
# split windows like vim
# vim's definition of a horizontal/vertical split is reversed from tmux's
bind s split-window -v
bind v split-window -h
# move around panes with hjkl, as one would in vim after pressing ctrl-w
bind h select-pane -L
bind j select-pane -D
bind k select-pane -U
bind l select-pane -R
# resize panes like vim
# feel free to change the "1" to however many lines you want to resize by, only
# one at a time can be slow
bind < resize-pane -L 1
bind > resize-pane -R 1
bind - resize-pane -D 1
bind + resize-pane -U 1
# bind : to command-prompt like vim
# this is the default in tmux already
bind : command-prompt
# vi-style controls for copy mode
setw -g mode-keys vi
#####################gentoo offical#####################
set -g default-terminal "screen-256color"   # Use 256 colors
set -g status-utf8 on                       # Enable utf-8
set -g history-limit 100000                 # Scrollback buffer number of lines
# Start window indexing at one instead of zero
set -g base-index 1
# Set the prefix key and some key bindings to match GNU Screen
set -g prefix C-a
bind-key C-a last-window
# Key bindings for horizontal and vertical panes
#unbind %
bind | split-window -h
bind _ split-window -v
# Enable window titles
#set -g set-titles on
# Window title string (uses statusbar variables)
set -g set-titles-string '#T'
# Status bar with load and time
set -g status-bg '#4e4e4e'
set -g status-fg '#ffffff'
set -g status-left ' '
set -g window-status-format '#I #W'
set -g window-status-current-format ' #I #W '
setw -g window-status-current-bg '#55ff55'
setw -g window-status-current-fg '#000000'
# Pane border colors
set -g pane-active-border-fg '#bbbbbb'
set -g pane-border-fg '#555555'
# Bind to reload config
bind r source-file ~/.tmux.conf
########################################################################
set -g status-right '#[bg=#gggggg XUN #{prefix_highlight} #{cpu_bg_color}CPU: #{cpu_icon} #{cpu_percentage},%a, %Y%m%d %H:%M:%S'
#set -g status-right '#[bg=#000bbb | #{prefix_highlight} | #{battery_status_bg} Batt: #{battery_icon} #{battery_percentage} #{battery_remain} | #{cpu_bg_color} CPU: #{cpu_icon} #{cpu_percentage}| %a | %Y%m%d %H:%M:%S'

#########################plugins######################################
#Tmux Resurrect 工作很好 , 只是备份和还原都是手动完成 。 而 Tmux Continuum 更进一步 , 它将 Tmux 会话的保存及还原自动化 , 定时备份 , 然后在 Tmux 启动时还原 。
#Tmux Continuum 的安装方法与 Tmux Resurrect 类似 :
#
# tmux-sidebar Key bindings::
# prefix + Tab - toggle sidebar with a directory tree
# prefix + Backspace - toggle sidebar and move cursor to it (focus it)
#
# List of plugins
set -g @plugin 'tmux-plugins/tpm'
set -g @plugin 'tmux-plugins/tmux-sensible'

set -g @plugin 'tmux-plugins/tmux-resurrect'
set -g @plugin 'tmux-plugins/tmux-continuum'
set -g @plugin 'tmux-plugins/tmux-prefix-highlight'
set -g @plugin 'tmux-plugins/tmux-copycat'
set -g @plugin 'tmux-plugins/tmux-yank'
set -g @plugin 'tmux-plugins/tmux-battery'
set -g @plugin 'tmux-plugins/tmux-cpu'
set -g @plugin 'tmux-plugins/tmux-sidebar'

# Other examples:
# set -g @plugin 'github_username/plugin_name'
# set -g @plugin 'git@github.com/user/plugin'
# set -g @plugin 'git@bitbucket.com/user/plugin'

# Initialize TMUX plugin manager (keep this line at the very bottom of tmux.conf)
run '~/.tmux/plugins/tpm/tpm'
Installs and loads tmux plugins.
Tested and working on Linux, OSX, and Cygwin.
Requirements: tmux version 1.9 (or higher), git, bash.
Clone TPM:
$ git clone https://github.com/tmux-plugins/tpm ~/.tmux/plugins/tpmPut this at the bottom of .tmux.conf:
# List of plugins
set -g @plugin 'tmux-plugins/tpm'
set -g @plugin 'tmux-plugins/tmux-sensible'

# Other examples:
# set -g @plugin 'github_username/plugin_name'
# set -g @plugin 'git@github.com/user/plugin'
# set -g @plugin 'git@bitbucket.com/user/plugin'

# Initialize TMUX plugin manager (keep this line at the very bottom of tmux.conf)
run '~/.tmux/plugins/tpm/tpm'
Reload TMUX environment so TPM is sourced:
# type this in terminal if tmux is already running
$ tmux source ~/.tmux.conf
That's it!
~/.tmux.conf with set -g @plugin '...'prefix + I (capital I, as in Install) to fetch the plugin.You're good to go! The plugin was cloned to ~/.tmux/plugins/ dir and sourced.
prefix + alt + u (lowercase u as in uninstall) to remove the plugin.All the plugins are installed to ~/.tmux/plugins/ so alternatively you can
find plugin directory there and remove it.
prefix + I
prefix + U
prefix + alt + u
For more plugins, check here.
More advanced features and instructions, regular users probably do not need this:
Tests for this project run on Travis CI.
When run locally, vagrant is required. Run tests with:
# within project directory
$ ./run_testsYou might want to follow @brunosutic on twitter if you want to hear about new tmux plugins or feature updates.
synbe
commented
6 years ago ~/.tmux.conf
修改的~/.tmux.conf配置文件有如下两种方式可以令其生效:
更为优雅的做法是新增一个加载配置文件的快捷指令 ,这样就可以随时随地load新的配置了,如下所示。
# 绑定快捷键为r
bind r source-file ~/.tmux.conf \; display-message "Config reloaded.." ##https://synbe.bitbucket.io/synbox/index.html?name=my-tem:axunconfigfiles
#####################gentoo offical#####################
set -g default-terminal "screen-256color" # Use 256 colors
set -g status-utf8 on # Enable utf-8
set -g history-limit 100000 # Scrollback buffer number of lines
# Start window indexing at one instead of zero
set -g base-index 1
# Set the prefix key and some key bindings to match GNU Screen
set -g prefix C-a
bind-key C-a last-window
# Key bindings for horizontal and vertical panes
#unbind %
bind | split-window -h
bind _ split-window -v
# Enable window titles
#set -g set-titles on
# Window title string (uses statusbar variables)
set -g set-titles-string '#T'
# Status bar with load and time
set -g status-bg '#4e4e4e'
set -g status-fg '#ffffff'
set -g status-left ' '
set -g window-status-format '#I #W'
set -g window-status-current-format ' #I #W '
setw -g window-status-current-bg '#55ff55'
setw -g window-status-current-fg '#000000'
# Pane border colors
set -g pane-active-border-fg '#bbbbbb'
set -g pane-border-fg '#555555'
# Bind to reload config
bind r source-file ~/.tmux.conf
set -g status-right '#[bg=#gggggg XUN #{prefix_highlight} #{cpu_bg_color}CPU: #{cpu_icon} #{cpu_percentage},%a, %Y%m%d %H:%M:%S'
#########################plugins###########################
# ----------------tmux-sidebar
# tmux-sidebar Key bindings::
# prefix + Tab - toggle sidebar with a directory tree
# prefix + Backspace - toggle sidebar and move cursor to it (focus it)
# ----------------tpm
# https://github.com/tmux-plugins/tpm ~/.tmux/plugins/tpm
# Installing plugins
# Add new plugin to ~/.tmux.conf with set -g @plugin '...'
# Press prefix + I (capital I, as in Install) to fetch the plugin.
# You're good to go! The plugin was cloned to ~/.tmux/plugins/ dir and sourced.
# ----------------
# List of plugins
set -g @plugin 'tmux-plugins/tpm'
set -g @plugin 'tmux-plugins/tmux-sensible'
set -g @plugin 'tmux-plugins/tmux-resurrect'
set -g @plugin 'tmux-plugins/tmux-continuum'
set -g @plugin 'tmux-plugins/tmux-prefix-highlight'
set -g @plugin 'tmux-plugins/tmux-cpu'
set -g @plugin 'tmux-plugins/tmux-sidebar'
# Other examples:
# set -g @plugin 'github_username/plugin_name'
# set -g @plugin 'git@github.com/user/plugin'
# set -g @plugin 'git@bitbucket.com/user/plugin'
# Initialize TMUX plugin manager (keep this line at the very bottom of tmux.conf)
run '~/.tmux/plugins/tpm/tpm'xterm终端的配置文件是:
~/.Xresources (如果没有,请手动建立:vi .Xresources)保存上述内容后,然后执行命令: xrdb ~/.Xresources
 ##https://synbe.bitbucket.io/synbox/index.html?name=my-tem:axunconfigfiles
!look and feel
xterm.termName: xterm-256color
xterm.geometry: 80x36
xterm*scrollBar: false
xterm*rightScrollBar: true
xterm*loginshell: true
xterm*cursorBlink: true
xterm*background:  black
xterm*foreground:  white
xterm.borderLess: true
xterm.cursorBlink: true
xterm*colorUL: yellow
xterm*colorBD: white

!fix alt key input
xterm*eightBitInput: false
xterm*altSendsEscape: true

!print color and bold/underline attributes
xterm*printAttributes: 2
xterm*printerCommand: cat > ~/xtermdump

!mouse selecting to copy, ctrl-v to paste
!Ctrl p to print screen content to file
XTerm*VT100.Translations: #override \
Ctrl <KeyPress> V: insert-selection(CLIPBOARD,PRIMARY,CUT_BUFFER0) \n\
<BtnUp>: select-end(CLIPBOARD,PRIMARY,CUT_BUFFER0) \n\
!    Ctrl <KeyPress> P: print() \n

!font and locale
!Xterm*locale:zh_CN.UTF-8
xterm*locale: true
xterm.utf8:     true
xterm*utf8Title: true
XTerm*selectToClipboard: true
xterm*fontMenu*fontdefault*Label: Default
xterm*faceName:DejaVu Sans Mono:antialias=True:pixelsize=14
xter*boldFont: DejaVu Sans Mono:style=Bold:pixelsize=15
xterm*faceNameDoublesize:WenQuanYi Micro Hei:antialias=True:pixelsize=14

xterm*xftAntialias: true
xterm*cjkWidth:false

!Tango color scheme
*xterm*color0: #2e3436
*xterm*color1: #cc0000
*xterm*color2: #4e9a06
*xterm*color3: #c4a000
*xterm*color4: #3465a4
*xterm*color5: #75507b
*xterm*color6: #0b939b
*xterm*color7: #d3d7cf
*xterm*color8: #555753
*xterm*color9: #ef2929
*xterm*color10: #8ae234
*xterm*color11: #fce94f
*xterm*color12: #729fcf
*xterm*color13: #ad7fa8
*xterm*color14: #00f5e9
*xterm*color15: #eeeeecsed 's/kernal.*/\0aaaaa/' test
sed '/kernal.*/ s/$/aaaaa/' test
sed '/kernal.*/ s/^/aaaaa/' test
sed '/kernal.*/i abcd' test
sed '/kernal.*/a abcd' test
synbe
commented
6 years ago :%s/old/new/g全文替换指定字符串
导入命令执行结果:r !命令
比如我现在想把date的执行结果放到这个文件中:r !date
:map 快捷键 触发命令
:map ^P I#
这个命令什么意思呢,就是把Ctrl+P快捷键定义为I#,I代表定位到行首并进入插入模式,然后插入#号,然后回到命令模式,定义了这个快捷键,后面再想加入注释#,直接Ctrl+P即可
删除#呢
:map ^B 0x 0代表移动到行首,x代表删除当前光标所在字符
:n1,n2s/^#//g
:n1,n2s/^/#/g
^代表行首
我们想把第一行和第二行注释掉
:ab donglu lixin ,比如以后我想输入donglu,自动变为lixin
好了,刚刚这几个快捷键或者是替换,在重启或者重新连接后就会失效,怎么办呢,需要在/home/当前用户下创建一个.vimrc的文件,然后在里面保存刚刚的设置,不需要开头的:即可,这样每次重启或者重新连接,配置的快捷键和替换都一直生效
osmc download:
http://ftp.fau.de/osmc/osmc/download/
http://ftp.fau.de/osmc/osmc/download/installers/diskimages/