 tamasbalassa
commented
5 years ago
tamasbalassa
commented
5 years ago This is a great thing!
However scrolling over the code, I was able to figure these things out even before, but I would suggest You also explaining or showing what kind of modifications are required for the yolov3.cfg file (number of classes and the filter numbers on last layers before the yolo layers).
 glenn-jocher
 graftedlife
 cy0616
 Jason-cs18
 cuixing158
 yang-jin-hai
 XiaoJiNu
 Jriandono
 sanazss
 sip-ops
 aiwithshekhar
 wangteng1111
 PointCloudNiphon
 siyangxie
 yangxu351
 Andy7775
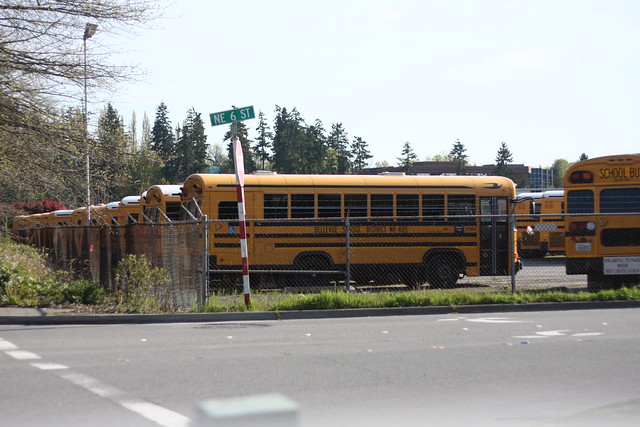
This guide explains how to train your own single-class dataset with YOLOv3.
Before You Start
git clone https://github.com/ultralytics/yolov3bash yolov3/data/get_coco2017.shTrain On Custom Data
1. Label your data in Darknet format. After using a tool like Labelbox to label your images, you'll need to export your data to darknet format. Your data should follow the example created by
get_coco2017.sh, with images and labels in separate parallel folders, and one label file per image (if no objects in image, no label file is required). The label file specifications are:class x_center y_center width heightformat.x_centerandwidthby image width, andy_centerandheightby image height.Each image's label file must be locatable by simply replacing
/images/*.jpgwith/labels/*.txtin its pathname. An example image and label pair would be:An example label file with 4 persons (all class
0):*2. Create train and test `.txt
files.** Here we createdata/coco_1cls.txt, which contains 5 images with only persons from the coco 2014 trainval dataset. We will use this small dataset for both training and testing. Each row contains a path to an image, and remember one label must also exist in a corresponding/labels` folder for each image that has targets.*3. Create new `.names file
** listing all of the names for the classes in our dataset. Here we use the existingdata/coco.namesfile. Classes are **zero indexed**, sopersonis class0`.4. Update
data/coco.datalines 2 and 3 to point to our new text file for training and validation (in your own data you would likely want to use separate train and test sets). Also update line 1 to our new class count, if not 80, and lastly update line 4 to point to our new*.namesfile, if you created one. Save the modified file asdata/coco_1cls.data.*5. Update `.cfg
file** (optional). Each YOLO layer has 255 outputs: 85 outputs per anchor [4 box coordinates + 1 object confidence + 80 class confidences], times 3 anchors. If you use fewer classes, reduce filters tofilters=[4 + 1 + n] * 3, wherenis your class count. This modification should be made to the layer preceding each of the 3 YOLO layers. Also modifyclasses=80toclasses=nin each YOLO layer, wherenis your class count (for single class training,n=1`).6. (OPTIONAL) Update hyperparameters such as LR, LR scheduler, optimizer, augmentation settings, multi_scale settings, etc in
train.pyfor your particular task. We recommend you start with all-default settings first updating anything.7. Train. Run
python3 train.py --data data/coco_1cls.datato train using your custom data. If you created a custom*.cfgfile as well, specify it using--cfg cfg/my_new_file.cfg.Visualize Results
Run
from utils import utils; utils.plot_results()to see your training losses and performance metrics vs epoch. If you don't see acceptable performance, try hyperparameter tuning and re-training. Multipleresults.txtfiles are overlaid automatically to compare performance.Here we see results from training on
coco_1cls.datausing the defaultyolov3-spp.cfgand also a single-classyolov3-spp-1cls.cfg, available in thedata/andcfg/folders.Evaluate your trained model: copy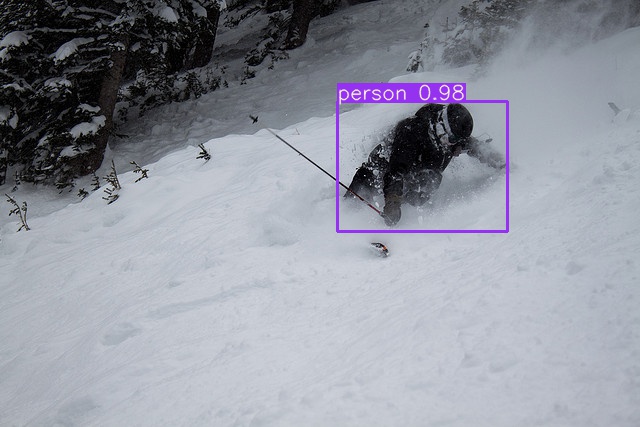
COCO_val2014_000000001464.jpgtodata/samplesfolder and runpython3 detect.py --weights weights/last.ptReproduce Our Results
To reproduce this tutorial, simply run the following code. This trains all the various tutorials, saves each results*.txt file separately, and plots them together as
results.png. It all takes less than 30 minutes on a 2080Ti.Reproduce Our Environment
To access an up-to-date working environment (with all dependencies including CUDA/CUDNN, Python and PyTorch preinstalled), consider a: